Containerize step groups
Currently, the Containerize step groups feature is behind the feature flag CDS_CONTAINER_STEP_GROUP. Contact Harness Support to enable the feature.
By default, the tasks performed by Harness CD steps are run on the Harness delegate host system, for example, the Kubernetes cluster where a Kubernetes delegate is running.
To provide greater control over the resources used for CD steps, Harness also lets you use your own Kubernetes cluster as the runtime infrastructure for CD steps.
You can use a CD step group that points to your cluster as the runtime infrastructure. Next, in the step group, you can add the steps supported by containerized step groups.
In this architecture, no tooling is installed on delegates. Delegates simply act as orchestrators. Any tooling is installed and removed on demand in the ephemeral step containers.
When you use deployment types that support containerized step groups (for example, AWS SAM), containerized steps are automatically generated when you add the execution strategy for the stage.
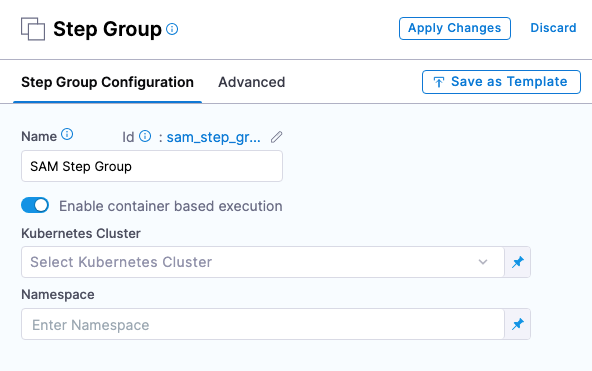
When you manually add a step group, you can enable containerized step groups by selecting the Enable container based execution option.

This option is disabled for deployment types that do not support containerized step groups.
Important notes
- CD containerized step groups are only supported in a Deploy stage. They are not supported in a Custom stage.
- Not all steps are supported in containerized step groups. You can see which steps are supported when you try to add steps in the containerized step group.
- You can use the same cluster to run the Harness delegate and the containerized step group(s), but it is not required.
- Currently, containerized step groups are supported in the following deployment types:
Add a containerized step group
Typically, Harness adds the step group and steps needed for a deployment automatically when you select the stage execution strategy in the Execution section.
Whether the containerized step group is added automatically or manually, you must configure it.
Here are the steps for adding a containerized step group manually:
- In your Deploy (CD) or Custom stage, in Execution, select Add Step, and then select Add Step Group.
- To configure a step group as containerized, enable the Enable container based execution setting.
- Configure the following settings.
Kubernetes Cluster
Select or add a Harness Kubernetes Cluster connector to connect to the cluster where this container will run.
Namespace
Enter an existing namespace in the cluster.
Shared Paths
This setting is the same as Kubernetes mountPath. The name for the volumeMounts is added internally.
Enter shared directories or specific paths within the filesystem to have them shared between containers running within the same pod.
Volumes
This setting is the same as Kubernetes volumes. Harness supports Host Path (hostPath), Empty Directory (emptyDir), and Persistent Volume Claim (persistentVolumeClaim).
Service Account Name
Specify a Kubernetes service account for step containers to use when communicating with the Kubernetes API server. Leave blank to use the namespace's default service account.
Automount Service Account Token
An application running inside a pod can access the Kubernetes API using automatically mounted service account credentials. See Accessing the Cluster to learn more.
To use a different service account, enter its name here.
Labels
Enter any labels to apply to the pods.
Annotations
Enter any annotations to apply to the pods.
Privileged
The standard privileged property for Kubernetes securityContext.
When this setting is enabled, it grants the container elevated privileges within the underlying host environment. This means that the container has access to all Linux kernel capabilities and devices, similar to running processes outside the container. It effectively removes the isolation provided by the container runtime and can potentially pose security risks if not used carefully.
Allow Privilege Escalation
The standard allowPrivilegeEscalation property for Kubernetes securityContext.
When this setting in enabled, it allows the container to gain additional privileges beyond those initially granted during container startup.
Add Capabilities
The standard add setting for the capabilities property in the Kubernetes securityContext.
Simply add the name of the capability, like NET_ADMIN.
Drop Capabilities
The standard drop setting for the capabilities property in the Kubernetes securityContext.
Simply add the name of the capability, like CHOWN.
Run as Non Root
Enable this setting to run the container as a non-root user.
Read-only Root Filesystem
The standard readOnlyRootFilesystem setting for the securityContext property.
Enable this setting to ensure that the root filesystem of the container is mounted as read-only.
Run as User
The standard runAsUser setting for the securityContext property.
Specify the user ID (UID) under which the container should run.
Priority Class
The standard Kubernetes PriorityClass.
Enter a standard priorityClassName like system-node-critical.
Node Selector
The standard Kubernetes nodeSelector.
Enter a key like disktype and and value like ssd.
Tolerations
The standard Kubernetes tolerations. Use the settings to specify that a pod can tolerate (or ignore) the effects of node taints.
Init Timeout
The standard Kubernetes timeoutSeconds for initContainers.
Override Image Connector
By default, at pipeline runtime, Harness pulls certain images from public Docker Hub repos. These images are only used for backend processes. At runtime, the Harness Delegate makes an outbound connection to the public repo and pulls the images.
The Harness Container Image Registry is dedicated exclusively to Harness-supported images.
You might want to override the default behavior and download your build images from this repo instead. To view the list of images in this registry, enter the following command.
curl -X GET https://app.harness.io/registry/_catalog
Add or select a connector to use instead of the default connector uses for the Harness Container Image Registry.
For more information, go to Connect to Harness container image registry Using Docker connector.
Advanced settings
In Advanced, you can use the following options:
Containerized step group example
When you run a pipeline that uses a containerized step group, you can see the container set up in the automatically generated Initialize step in the pipeline execution.
Select Initialize to see its log and how the container is set up.
Step group setup log
In the following log, the containerized step group is created and a Background step using Docker in Docker (DinD) is also set up. The Background step is only required for certain subsequent step types that need DinD. It is provided here as an example only.
Successfully assigned harness-delegate-ng/harnesscd-asdasd-89xlhk71 to gke-qa-target-ng-pool-1-b4499db2-2431
Pulling image "harness/ci-addon:1.16.8"
Successfully pulled image "harness/ci-addon:1.16.8" in 437.806182ms (437.815597ms including waiting)
Created container setup-addon
Started container setup-addon
Container image "harness/drone-git:1.3.4-rootless" already present on machine
Created container step-harness-git-clonem1
Started container step-harness-git-clonem1
Container image "harness/drone-git:1.3.4-rootless" already present on machine
Created container step-harness-git-clonem2
Started container step-harness-git-clonem2
Pulling image "harnessdev/sam-deploy:1.82.0-latest"
Successfully pulled image "harnessdev/sam-deploy:1.82.0-latest" in 429.518494ms (429.527506ms including waiting)
Created container step-samdeploy
Started container step-samdeploy
Pulling image "harnessdev/sam-build:1.82.0-latest"
Successfully pulled image "harnessdev/sam-build:1.82.0-latest" in 380.845932ms (380.855397ms including waiting)
Created container step-sambuild
Started container step-sambuild
Container image "docker:dind" already present on machine
Created container step-dind
Started container step-dind
Pulling image "harness/ci-lite-engine:1.16.8"
Successfully pulled image "harness/ci-lite-engine:1.16.8" in 355.654902ms (355.690135ms including waiting)
Created container lite-engine
Started container lite-engine
Harness Docker connector for all group steps
In each step in the containerized step group, you must provide a Harness connector to a container registry and an image for the container step to run in.
You can create the connector in the any of the steps and then select it in the other steps, or you can create it separately and select it in the steps.
You select the image to use in each step separately.
Here's how to create the connector separately using the Harness Docker registry connector:
Add Docker registry connector
- YAML
- API
- Terraform Provider
- Harness Manager
Docker connector YAML
connector:
  name: Docker Hub with Pwd
  identifier: Docker_Hub_with_Pwd
  description: ""
  orgIdentifier: default
  projectIdentifier: CD_Docs
  type: DockerRegistry
  spec:
    dockerRegistryUrl: https://docker.dev.harness.io/v2/
    providerType: DockerHub
    auth:
      type: Anonymous
    executeOnDelegate: true
Create the Docker connector using the Create a Connector API.
Docker connector example
curl --location --request POST 'https://app.harness.io/gateway/ng/api/connectors?accountIdentifier=123456' \
--header 'Content-Type: text/yaml' \
--header 'x-api-key: PERSONAL_ACCESS_TOKEN' \
--data-raw 'connector:
  name: dockerhub
  identifier: dockerhub
  description: ""
  tags: {}
  orgIdentifier: default
  projectIdentifier: APISample
  type: DockerRegistry
  spec:
    dockerRegistryUrl: https://docker.dev.harness.io/v2/
    providerType: DockerHub
    auth:
      type: Anonymous'
For the Terraform Provider Docker connector resource, go to harness_platform_connector_docker.
Docker connector example
# credentials anonymous
resource "harness_platform_connector_docker" "test" {
  identifier  = "identifer"
  name        = "name"
  description = "test"
  tags        = ["foo:bar"]

  type               = "DockerHub"
  url                = "https://docker.dev.harness.io/v2/"
  delegate_selectors = ["harness-delegate"]
}
At the Harness project, org, or account level, go to Connectors.
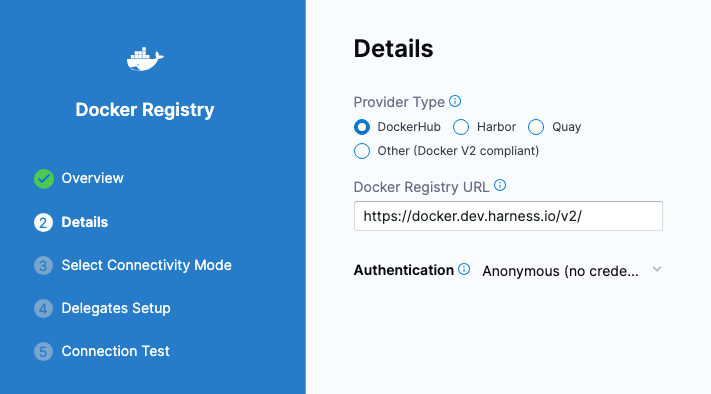
Select New Connector, and then select Docker Registry.
Name the connector and select Continue.
Enter the following settings and select Continue:
- Provider Type:
DockerHub. - Docker Registry URL:
https://docker.dev.harness.io/v2/. - Authentication:
Anonymous.

- Provider Type:
Connect using a Harness delegate, and select Continue.
Select any delegate or select/create a specific delegate, and then select Save and Continue.
When the connection test is complete, select Finish.
Important notes
- For pulling Docker images from Docker repos, Harness is restricted by the limits of the Docker repo. For example, Docker Hub limits.
- The maximum number of artifact image tags fetched by Harness that is 10000.
DinD Background step
Some steps in a containerized step group might require Docker in Docker (DinD). For example, some deployment types might use DinD because of the requirements of their platforms.
There is no DinD requirement for containerized step groups. Unless a step requires DinD, Harness needs only a Kubernetes cluster to run the containerized step.
If a Harness deployment type requires DinD, the Background step is added automatically as part of the stage Execution setup.
Whether the dind step is added automatically or manually, you must configure it.
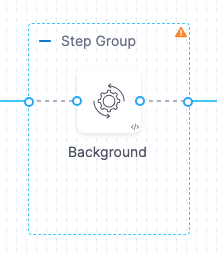
If step(s) in a containerized step group require DinD, you can add a Background step that performs the Docker in Docker (DinD) setup.

The Background step creates the DinD environment. In this environment, each subsequent step group step is run inside the Kubernetes pod as containers.
Container Registry
Container Registry is the Harness container registry connector that connects to the container registry hosting the image to use for this step.
Image
This is the container image to use for the background service.
Simply enter docker:dind.
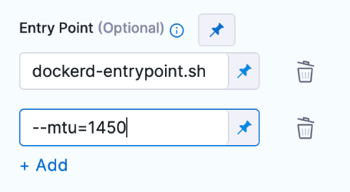
Entry Point
Supply a list of arguments in exec format. Enter each argument separately.
- Visual
- YAML

entrypoint:
  - dockerd-entrypoint.sh
  - "--mtu=1450"
Entry Point arguments override the image ENTRYPOINT and any commands in the Command field.
Shell and Command
For Shell, select the shell script type for the arguments and commands defined in Entry Point and Command.
In Command, enter POSIX shell script commands to execute inside the container.
For example, a command that checks the Java version installed on the system and verifies if it is equal to 17.
JAVA_VER=$(java -version 2>&1 | head -1 | cut -d'"' -f2 | sed '/^1\./s///' | cut -d'.' -f1)
if [[ $JAVA_VER == 17 ]]; then
  echo successfully installed $JAVA_VER
else
  exit 1
fi
Notes:
- You can use
docker-compose upto start multiple services in one Background step. - You can run PowerShell commands on Windows VMs running in AWS build farms.
- You can run PowerShell Core commands in pods or containers that have pwsh installed.
Privileged
Enable this option to run the container with escalated privileges. This is equivalent to running a container with the Docker --privileged flag.
Report Paths
Specify the file paths or directories within the container where various reports or log files generated by applications or processes running inside the container are stored.
Environment Variables
You can inject environment variables into a container and use them in the Command script. You must input a Name and Value for each variable.
You can reference environment variables in the Command script by their name. For example, a Bash script would use $var_name or ${var_name}, and a Windows PowerShell script would use $Env:varName.
Image Pull Policy
Select an option to set the pull policy for the image.
- Always: The kubelet queries the container image registry to resolve the name to an image digest every time the kubelet launches a container. If the kubelet encounters an exact digest cached locally, it uses its cached image; otherwise, the kubelet downloads (pulls) the image with the resolved digest, and uses that image to launch the container.
- If Not Present: The image is pulled only if it is not already present locally.
- Never: The image is assumed to exist locally. No attempt is made to pull the image.
Set Container Resources
Maximum resource limits for containers that clone the codebase at runtime. For more information, go to Resource units in Kubernetes.
DinD Background step example
When you run a pipeline that uses a containerized step group and Background step, you can see the DinD set up in the step log in the pipeline execution.
Select the step to see its log and how the DinD is set up. The general sequence is:
- The log shows certificate requests being self-signed for the Docker in Docker (DinD) server and client.
- The DinD environment is starting up.
- It indicates that containerd is not running and starts the managed containerd process.
- Containerd starts with information about the revision and version.
- Various plugins are loaded, such as snapshotter, content, metadata, differ, event, GC scheduler, lease manager, NRI (disabled), runtime, sandbox, streaming, and services.
- The log ends without further actions or errors.