Create an Azure Web App Canary Deployment
Currently, this feature is behind the Feature Flag AZURE_WEBAPP. Contact Harness Support to enable the feature.A Harness Azure Web App Canary deployment shifts traffic from one deployment slot to another incrementally.
First, you select the deployment (live) and target (stage) slots to use. Next, you add Traffic Shift steps to incrementally increase traffic to the target slot.
Finally, you swap entirely to the target slot, making it the deployment slot for this release. Azure swaps the Virtual IP addresses and URLs of the deployment and target slots.
You can perform a Web App Canary deployment using a single or multi-phase Workflow. In either method, make sure the Swap Slot step is in the final phase of the Workflow.
Before You Begin
Make sure you have read the following:
- Azure Web App Deployments Overview
- Make sure that you have connected Harness to your Azure subscription as described in Connect to Azure and Artifact Repo for Your Web App Deployments.
- Add Your Docker Image for Azure Web App Deployment
- Add Non-Containerized Artifacts for Azure Web App Deployment
- Define Your Azure Web App Infrastructure
- Azure Web App Deployment Rollback
Visual Summary
The following short video walks you through a Harness Azure Web App Canary Workflow setup.
Supported Platforms and Technologies
See Supported Platforms and Technologies.
Step 1: Collect Azure Web App Information
The Harness Workflow will use the existing Deployment slots from your Azure Web App.
In the Azure portal, click your Web App, and then click Deployment slots. You can see the Deployment slots for your Web App.
Click Swap. You can see the Source and Target slots.

You'll use these slot names in your Harness Workflow.
Don't click the Swap button. Click Close.
Step 2: Create the Canary Workflow
Next we'll create a single phase Canary Workflow.
You can perform a Web App Canary deployment using a single or multi-phase Workflow. In either method, make sure the Swap Slot step is in the final phase of the Workflow.In your Harness Application, click Workflows, and then click Add Workflow.
Enter the following settings and click Submit.
- Name: the name for this Workflow.
- Workflow Type: select Canary Deployment.
- Environment: select the Harness Environment you added in Define Your Azure Web App Infrastructure.
Step 3: Create Phase 1
In your new Workflow, click Add Phase.
In Workflow Phase, enter the following settings and click Submit.
- Service: select the Harness Service you set up in Add Your Docker Image for Azure Web App Deployment or Add Non-Containerized Artifacts for Azure Web App Deployment.
- Infrastructure Definition: select the Web App Infrastructure Definition you set up in Define Your Azure Web App Infrastructure.
Harness generate the steps needed for the phase.
Step 4: Slot Deployment Step
The Slot Deployment step is where you select the Web App and source and target deployment slots for the deployment.
Open the Slot Deployment step.
Enter the following settings and click Submit.
- Name: enter a name for the step.
- App Service: select the Azure Web App for deployment. Harness pulls the list of Web Apps using the credentials of the Azure Cloud Provider you selected in the phase's Infrastructure Definition.
- Deployment Slot: select the Source slot for the deployment. This slot is where Harness deploys the new Web App version.Make sure the slot you select is running. Harness shows all slots regardless of their status.
- Target Slot: select the Target slot for the deployment. This slot is where Harness will swap the App content and configurations elements during the Swap Slot step.Make sure the slot you select is running. Harness shows all slots regardless of their status.
- Slot Steady State Timeout: enter a minimum of 30m. The slot deployment relies on Azure and can take some time.
When you are done, the step will look similar to this:

Option: Use Variable Expressions in Settings
You can use built-in Harness or custom Workflow variable expressions in the Slot Deployment step. See Set Workflow Variables.
Variables are often used for templating the Workflow. See Create Pipeline Templates.
Option: Add a Health Check after Slot Setup
In the Workflow Verify Service section, add a health check to ensure that the Docker container or non-containerized app is running correctly.
The Slot Deployment step is considered successful once the slot is in a running state.
A running state does not ensure that your new app is accessible. It can take some time for new content to become available on Azure.
Also, the slot deployment might succeed but the Docker container or non-containerized artifact could be corrupted.
A health check after Slot Deployment can ensure a successful deployment.
Step 5: Traffic % Step
The Traffic % step shifts network traffic to the new Web App version in the deployment (source) slot.
Traffic % steps are not cumulative. If you set 25% in one and 25% in the next one, only 25% of traffic is routed.
Open the Traffic % step.
In Traffic Percentage, enter a number (without the % character).
Click Submit.
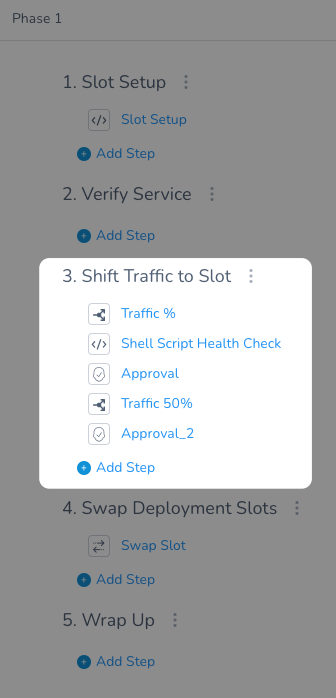
You can use multiple Traffic % steps to incrementally increase traffic. In-between each Traffic % step, you can add a health check and/or Approval step. Here is an example:
The Script in this example is:
curl -Is <stage-url> | head -n 1
The Script output is:
INFO   2021-02-02 12:01:05    Executing command ...
INFO   2021-02-02 12:01:17    HTTP/1.1 200 OK
INFO   2021-02-02 12:01:17    Command completed with ExitCode (0)
Step 6: Swap Slot
You can perform a Web App Canary deployment using a single or multi-phase Workflow. In either method, make sure the Swap Slot step is in the final phase of the Workflow.The final step in the phase is Swap Slot. This step performs the Web App deployment slot swap. It is similar to doing a swap in the Azure portal or via the Azure CLI:
az webapp deployment slot swap -n "web app name" -g "resource group name" -s "source slot name" --target-slot "target slot"
Here is an example of the swap in the deployment logs:
Sending request for swapping source slot: [stage] with target slot: [production]
Operation name : [Apply Web App Slot Configuration]
Status : [Succeeded]
Description : [Applied configuration settings from slot 'Production' to a site with deployment id 'anil-demowebapp__f3c3' in slot 'stage']
Operation name : [Microsoft.Web/sites/slots/StartSlotWarmup/action]
Status : [Succeeded]
Description : [Initial state for slot swap operation is (Source slot: 'stage', DeploymentId:'anil-demowebapp__f3c3') (TargetSlot: 'production', DeploymentId:'anil-DemoWebApp')'. Operation:db1d5ed2-edba-471d-a8f2-d0421cdbe43f]
Operation name : [Microsoft.Web/sites/slots/EndSlotWarmup/action]
Status : [Succeeded]
Description : [Finished warming of site with deploymentId 'anil-demowebapp__f3c3']
Operation name : [Microsoft.Web/sites/slots/EndSlotWarmup/action]
Status : [Succeeded]
Description : [Finished warming of site with deploymentId 'anil-demowebapp__f3c3']
Operation name : [Microsoft.Web/sites/slots/EndSlotWarmup/action]
Status : [Succeeded]
Description : [Finished warming of site with deploymentId 'anil-demowebapp__f3c3']
Operation - [Swap Slots] was success
Swapping request returned successfully
Operation name : [Microsoft.Web/sites/slots/EndSlotWarmup/action]
Status : [Succeeded]
Description : [Finished warming of site with deploymentId 'anil-demowebapp__f3c3']
Operation name : [Microsoft.Web/sites/slots/SlotSwap/action]
Status : [Succeeded]
Description : [Finished swapping site. New state is (Slot: 'stage', DeploymentId:'anil-DemoWebApp'), (Slot: 'Production', DeploymentId:'anil-demowebapp__f3c3')'. Operation:db1d5ed2-edba-471d-a8f2-d0421cdbe43f]
Swapping slots done successfully
The Workflow phase is complete. You can now deploy.
Review: Artifact Check Step
When you navigate back to the main Workflow view, you will see that an Artifact Check step has been added. Harness adds this step automatically to ensure that the deployment does not proceed unless the artifact can be obtained.
Step 7: Deploy the Workflow
Click Deploy, select an artifact, and then click Submit.
The Workflow deploys:
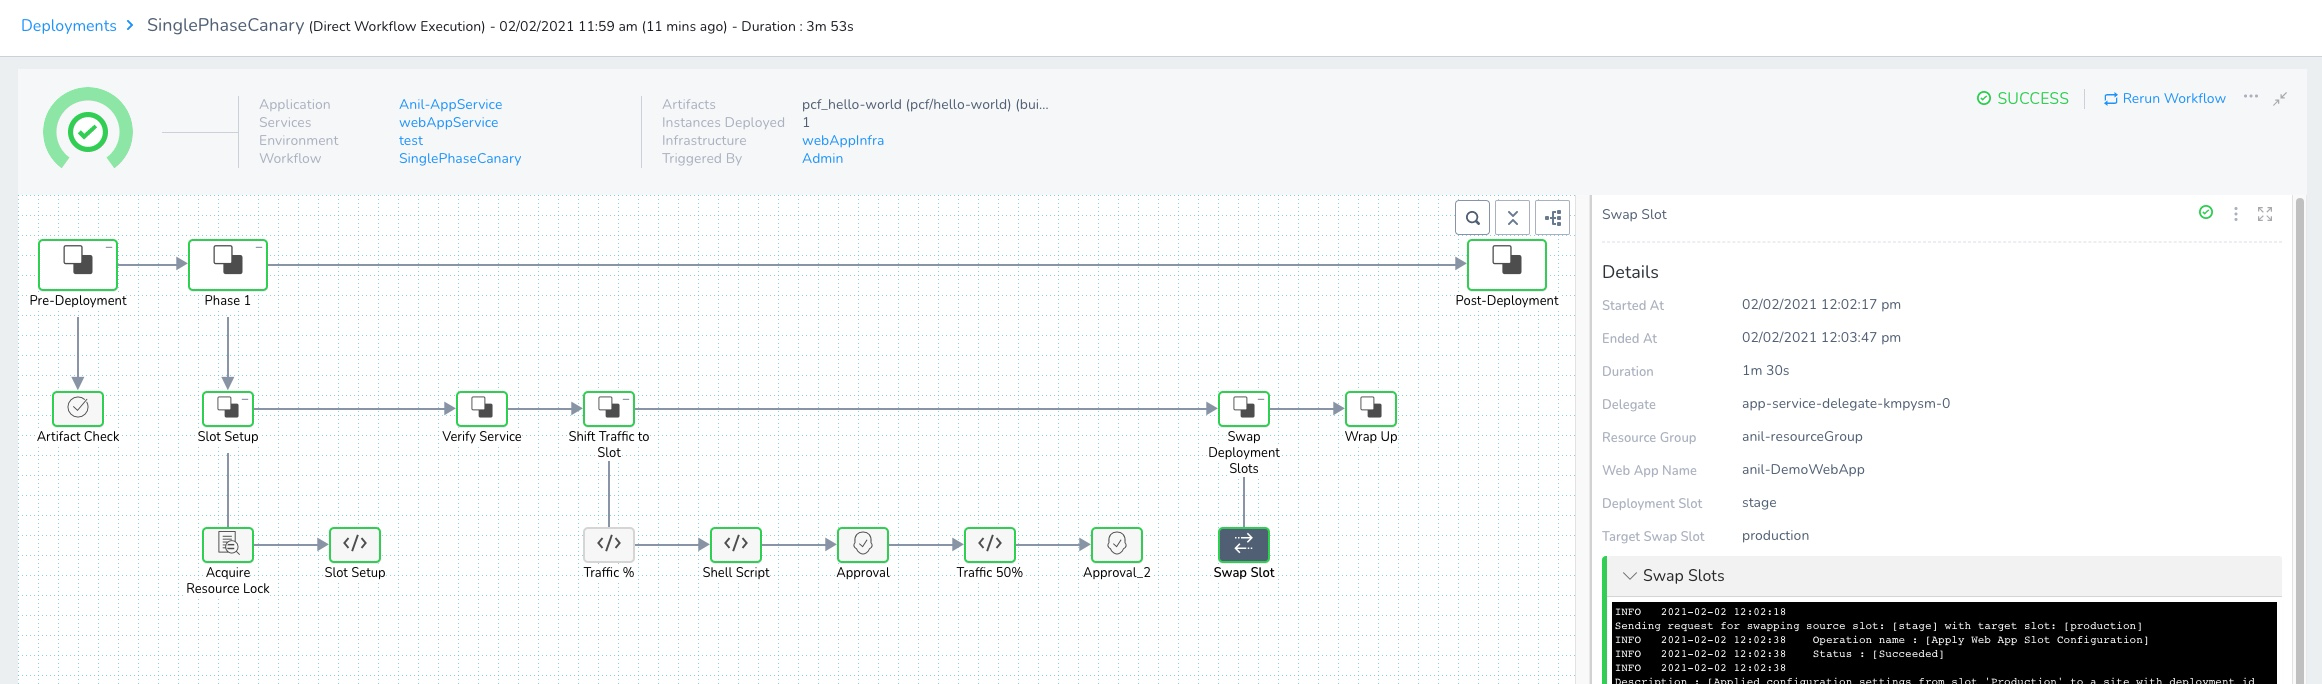
You can see the swap succeeded in the logs:
...
Description : [Finished swapping site. New state is (Slot: 'stage', DeploymentId:'anil-DemoWebApp'), (Slot: 'Production', DeploymentId:'anil-demowebapp__f3c3')'. Operation:db1d5ed2-edba-471d-a8f2-d0421cdbe43f]
Swapping slots done successfully
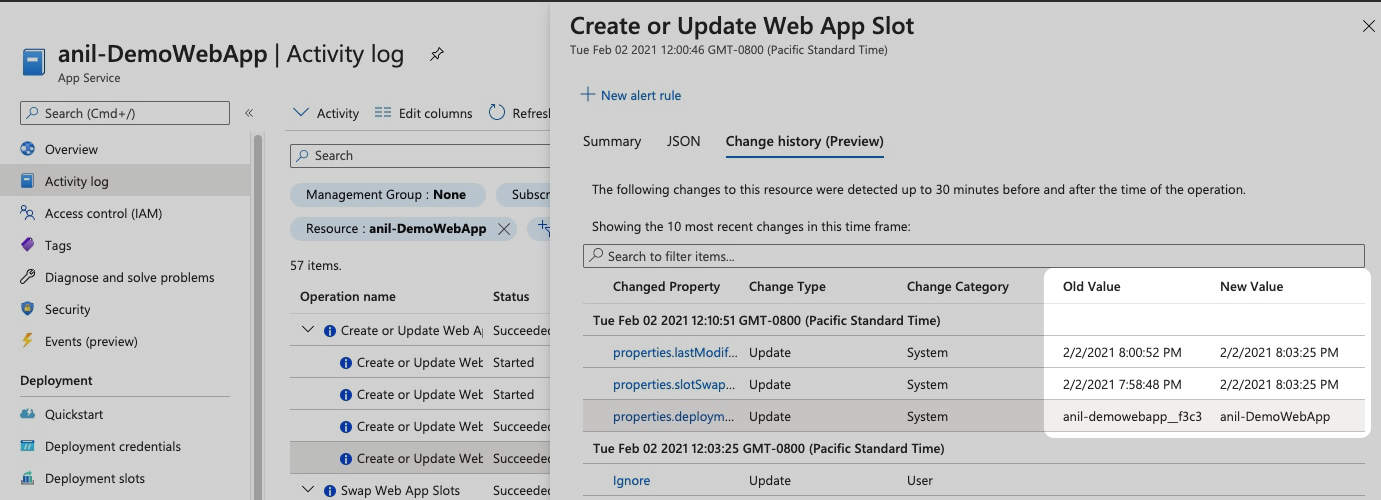
And the same information is displayed in the Azure portal Activity log:
Option: Templatize the Workflow
See Create Pipeline Templates.
Configure As Code
To see how to configure the settings in this topic using YAML, configure the settings in the UI first, and then click the YAML editor button.