Run Google Cloud Builds
Currently, this feature is behind the feature flag GCB_CI_SYSTEM. Contact Harness Support to enable the feature.Google Cloud Build (GCB) can import source code from a variety of repositories or cloud storage spaces, execute a build to your specifications, and produce artifacts such as Docker containers or Java archives.
Harness GCB integration lets you do the following:
- Run GCB builds as part of your Harness Workflow.
- Run GCB builds using config files inline or in remote Git repos.
- Execute GCB Triggers, including substituting specific variables at build time.
Before You Begin
- If you are new to GCB, review Overview of Cloud Build and Quickstart: Build from Google.
- Add Google Cloud Platform Cloud Provider
- Add Source Repo Providers
- Workflows
Review: Harness GCB Integration
You can add the Google Cloud Build step to any Workflow type and Workflow section.The following steps describe, in general, the lifecycle of a GCB build with Harness:
- In GCB:
- Prepare your application code and any needed assets.
- Create a build config file in JSON format.
- For GCB triggers, create a trigger in Google Cloud Build.
- In Harness:
- Connect Harness to your Google Cloud Platform account.
- Connect Harness to your Git account if you will be using remote GCB build config files.
- Add a GCB step to your Workflow.
- Target your GCB build using one of the following:
- Inline config file.
- Remote config file.
- GCB trigger.
- Deploy the Workflow to execute the GCB build.
Let's set it up.
Step 1: Connect to Google Cloud Platform
- Connect Harness to your GCP account by setting up a Harness Google Cloud Platform Cloud Provider.
You set up this connection using a GCP service account key file (in JSON format). - Ensure that the service account used has the GCB Cloud Build Editor role.
For a detailed description of the permissions used, see the following section.
Required GCP Permissions
GCB roles and permissions are described in IAM Roles and permissions from Google.Harness uses get, create, and list permissions. Here is how these permissions map to Harness GCB operations:
- Run inline builds:
cloudbuild.builds.create - Run remote builds:
cloudbuild.builds.create - Run triggers:
cloudbuild.builds.create - Fetch logs:
cloudbuild.builds.get - List triggers:
cloudbuild.builds.list(if you are entering the trigger name manually, this is not needed)
If you create your own role, ensure that it includes these permissions.
Step 2: Add Google Cloud Build Step
You can add the Google Cloud Build step to any Workflow type and Workflow section.
- In your Harness Workflow, in any section, click Add Step.
- Select Google Cloud Build, and click Next.
- In Google Cloud Provider, select the Harness Google Cloud Provider you set up earlier. See Add Google Cloud Platform Cloud Provider.You can turn this setting into a deployment runtime parameter by clicking the template button [T]. This will create a Workflow variable for the setting. When you deploy this Workflow, you can enter the option for the setting.
- Complete the step using the following settings.
Option 1: Inline JSON Build Spec
You can enter an inline JSON build configuration just like you would in a Cloud Build config file.
- In Build Specification, click Inline.
Enter your build config spec in JSON. For example:
{
  "steps": [
    {
      "name": "gcr.io/cloud-builders/git",
      "args": ["clone", "https://github.com/john-smith/gcb.git", "."]
    },
    {
      "name": "gcr.io/cloud-builders/gradle",
      "entrypoint": "gradle",
      "args": ["build"]
    },
    {
      "name": "gcr.io/cloud-builders/docker",
      "args": ["build", "-t", "gcr.io/$PROJECT_ID/v-image", "--build-arg=JAR_FILE=build/libs/playground-0.0.1.jar", "."]
    }
  ],
  "options": {"logStreamingOption": "STREAM_ON"},
  "images": ["gcr.io/$PROJECT_ID/v-image"]
}
Harness uses the Cloud Build API Build resource to process the build config spec.
Option 2: Pulling Build Spec from Git Repo
In this option, you specify the repo where your build config file and its related files are located.
- Ensure you have set up a Harness Source Repo Provider that points to the Git repo containing your build config file. See Add Source Repo Providers.
- In Build Specification, select Remote.
- In Source Repository, select the Source Repro Provider that connects to your build config file repo.You can turn this setting into a deployment runtime parameter by clicking the template button [T]. This will create a Workflow variable for the setting. When you deploy this Workflow, you can enter the option for the setting.
- In Commit ID, select Latest from Branch or Specific Commit ID.
- Enter the branch name or commit ID. Both of these settings allow Harness variables, such as Workflow variables.
When you set up the Source Repo Provider, you entered in a branch name. The branch name you enter in the Google Cloud Build step Branch Name overrides that setting. - In File Path, enter the full path from the root of the repo to the build config file. If the build file location in the repo is
https://github.com/john-smith/gcb/cloudbuild.json, then the file is at the repo root and you would just enter cloudbuild.json in File Path.
Option 3: Execute Existing GCB Trigger
Select this option if you have created a Cloud Build trigger for your Cloud Build and you want to execute it in your Workflow.
- In Build Specification, click Trigger.
- In Trigger Name, select the name of the Cloud Build trigger you want to execute.You can enter the name of an existing variable expression in this setting. For example, if you created the Workflow variable
triggerName, you can enter${workflow.variables.triggerName}. The variable expression should refer to a Workflow variable or other available Harness variable. When you deploy this Workflow, you can enter the option for the setting. - In Trigger Type, select one of the following:
- Branch Name: Set your trigger to start a build using commits from a particular branch.
- Tag Name: Set your trigger to start a build using commits that contain a particular tag.
- Commit SHA: Set your trigger to start a build using an explicit commit SHA.
All of these settings allow Harness variables, such as Workflow variables.
Substitutions
GCB lets you use substitutions for specific variables at build time. You can do this in the Harness Google Cloud Build step, also.
See Substituting variable values from Google.1. In Substitutions, click Add.
2. In Name, enter the name of the variable you want to make a substitution on.
For example, if your Cloud Build config file uses name: ${_NAME}, you would enter _Name.
3. In Value, enter the value to substitute for the variable.
This is often used for tagging. For example, if your config file has tags: ["${_TAG1}", "${_TAG2}"], you would create substitutions with the names _TAG1 and _TAG2 and then enter the tag values in Value.
Step 3: Execution Settings
Timeout
The timeout period determines how long to wait for the step to complete. When the timeout expires, it is considered a workflow failure and the workflow Failure Strategy is initiated.
Execute with previous steps
Select this checkbox to run this step in parallel with the previous Workflow step(s).
Wait interval before execution
Set how long the deployment process should wait before executing the step.
Option 4: Use Output Variables
Harness provides the following information about the builds it executes:
- Activity ID:
activityId - Build Url:
buildUrl - Build#
buildNo - Tags:
tags - Status:
buildStatus - Build Name:
name - Created At:
createTime - Substitutions (an array of key-value pairs):
substitutions - Logs URL:
logUrl - Images:
images - Bucket:
artifactLocation - Artifacts (an array of artifacts):
artifacts
You create an output variable in the Google Cloud Build step, and then you can reference each build output item in a subsequent Shell Script step.
- Select Build output in the Context.
- In Name, enter a name for the output variable, such as gcb.
- In Scope, select Workflow, Pipeline, or Phase (Canary or Multi-Service Workflows only). Scope is used to avoid variable name conflicts and to make the output information available across Workflows in a Pipeline.
For example, if I create the variable gcb, in a subsequent Shell Script step, I could enter the following:
echo "Activity ID: ${gcb.activityId}"
echo "Build Url: ${gcb.buildUrl}"
echo "Build# ${gcb.buildNo}"
echo "Tags: ${gcb.tags}"
echo "Status: ${gcb.buildStatus}"
echo "Build Name: ${gcb.name}"
echo "Created At: ${gcb.createTime}"
echo "Substitutions: ${gcb.substitutions}"
echo "Logs URL: ${gcb.logUrl}"
echo "Images: ${gcb.images}"
echo "Bucket: ${gcb.artifactLocation}"
echo "Artifacts: ${gcb.artifacts}"
When the Workflow is deployed, the Harness Deployments page will show the output information in the Shell Script step:
Activity ID: up9p7jG6SoCAIvwyv8sE6A
Build Url: https://console.cloud.google.com/cloud-build/builds/8ba3539e-658e-44bb-8624-d34638264f9b
Build# 8ba3539e-658e-44bb-8624-d34638264f9b
Tags: [TAG1, TAG2]
Status: SUCCESS
Build Name: operations/build/project-123/OGJhMzUzOWUtNjU4ZS00NGJiLTg2MjQtZDM0NjM4MjY0Zjli
Created At: 2020-07-29T15:56:22.306572924Z
Substitutions: {_NAME=gcr.io/cloud-builders/docker, _TAG2=test2, _TAG1=test1, BRANCH_NAME=master, REPO_NAME=gcb, REVISION_ID=d89b008ffd36d40d3e9c71cca5f0a9e699602f60, COMMIT_SHA=d89b008ffd36d40d3e9c71cca5f0a9e699602f60, SHORT_SHA=d89b008}
Logs URL: https://console.cloud.google.com/cloud-build/builds/8ba3539e-658e-44bb-8624-d34638264f9b?project=196121614392
Images: [gcr.io/project-123/v-image]
Bucket: gs://gcb-playgound/
Artifacts: [build/libs/playground-0.0.1.jar]
Step 4: Deploy Workflow
When you are finished setting up the Google Cloud Build step, and any other steps, deploy your Workflow.
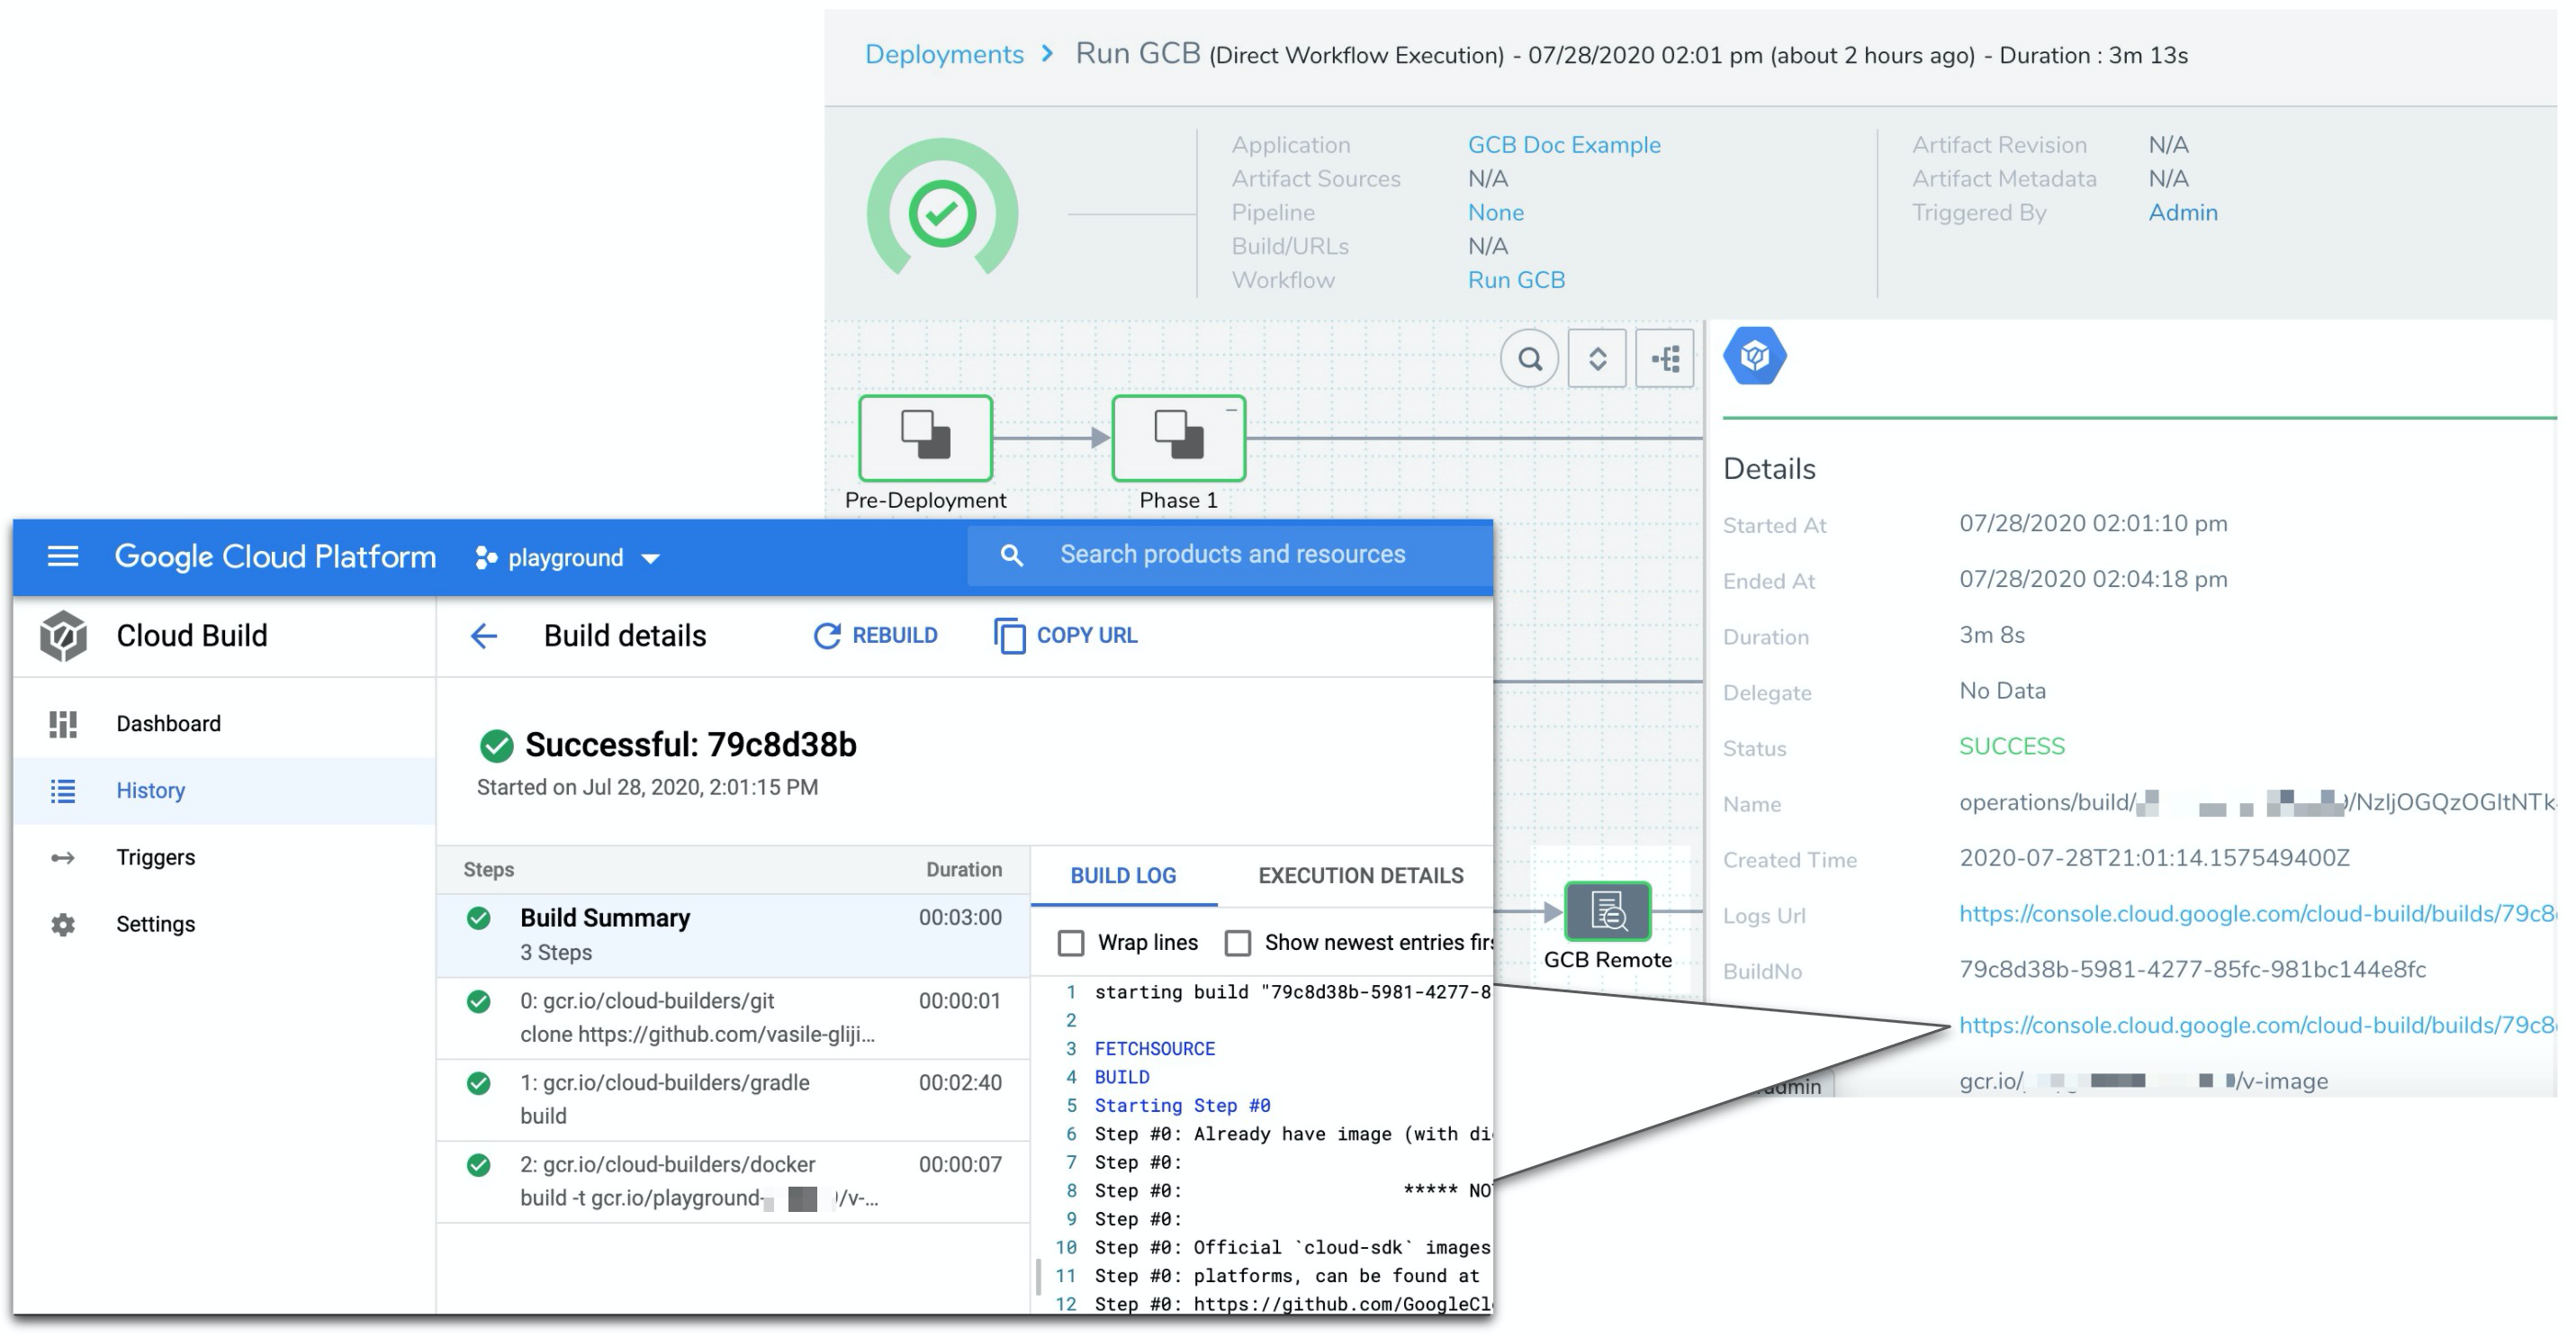
The Google Cloud Build step Details displays information about the build, including a build URL you can click to open the build in the GCB console:
Limitations
Harness only supports the use of JSON in inline and remote build config files. If you use a GCB trigger in the Google Cloud Build step, the config file it uses can be either YAML or JSON.
See Also
Configure As Code
To see how to configure the settings in this topic using YAML, configure the settings in the UI first, and then click the YAML editor button.