Backup and Recovery
You can back up and recover Harness Self-Managed Enterprise Edition - Virtual Machine using KOTS snapshots.
KOTS has documented snapshots extensively in Snapshots.
This topic provides a summary of the backup and recovery steps involved, and provides details on storage and Harness Self-Managed Enterprise Edition - Virtual Machine version requirements.
Overview
You can back up and recover Harness Self-Managed Enterprise Edition - Virtual Machine using KOTS snapshots.
There are two types of snapshots:
- Full snapshots: a snapshot of all objects including setup data and applications.
- Full snapshots are useful in disaster recovery and rolling back to previous versions of Harness Self-Managed Enterprise Edition - Virtual Machine.
- Full snapshots can restore fully or partially.
- Partial snapshots: a snapshot of application data only.
- Partial snapshots are useful for rolling back to previously installed versions of Harness Self-Managed Enterprise Edition - Virtual Machine.
You can automate both types of snapshots.
Requirements
Ensure you meet the Harness Self-Managed Enterprise Edition - Virtual Machine version and other requirements below.
Harness Self-Managed Enterprise Edition - Virtual Machine Version Required
Automated backup and recovery is supported in the following Harness Self-Managed Enterprise Edition versions:
- 670XX and later. See Harness Self-Managed Enterprise Edition Release Notes.
Storage Required
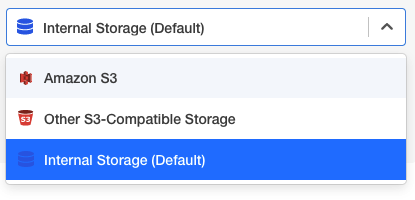
Snapshots are stored in an AWS S3 bucket or AWS S3-compatible storage (Harness recommends either), or in Internal Storage.
You will select and set up the storage option before creating a snapshot. This setup is described below.
Velero is Already Installed
Velero is installed and configured automatically in Harness Self-Managed Enterprise Edition - Virtual Machine installations. You do not have to install it.
Step 1: Choose Storage Destination
You have the following options for snapshot storage:
- AWS S3 bucket
- AWS S3-compatible storage
- Internal Storage
Harness recommends using an S3 bucket or S3-compatible storage to accommodate large files.
A Harness Self-Managed Enterprise Edition - Virtual Machine Production installation has a minimum disk space requirement of 400G, so there should be enough space for Internal Storage. Still, Harness recommends an S3 bucket or S3-compatible storage to avoid any issues.
Storage destinations are described in the KOTS documentation.
- Log into the Harness Self-Managed Enterprise Edition - Virtual Machine KOTS admin tool.
- Click Snapshots.
- Click Settings & Schedule.
- In Storage, select the storage method to use.
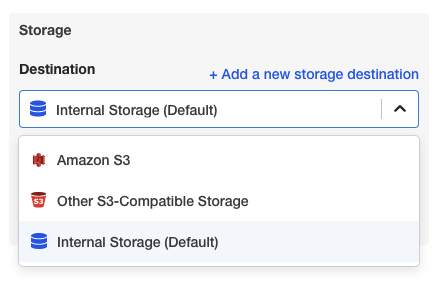
- For Amazon S3 and Other S3-Compatible Storage, enter in the location and credentials.
For details on these settings, see Compatible Backend Stores from KOTS. - Click Update storage settings. The settings are updated.
Now that you have storage for your snapshots, you can create the snapshots.
Step 2: Create Full or Partial Snapshots
- In the KOTS admin tool, click Full Snapshots (Instance) or Partial Snapshots (Application).
- Click Start a snapshot. The snapshot begins. You can see its progress:

- Click the more options (︙) button. The details of the snapshot appear.
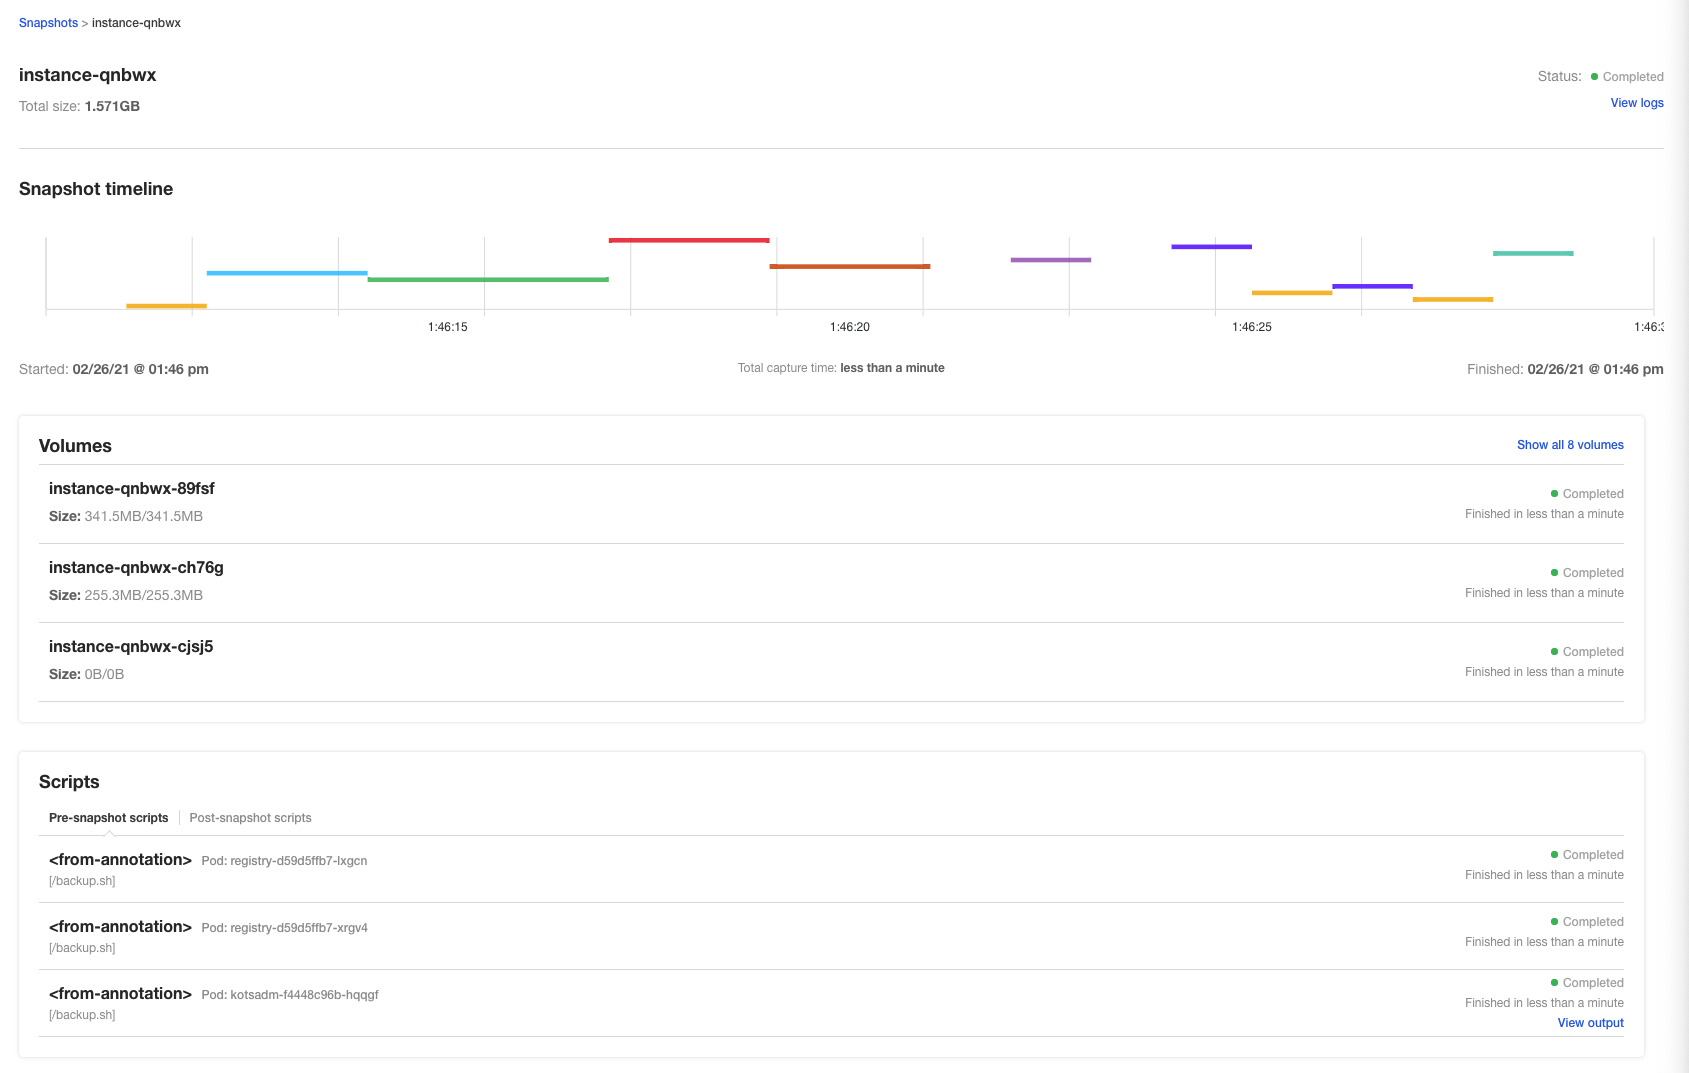 That's it! You now have a snapshot you can use for recovery.
Option: Automating Snapshots
Scheduling snapshots is covered in the KOTS Schedules documentation. Here is a summary of the steps:
To automate snapshots, click Settings & Schedule.
Select Full snapshots or Partial snapshots.
Select Enable automatic scheduled snapshots.
In Schedule, select the schedule for the snapshot.
In Retention policy, define how long to keep snapshots.
The retention policy is described by KOTS:
The default retention period for snapshots is 1 month. Setting the retention only affects snapshots created after the time of the change. For example, if an existing snapshot had a retention of 1 year and is already 6 months old, and a user then uses the UI to change the retention to 1 month, the existing snapshot will still be around for another 6 months.
Click Update schedule. The schedule is updated. To disable it, deselect Enable automatic scheduled snapshots.
Option: Restore from a Full Snapshot
You can perform a full or partial restore from a Full Snapshot. This is why KOTS recommends Full Snapshots.
Click Full Snapshots (Instance).
Click the restore button.

Restore from backup appears.
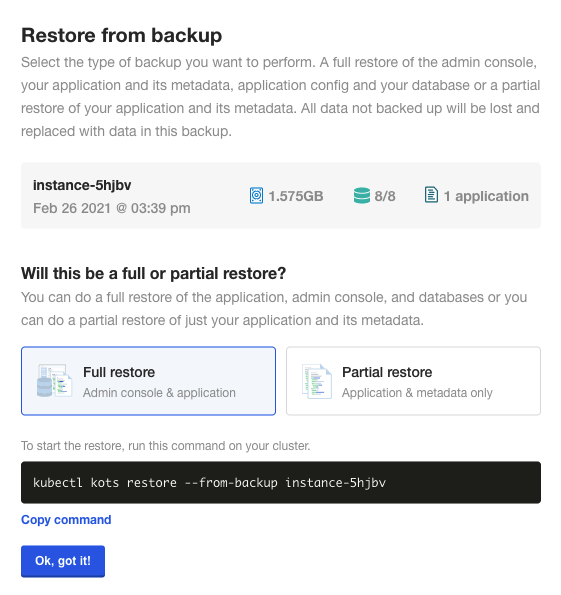
Select Full restore or Partial restore.
For Full restore, do the following:
- Copy the provided command and run it on any master node. You might need to log into the admin tool again after the restore.
- Click Ok, got it.
For Partial restore, do the following:
- Enter the slug harness.
- Click Confirm and restore. You might need to log into the admin tool again after the restore.
Option: Restore from a Partial Snapshot
You can perform a partial restore using a Full or Partial Snapshot. The Full Snapshot steps are described above.
Click Partial snapshots.
Click the restore button.
Restore from Partial backup (Application) appears.
Enter the slug harness.
Click Confirm and restore. You might need to log into the admin tool again after the restore.
Notes
See the KOTS documentation for more details on backup and recovery settings.