Create an integrated STO/CI pipeline
This tutorial builds on the Create a standalone STO pipeline tutorial. You need to complete the standalone STO pipeline first. This pipeline scans a test target and reports on the vulnerabilities, but it doesn't do anything else.
In this tutorial, you'll learn how to integrate STO functionality into CI and CD pipelines. The core benefit of STO in an integrated pipeline is to fail the pipeline if a scanner finds any "show-stopper" vulnerabilities. The following sections describe the different failure strategies you can implement.
For the list of supported scanners, see Security step settings reference.
Review: ingestion Workflows
STO supports three different workflows to ingest scan results into a pipeline:
- Orchestrated workflows — A Security step runs a scan with predefined settings and ingests the results.
- Ingestion-Only workflows — Run a scan in a Run step, or outside the pipeline, and save in a shared folder. A Security step then ingests the results.
- Data-Load workflows — A Security step downloads and ingests results from an external scanner.
Fail pipelines on severity
Key Concept: Fail on Severity
Every Security step supports a fail_on_severity setting. If any vulnerability with the specified severity or higher is found, the pipeline fails. It is good practice to include this setting in every Security step in an integrated pipeline.
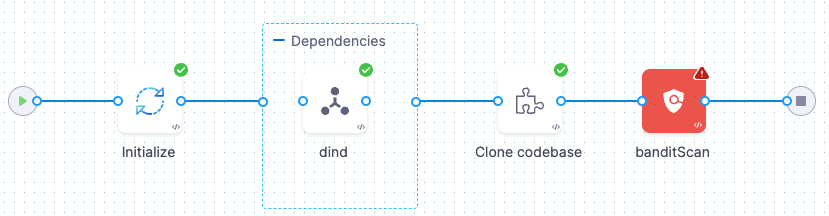
In the Pipeline Studio, open the STO Tutorial 1 pipeline > SecurityTestStage stage > banditScan step.
Under Settings, add the following:
fail_on_severity=CRITICALClick Apply Changes, save the updated pipeline, and run a new build with the DEMO-001 branch.
The pipeline now fails because the bandit step is now configured to fail on any vulnerability with a severity of low or higher. The last log message in the bandit step log is:
Exited with message: fail_on_severity is set to CRITICAL and that threshold was reached.
Exemptions for specific issues
Key Concept: Issue Exemptions
In some cases, developers might want to create "ignore rules" that override the fail_on_severity setting. If an issue is marked as Ignored, it will not fail the pipeline. Developer users cannot create Ignore Rules; only SecOps users have this permission.
Harness provides two pre-defined roles for STO:
- Developer role — Permissions needed for developer workflows. These workflows are described in Create a standalone pipeline. A Developer can set up security pipelines, run scans, and view results. A Developer can also request (but not approve) Ignore rules for specific issues.
- SecOps role — Permissions needed for Security Operations staff. This role includes all Developer permissions. In addition, SecOps users can approve Ignore rules. These workflows are covered in this tutorial.
In this section, you'll create an Ignore rule and approve it as SecOps user. In many real-world scenarios, two separate people will be performing the workflow: a developer creates an Ignore Rule, but the rule isn't active until a SecOps person approves it.
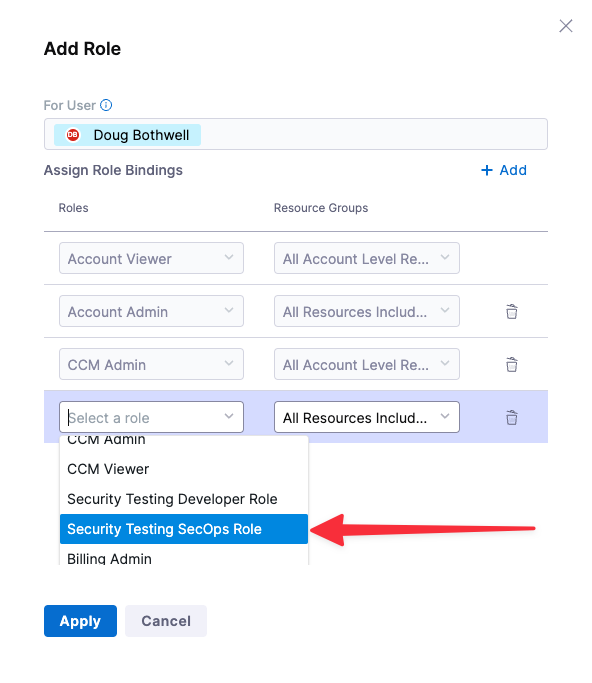
Make sure that you have the SecOps role assigned to yourself:
Click Account Settings (left menu) > Access Control.
In the Users table, click your user profile.
Under Role Bindings, click +Role.
Make sure that you have the Security Testing SecOps role assigned to yourself.
Go to the Security Tests page for the build you ran previously: In the pipeline Studio, click Execution History (top right) and then click the last successful build you ran before the failed build.
In the following step, you will create an Ignore request for each of the two critical issues found:
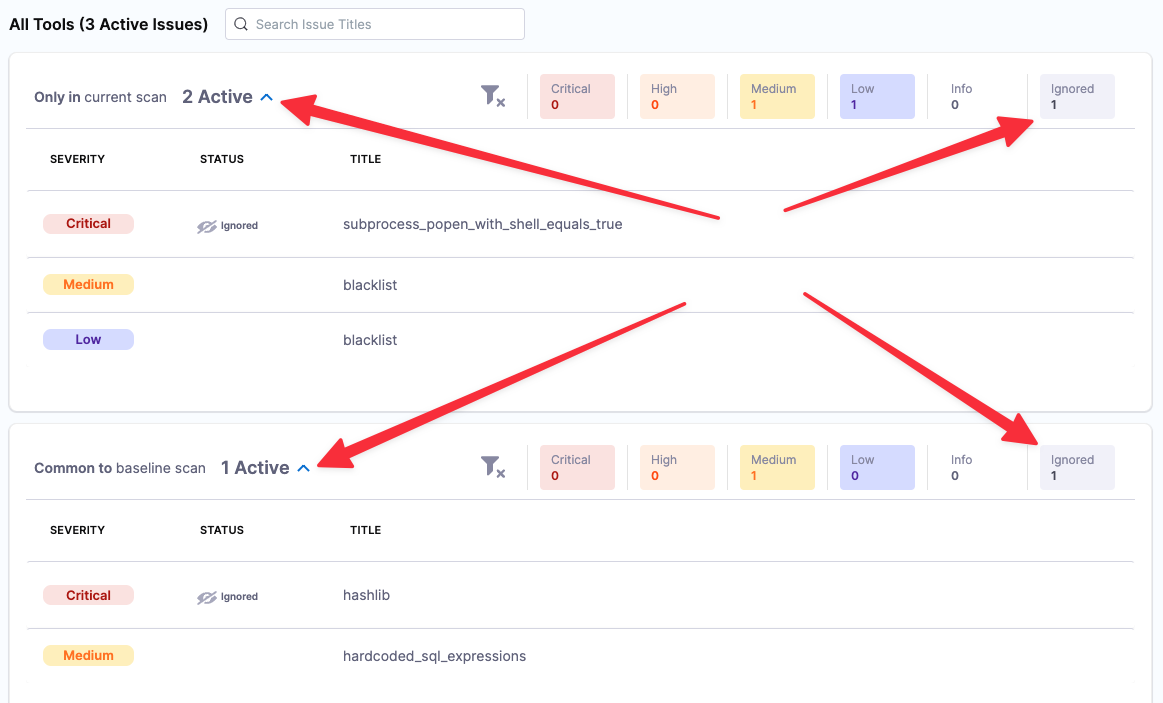
subprocess_popen_with_shell_equals_true(only in the current scan) andhaslib(common to the baseline scan).In the Security Tests tab, do the following steps for each of the two critical issues:
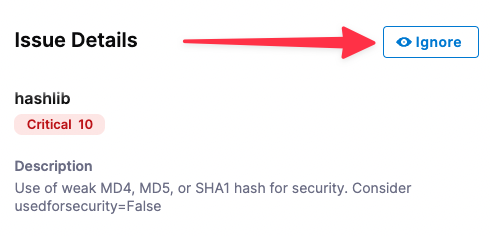
Click in the row to open the Issue Details pane.
Click the Ignore button.
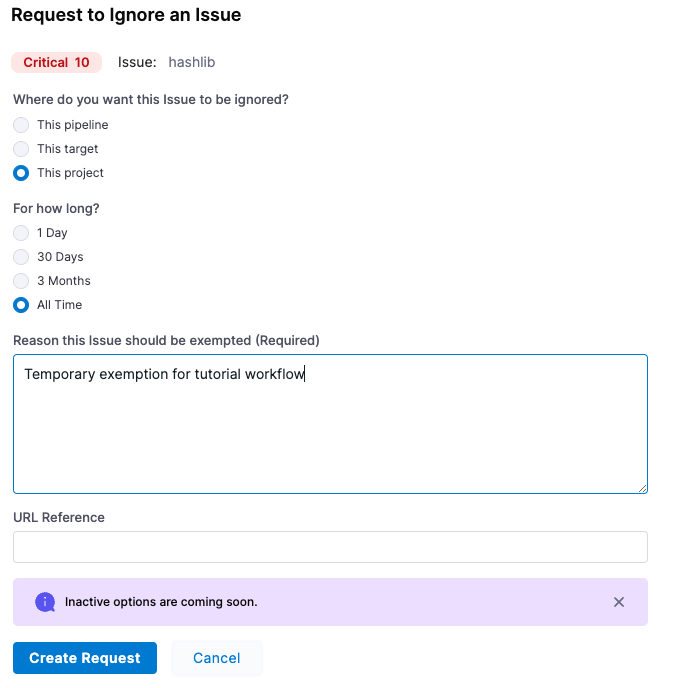
In the Request to Ignore an Issue popup, configure the Ignore request as follows:
- Where do you want this issue to be ignored? This pipeline (if available)
- For how long? 1 Day (if available)
- Reason this issue should be exempted: Temporary exemption for tutorial workflow
- Click Create Request.
Click Security Tests (left menu) and then Security Review (second-from-left menu).
In the Security Review page, click the "thumbs-up" buttons to approve both exemptions.

Go back to your pipeline and run another build with the DEMO-001 branch. When the build finishes, go to the Security Tests page.
In the issues table (bottom), each section has a set of show/hide buttons for different issue types: Critical, High, Medium. Low, and Info. Note that each section now includes an Ignored button. Also note that the ignored issues are hidden by default.
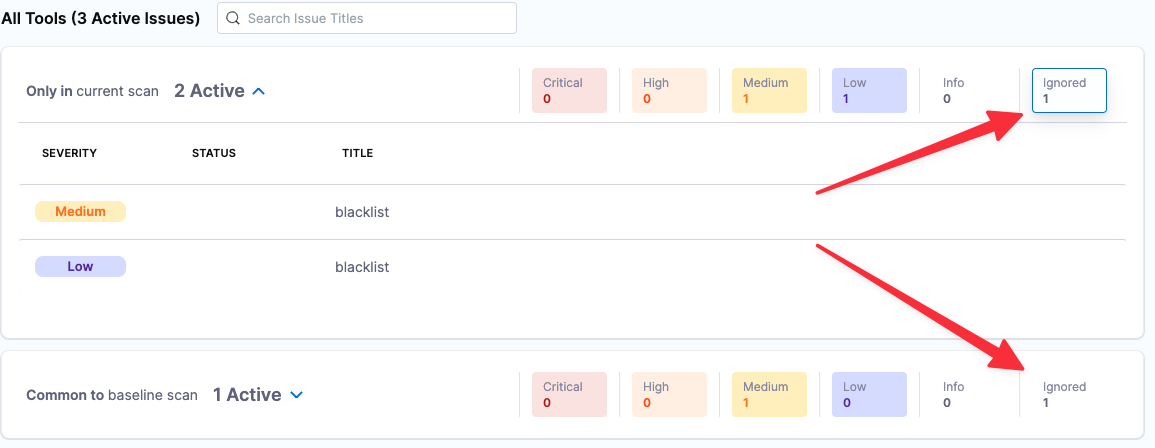
Click the Ignored buttons (right) and the expand/contract buttons (left) so that both ignored issues are visible.
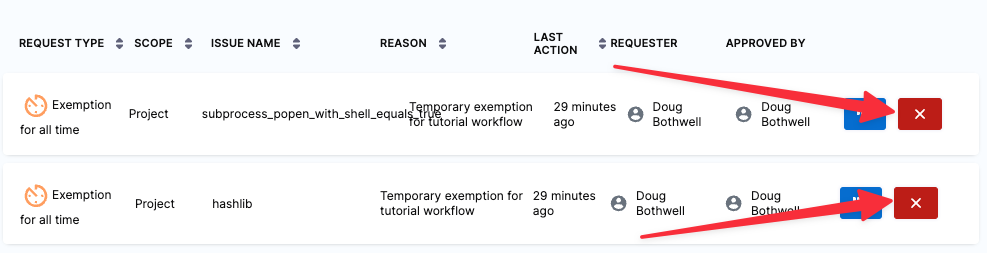
Go to Security Tests > Security Review. Then click Approved to show the Ignore rules you created and approved.
Click the Delete (X) buttons on the right to delete both rules.
Next steps
You've now learned the core STO features and workflows. Here are the next steps you can take.
Add more scanner steps
STO supports an extensive set of external scanners for repos, images, and artifacts. See Security steps reference.
Add steps or stages for CI/CD workflows
You know how to implement pipelines when scanners detect security issues, and how to create Ignore Rules for specific issues. Once you set up your Security steps, baselines, and exemptions, you can add more stages and steps to implement your CI/CD workflows.
Add governance policies
You can use the Harness Policy Engine to create policies based on the Open Policy Agent (OPA) standard. For example, you could create a rule like the following to ensure that all pipelines include a Security stage.
package pipeline_required

# Deny pipelines that are missing required steps
deny[sprintf("CI stage '%s' is missing required step '%s'", [stage.name, existing_steps])] {
     stage = input.pipeline.stages[i].stage                                # Find all stages ...
     stage.type == "CI"                                                    # ... that are CI stages
     existing_steps := [ s | s = stage.spec.execution.steps[_].step.type ] # ... and create a list of all step types in use
     required_step := required_steps[_]                                    # For each required step ...
     not contains(existing_steps, required_step)                           # ... check if it's present in the existing steps
}

# steps that must be present in every CI stage - try to create a CI stage without a Security step to see the policy fail
required_steps = ["Security"]

contains(arr, elem) {
    arr[_] = elem
}
Add failure strategies to a CI/CD stage
You can implement Failure Strategies to bypass the failure policies in previous Security steps. One use case for this would be to enable manual interventions when a Security step generates a failure. You could set up a workflow like this:
- A Build step is downstream from the Security step. It has a failure strategy that's set to run on All Errors.
- The scanner detects issues and the Security step generates an error.
- The Failure Strategy in the Build step initiates a 30-minute pause before proceeding.
- The developer and security team evaluate the issues and then abort the pipeline or allow it to proceed.
Integrated STO/CI Workflow Example
The following pipeline provides a simple example of how you can implement STO into a CI workflow. This is an expanded version of the standalone STO stage we have been working with. The YAML of this pipeline is provided below.

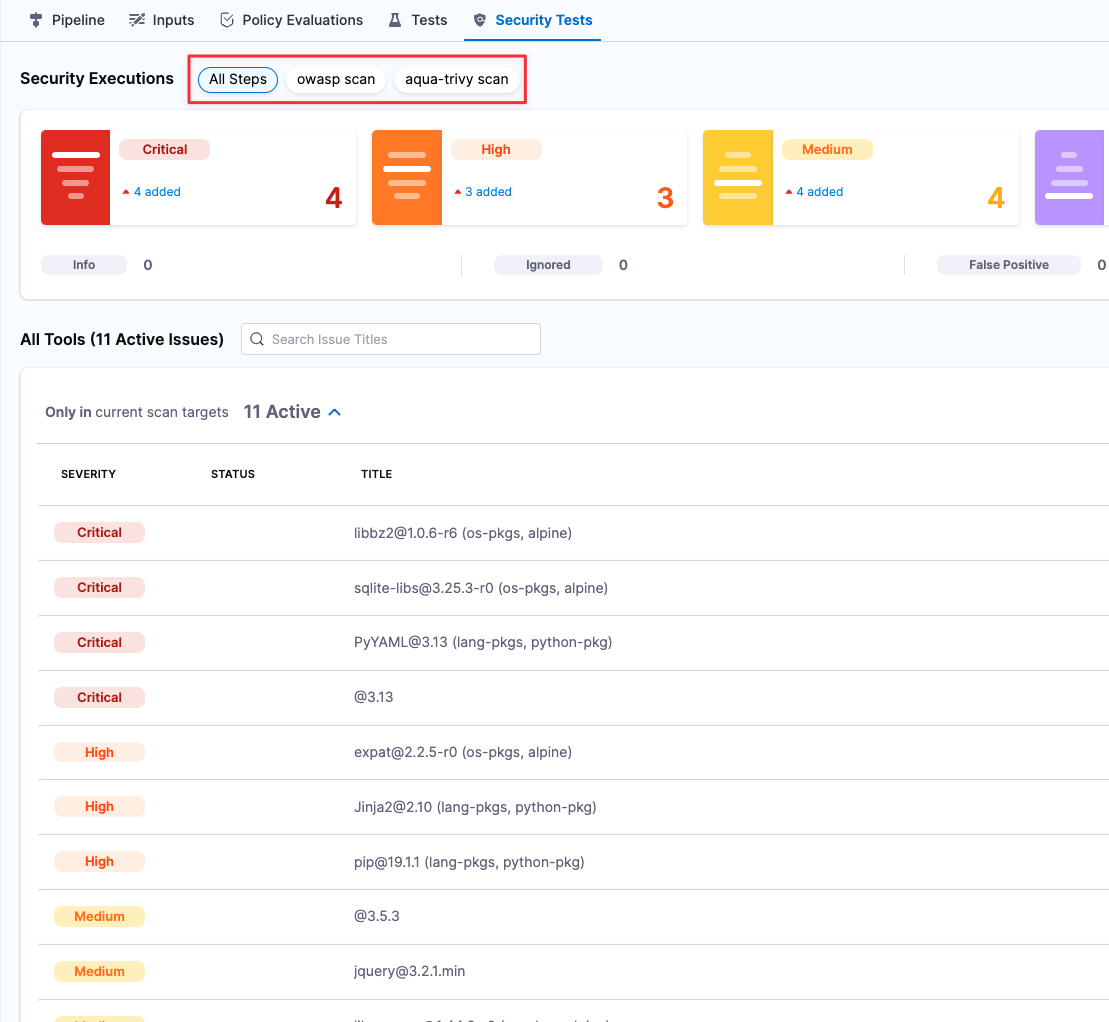
This pipeline works as follows:
- The owasp scan step has
fail_on_severityset toHIGH. It scans the master branch of the dvpwa repo and detects one Critical issue, which results in an error. - The Build Image step is set up to build (but not push) an image from the dvpwa repo. It has a Failure Strategy that responds to the error from owasp as follows:
- Pauses the pipeline and waits for you to choose what to do. You examine the detected issues and decide if you want to proceed.
- If you don't choose to proceed after 20 minutes, the pipeline aborts.
- If you click Proceed, the Build Image step builds an image from the repo.
- The aqua-trivy step also has
fail_on_severityset toHIGH. It scans the resulting image, detects issues with high and critical severities and generates an error, which causes the pipeline to fail.
You can view all issues from all scanners in the Security Tests tab, and also filter the issue list by scanner.
Congratulations!
In this tutorial, you learned how to:
- Add a STO Security stage to your Harness pipelines.
- Configure Security steps for different security scanners: one for code scanning and one for container scanning.
- Run a pipeline and scan its codebase and the container image.
- View the normalized and deduplicated security results in the Security dashboard.
Integrated Workflow YAML
Here's the YAML of the integrated workflow example we examined in this tutorial.
Integrated Workflow YAML
pipeline:
    name: quickstart-integrated-pipeline
    identifier: quickstartintegratedpipeline
    projectIdentifier: STO
    orgIdentifier: default
    tags: {}
    properties:
        ci:
            codebase:
                connectorRef: $CODEBASE_CONNECTOR
                build: <+input>
    stages:
        - stage:
              name: Docker Build and Scan
              identifier: Docker_Build_and_Scan
              type: CI
              spec:
                  cloneCodebase: true
                  infrastructure:
                      type: KubernetesDirect
                      spec:
                          connectorRef: $K8S_CONNECTOR
                          namespace: harness-delegate-ng
                          automountServiceAccountToken: true
                          nodeSelector: {}
                          os: Linux
                  sharedPaths:
                      - /var/run
                  execution:
                      steps:
                        - step:
                            type: Background
                            name: dind
                            identifier: dind
                            spec:
                              connectorRef: $DOCKER_CONNECTOR
                              image: docker:dind
                              shell: Sh
                              privileged: true
                              entrypoint:
                                - dockerd-entrypoint.sh
                          - step:
                                type: Security
                                name: owasp scan
                                identifier: owasp_scan
                                spec:
                                    privileged: true
                                    settings:
                                        policy_type: orchestratedScan
                                        scan_type: repository
                                        repository_project: nodegoat
                                        repository_branch: <+codebase.branch>
                                        product_name: owasp
                                        product_config_name: default
                                        fail_on_severity: HIGH
                                    imagePullPolicy: Always
                                failureStrategies:
                                    - onFailure:
                                          errors:
                                              - AllErrors
                                          action:
                                              type: Ignore
                          - step:
                                type: Run
                                name: Build Image
                                identifier: Build_Docker_Image
                                spec:
                                    connectorRef: $DOCKER_CONNECTOR
                                    image: docker:latest
                                    shell: Sh
                                    command: |-
                                        docker build .  -f Dockerfile.app -t nodegoat:local
                                    privileged: true
                                when:
                                    stageStatus: All
                                failureStrategies:
                                    - onFailure:
                                          errors:
                                              - AllErrors
                                          action:
                                              type: ManualIntervention
                                              spec:
                                                  timeout: 20m
                                                  onTimeout:
                                                      action:
                                                          type: Abort
                          - step:
                                type: Security
                                name: aqua-trivy scan
                                identifier: aqua_trivy_scan
                                spec:
                                    privileged: true
                                    settings:
                                        product_name: aqua-trivy
                                        product_config_name: aqua-trivy
                                        policy_type: orchestratedScan
                                        scan_type: container
                                        container_type: local_image
                                        container_domain: docker.io
                                        container_project: nodegoat
                                        container_tag: local
                                        fail_on_severity: HIGH
                                    imagePullPolicy: Always
                                failureStrategies: []