Create an AutoStopping proxy for AWS
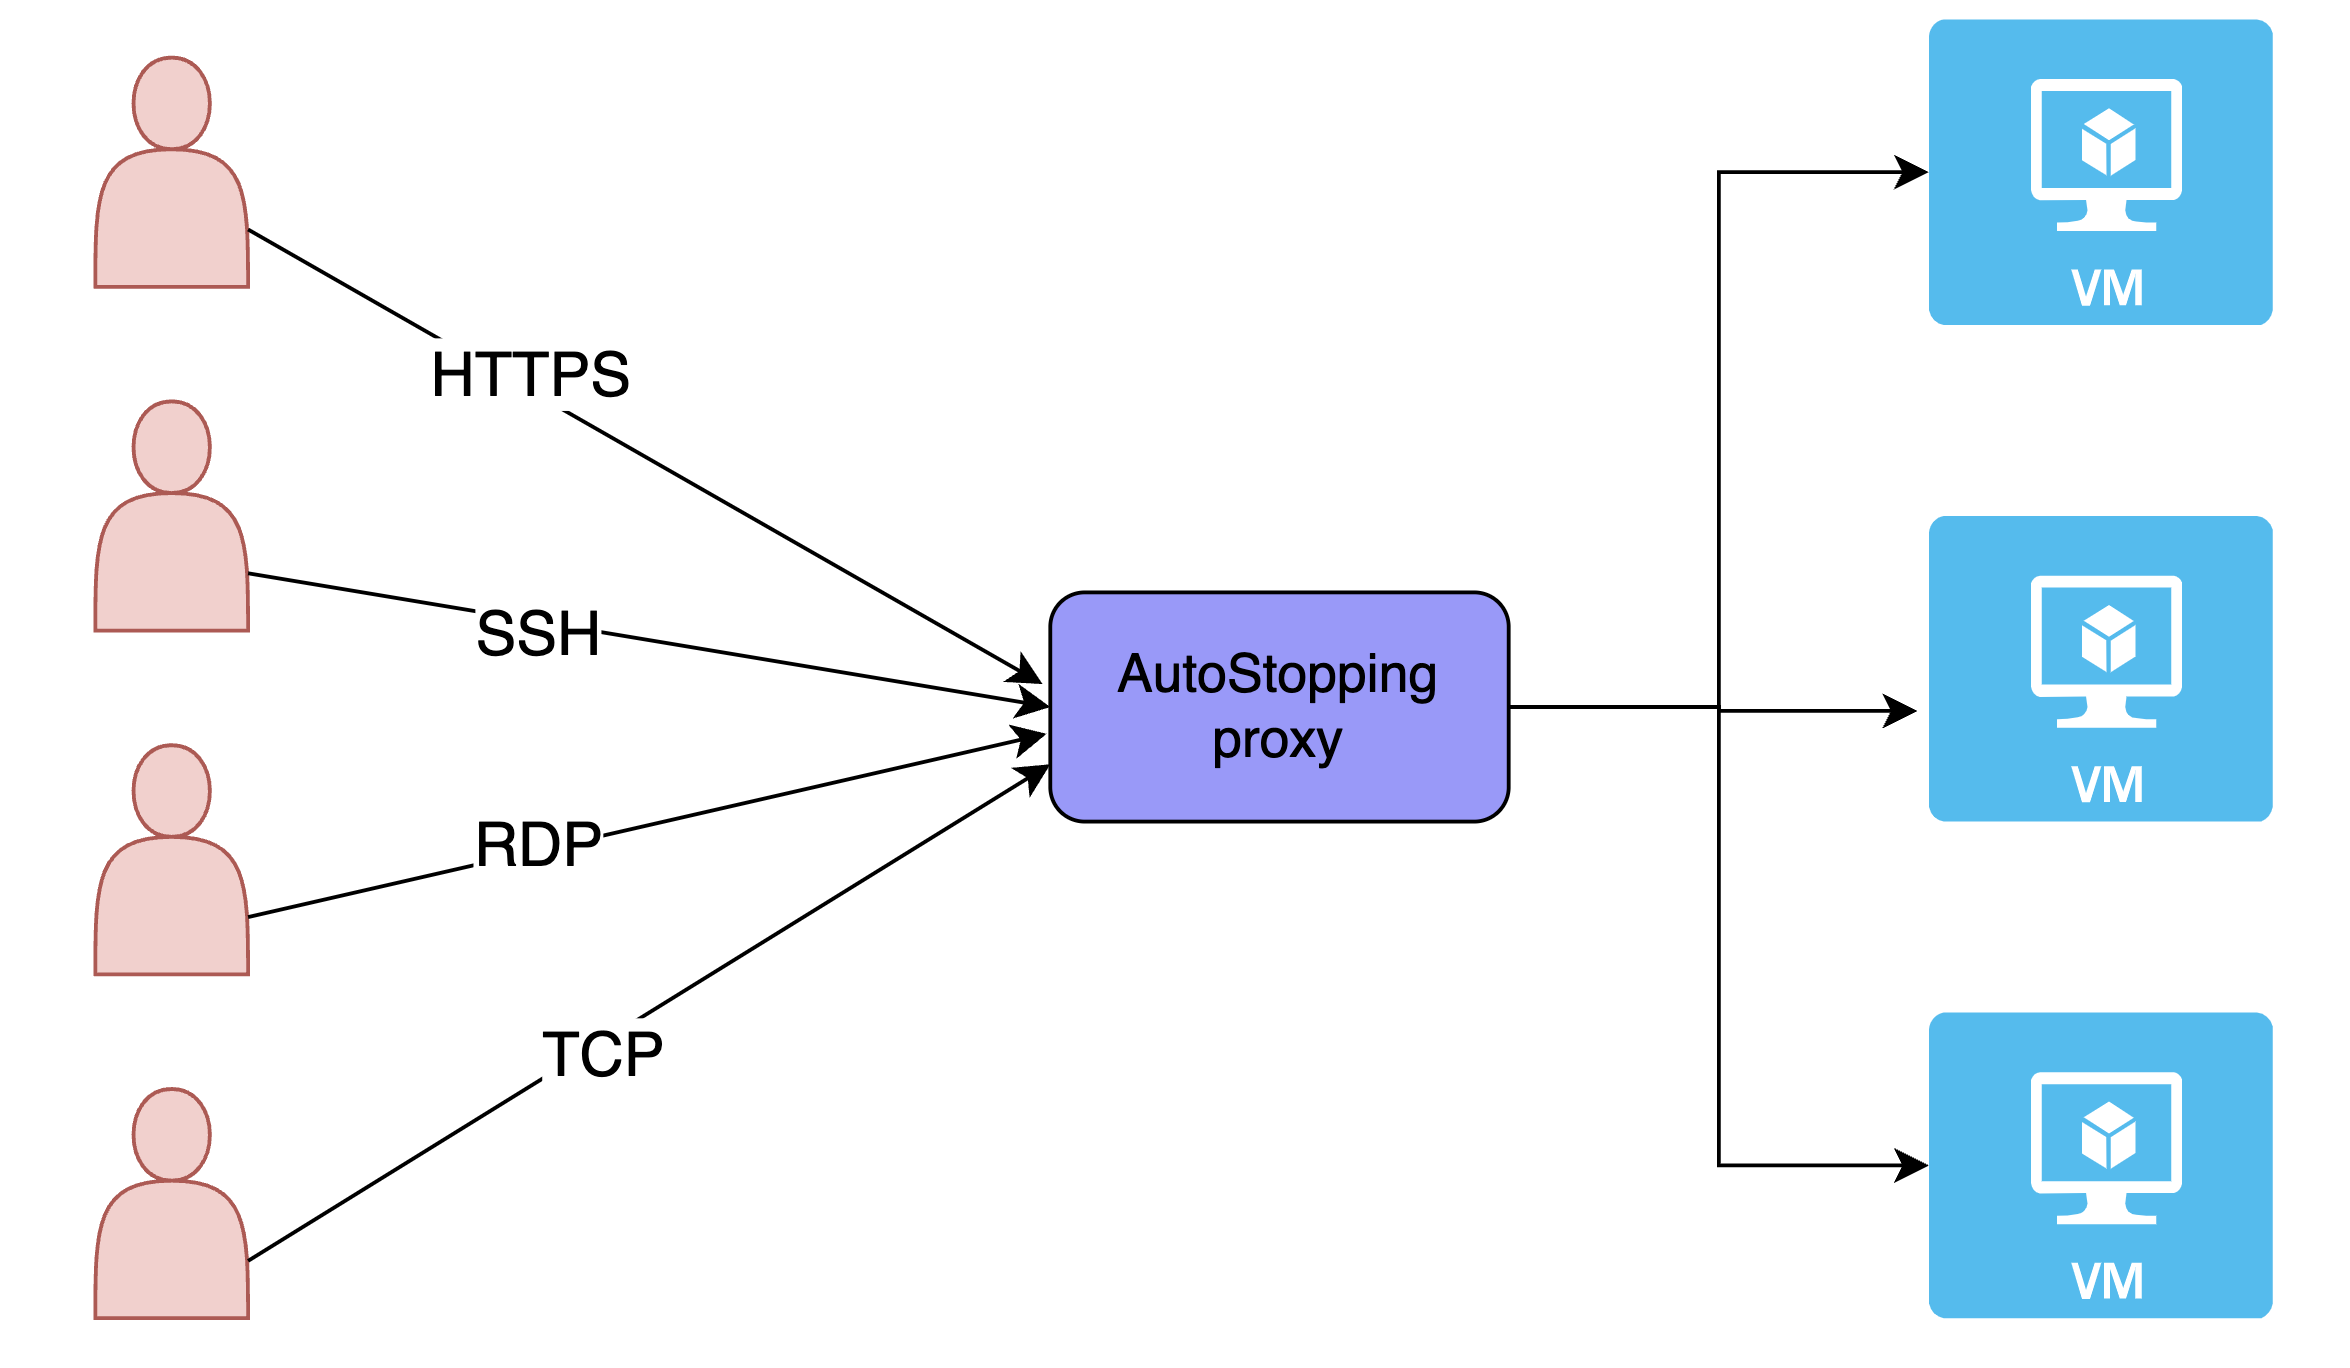
AutoStopping is a solution that is well-suited for use with native load-balancing options like AWS ALB. However, there are certain use cases, such as SSH/RDP/RDS connections, that cannot be addressed by native load balancer integrations for AutoStopping.
To address these use cases, AutoStopping offers a reverse proxy called the AutoStopping proxy. This proxy sits in front of the virtual machines (VMs) and manages the start and stop of the VMs based on network traffic. The proxy is capable of supporting both HTTP(S) and TCP connections.
For HTTP(S) traffic, the AutoStopping proxy provides Layer-7 load balancing and request routing capabilities, as well as SSL support. For all other TCP traffic, the proxy provides a dynamically generated ephemeral port-based configuration.
The AutoStopping proxy runs in a VM and uses the Envoy proxy, an open-source solution that has been thoroughly tested. One proxy VM can handle traffic to multiple AutoStopping-controlled VMs.
Perform the following steps to create an AutoStopping proxy for your resources in AWS:
- In Harness, go to the Cloud Costs module.
- Under Setup, click Load Balancers.
- Click Create New Load Balancer.
- Select AWS.
- Choose an existing connector or create a new one.
- Click Continue.
- Click Create AutoStopping Proxy.
- Click Continue.
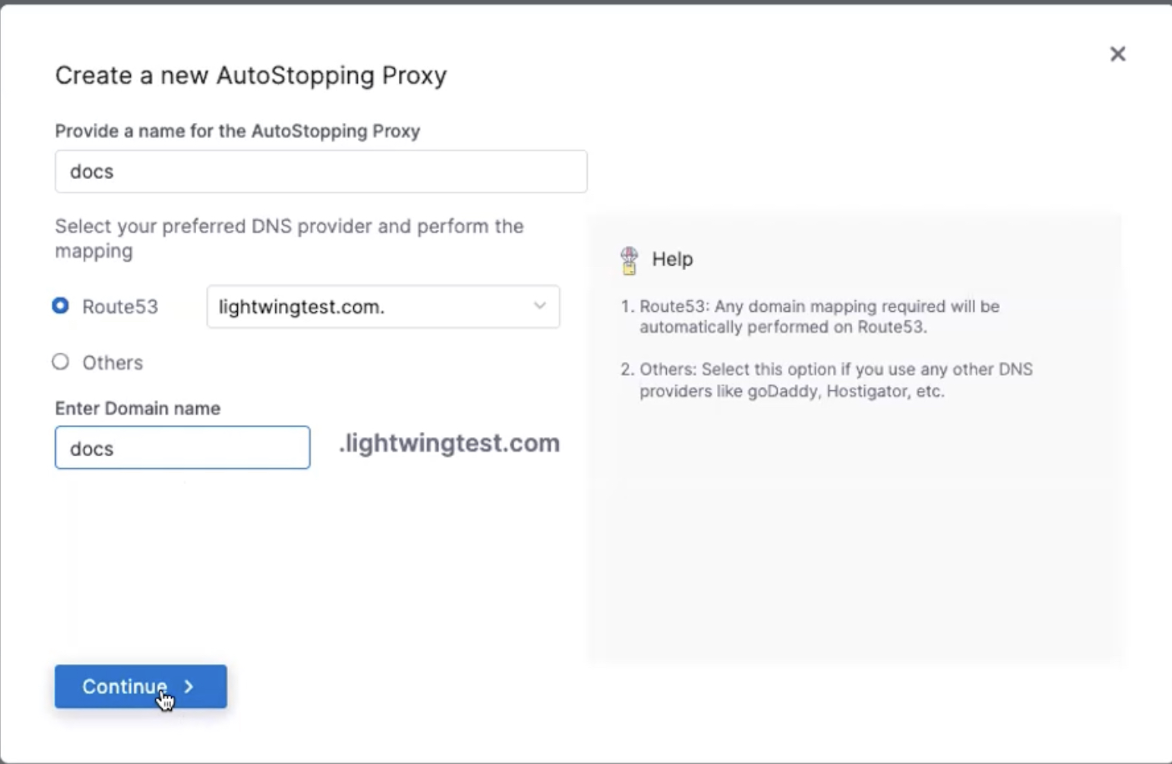
- In the Create a new AutoStopping Proxy window, enter the following information:
- Provide a name for the AutoStopping Proxy.
- Select your preferred DNS provider and perform the mapping:
- If you select Route 53, you must choose a hosted zone from the available zones and enter the domain name. AutoStopping manages Route 53 configuration automatically.
- If you select Others, enter the URL of the DNS provider. Make sure that you have updated the DNS mapping in your DNS provider.
- Click Continue.
Select region: Select the region where you have your cloud resources hosted.
Select the VPC from the dropdown list.
Machine type: Select the instance family type from the dropdown list.
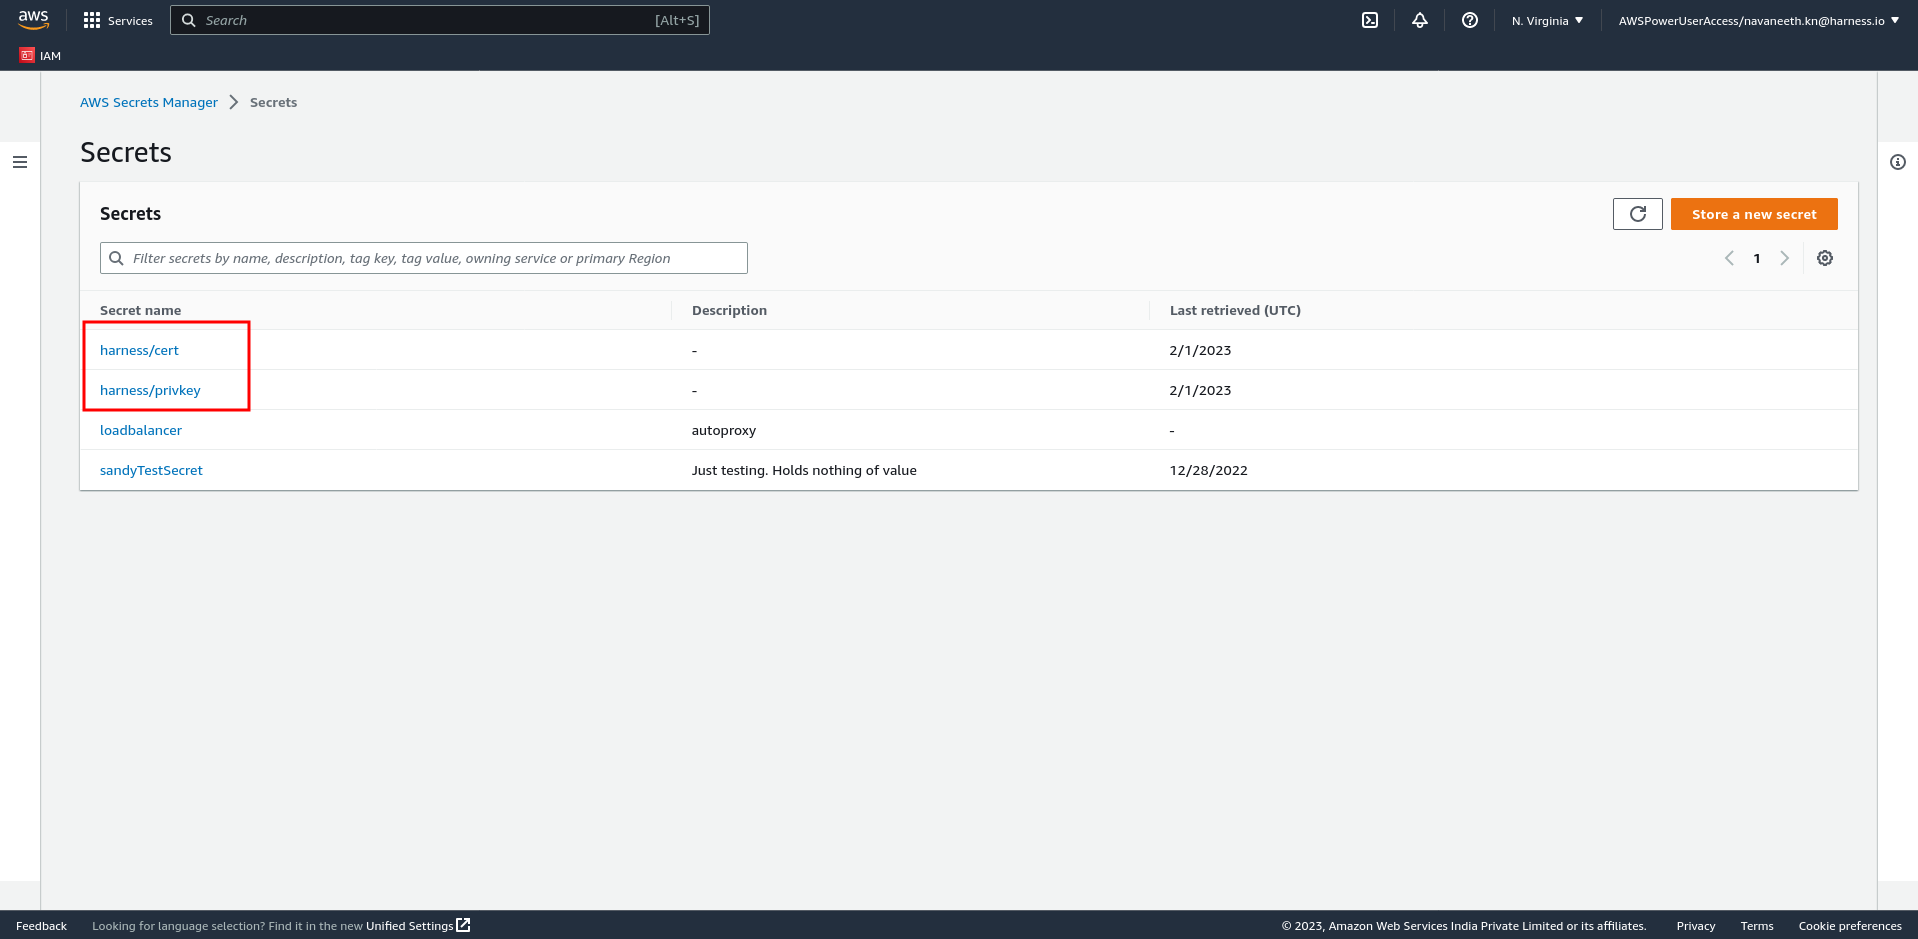
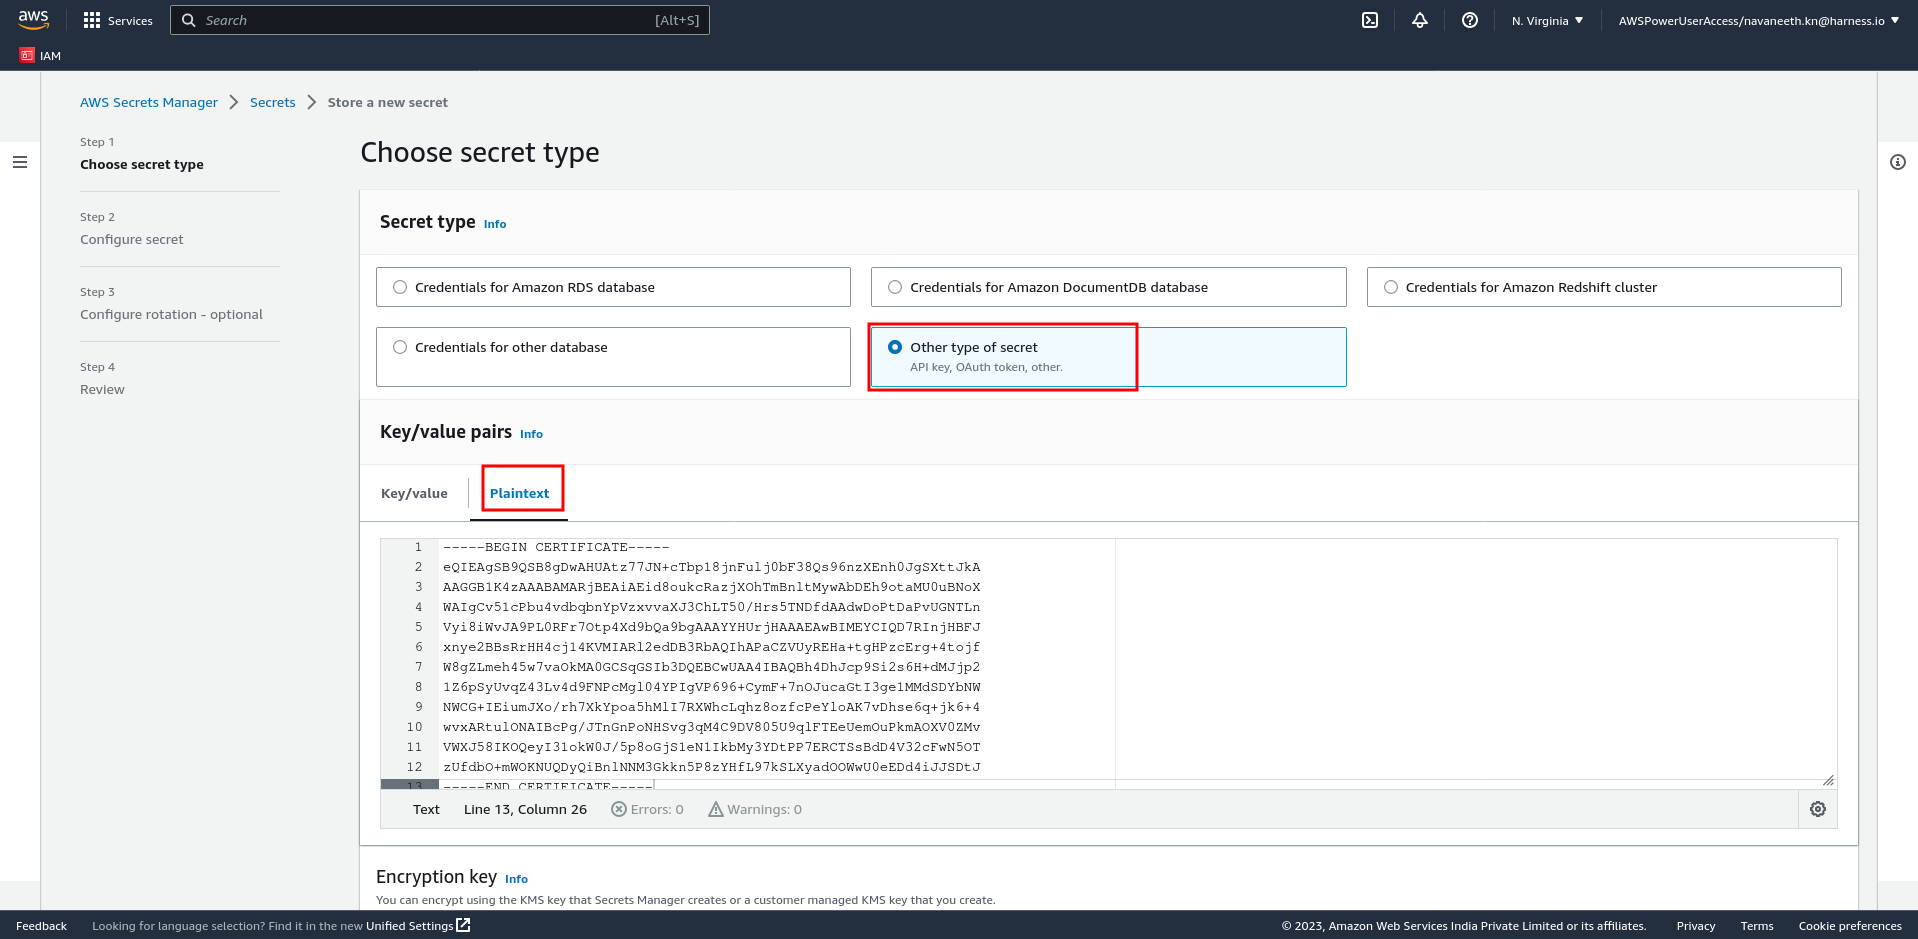
TLS Certificate Secret Version: AutoStopping proxy supports PEM-encoded certificates. You need to provide the certificate and the private key. A Cert chain is not required for the configuration. On the AWS console, go to Secrets Manager, and store a secret. It is recommended to use harness/ in the secret name. You must choose the Other type of secret option. Go to https://docs.aws.amazon.com/secretsmanager/latest/userguide/create_secret.html for more information. After successfully storing the secret, enter the Secret ARN in this field.
Sample certificate:
-----BEGIN CERTIFICATE-----
eQIEAgSB9QSB8gDwAHUAtz77JN+cTbp18jnFulj0bF38Qs96nzXEnh0JgSXttJkA
AAGGB1K4zAAABAMARjBEAiAEid8oukcRazjXOhTmBnltMywAbDEh9otaMU0uBNoX
WAIgCv51cPbu4vdbqbnYpVzxvvaXJ3ChLT50/Hrs5TNDfdAAdwDoPtDaPvUGNTLn
Vyi8iWvJA9PL0RFr7Otp4Xd9bQa9bgAAAYYHUrjHAAAEAwBIMEYCIQD7RInjHBFJ
xnye2BBsRrHH4cj14KVMIARl2edDB3RbAQIhAPaCZVUyREHa+tgHPzcErg+4tojf
W8gZLmeh45w7vaOkMA0GCSqGSIb3DQEBCwUAA4IBAQBh4DhJcp9Si2s6H+dMJjp2
1Z6pSyUvqZ43Lv4d9FNPcMgl04YPIgVP696+CymF+7nOJucaGtI3ge1MMdSDYbNW
NWCG+IEiumJXo/rh7XkYpoa5hMlI7RXWhcLqhz8ozfcPeYloAK7vDhse6q+jk6+4
wvxARtulONAIBcPg/JTnGnPoNHSvg3qM4C9DV805U9qlFTEeUemOuPkmAOXV0ZMv
VWXJ58IKOQeyI31okW0J/5p8oGjS1eN1IkbMy3YDtPP7ERCTSsBdD4V32cFwN5OT
zUfdbO+mWOKNUQDyQiBnlNNM3Gkkn5P8zYHfL97kSLXyadOOWwU0eEDd4iJJSDtJ
-----END CERTIFICATE-----
API Key: Enter a valid API key generated in Harness New Generation. Choose No Expiration in the Expiration dropdown list while creating this API key. Go to Create an API Key for more information.
Select security groups: Select the Security Group of your instance.
Key pair: Select the SSH key pair to connect to your VM.
TLS Private Key Secret Version: Enter the Secret ARN in this field.
Private key:
-----BEGIN PRIVATE KEY-----
afIpjsz6ebCXH6b4ZhX2or8t8BNQU2i2f88efNhxvD6VYo1j+z0TIXSWKTL65NdZ
uw0b2m7N2E5OjcXtVmUocMEvGQKBgQD4GdB/vkDdsUfCP8nnRKHq4idBTj35YfSf
xGcp5f/KFLQ2eIKIsjtkHrxeGORzuMiYj8N2bwqgHDfICHPRN7ZgLTctbJc9kYfR
Dh1wAoMAKC15RgmdH/KmSOYY2iUFrYCMnaStM3XcDXdu5/mlxRoMzZPNZUtQaCRY
RNCMpEQsUwKBgQCJaegeXp20e9sWxaPCGYZFulG95N4owHqQ7WI1uPcilbzMaCqw
pfrYQCreKLwnDWYDIcGnYjdvw/UG5elkCxhzMx9ByMMOCo5aNnod+LJIFFmKV6cT
LxNOQU0/lYZTZMfWgUt6PNX0vPMoKSraIV/bUTATQa2woDHIxVrhS7Qt4QKBgQDi
IAUcqPbOGEpjDWikVLWPM1i7+OgbZ+BhzcyJL4wXTw+BpgyzMl9XPXxJ9z4hCwYp
pr5sL4DrtUxSEQIeajzbI9rql9Kw1veG3uqNsHxdpEDuC5uvjfLHBCJT/F9J8Xz8
rKHvCrwdOFjmyJ+NKzw29xgDWJNwUbruiKnbxcws6QKBgQCLtfXFRQG87TGLpNn/
pUzRWa4TlIaPsftcPZlD0ZEW0g+Ukbd+V5EFZlfm7hBa0+LlpBUAQIHyMIihMSnG
qhhpq85lkBaErOwIZUJzxJuG2AveiOMcn7XKaxxC4IizJtuLNUnnmsHwBYYr8c2c
1k4KtNs00P03Y6G5pm5FZsMcPA==
-----END PRIVATE KEY-----
- Enable Allocate Static IP if you need to assign an elastic IP address to make the instance publicly accessible. Update the DNS route to point to the public IP. You don't need to enable this field if it is pointing to a private IP provided the DNS resolves. For example, when the DNS resolution is done within the VPC.
- Click Save Load Balancer.