Serverless.com framework for AWS Lambda deployments
This quickstart shows you how to deploy a Serverless Lambda application to AWS Lambda using Harness. We'll use a publicly-available serverless.yaml and artifact and deploy them to your AWS Lambda service using a Harness Pipeline.
New to Serverless.com Framework? See Tutorial: Your First Serverless Framework Project from Serverless.
Objectives
- Add a serverless.yaml file and ZIP artifact to a Harness Pipeline stage.
- Define your AWS Lambda service as the deployment target.
- Deploy the Serverless application to Lambda.
Visual summary
Before you begin
Review Harness Key Concepts to establish a general understanding of Harness.
GitHub account: this quickstart uses a publicly available serverless.yaml file, but GitHub requires that you use a GitHub account for fetching files.
Harness Delegate with Serverless installed: the Harness Delegate is a worker process that performs all deployment tasks. For this quickstart, we'll install a Kubernetes delegate in your own cluster.
- You can use a cluster hosted on a cloud platform or run one in minikube using Docker Desktop locally. The installation steps are the same.
- The Delegate pod(s) must have Serverless installed. We'll add the Serverless installation script using the delegate environment variable
INIT_SCRIPTto the delegate YAML file later in this quickstart.
AWS User account with required policy: Serverless deployments require an AWS User with specific AWS permissions, as described in AWS Credentials from Serverless.com. To create the AWS User, do the following:
- Log into your AWS account and go to the Identity & Access Management (IAM) page.
- Click Users, and then Add user. Enter a name. Enable Programmatic access by clicking the checkbox. Click Next to go to the Permissions page. Do one of the following:
- Full Admin Access: click on Attach existing policies directly. Search for and select AdministratorAccess then click Next: Review. Check to make sure everything looks good and click Create user.
- Limited Access: click on Create policy. Select the JSON tab, and add the JSON using the following code from the Serverless gist: IAMCredentials.json
{
    "Statement": [
        {
            "Action": [
                "apigateway:*",
                "cloudformation:CancelUpdateStack",
                "cloudformation:ContinueUpdateRollback",
                "cloudformation:CreateChangeSet",
                "cloudformation:CreateStack",
                "cloudformation:CreateUploadBucket",
                "cloudformation:DeleteStack",
                "cloudformation:Describe*",
                "cloudformation:EstimateTemplateCost",
                "cloudformation:ExecuteChangeSet",
                "cloudformation:Get*",
                "cloudformation:List*",
                "cloudformation:UpdateStack",
                "cloudformation:UpdateTerminationProtection",
                "cloudformation:ValidateTemplate",
                "dynamodb:CreateTable",
                "dynamodb:DeleteTable",
                "dynamodb:DescribeTable",
                "dynamodb:DescribeTimeToLive",
                "dynamodb:UpdateTimeToLive",
                "ec2:AttachInternetGateway",
                "ec2:AuthorizeSecurityGroupIngress",
                "ec2:CreateInternetGateway",
                "ec2:CreateNetworkAcl",
                "ec2:CreateNetworkAclEntry",
                "ec2:CreateRouteTable",
                "ec2:CreateSecurityGroup",
                "ec2:CreateSubnet",
                "ec2:CreateTags",
                "ec2:CreateVpc",
                "ec2:DeleteInternetGateway",
                "ec2:DeleteNetworkAcl",
                "ec2:DeleteNetworkAclEntry",
                "ec2:DeleteRouteTable",
                "ec2:DeleteSecurityGroup",
                "ec2:DeleteSubnet",
                "ec2:DeleteVpc",
                "ec2:Describe*",
                "ec2:DetachInternetGateway",
                "ec2:ModifyVpcAttribute",
                "events:DeleteRule",
                "events:DescribeRule",
                "events:ListRuleNamesByTarget",
                "events:ListRules",
                "events:ListTargetsByRule",
                "events:PutRule",
                "events:PutTargets",
                "events:RemoveTargets",
                "iam:AttachRolePolicy",
                "iam:CreateRole",
                "iam:DeleteRole",
                "iam:DeleteRolePolicy",
                "iam:DetachRolePolicy",
                "iam:GetRole",
                "iam:PassRole",
                "iam:PutRolePolicy",
                "iot:CreateTopicRule",
                "iot:DeleteTopicRule",
                "iot:DisableTopicRule",
                "iot:EnableTopicRule",
                "iot:ReplaceTopicRule",
                "kinesis:CreateStream",
                "kinesis:DeleteStream",
                "kinesis:DescribeStream",
                "lambda:*",
                "logs:CreateLogGroup",
                "logs:DeleteLogGroup",
                "logs:DescribeLogGroups",
                "logs:DescribeLogStreams",
                "logs:FilterLogEvents",
                "logs:GetLogEvents",
                "logs:PutSubscriptionFilter",
                "s3:GetBucketLocation",
                "s3:CreateBucket",
                "s3:DeleteBucket",
                "s3:DeleteBucketPolicy",
                "s3:DeleteObject",
                "s3:DeleteObjectVersion",
                "s3:GetObject",
                "s3:GetObjectVersion",
                "s3:ListAllMyBuckets",
                "s3:ListBucket",
                "s3:PutBucketNotification",
                "s3:PutBucketPolicy",
                "s3:PutBucketTagging",
                "s3:PutBucketWebsite",
                "s3:PutEncryptionConfiguration",
                "s3:PutObject",
                "sns:CreateTopic",
                "sns:DeleteTopic",
                "sns:GetSubscriptionAttributes",
                "sns:GetTopicAttributes",
                "sns:ListSubscriptions",
                "sns:ListSubscriptionsByTopic",
                "sns:ListTopics",
                "sns:SetSubscriptionAttributes",
                "sns:SetTopicAttributes",
                "sns:Subscribe",
                "sns:Unsubscribe",
                "states:CreateStateMachine",
                "states:DeleteStateMachine"
            ],
            "Effect": "Allow",
            "Resource": "*"
        }
    ],
    "Version": "2012-10-17"
}
The
s3:GetBucketLocationaction is required for a custom S3 bucket only.- View and copy the API Key and Secret to a temporary place. You'll need them when setting up the Harness AWS Connector later in this quickstart.
Serverless framework support
- Harness supports Serverless framework 1.82 and later.
- Harness supports Serverless framework CLI versions 2.x.x and 3.x.x.
- Harness supports all language runtimes that Serverless supports.
- Harness supports ZIP files and Docker image artifacts only.
- ZIP files are supported with JFrog Artifactory.
- Docker images are supported with AWS ECR.
Create the Deploy stage
Pipelines are collections of stages. For this quickstart, we'll create a new Pipeline and add a single stage.
Create a Project for your new CD Pipeline: if you don't already have a Harness Project, create a Project for your new CD Pipeline. Make sure that you add the Continuous Delivery module to the Project. See Create Organizations and Projects.
In your Harness Project, click Deployments, and then click Create a Pipeline.
Enter the name Serverless Quickstart and click Start. Your Pipeline appears.
Click Add Stage and select Deploy.
Enter the name Deploy Service, make sure Service is selected, and then click Set Up Stage.
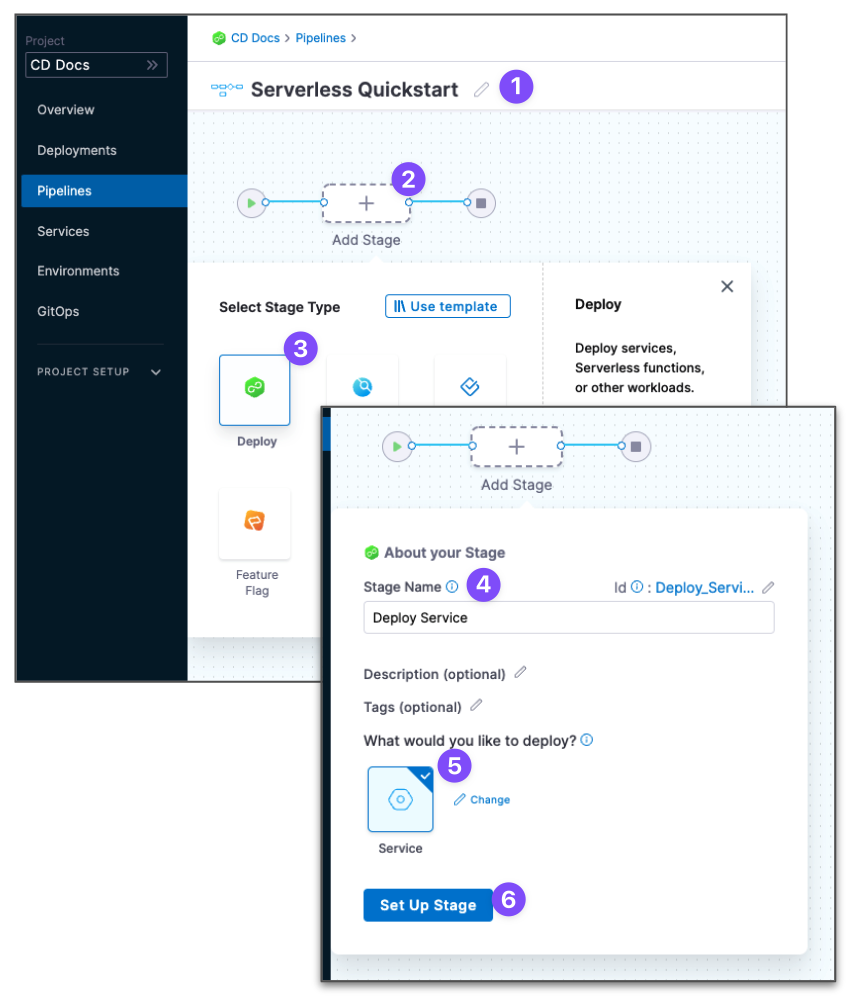
The new stage settings appear.
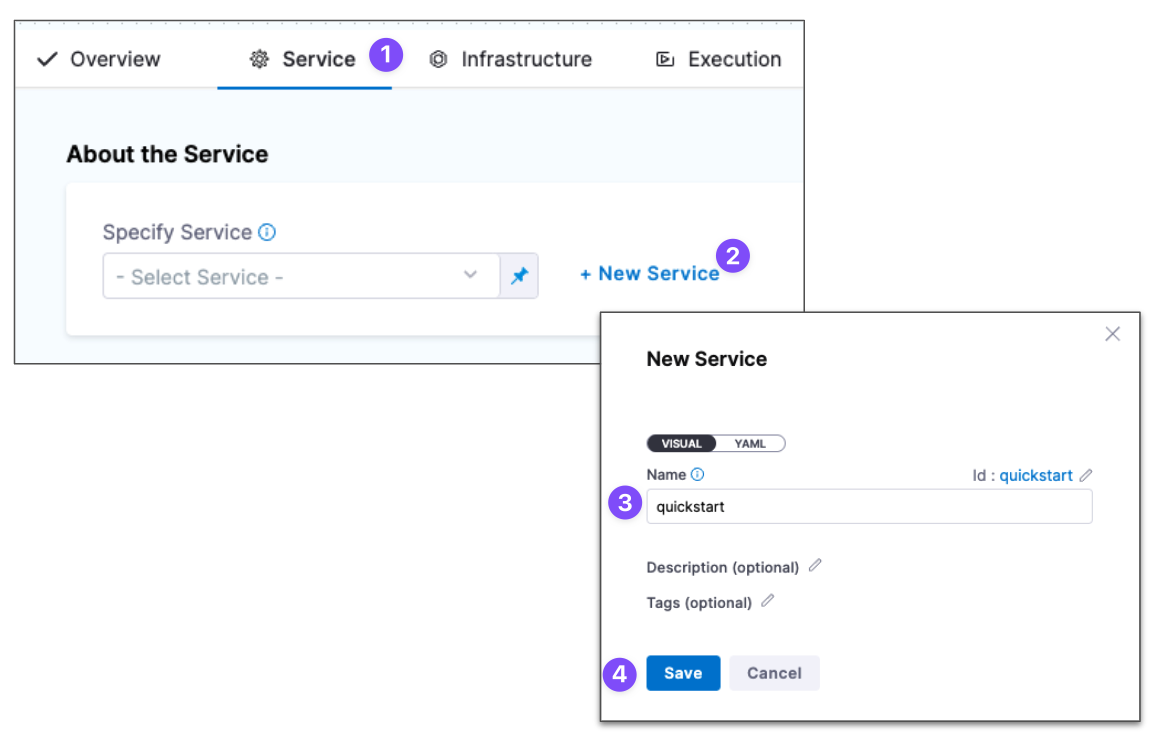
In About the Service, click New Service.
Give the Service the name quickstart and click Save.
Let's take a moment and review Harness Services and Service Definitions (which are explained below). A Harness Service represents your microservice/app logically.
You can add the same Service to as many stages as you need. Service Definitions represent your artifacts, manifests, and variables physically. They are the actual files and variable values.
By separating Services and Service Definitions, you can propagate the same Service across stages while changing the artifacts, manifests, and variables with each stage.
Once you have created a Service, it's persistent and you can use it throughout the stages of this or any other Pipeline in the Project.
Add the manifest
Next, we can add a serverless.yaml for our deployment. We'll use the publicly-available serverless.yaml file available from Harness.
In Service Definition, in Deployment Type, click Serverless Lambda.
In Manifests, click Add Manifest.
Select Serverless Lambda Manifest, and click Continue.
In Specify Serverless Lambda Manifest Store, click GitHub, and then click New GitHub Connector. The Git Connector settings appear. Enter the following settings.
- Name:
serverless. - URL Type:
Repository. - Connection Type:
HTTP. - GitHub Repository URL:
https://github.com/wings-software/harness-docs.git. - Username: Enter your GitHub account username.
- In Personal Access Token, click Create or Select a Secret.
- Click New Secret Text.
- In Secret Name, enter a name for the secret like github-pat.
- In Secret Value, paste in a GitHub Personal access token.When you're logged into GitHub, these tokens are listed at https://github.com/settings/tokens. For steps on setting up a GitHub PAT, see Creating a personal access token from GitHub.
- Make sure your PAT has the repo scope selected:
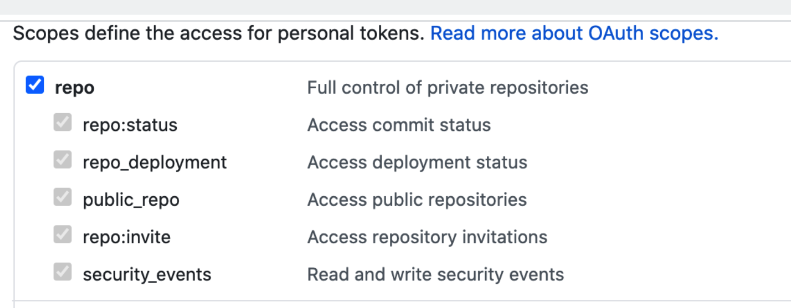
- Name:
Select Connect through Harness Platform.
Click Finish.
Back in Specify Serverless Lambda Manifest Store, click Continue.
In Manifest Details, enter the following.
- Manifest Identifier:
serverless. - Git Fetch Type:
Latest from Branch. - Branch:
main. - Folder Path:
serverless/artifacts. - In Advanced, you can see Serverless Config File Path. Use this setting when your Serverless manifest isn't named
serverless.yml|.yaml|.js|.json. This option is the same as the--configoption inserverless deploy. See AWS - deploy from Serverless.
- Manifest Identifier:
You can see the serverless.yaml manifest in Harness.

Here's what the serverless.yaml looks like:
service: <+service.name>
frameworkVersion: '2 || 3'

provider:
  name: aws
  runtime: nodejs12.x
functions:
  hello:
    handler: handler.hello
    events:
      - httpApi:
          path: /tello
          method: get
package:
  artifact: <+artifact.path>
plugins:
  - serverless-deployment-bucket@latest
You can see the Harness expression <+artifact.path> in artifact: <+artifact.path>. The expression <+artifact.path> tells Harness to get the artifact from Artifacts section of the Service. We'll add the artifact next.
The expression <+service.name> simply uses the Harness Service name for the deployed service name.
For Docker images, you use the expression <+artifact.image>.
Add the artifact
Currently, Harness supports ZIP file artifacts only. Harness doesn't support Docker images yet.Next, we'll add a publicly-available artifact to your Service. The artifact is a zip file with a JavaScript function hosted in Artifactory.
We'll add a new Artifactory Connector and install a Harness Kubernetes Delegate in a Kubernetes cluster. The Delegate is a worker process that performs the deployment operations. The Delegate will use the URL and credentials you provide in the Connector to connect to Artifactory and fetch the artifact at runtime.
In Artifact, click Add Primary.
In Specify Artifact Repository Type, click Artifactory, and click Continue.
In Artifactory Repository, click New Artifactory Connector.
In Create or Select an Existing Connector, click New Artifactory Connector.
Enter a name for the Connector, such as JFrog Serverless. Click Continue.
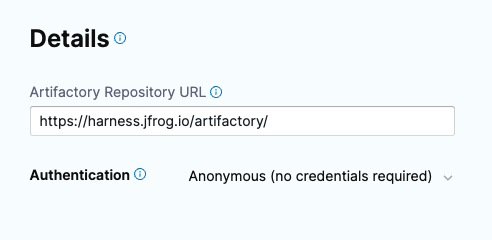
In Details, in Artifactory Repository URL, enter
https://harness.jfrog.io/artifactory/.In Authentication, select Anonymous.
In Connect to the provider, select Connect through a Harness Delegate, and then select Continue. We don't recommend using the Connect through Harness Platform option here because you'll need a delegate later for connecting to your target environment. Typically, the Connect through Harness Platform option is a quick way to make connections without having to use delegates.
Expand the section below to learn more about installing delegates.
Install a new delegate
In Delegates Setup, select Install new Delegate. The delegate wizard appears.
In the New Delegate dialog, in Select where you want to install your Delegate, select Kubernetes.
In Install your Delegate, select Kubernetes Manifest.
Enter a delegate name.
- Delegate names must be unique within a namespace and should be unique in your cluster.
- A valid name includes only lowercase letters and does not start or end with a number.
- The dash character (“-”) can be used as a separator between letters.
At a terminal, run the following cURL command to copy the Kuberntes YAML file to the target location for installation.
curl -LO https://raw.githubusercontent.com/harness/delegate-kubernetes-manifest/main/harness-delegate.yamlOpen the
harness-delegate.yamlfile. Find and specify the following placeholder values as described.Value Description PUT_YOUR_DELEGATE_NAMEName of the delegate. PUT_YOUR_ACCOUNT_IDHarness account ID. PUT_YOUR_MANAGER_ENDPOINTURL of your cluster. See the following table of Harness clusters and endpoints. PUT_YOUR_DELEGATE_TOKENDelegate token. To find it, go to Account Settings > Account Resources, select Delegate, and select Tokens. For more information on how to add your delegate token to the harness-delegate.yaml file, go to Secure delegates with tokens. Your Harness manager endpoint depends on your Harness SaaS cluster location. Use the following table to find the Harness manager endpoint in your Harness SaaS cluster.
Harness cluster location Harness Manager endpoint SaaS prod-1 https://app.harness.io SaaS prod-2 https://app.harness.io/gratis SaaS prod-3 https://app3.harness.io Install the delegate by running the following command:
kubectl apply -f harness-delegate.yamlThe successful output looks like this.
namespace/harness-delegate-ng unchanged
clusterrolebinding.rbac.authorization.k8s.io/harness-delegate-cluster-admin unchanged
secret/cd-doc-delegate-account-token created
deployment.apps/cd-doc-delegate created
service/delegate-service configured
role.rbac.authorization.k8s.io/upgrader-cronjob unchanged
rolebinding.rbac.authorization.k8s.io/upgrader-cronjob configured
serviceaccount/upgrader-cronjob-sa unchanged
secret/cd-doc-delegate-upgrader-token created
configmap/cd-doc-delegate-upgrader-config created
cronjob.batch/cd-doc-delegate-upgrader-job created
Select Verify to make sure that the delegate is installed properly.
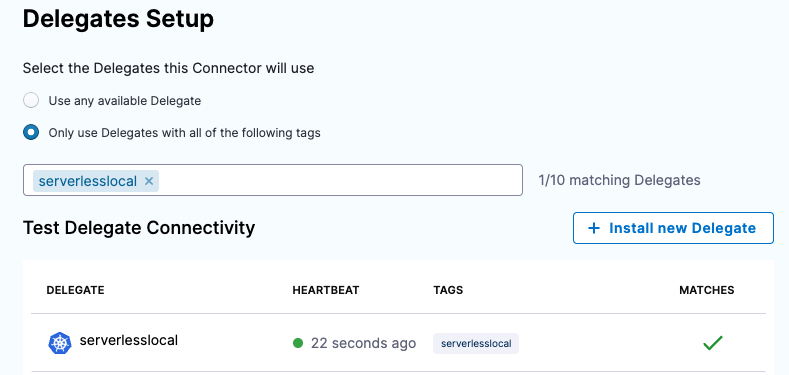
Back in Set Up Delegates, in the list of Delegates, you can see your new Delegate and its tags.
Select the Connect using Delegates with the following Tags option.
Enter the tag of the new Delegate and click Save and Continue.
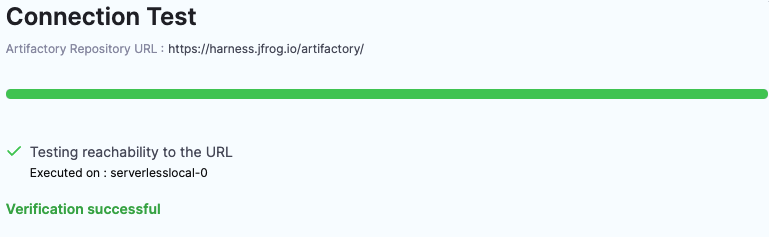
In Connection Test, you can see that the connection is successful. Click Finish.
Installing Serverless on the Delegate
Now we need to edit the YAML to install Serverless when the Delegate pods are created.
Open the Delegate YAML in a text editor.
Locate the Environment variable
INIT_SCRIPTin theStatefulSet(Legacy Delegate) orDeployment(Harness Delegate) object:...
- name: INIT_SCRIPT
value: ""
...Replace the value with the following Serverless installation script (the Harness Delegate uses the Red Hat Universal Base Image (UBI)).
Here's an example using microdnf and npm:
...
    - name: INIT_SCRIPT
    value: |-
        #!/bin/bash

        # Install Node.js and npm on the Red Hat UBI image using Microdnf
        microdnf install -y nodejs

        # Install the Serverless Framework using npm
        npm install -g serverless@2.50.0
...
Here's an example using yum and npm:
...
    - name: INIT_SCRIPT
    value: |-
        #!/bin/bash

        # Install Node.js and npm on the Red Hat UBI image
        yum install -y nodejs

        # Install the Serverless Framework using npm
        npm install -g serverless@2.50.0
...
In cases when the Delegate OS doesn't support apt (Red Hat Linux), you can edit this script to install npm. The rest of the code should remain the same. If you are using Harness Delegate, the base image is Red Hat UBI.Save the YAML file as harness-delegate.yml.
Add the artifact
Back in Artifactory Repository, click Continue.
Enter the following artifact settings and click Submit. The following image shows how the Artifactory settings correspond to Artifact Details.
- Repository:
lambda. - Artifact Directory:
serverless. - Artifact Details:
Value. - Artifact Path:
handler.zip. When you click one of the settings, the Delegate fetches artifact metadata from Artifactory.
- Repository:
Click Submit.
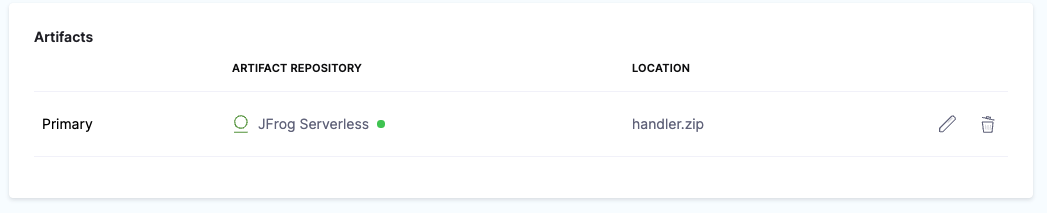
The artifact is now in the Service.
Click Continue to view the Infrastructure.
Now that you have configured the Service, we can define the target for our deployment.
Define the AWS deployment target
In Infrastructure, we'll add an AWS Connector to connect Harness with your Lambda service.
In Infrastructure Details, in Specify your environment, click New Environment. Just like with a Service, you can create a new Environment or select an existing one. We'll create a new one.
In New Environment, enter a name, select Pre-Production, and click Save. The new Environment appears.
In Infrastructure Definition, click AWS.
In Amazon Web Services Details, click in Connector.
In Create or Select an Existing Connector, click New Connector.
Enter the following and click Save and Continue.
- Name:
AWS Serverless. - Credentials:
AWS Access Key. Enter the AWS access key for the AWS User you created with the required policies in Before You Begin. - Enter the secret key as a Harness Text Secret. The Harness Delegate uses these credentials to authenticate Harness with AWS at deployment runtime.
- Delegates Setup:
Only use Delegates with all of the following tags. - Select the Delegate you added earlier in this quickstart.
- Name:
The Connection Test verifies the connection. Click Finish.
Back in Amazon Web Services Details, in Region, enter the region for your AWS Lambda service, such as us-east-1.
In Stage, enter the name of the stage in your service that you want to deploy to, such as dev. This is the same as the
--stageoption in theserverless deploycommand.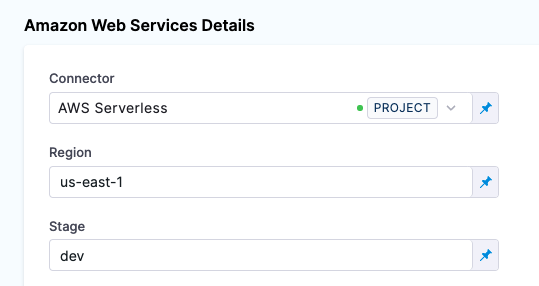
When you run your deployment, you'll see these settings used in the logs. For example:
serverless deploy list --stage dev --region us-east-1.Click Continue. The Execution steps appear.
Add a Serverless AWS Lambda Deploy step
In Execution, you add the steps that define how Harness deploys your Serverless Lambda service.
Harness automatically adds two Serverless Lambda steps to Execution:
- Serverless Lambda Deploy: this step performs the deployment.
- Serverless Lambda Rollback: this step performs a rollback in the event of a deployment failure. To see this step, toggle the Execution/Rollback setting.
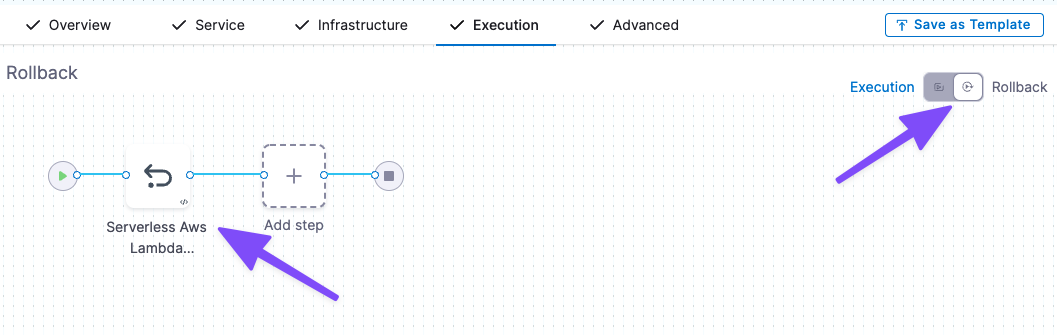
In Execution, click Serverless Lambda Deploy.
Click the Advanced tab and select the Delegate that you installed in Delegate Selector.
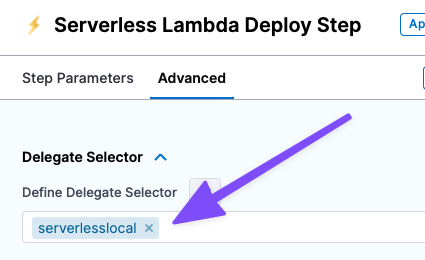
If you only have one Delegate installed in your Project, then this isn't necessary. But if you have multiple Delegates, you want to make sure the Serverless Lambda Deploy step uses the Delegate where you installed Serverless.
Click Apply Changes.
Now you're ready to deploy.
Serverless Deploy Command Options
In Serverless Deploy Command Options, you can add any serverless deploy command options. See the Serverless AWS - Deploy doc for the list of options.
In the deployment logs, you'll see the options added to the serverless deploy command.
For example, if you add --conceal in Serverless Deploy Command Options you'll see the following:
serverless deploy --stage dev --region us-east-1 --conceal
Deploy and review
Save your Pipeline and then click Run, and then Run Pipeline. The Pipeline executes.
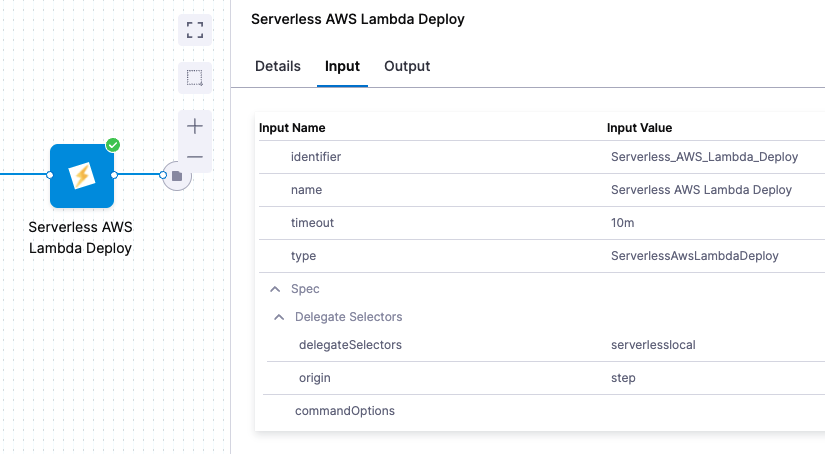
In the Serverless AWS Lambda Deploy step, click Input to see the deployment inputs:
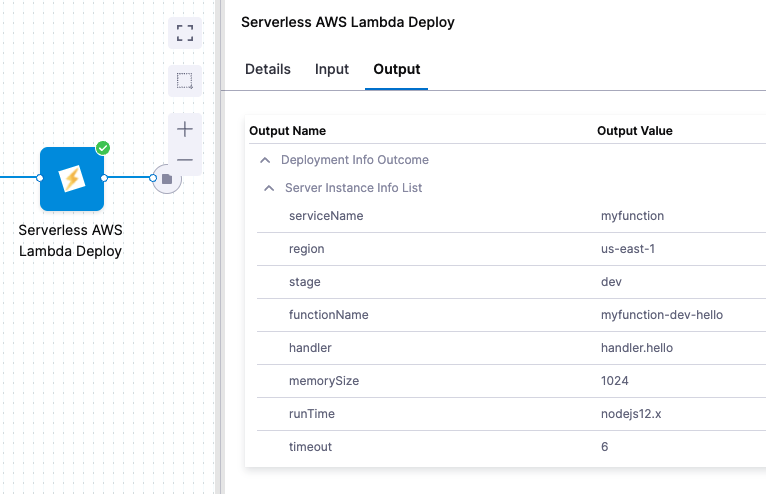
Click Output to see what's deployed:
Click Details or Console View to see the logs.
In the logs you can see the successful deployment.
Deploying..

Serverless Deployment Starting..
serverless deploy --stage dev --region us-east-1
Serverless: Deprecation warning: Support for Node.js versions below v12 will be dropped with next major release. Please upgrade at https://nodejs.org/en/
            More Info: https://www.serverless.com/framework/docs/deprecations/#OUTDATED_NODEJS
Serverless: Deprecation warning: Resolution of lambda version hashes was improved with better algorithm, which will be used in next major release.
            Switch to it now by setting "provider.lambdaHashingVersion" to "20201221"
            More Info: https://www.serverless.com/framework/docs/deprecations/#LAMBDA_HASHING_VERSION_V2
Serverless: Packaging service...
Serverless: Uploading CloudFormation file to S3...
Serverless: Uploading artifacts...
Serverless: Uploading service artifactFile file to S3 (721 B)...
Serverless: Validating template...
Serverless: Updating Stack...
Serverless: Checking Stack update progress...
.........
Serverless: Stack update finished...
Service Information
service: myfunction
stage: dev
region: us-east-1
stack: myfunction-dev
resources: 11
api keys:
  None
endpoints:
  GET - https://85h6zffizc.execute-api.us-east-1.amazonaws.com/tello
functions:
  hello: myfunction-dev-hello
layers:
  None

Deployment completed successfully.
Congratulations! You have successfully deployed a function using Serverless Lambda and Harness.
Clean up
For steps on deleting the Delgate, go to Delete a delegate.
Notes
Now that you're done the quickstart, here's some more information to help you extend your Harness Serverless Lambda deployments.
Serverless manifest supports Harness secrets and expressions
The serverless.yaml file you use with Harness can use Harness secret and built-in expressions.
Expression support lets you take advantage of Runtime Inputs and Input Sets in your serverless.yaml files. For example, you could use a Stage variable as a runtime input to change plugins with each stage deployment:
service: <+service.name>
frameworkVersion: '2 || 3'

provider:
  name: aws
  runtime: nodejs12.x
functions:
  hello:
    handler: handler.hello
    events:
      - httpApi:
          path: /tello
          method: get
package:
  artifact: <+artifact.path>
plugins:
  - <+stage.variables.devplugins>
See:
- Add and Reference Text Secrets
- Built-in Harness Variables Reference
- Run Pipelines using Input Sets and Overlays
Supported stores for Serverless Lambda YAML files
Harness can fetch your YAML files and packaged code from the following stores:
- AWS S3 buckets.
- You can store the serverless.yml and the artifact code in AWS S3, including in the same bucket.
- You can use the .Zip format to grab the serverless.yaml and the packaged code that has been bundled in .zip and published in S3.
- Harness will extrapolate the serverless.yaml file and use that for deployment.
- For S3, you use a Harness AWS Connector. The IAM role permissions required by Harness for S3 are described in AWS Connector Settings Reference.
- Git providers.
Rollback timestamps
In a Serverless CLI rollback (serverless rollback --timestamp timestamp), you'd have to manually identify and select the timestamp of the last successful deployment. This can be difficult because you need to know which timestamp to use. With multiple developers deploying, there's the possibility of rolling back to the wrong version.
Harness avoids this issue by automatically identifying the last successful deployment using its timestamp. During the event of a rollback, Harness will automatically rollback to that deployment.
You can see the timestamps in the deployment logs:
Serverless: Listing deployments:
Serverless: -------------
Serverless: Timestamp: 1653065606430
Serverless: Datetime: 2022-05-20T16:53:26.430Z
Serverless: Files:
Serverless: - compiled-cloudformation-template.json
Serverless: - myfunction.zip
Serverless: -------------
Serverless: Timestamp: 1653344285842
Serverless: Datetime: 2022-05-23T22:18:05.842Z
Serverless: Files:
Serverless: - artifactFile
Serverless: - compiled-cloudformation-template.json
Serverless: -------------
Serverless: Timestamp: 1653415240343
Serverless: Datetime: 2022-05-24T18:00:40.343Z
Serverless: Files:
Serverless: - artifactFile
Serverless: - compiled-cloudformation-template.json
If there is no change in code, Serverless doesn't deploy anything new. In the logs you'll see Serverless: Service files not changed. Skipping deployment....
While this is somewhat similar to how rollback is performed in Serverless CLI, Harness performs rollback automatically and always uses the timestamp of the last successful deployment.
During a Harness rollback, you can see the timestamp used to rollback to the last successful deployment (rollback --timestamp 1653415240343 --region us-east-1 --stage dev):
Rollback..

Serverless Rollback Starting..
serverless rollback --timestamp 1653415240343 --region us-east-1 --stage dev
Serverless: Deprecation warning: Support for Node.js versions below v12 will be dropped with next major release. Please upgrade at https://nodejs.org/en/
            More Info: https://www.serverless.com/framework/docs/deprecations/#OUTDATED_NODEJS
Serverless: Deprecation warning: Resolution of lambda version hashes was improved with better algorithm, which will be used in next major release.
            Switch to it now by setting "provider.lambdaHashingVersion" to "20201221"
            More Info: https://www.serverless.com/framework/docs/deprecations/#LAMBDA_HASHING_VERSION_V2
Serverless: Updating Stack...

Rollback completed successfully.
Versioning
Serverless Lambda deployments are versioned using the timestamp of their deployment. This versioning has no relation to the versioning in AWS Lambda.
Sidecar artifacts
You reference sidecar artifacts with the format <+artifacts.sidecars.[artifact_Id]>.
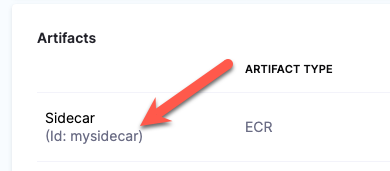
The artifact Id comes from the Artifact Details:
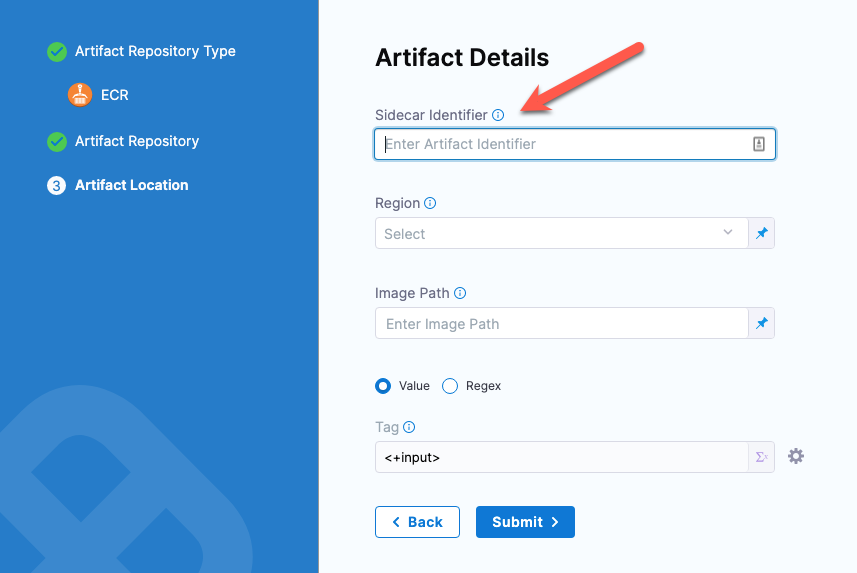
You can see it in the artifact list:
Docker sidecars
Here's an example of a serverless.yaml referencing primary and sidecar artifacts:
...
functions:
  hello:
    image: <+artifact.image>
  hello1:
    image: <+artifacts.sidecars.mysidecar>
...
Non-container sidecars
Here's an example of a serverless.yaml referencing primary and sidecar artifacts:
service: my-project-134fadsaez
frameworkVersion: '2.35.0'

provider:
  name: aws
  runtime: java8

package:
  artifact: <+artifact.path>

functions:
  currentTime:
    handler: com.serverless.Handler
    events:
      - httpApi:
          path: /time
          method: get
    layers:
      # Ref name is generated by TitleCasing the layer name & appending LambdaLayer
      - { Ref: CommonLibsLambdaLayer }

layers:
  commonLibs:
    package:
      artifact: <+artifacts.sidecars.mysidecar>
Plugin support
Harness supports Serverless plugins in your serverless.yaml file.
You simply add the plugin using the standard Serverless plugins format and Harness adds the plugin at runtime.
service: <+service.name>
frameworkVersion: '2 || 3'

provider:
  name: aws
  runtime: nodejs12.x
functions:
  hello:
    handler: handler.hello
    events:
      - httpApi:
          path: /tello
          method: get
package:
  artifact: <+artifact.path>
plugins:
  - serverless-deployment-bucket@latest
Serverless YAML for files and images
The serverless.yaml format for files (for example, ZIP, JAR, WAR) is different from the format for Docker images.
Serverless YAML for files
service: example-service
frameworkVersion: '2 || 3'

provider:
  name: aws
  runtime: nodejs12.x
functions:
  hello:
    handler: handler.hello
    events:
      - httpApi:
          path: /tello
          method: get
package:
  artifact: <+artifact.path>
plugins:
  - serverless-deployment-bucket@latest
Serverless YAML for Docker images
service: example-service
frameworkVersion: '2 || 3'

provider:
  name: aws

functions:
  hello:
    image: <+artifact.image>