Harness GitOps ApplicationSet and PR pipeline tutorial
Currently, this feature is behind the feature flags ENV_GROUP, NG_SVC_ENV_REDESIGN, and OPTIMIZED_GIT_FETCH_FILES MULTI_SERVICE_INFRA. Contact Harness Support to enable the feature.
This tutorial shows you how to create a GitOps ApplicationSet and PR Pipeline in Harness GitOps.
In this tutorial, we'll demonstrate two major use cases:
- We'll create an ApplicationSet defines one application and syncs it to multiple target environments.
- We'll create a Harness PR Pipeline to change the application in just one of the target environments.
New to ApplicationSets and PR Pipelines? Go to ApplicationSet and PR Pipeline Summary.
Before you begin
This tutorial extends Harness GitOps features covered the following topics:
Review these topics before proceeding.
Requirements
To perform this tutorial you'll need the following:
- 3 Kubernetes clusters with a minimum of 2 vCPUs, 8GB Memory, 100 GB disk size (for example the e2-standard-2 in GCP):
- 2 target clusters: the ApplicationSet will deploy an app to these 2 clusters.
- For this tutorial, we will name the clusters engineering-dev and engineering-prod.
We will use the Kubernetes default namespace for the applications, but you can use any namespace.
- For this tutorial, we will name the clusters engineering-dev and engineering-prod.
- 1 cluster for the Harness GitOps Agent. You can install the Agent in a cluster with or without an existing Argo CD project.
- 2 target clusters: the ApplicationSet will deploy an app to these 2 clusters.
- GitHub account. You will be cloning the Argo Project's ApplicationSet repo and using one of its examples.
Install the GitOps Agent
For steps on how to install a Harness GitOps Agent, go to Install a Harness GitOps Agent.
- Install the Agent in the Kubernetes cluster you have set up for your GitOps Agent, not the target dev or prod target clusters.
Ensure the Agent has access to Harness and to the other 2 target clusters. Once it's installed you'll see it register with Harness:
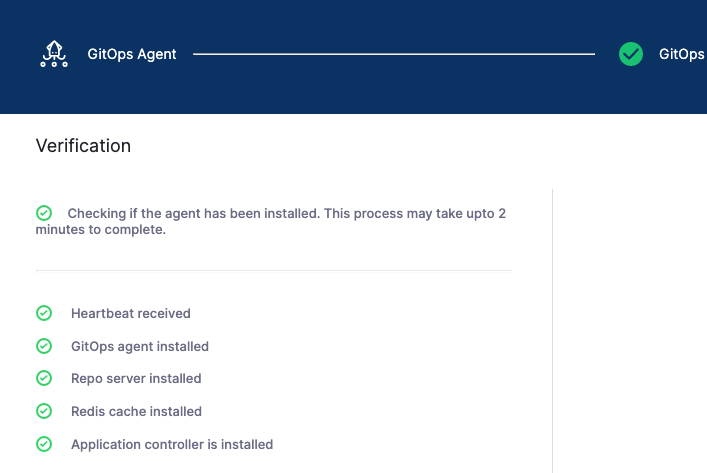
Mapped Harness Project: if you installed the Agent in a cluster without an existing Argo CD project, there will not be a mapping initially. Once you create a Harness GitOps entity using the Agent, such as a Cluster or Repo, Harness will automatically create the Argo CD project and map it to the Agent.
Add the GitOps Clusters
Now we'll add 3 GitOps Clusters in Harness:
- 1 GitOps Cluster for the cluster running your GitOps Agent.
- 1 GitOps Cluster for the cluster that will host the dev application.
- 1 GitOps Cluster for the cluster that will host the prod application.
GitOps Agent Cluster
In GitOps, click Settings, and then Clusters.
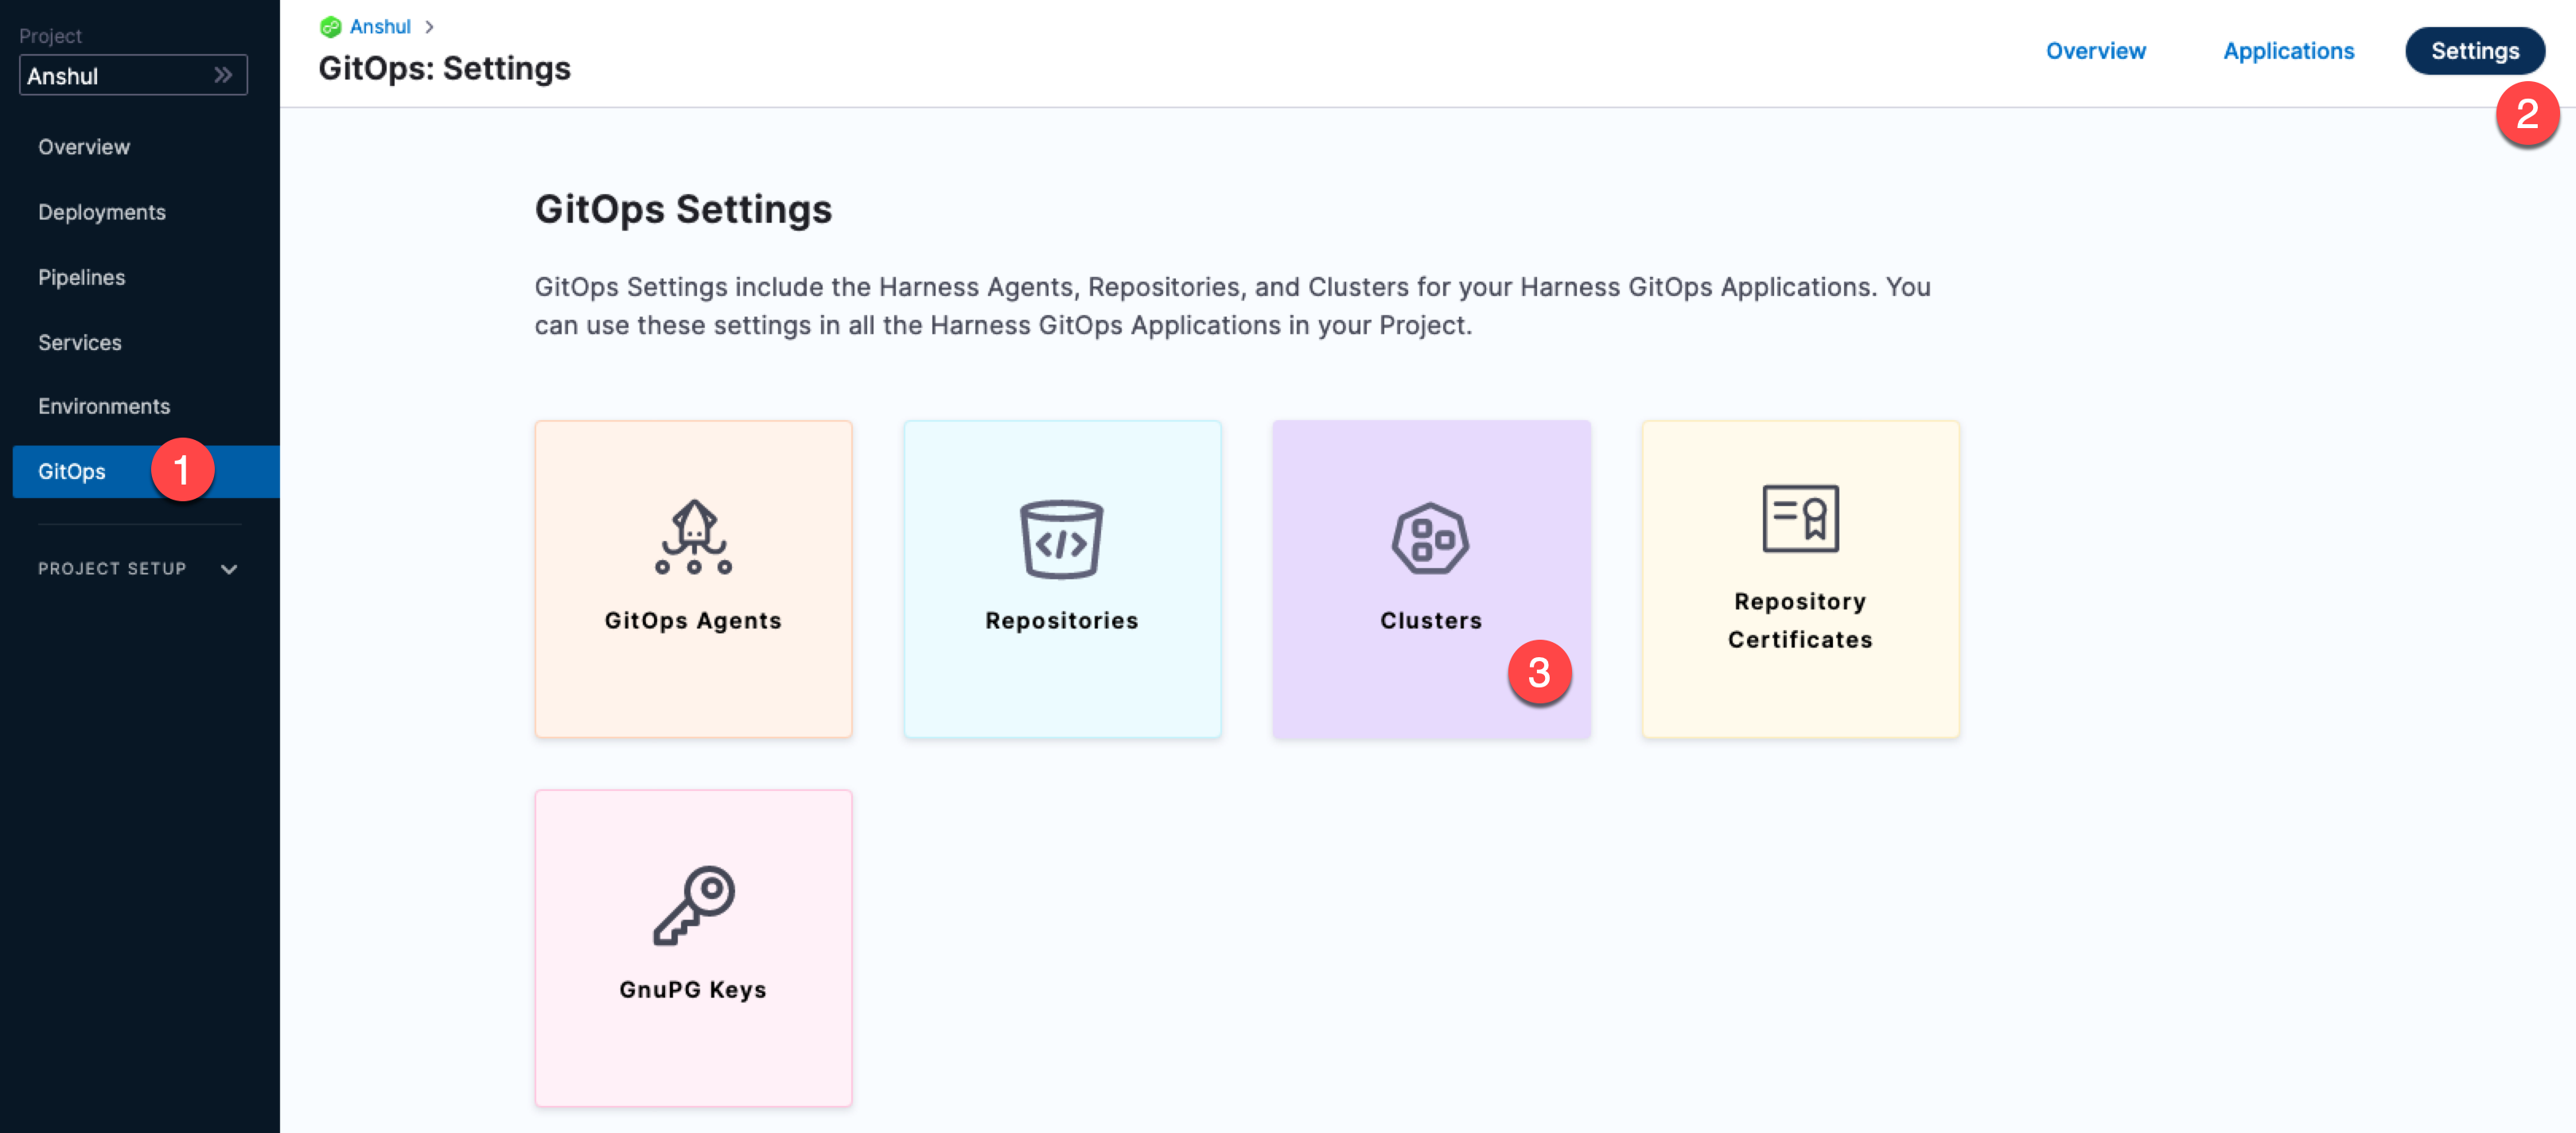
Click New Cluster.
In Name, enter the name appset-example.
In GitOps Agent, select the Agent you installed earlier.
Click Continue.
In Details, click Use the credentials of a specific Harness GitOps Agent.
Click Save and Continue. The connections is verified.
Click Finish.
Dev and Prod Application Clusters
We'll add Harness GitOps Clusters for the two target clusters where we want to add our application.
Create a new Harness GitOps Cluster for your dev cluster.
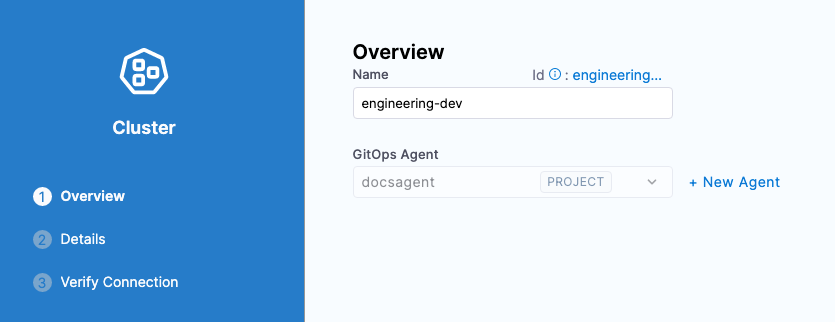
Name the cluster engineering-dev.
In GitOps Agent, select the GitOps Agent you added earlier.
In Details, select Specify Kubernetes Cluster URL and credentials.
In Master URL, enter the Endpoint URL for the target cluster (you can use
kubectl cluster-infoor your cloud console). Ensure that you use thehttps://scheme.Here's an example: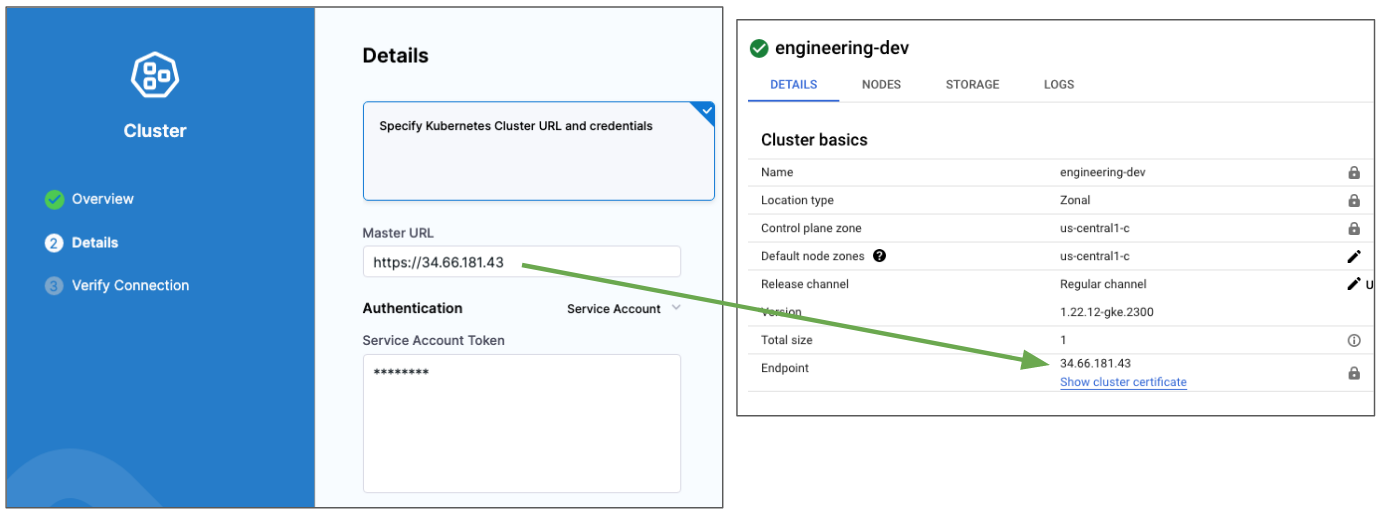
In Authentication, use the authentication method you prefer. In this tutorial, we use the
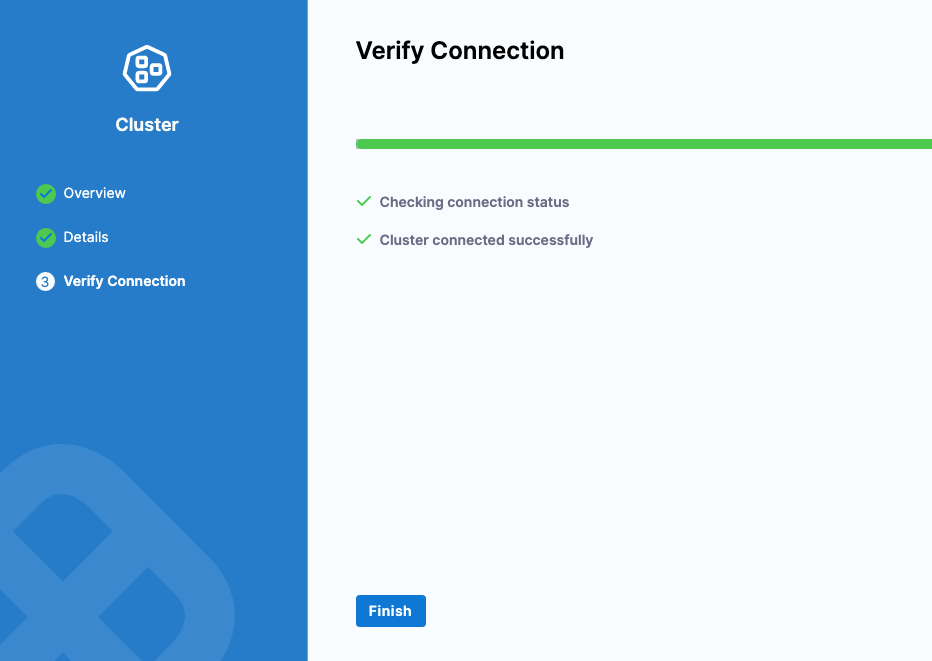
defaultnamespaceservice-accounttoken.Click Save and Continue. The GitOps Cluster is verified.
Click Finish.
Repeat the process for the Prod cluster.
- Name the cluster engineering-prod.
- Use the same Agent.
- For Master URL, ensure that you use the
https://scheme. - Use whatever authentication method you want.
When you're done, you will have three Harness GitOps Clusters: 1 for the GitOps Agent and two for the target clusters.

You might see a Warning status. This status simply indicates that nothing has been deployed to the cluster yet.
Clone and update the ApplicationSet repo
The repo and example we will use is located in the Argo Project's public ApplicationSet repo:
https://github.com/argoproj/applicationset/tree/master/examples/git-generator-files-discovery
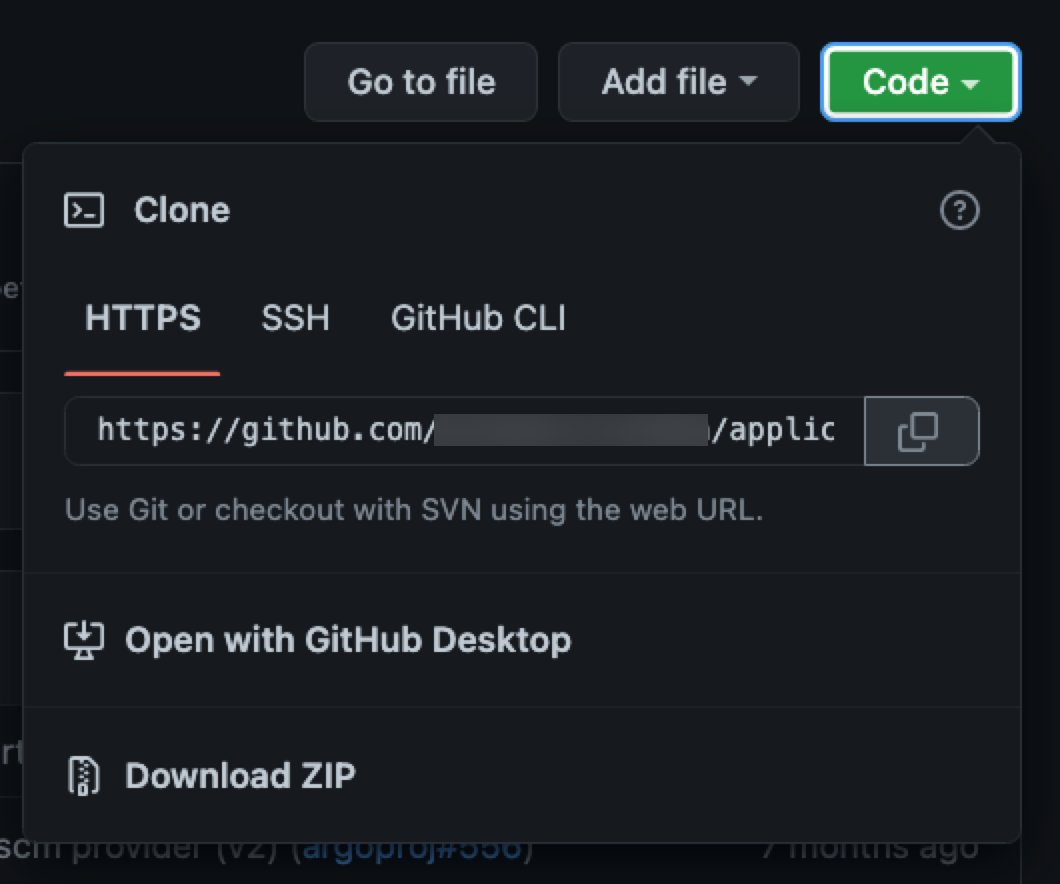
For a summary of this example, go to Argo CD docs. You will need to clone this repo into your GitHub account and then update 3 files.
- Clone the repo
https://github.com/argoproj/applicationset. - Navigate to
applicationset/examples/git-generator-files-discovery/git-generator-files.yaml. - Update
git-generator-files.yamlwith the following YAML keys/values:
apiVersion: argoproj.io/v1alpha1
kind: ApplicationSet
metadata:
  name: guestbook
spec:
  generators:
    - git:
        repoURL: https://github.com/<your account name>/applicationset.git
        revision: HEAD
        files:
        - path: "examples/git-generator-files-discovery/cluster-config/**/config.json"
  template:
    metadata:
      name: '{{cluster.name}}-guestbook'
    spec:
      project: <Harness GitOps Agent Project Id>
      source:
        repoURL: https://github.com/<your account name>/applicationset.git
        targetRevision: HEAD
        path: "examples/git-generator-files-discovery/apps/guestbook"
      destination:
        server: '{{cluster.address}}'
        namespace: default
      syncPolicy:
        automated: {}
Make sure you update the following:
Update
repoURL: https://github.com/argoproj/applicationset.gitwithrepoURL: https://github.com/<your account name>/applicationset.git.spec.template.spec.project: replacedefaultwith the Harness GitOps Agent Project Id.spec.template.spec.destination.server: replaceserver: https://kubernetes.default.svcwithserver: '{{cluster.address}}'.Add
syncPolicy.automated: {}tospec.template.spec.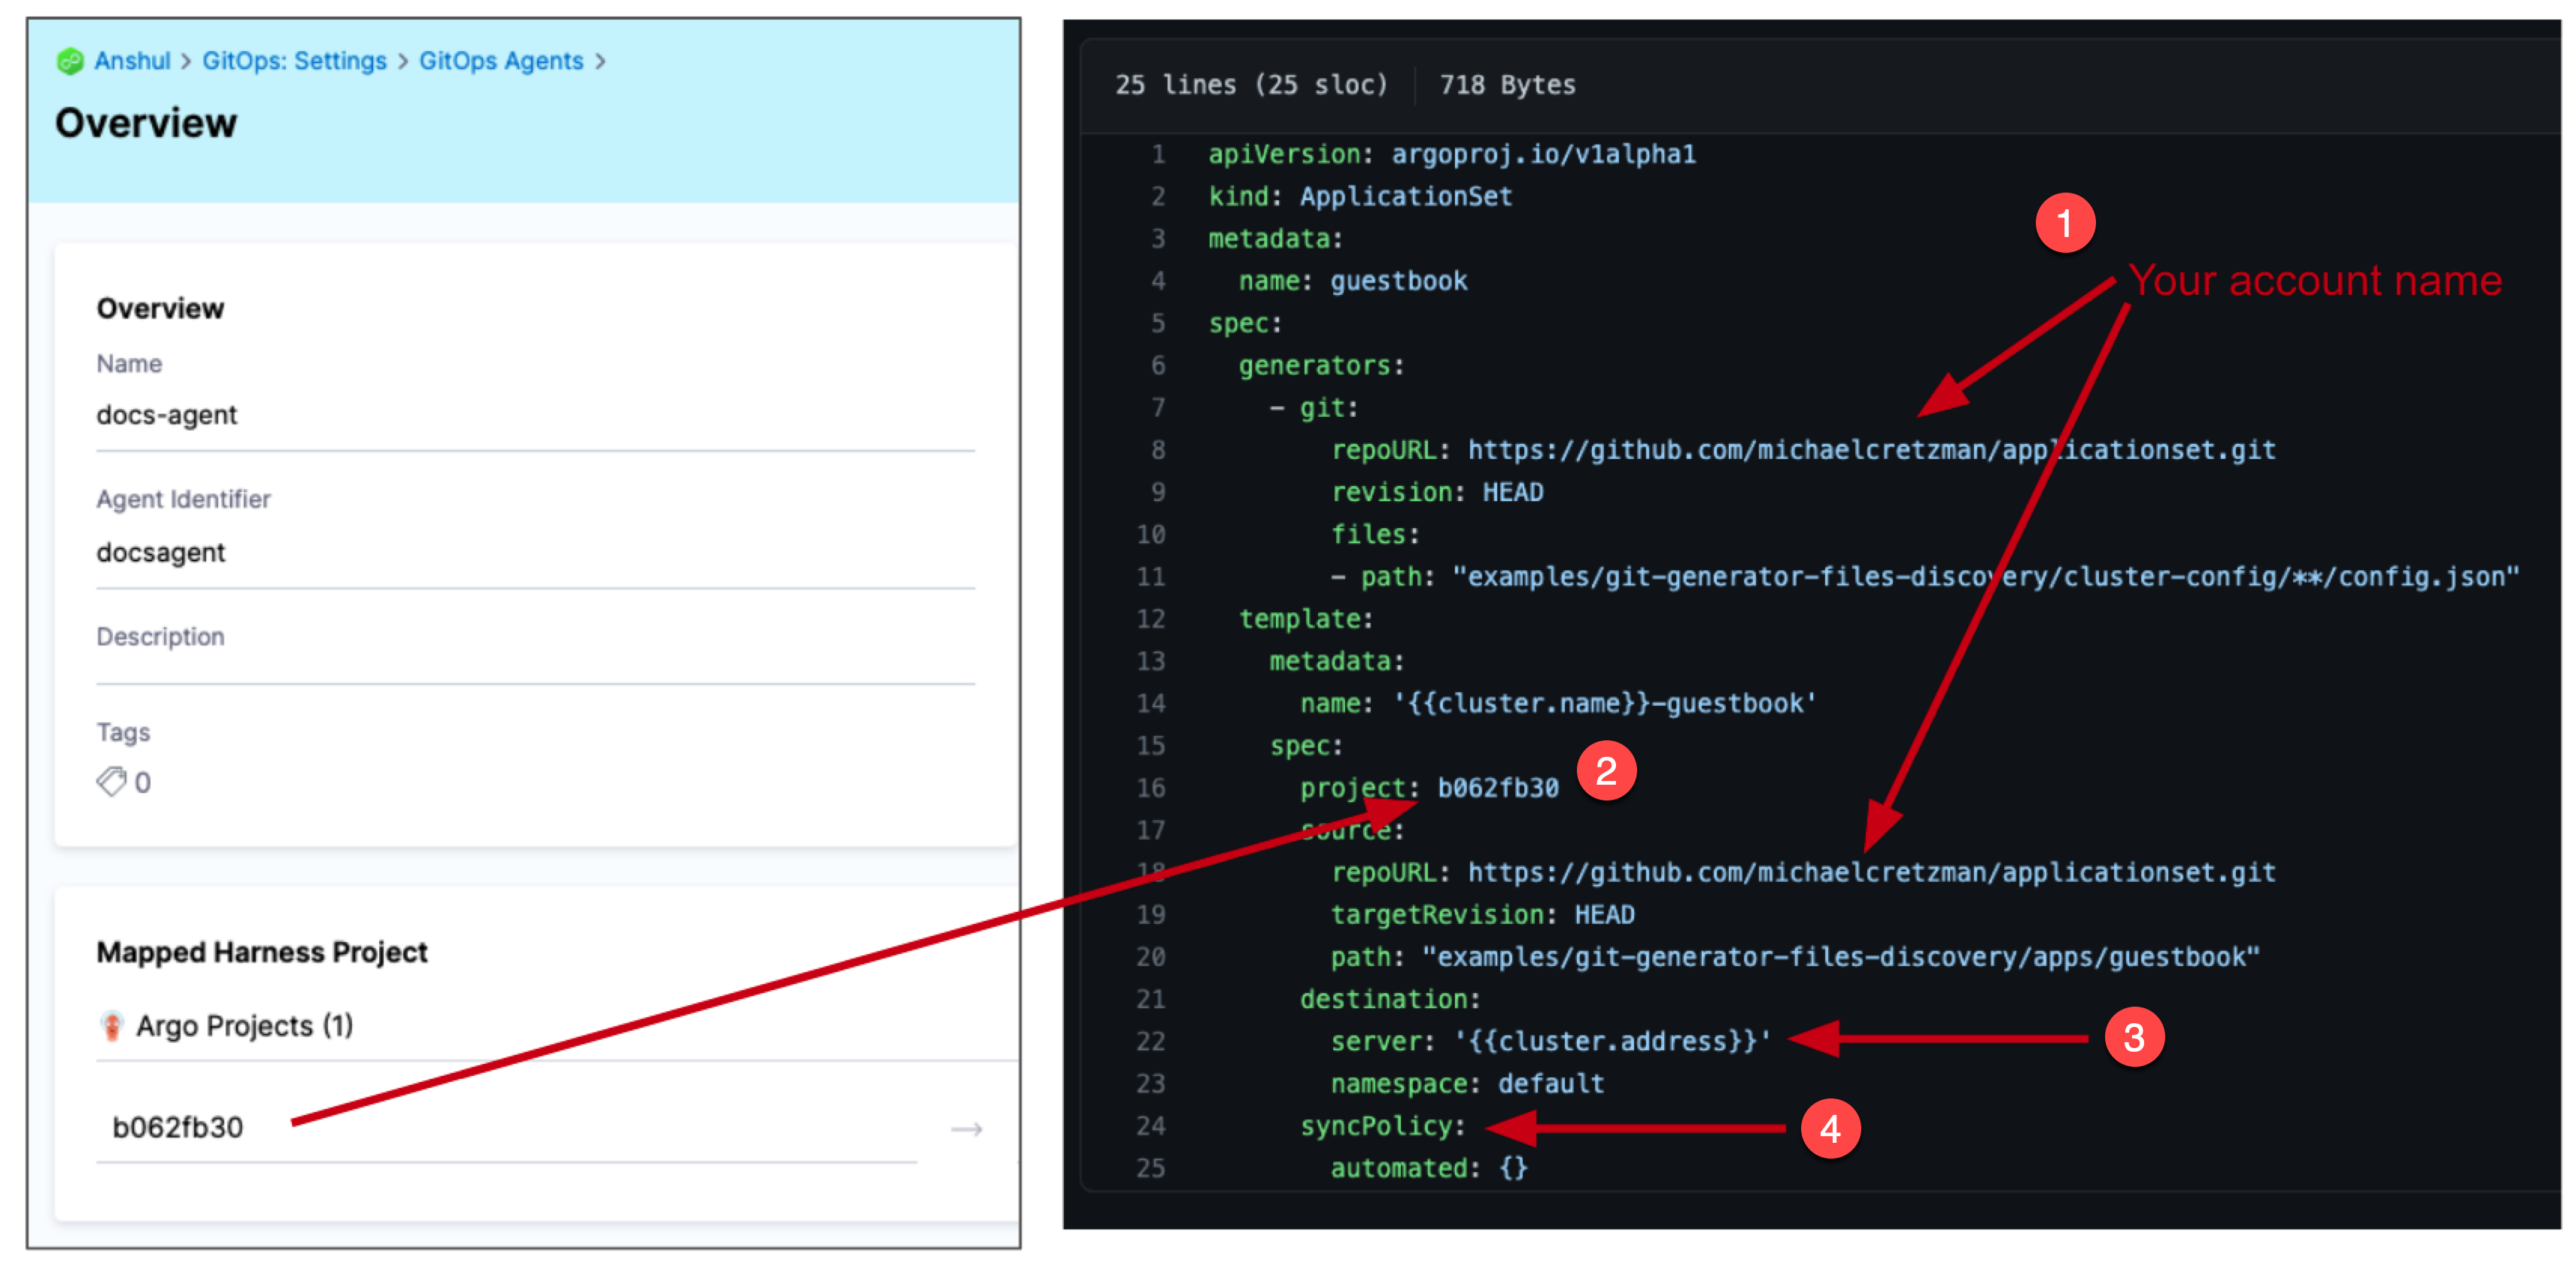
Save your changes.
Next, we'll update the config.json files for the two target clusters.
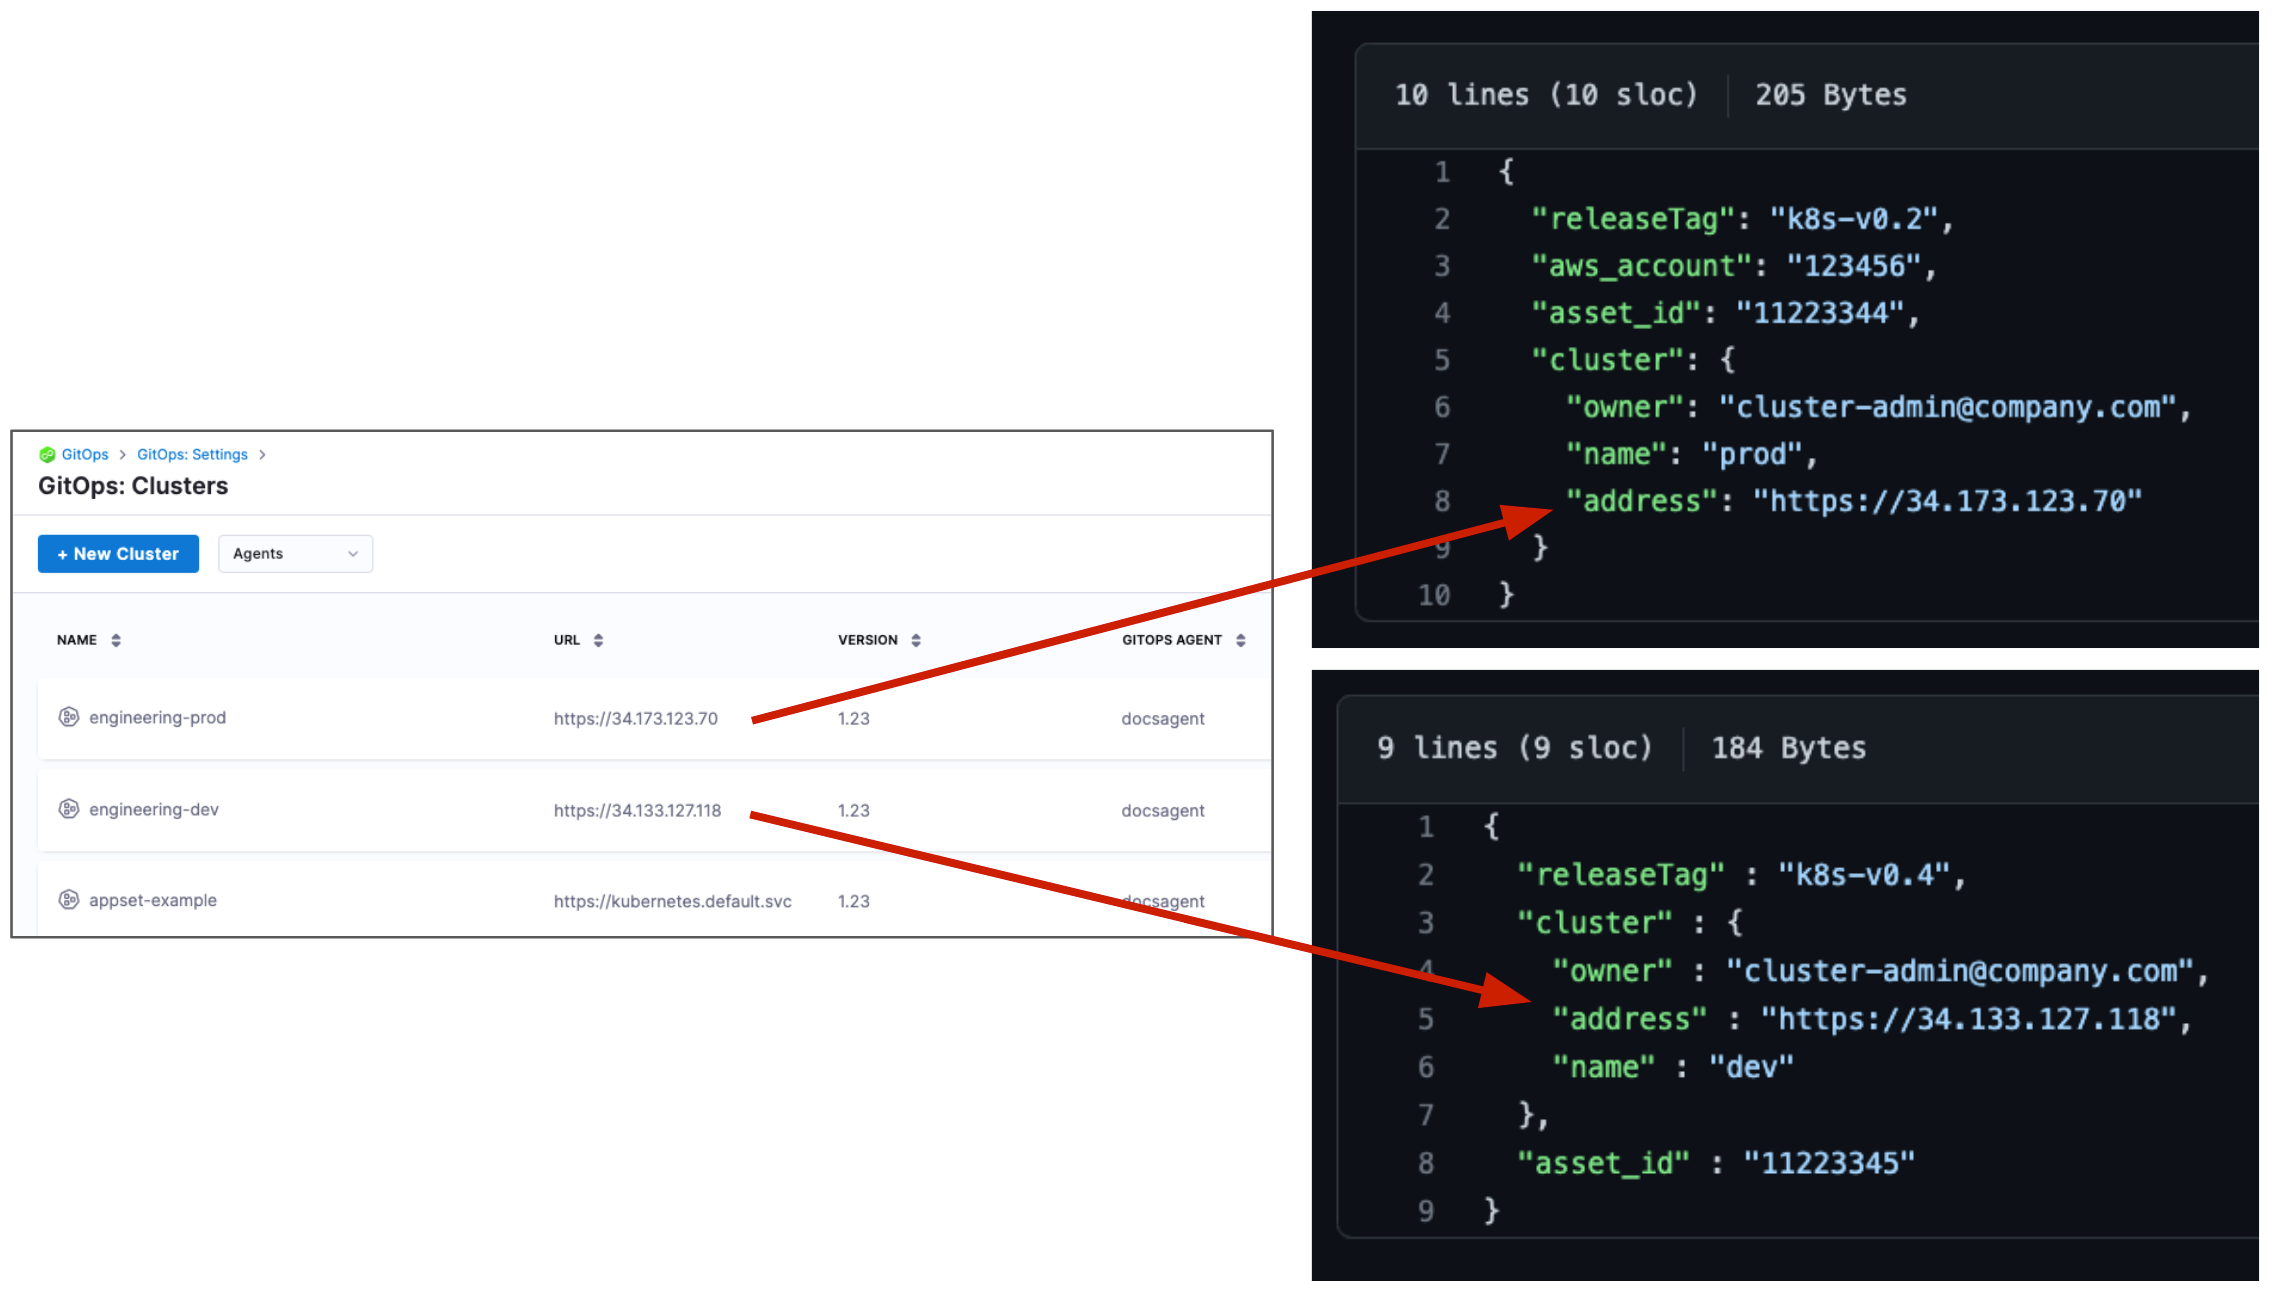
- Navigate to
applicationset/examples/git-generator-files-discovery/cluster-config/engineering/dev/config.json. - Replace
"address": "https://1.2.3.4"with the Endpoint IP address for the dev cluster. Ensure that you use thehttps://scheme. - Navigate to
applicationset/examples/git-generator-files-discovery/cluster-config/engineering/prod/config.json. - Replace
"address": "https://1.2.3.4"with the Endpoint IP address for the prod cluster. Ensure that you use thehttps://scheme.
Here's an example. Your IP addresses will be different.
Add the GitOps Repository
Let's add a Harness GitOps Repository for your ApplicationSet repo. Later, you'll select this GitOps Repository when you set up the Harness GitOps Application.
In your Harness Project, click GitOps, and then click Settings.
Click Repositories.
Click New Repository.
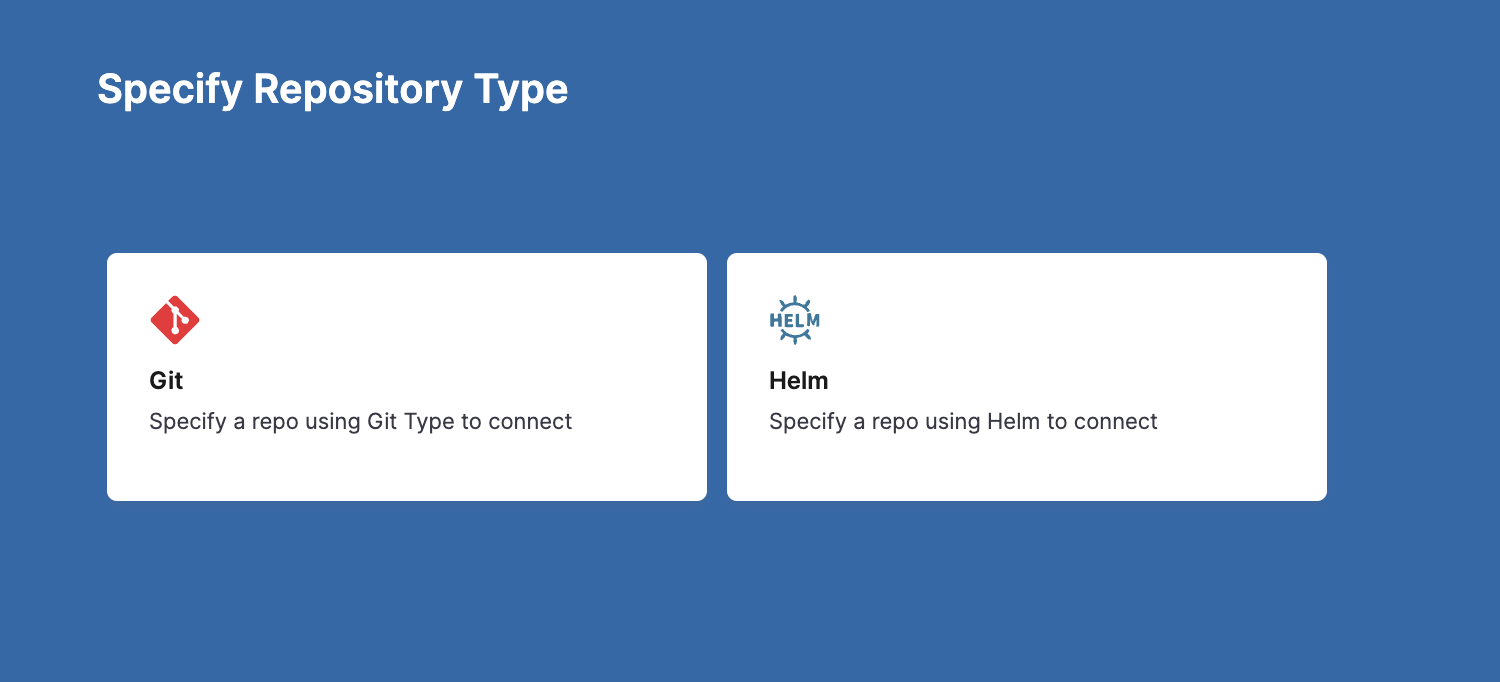
In Specify Repository Type, click Git.
Enter the following and click Continue.
- Repository Name: applicationset_examples.
- GitOps Agent: select the Agent you added earlier.
- Git Repository URL: the URL to your repo. You can simply copy and paste the HTTPS URL from GitHub.
- In Credentials, either user your GitHub credentials or, if your repo is public, select Anonymous in Authentication.
- Click Save & Continue.
Once the connection is verified, click Finish.
Now you can create the Harness GitOps Application using the Harness GitOps Agent, Clusters, and Repositories you have set up.
Create the Harness GitOps Application
Now that we have the Agent, Clusters, and Repo, we can create the GitOps Application.
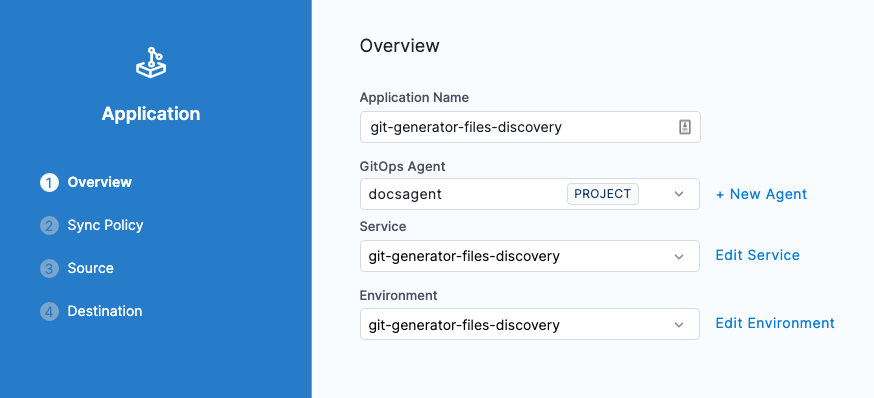
In GitOps, click Applications, and then click New Application.
Enter the following settings and then click Continue.
- Application Name: enter git-generator-files-discovery.
- GitOps Agent: select the Agent you added earlier.
- Service: create a new Service named git-generator-files-discovery.
- Environment: create a new Environment named git-generator-files-discovery.
- Select Pre-Production.
Leave the default Sync Policy settings, and click Continue.
In Source, enter the following settings and then click Continue.
- Repository URL: select the GitOps Repository you added earlier.
- Target Revision: select master.
- Path: enter examples/git-generator-files-discovery and click + to add it.

In Destination, enter the following settings and then click Finish.
- Cluster: select the Agent cluster appset-example.
- Namespace: enter default.
The GitOps Application is added. Now you can sync it.
Create a PR Pipeline
As noted earlier, when you deploy a Harness PR Pipeline, you simply indicate the target environment application and the config.json keys/values you want changed. Harness creates the pull request in your Git repo and merges it for you. Once complete, the target environment application has the new keys/values.
For the PR Pipeline, we'll create two Harness Environments, dev and prod. These names are the same as the folder names in the repo:
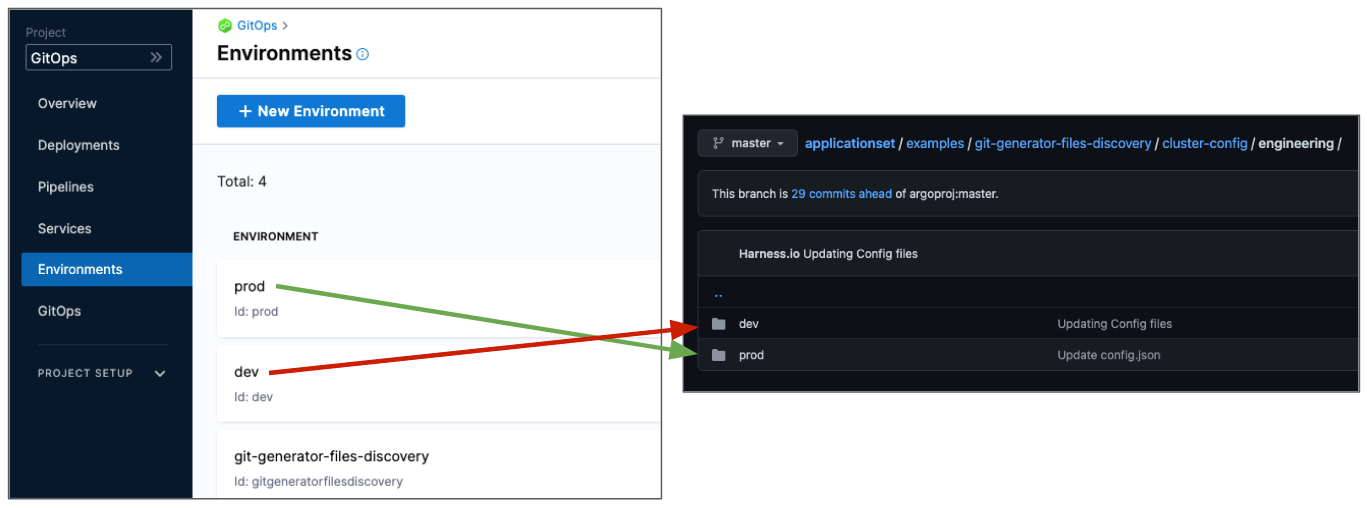
We use the same names so that when we select a Harness Environment we can pass along the same name as the target folder.
Next, we'll create a Harness Service that points to the config.json files in these directories.
The path to the config.json files in the Service will use the expression <+env.name>: examples/git-generator-files-discovery/cluster-config/engineering/<+env.name>/config.json.
At runtime, this expression resolves to the Harness Environment you selected.
When you run the Pipeline, you'll select which Environment to use, dev or prod, and Harness will use the corresponding repo folder and update that application only.
Create Harness Environments for each target environment
First, let's create the dev Environment.
- In your Harness Project, click Environments.
- Click New Environment.
- Enter the following and click Save:
- Name: dev.
- Environment Type: Pre-Production.
The new Environment is created.
Create Variable for JSON key:value
Next, we'll add a Variable for the JSON key:value we will be updating.
In Advanced, in Variables, click New Variable Override.
In Variable Name, enter asset_id and click Save.
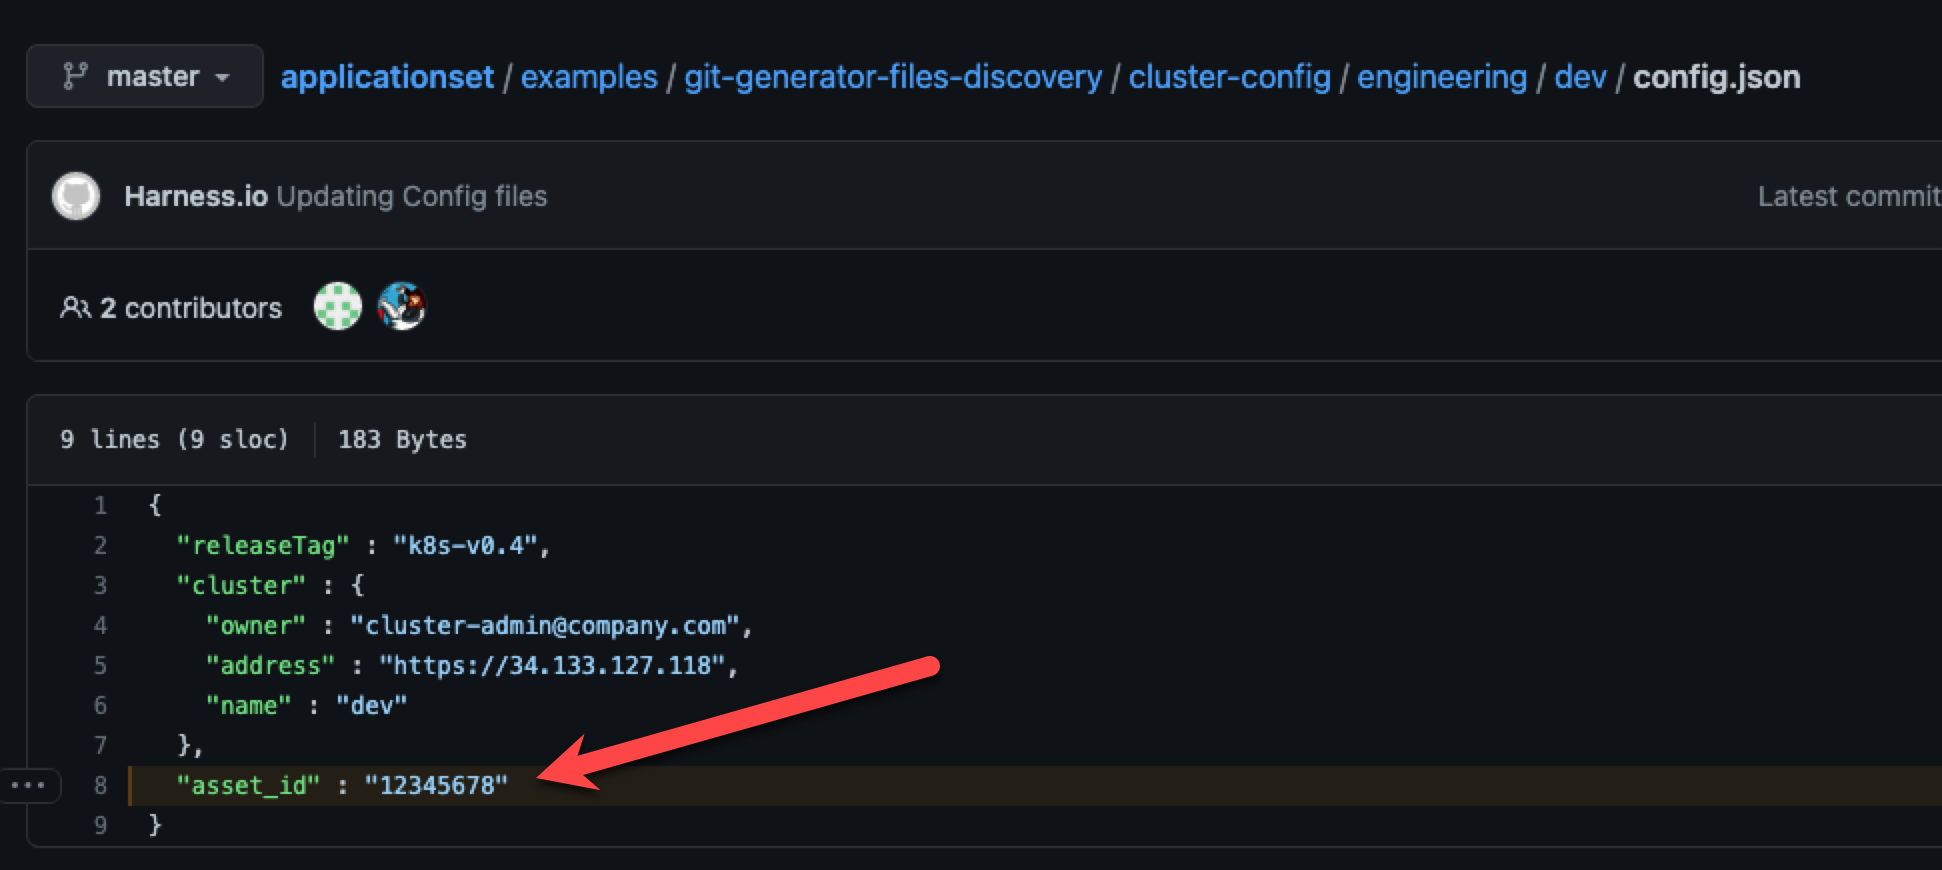
The
asset_idname is a key:value in the config.json files for both dev and prod: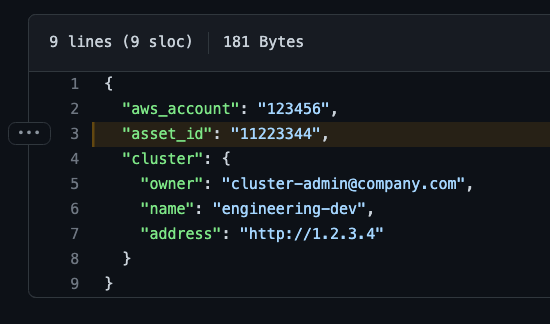
For the Variable Value, select Runtime Input:

Later, when you run the Pipeline, you'll provide a new value for this variable, and that value will be used to update the config.json file.
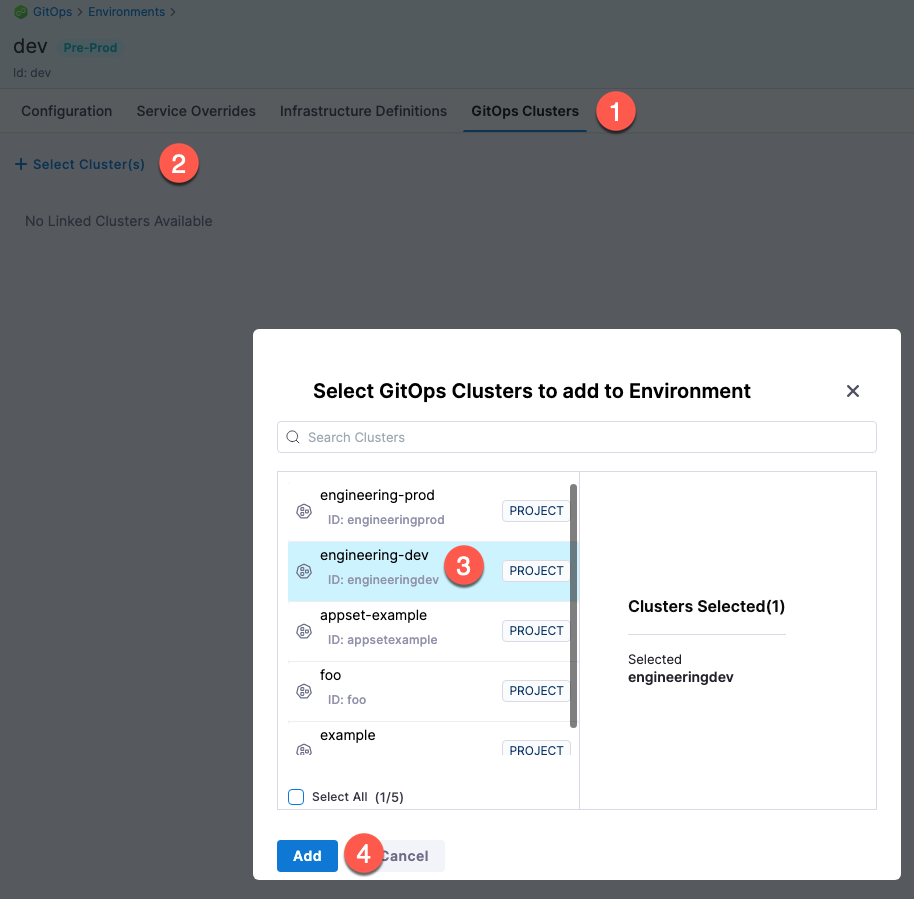
Select GitOps Clusters to add to Environment
Next, we'll link the GitOps Clusters for dev with the dev Environment. Once you link GitOps Clusters to an Environment, you can then select from an Environment's linked GitOps Clusters when you select the Environment in a Pipeline.
- Click GitOps Clusters.
- Click Select Cluster(s).
- Select engineering-dev.
- Click Add.
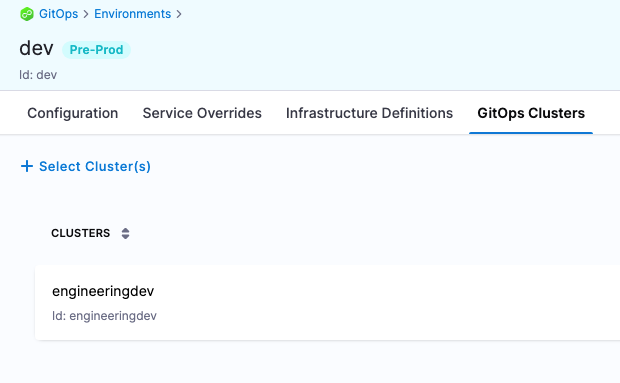
The GitOps Cluster is now linked to the Environment.
Repeat the process for the prod Environment
- Create a new Environment named prod.
- Add the same
asset_idVariable to the prod Environment. - Link the engineering-prod GitOps Cluster to the Environment.

Create the PR Pipeline
To create the Pipeline, we'll simply create a new Service that includes the manifest you want deployed and select the dev Environment you created earlier.
In your Harness Project, click Pipelines.
Click Create a Pipeline.
In Create new Pipeline, enter the name PR Pipeline, and then click Start.
Click Add Stage, and select Deploy.
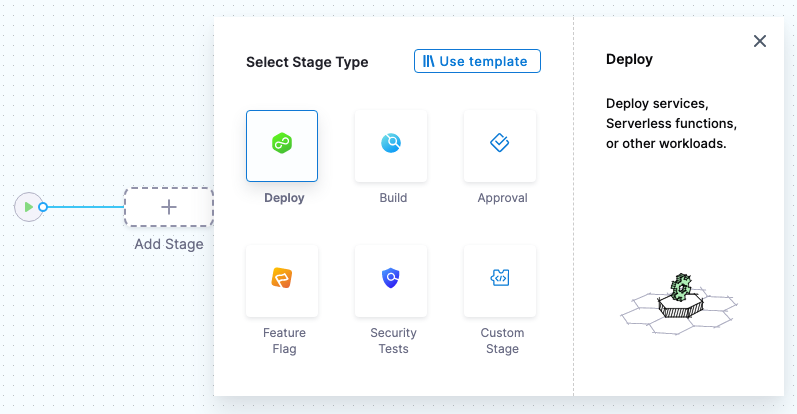
Enter the following and click Set Up Stage:
- Stage Name: enter PR Example.
- Deployment Type: select Kubernetes.
- Enable the GitOps option.
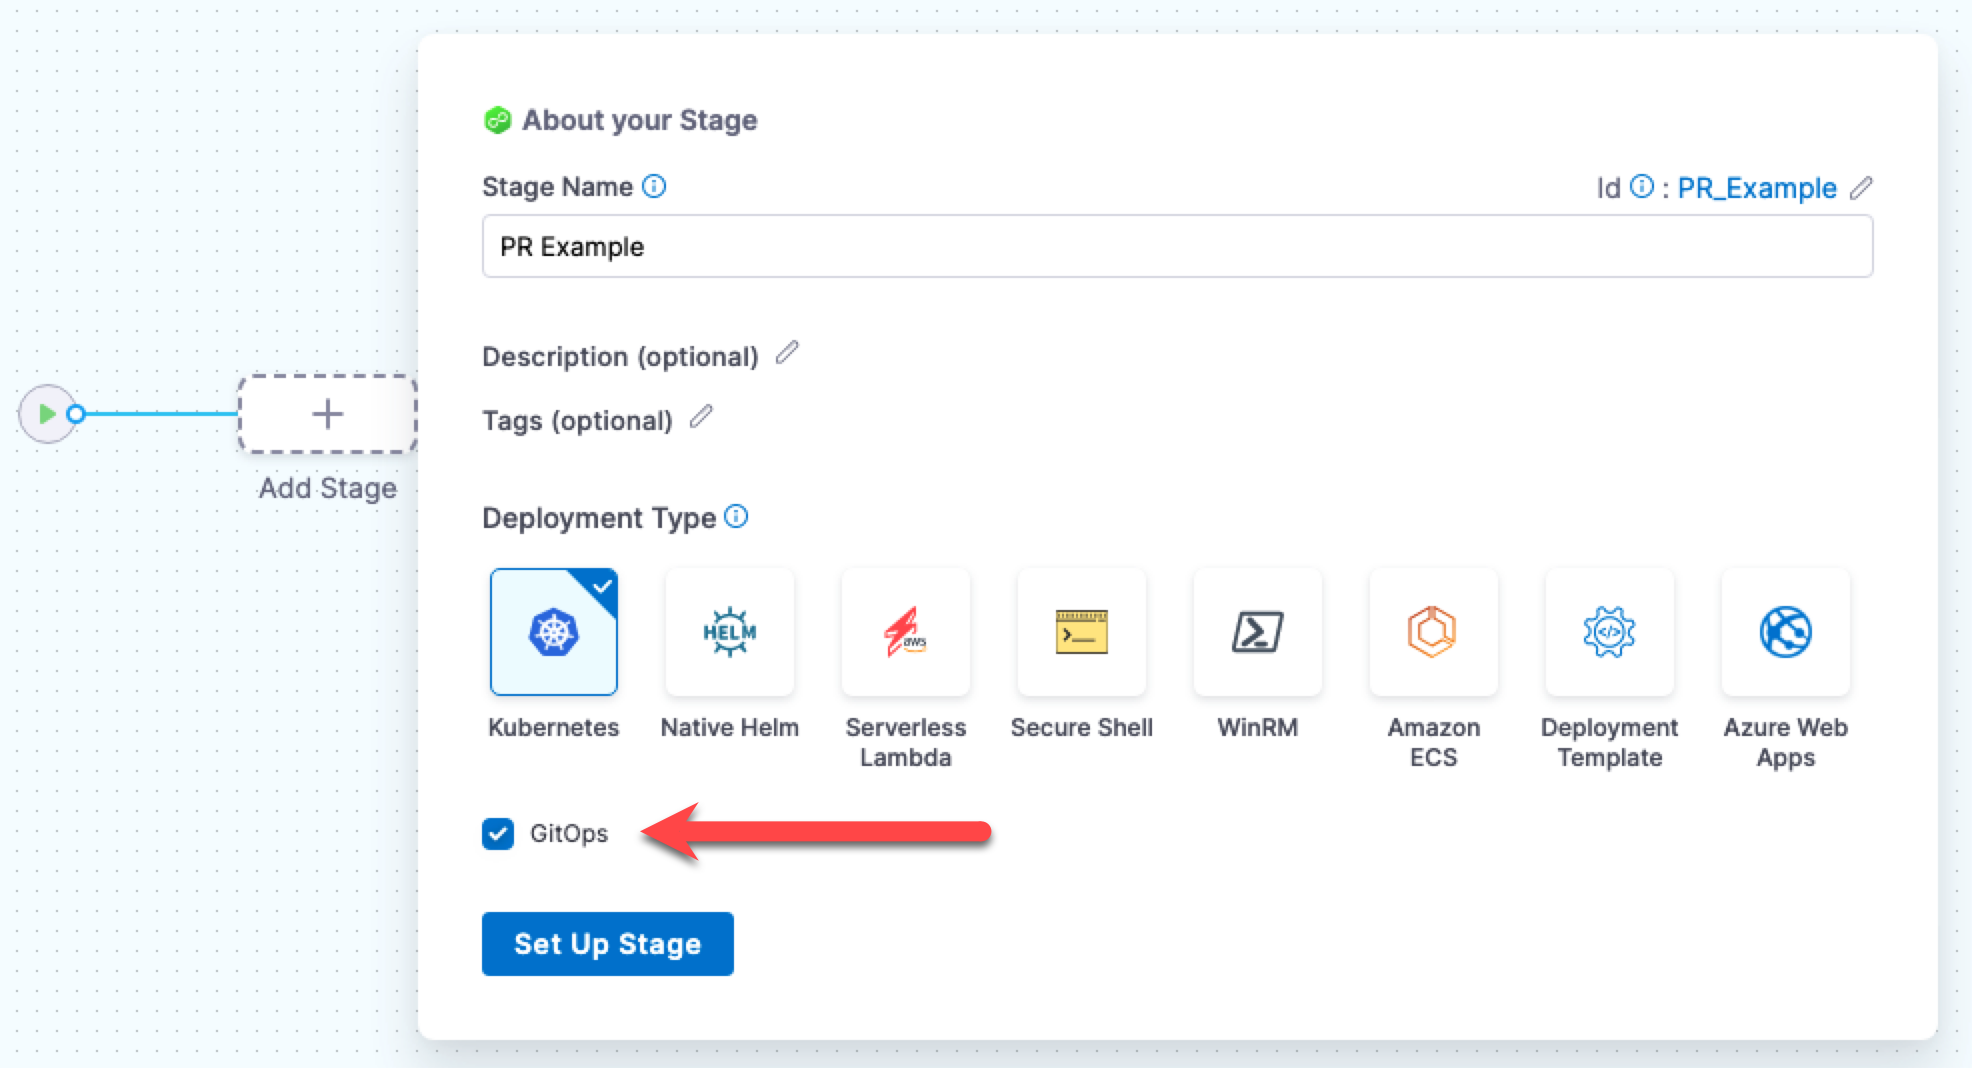
The stage is created and the Service settings appear.
Create the Service
The Harness Service represents what you're deploying. In this case, we're deploying a config.json file.
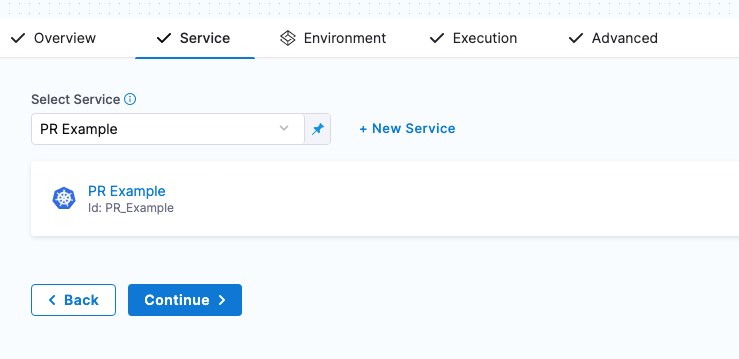
- In Select Service, click New Service.
- In Name, enter PR Example.
- In Manifests, click Add Release Repo Manifest.
- In Release Repo Store, select one of the following repositories.
- GitHub
- Bitbucket
Add a Github connector to configure the location from which Harness can pull the config.json file.
To add a Github connector:
In Github Connector, select New Github Connector.
Enter the following Github Connector settings:
Name: enter gitops-github.
URL Type: select Repository.
Connection Type: select HTTP.
GitHub Repository URL: enter the HTTP URL for repo you used for your ApplicationSet, such as
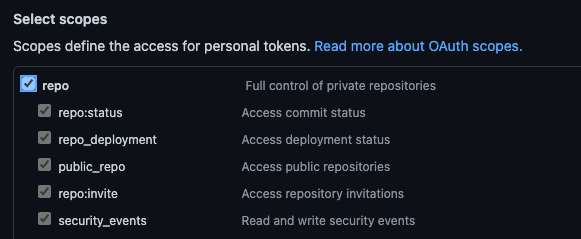
https://github.com/johnsmith/applicationset.git.Authentication: select Username and Token. For the Token, you'll need to use a Personal Access Token (PAT) from Github. If you are logged into Github, just go to https://github.com/settings/tokens.
Ensure the PAT has the repo scope selected.
You will store the PAT in a Harness Text Secret. For details on Secrets Management, go to Harness Secrets Management Overview.
Select Enable API access and use the same Harness Secret.
For more information, go to the GitHub connector settings reference.
Select Continue.
In Connect to the provider, select Connect through Harness Platform., and then click Save and Continue.
When the Connection Test in complete, click Continue.
Add a Bitbucket connector to configure the location from which Harness can pull the config.json file.
To add a Bitbucket connector:
In Bitbucket Connector, select New Bitbucket Connector.
Enter the following Bitbucket Connector settings:
Name: enter gitops-bitbucket-cloud.
URL Type: select Repository.
Connection Type: select HTTP.
GitHub Repository URL: enter the HTTP URL for repo you used for your ApplicationSet, such as
https://bitbucket.org/johnsmith/applicationset.git.Authentication: select Username and Token. For the Token, use a Personal Access Token (PAT) from Bitbucket. If you are logged into Bitbucket, go to HTTP access tokens. You must provide an account-level app password or token. Repo-level tokens are not supported.
Store the PAT in a Harness Text Secret. For details on Secrets Management, go to Harness Secrets Management Overview.
Select Enable API access and use the same Harness Secret.
For more information, go to Bitbucket connector settings reference.
Select Continue.
In Connect to the provider, select Connect through Harness Platform, and then click Save and Continue.
After the Connection Test is complete, click Continue.
Specify manifest details
Now we'll define the manifest to use for the PR Pipeline. We'll use the path to the config.json files. We'll use the expression <+env.name> in the path so that we can dynamically select the path based on the Harness Environment we select: dev or prod.
In Manifest Details, enter the following settings and then click Submit.
- Manifest Name: enter config.json.
- Git Fetch Type: select Latest from Branch.
- Branch: enter the name of the main branch (master, main, etc).
- File Path: enter
examples/git-generator-files-discovery/cluster-config/engineering/<+env.name>/config.json.
Note the use of
<+env.name>.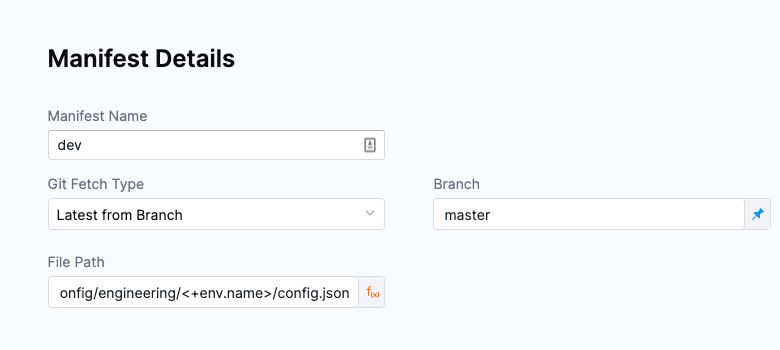
Back in New Service, click Save.
The Service is added to the Pipeline.
Click Continue to add the Environment.
Add Environment Runtime Input
For the stage Environment, we'll use a Runtime Input. When you run the Pipeline, Harness will prompt you for a value for the Environment. You can select the Environment you want to use for the PR.
Set Specify environment or environment group as a Runtime Input.
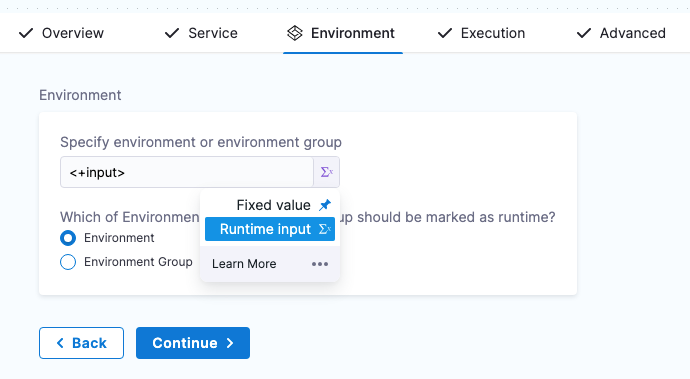
Click Continue.
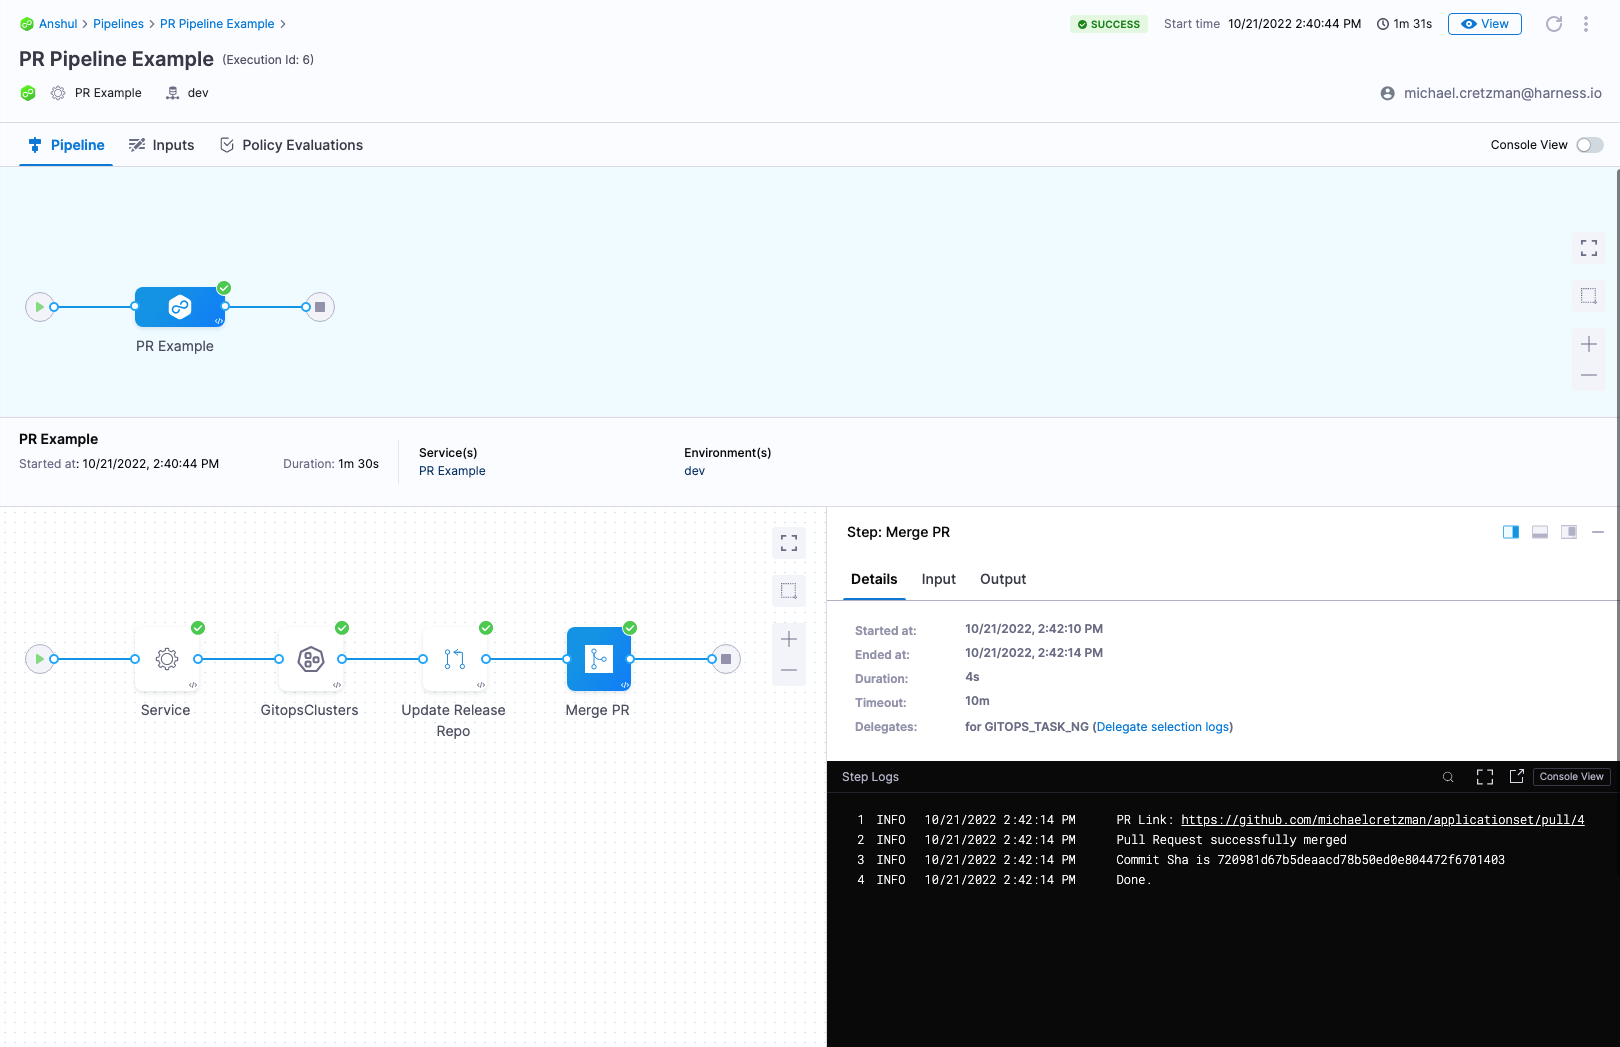
Review Execution steps
In Execution, Harness automatically adds the following steps:
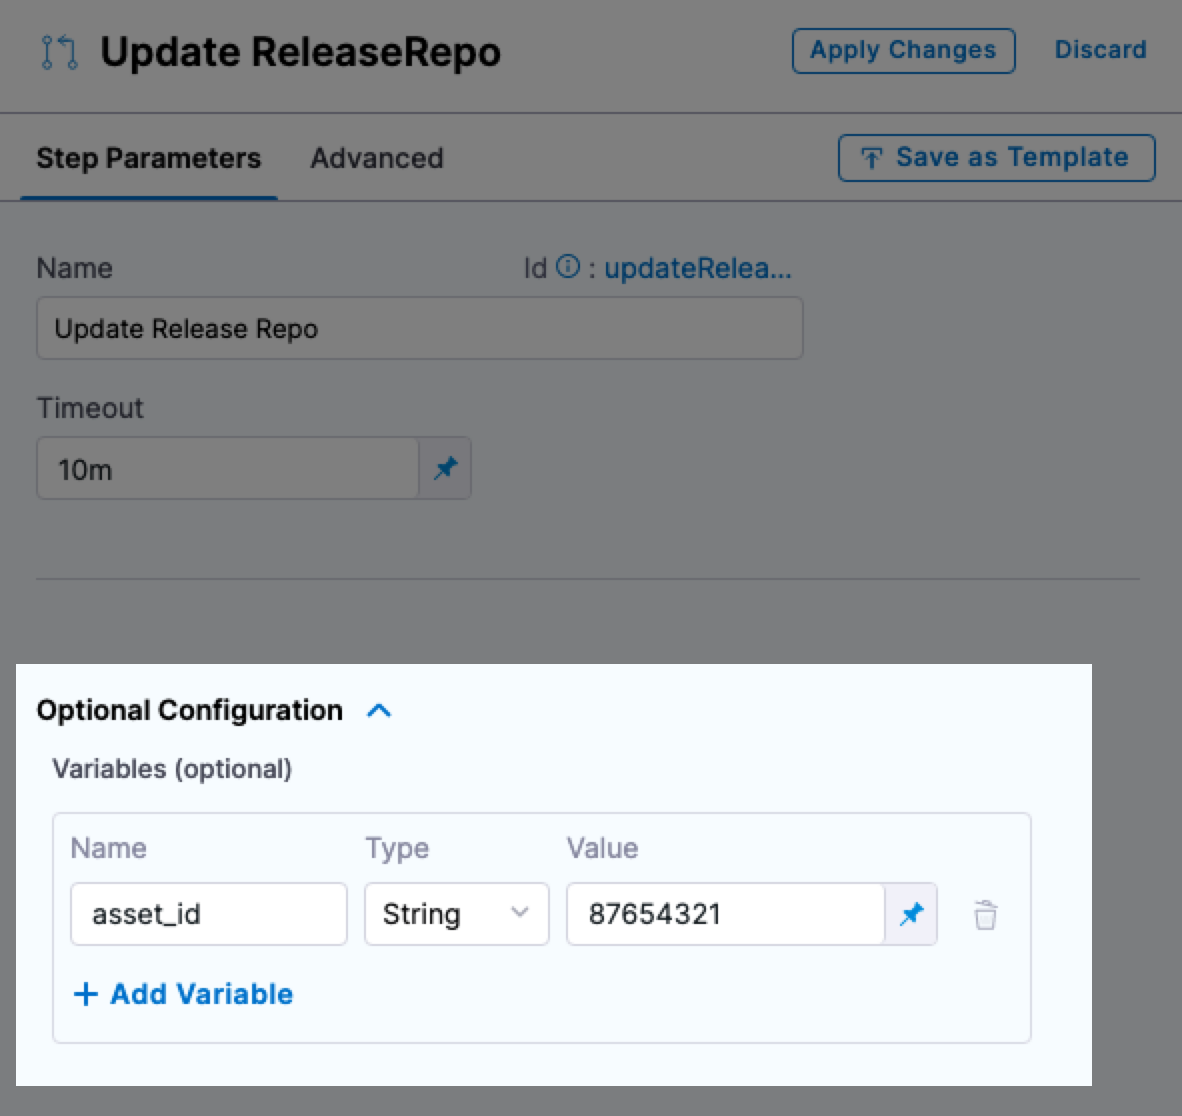
Update Release Repo: This step fetches your JSON files, update them with your changes, Commit and Push, and then create the PR.
There is an option to provide a custom PR title. If you don't provide a PR title, Harness creates the PR with the title Harness: Updating config overrides.This step supports hierarchical variables. If you specify a dot-separated variable in this step, it creates or updates a nested variable.
You can also enter variables in this step to update key:value pairs in the config file you are deploying.
If there is a matching variable name in the variables of the Service or Environment used in this Pipeline, the variable entered in this step will override them.If an empty or blank value is provided for a variable, it will be disregarded, and no updates will be made to the JSON or YAML file for that specific variable.
Merge PR: Merges the new PR.
Revert PR: Reverts the commit passed and creates a new PR. Use this step if you want to run any tests or automation on the pipeline and then revert the commit done by the Update Release Repo step.
The Revert PR step uses the commitId of the Update Release Repo step as input. The commitId can be an expression, runtime input, or a static value. For example,
<+pipeline.stages.deploy.spec.execution.steps.updateReleaseRepo.updateReleaseRepoOutcome.commitId>.The Revert PR step creates a new branch and creates a commit to revert the changes done in the Update Release Repo step commit.
You can create another Merge PR step to merge the Revert PR step.
LimitationYou can create a maximum of two Merge PR steps in a stage.
You don't have to edit anything in these steps.
Run and verify the PR Pipeline
Now your PR Pipeline is ready.
Click Save, and then click Run.
In Run Pipeline, in Specify Environment, select the dev Environment.
In Environment Variables, for asset_id, enter the value
12345678.In Specify GitOps Clusters, select the engineeringdev cluster.
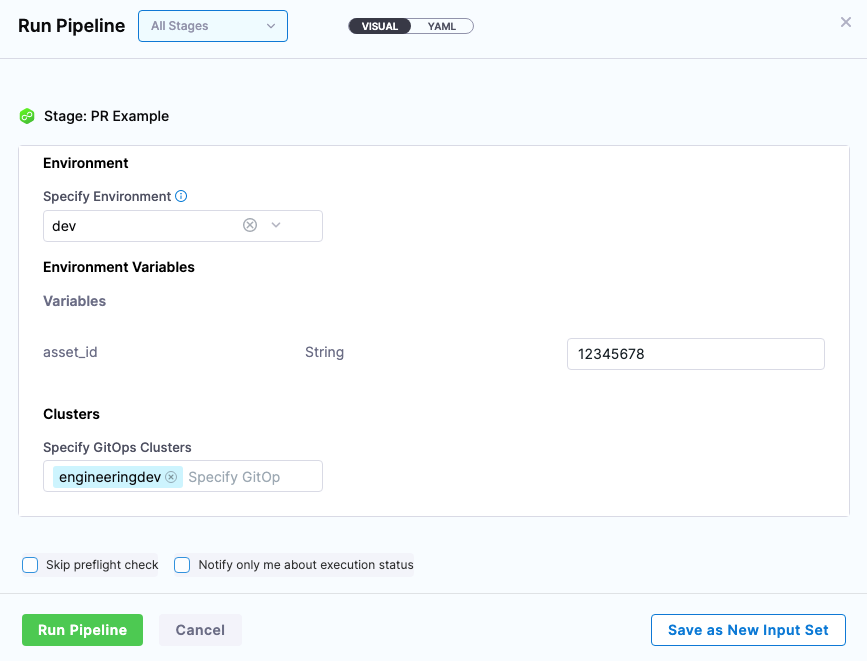
Click Run Pipeline.
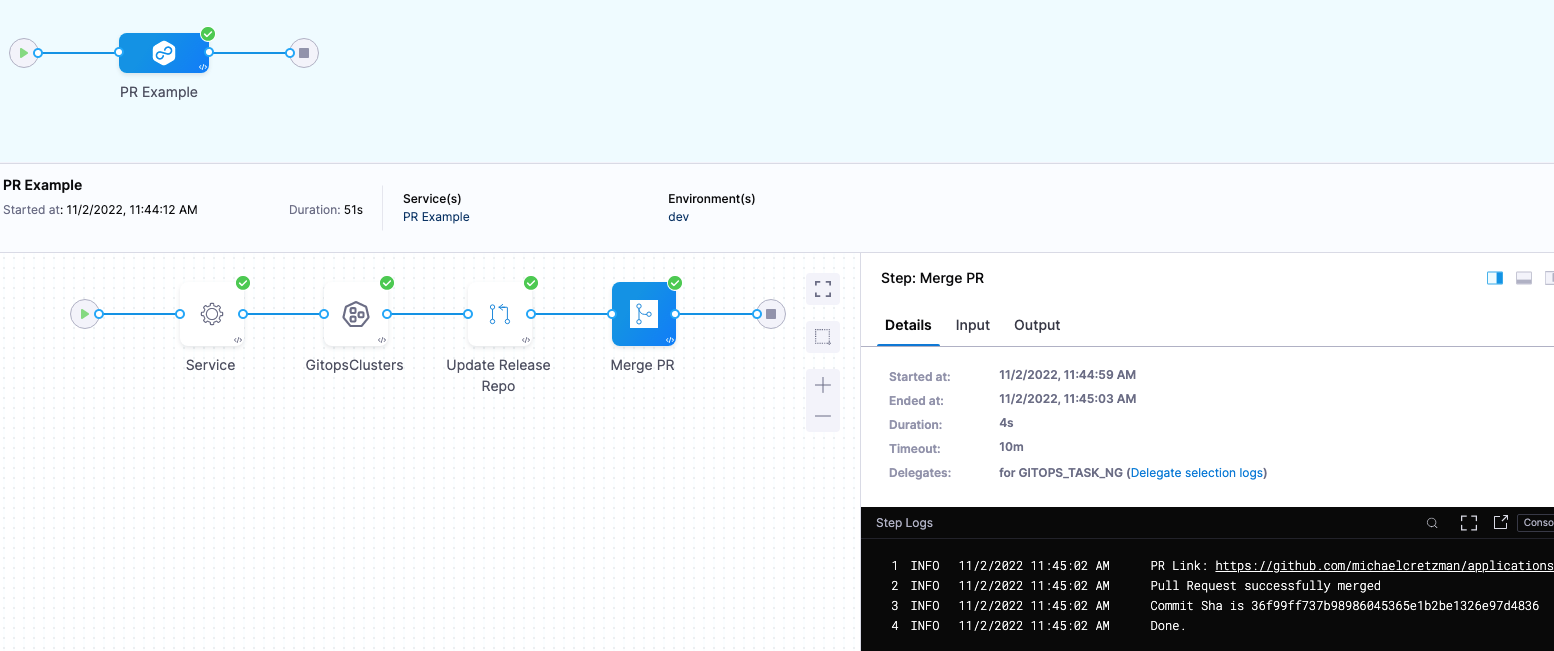
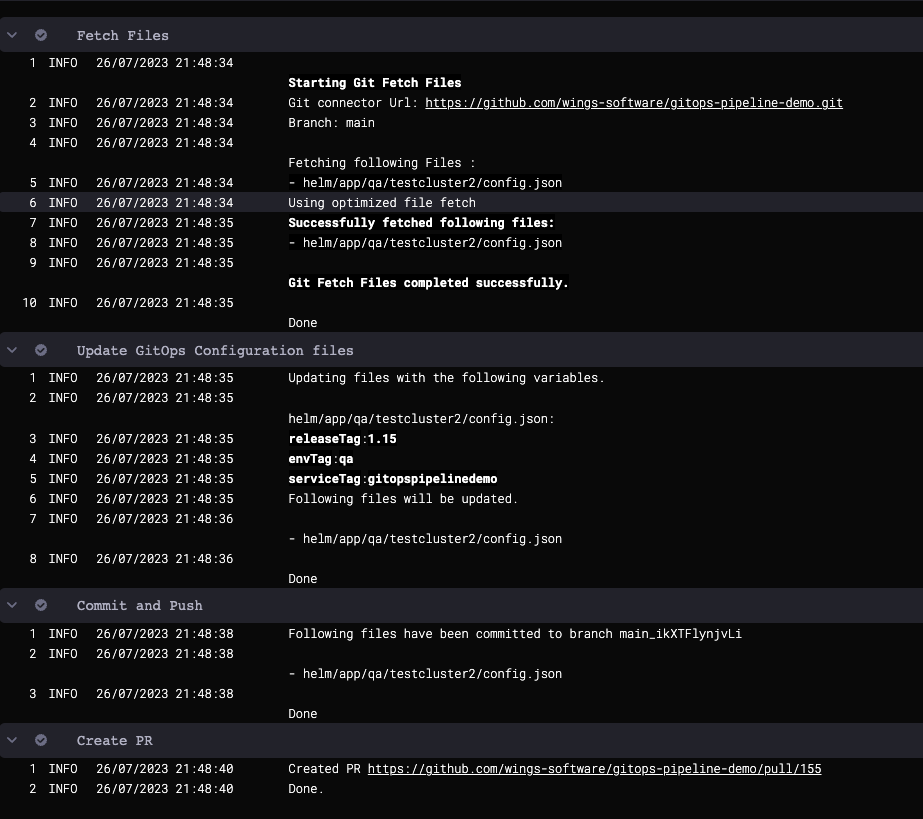
You can review the deployment steps in real-time.
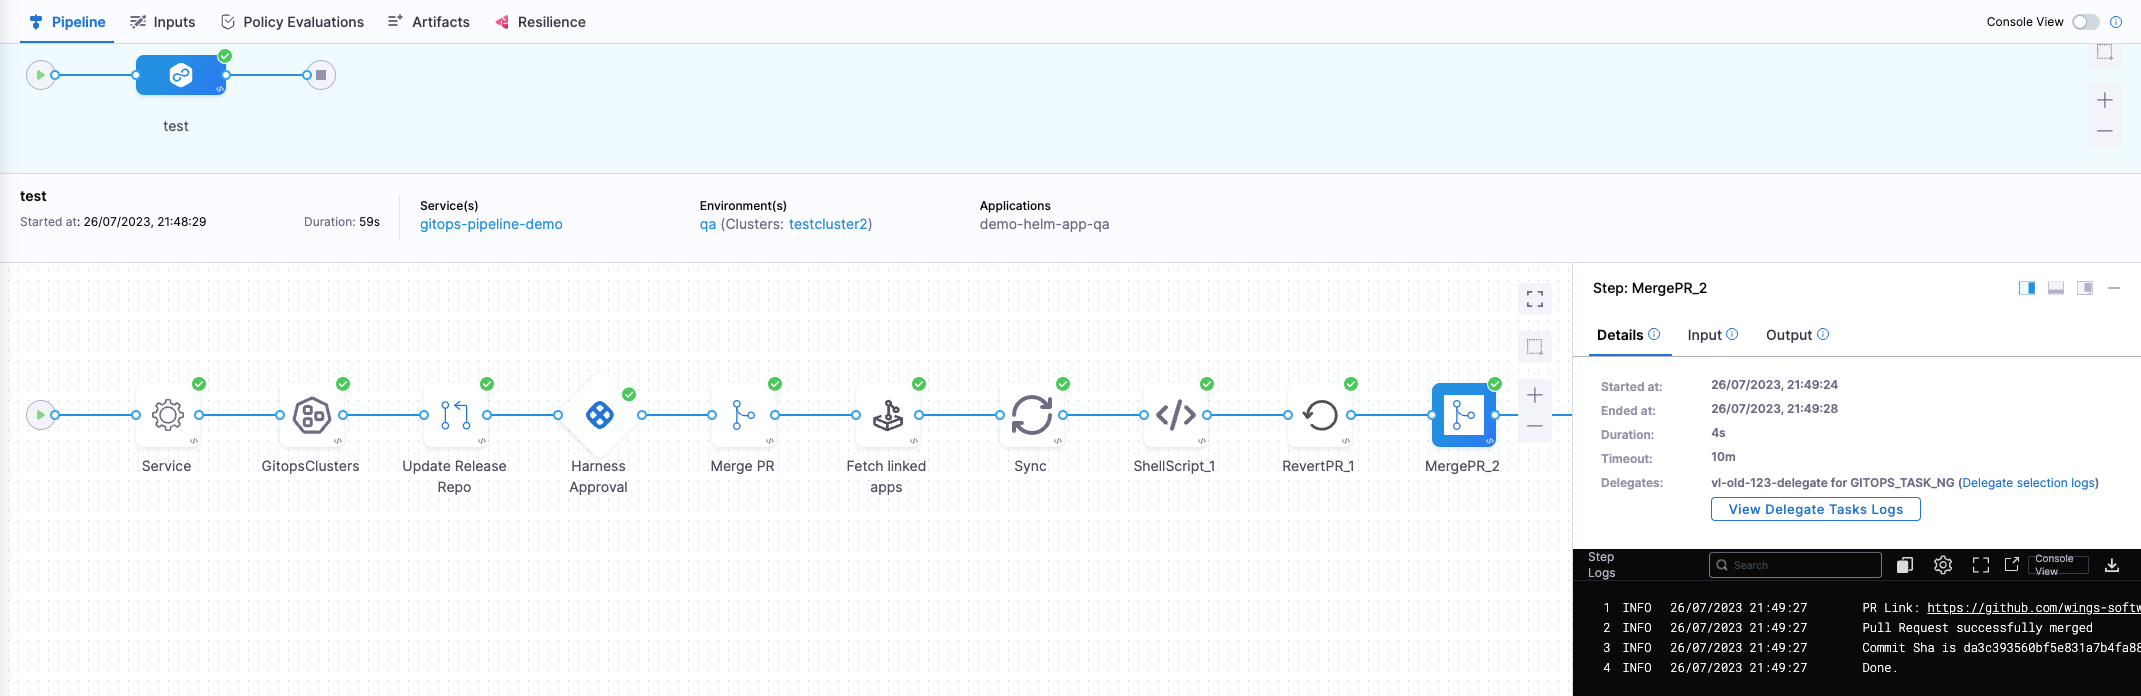
Here's an example of each step:
Service:
Starting service step...
Processing service variables...
Applying environment variables and service overrides
Processed service variables
Processed artifacts and manifests
Completed service step
GitOps Clusters:
Environment(s): {dev}

Processing clusters at scope PROJECT
Following 1 cluster(s) are present in Harness Gitops
Identifiers: {engineeringdev}

Following 1 cluster(s) are selected after filtering
Identifiers: {engineeringdev}

Completed
Update Release Repo:
Merge PR:
PR Link: https://github.com/wings-software/gitops-pipeline-demo/pull/155
Pull Request successfully merged
Commit Sha is bcd4f2f73a47b74dba54habbcd10a6679ed99a
Done.
Revert PR:
Setting git configs
Using optimized file fetch
Created revert PR https://github.com/wings-software/gitops-pipeline-demo/pull/156
Done.
Merge PR_1:
PR Link: https://github.com/wings-software/gitops-pipeline-demo/pull/156
Pull Request successfully merged
Commit Sha is da3c393560bf5e831a7b4fa123456c1eafb989ac
Done.
Check the repo to see that the config.json file for the dev environment has been updated with the new asset_id value:
Congratulations! You PR Pipeline was successful.
In this tutorial, you learned how to:
- Create an ApplicationSet that defines one application and syncs it to multiple target environments.
- Create a Harness PR Pipeline to change the application in just one of the target environments.
ApplicationSet and PR Pipeline Summary
A typical GitOps Application syncs a source manifest to a destination cluster. If you have multiple target clusters, you could create separate GitOps Applications for each one, but that makes management more challenging. Also, what if you want to sync an application with 100s of target clusters? Managing 100s of GitOps Applications is not acceptable.
To solve this use case, Harness supports ApplicationSets.
ApplicationSets
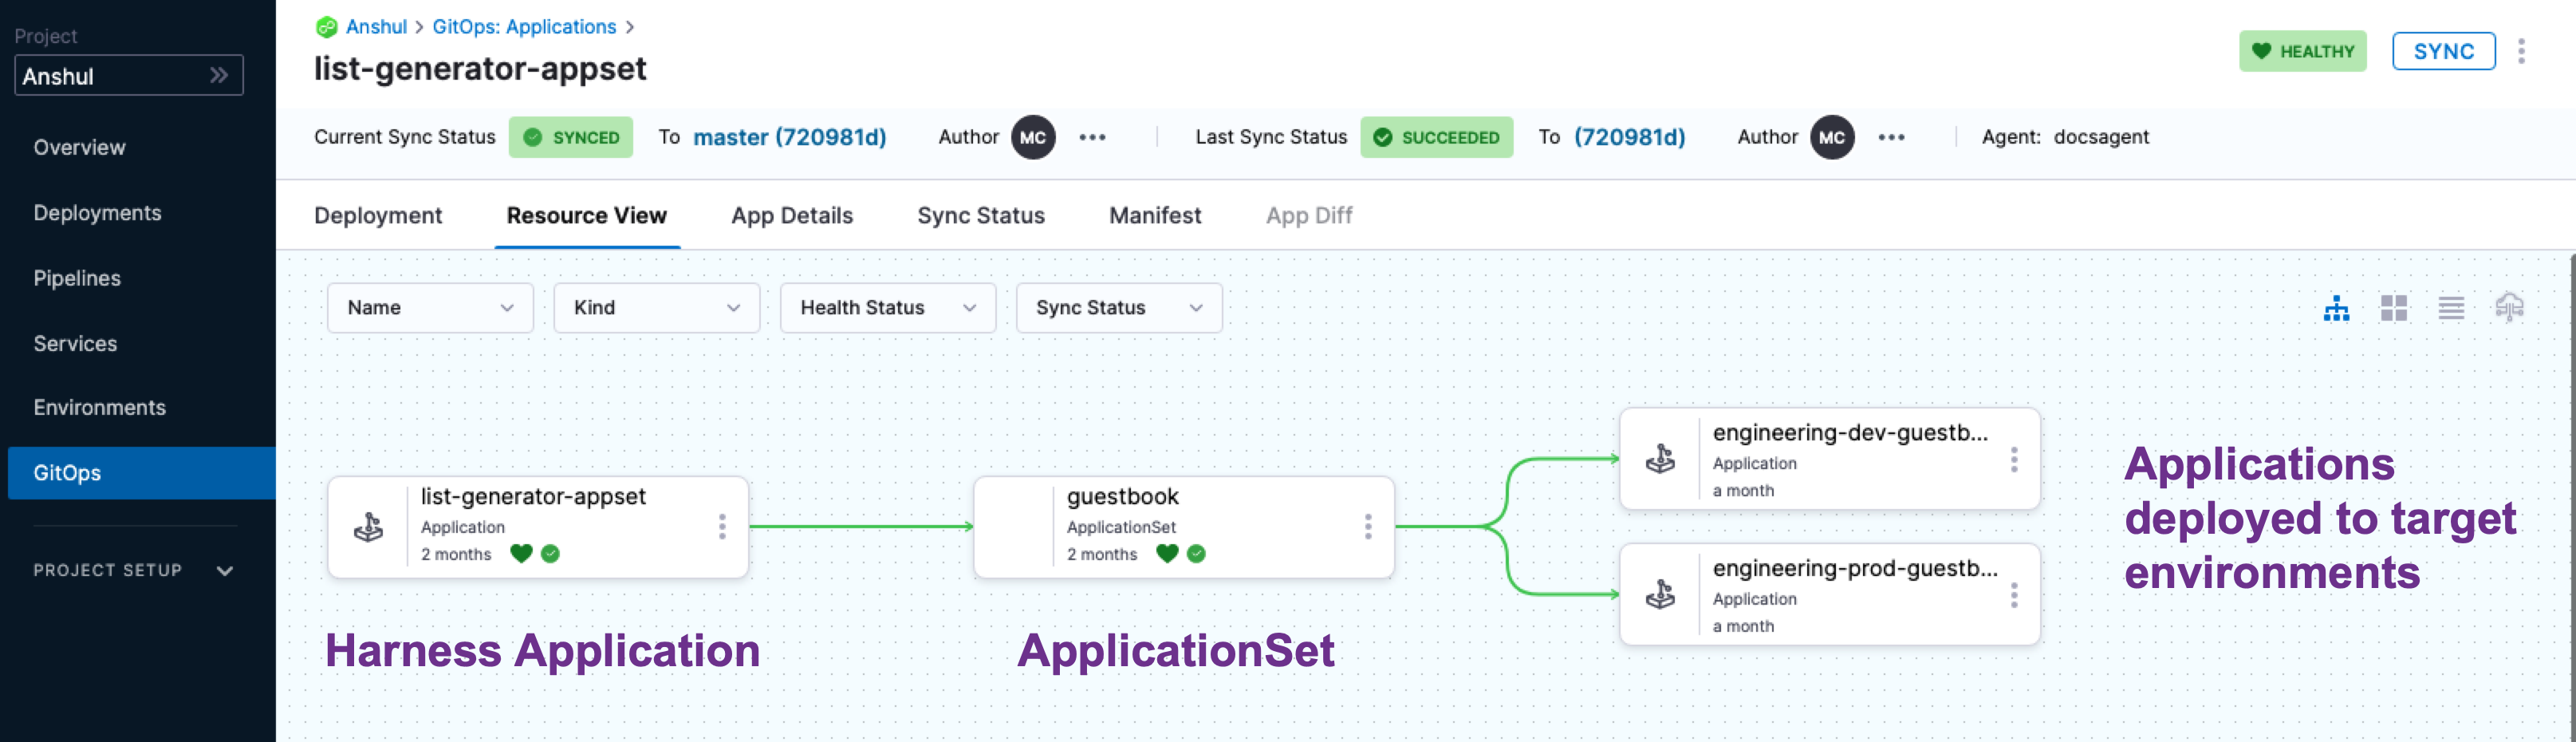
An ApplicationSet uses an ApplicationSet controller to automatically and dynamically generate applications in multiple target environments. A GitOps ApplicationSet is similar to a GitOps Application but uses a template to achieve application automation using multiple target environments.
ApplicationSet is supported in your cluster using a Kubernetes controller for the ApplicationSet CustomResourceDefinition (CRD). You add an ApplicationSet manifest to a Harness GitOps Application just like you would add a typical Deployment manifest. At runtime, Harness uses the ApplicationSet to deploy the application to all the target environments' clusters.
Template parameters
ApplicationSets use generators to generate parameters that are substituted into the template: section of the ApplicationSet resource during template rendering.
There are many types of generators. For the list, go to Generators from Argo CD docs.Generators support parameters in the format {{parameter name}}.
For example, here's the template section of a guestbook List generator that uses {{cluster.name}} and {{cluster.address}}:
  template:
    metadata:
      name: '{{cluster.name}}-guestbook'
    spec:
      project: 191b68fc
      source:
        repoURL: https://github.com/johndoe/applicationset.git
        targetRevision: HEAD
        path: "examples/git-generator-files-discovery/apps/guestbook"
      destination:
        server: '{{cluster.address}}'
        namespace: default
      syncPolicy:
        automated: {}
The values for these parameters will be taken from the cluster list config.json cluster.name and cluster.address:
{
  "releaseTag" : "k8s-v0.4",
  "cluster" : {
    "owner" : "cluster-admin@company.com",
    "address" : "https://34.133.127.118",
    "name" : "dev"
  },
  "asset_id" : "12345678"
}
After substitution, this guestbook ApplicationSet resource is applied to the Kubernetes cluster:
apiVersion: argoproj.io/v1alpha1
kind: Application
metadata:
  name: dev-guestbook
spec:
  source:
    repoURL: https://github.com/johndoe/applicationset.git
    path: examples/git-generator-files-discovery/apps/guestbook
    targetRevision: HEAD
  destination:
    server: https://34.133.127.118
    namespace: default
  project: 191b68fc
  syncPolicy:
    automated: {}
PR Pipelines
Often, even though your ApplicationSet syncs one microservice/application to multiple target environments, you might want to change a microservice in just one of the target environments, such as a dev environment. A Harness PR Pipeline enables you to do this.
When you deploy a Harness PR Pipeline, you simply indicate what target environment application you want to update and the config.json keys/values you want changed, such as release tags. Harness creates the pull request in your Git repo and merges it for you. Now, the target environment application has the new keys/values.
Wave deployments
You often hear the term wave deployments used when PR Pipelines are discussed.
A wave deployment is a deployment strategy in Continuous Delivery that involves releasing changes to a portion of users at a time, rather than all users at once. Typically, this is done using separate cloud regions for each target environment.
Wave deployments help reduce the risk of deployment failures and allow for quick recovery. The changes are rolled out in waves, typically starting with a group of users in one region and gradually expanding to the entire user base across all regions. This approach allows for a more controlled and monitored rollout of changes, improving the overall quality and stability of the deployment process.
With Harness GitOps, you can implement wave deployments by creating multiple environments for your application: one environment for each cloud region. Then, gradually promote changes from one environment to the next. This way, you can test changes in a safe and controlled manner before releasing them to the entire user base.
PR Pipelines support the wave deployments practice by allowing you to change a microservice in each target environment as needed.
Notes
ApplicationSet Support
- Do not deploy an ApplicationSet in a namespace other than the namespace where the GitOps Agent is installed. The ApplicationResource has to be deployed in same namespace as the GitOps Agent.
- Harness supports both JSON and YAML formats for ApplicationSets.
- Harness supports all ApplicationSet generators. You can add an ApplicationSet for any generator as an Application in Harness:
- Git Generator has first class support with the Update Release Repo and Merge PR steps in the Pipeline.
- All generators can be used in Shell Script steps. For example, you could create a Cluster generator YAML spec in a Shell Script step as a bash variable, and then use git commands in the script to update the ApplicationSet in your repo with the spec in the step. The updated repo spec will be used in the next Application sync (manual or automatic).
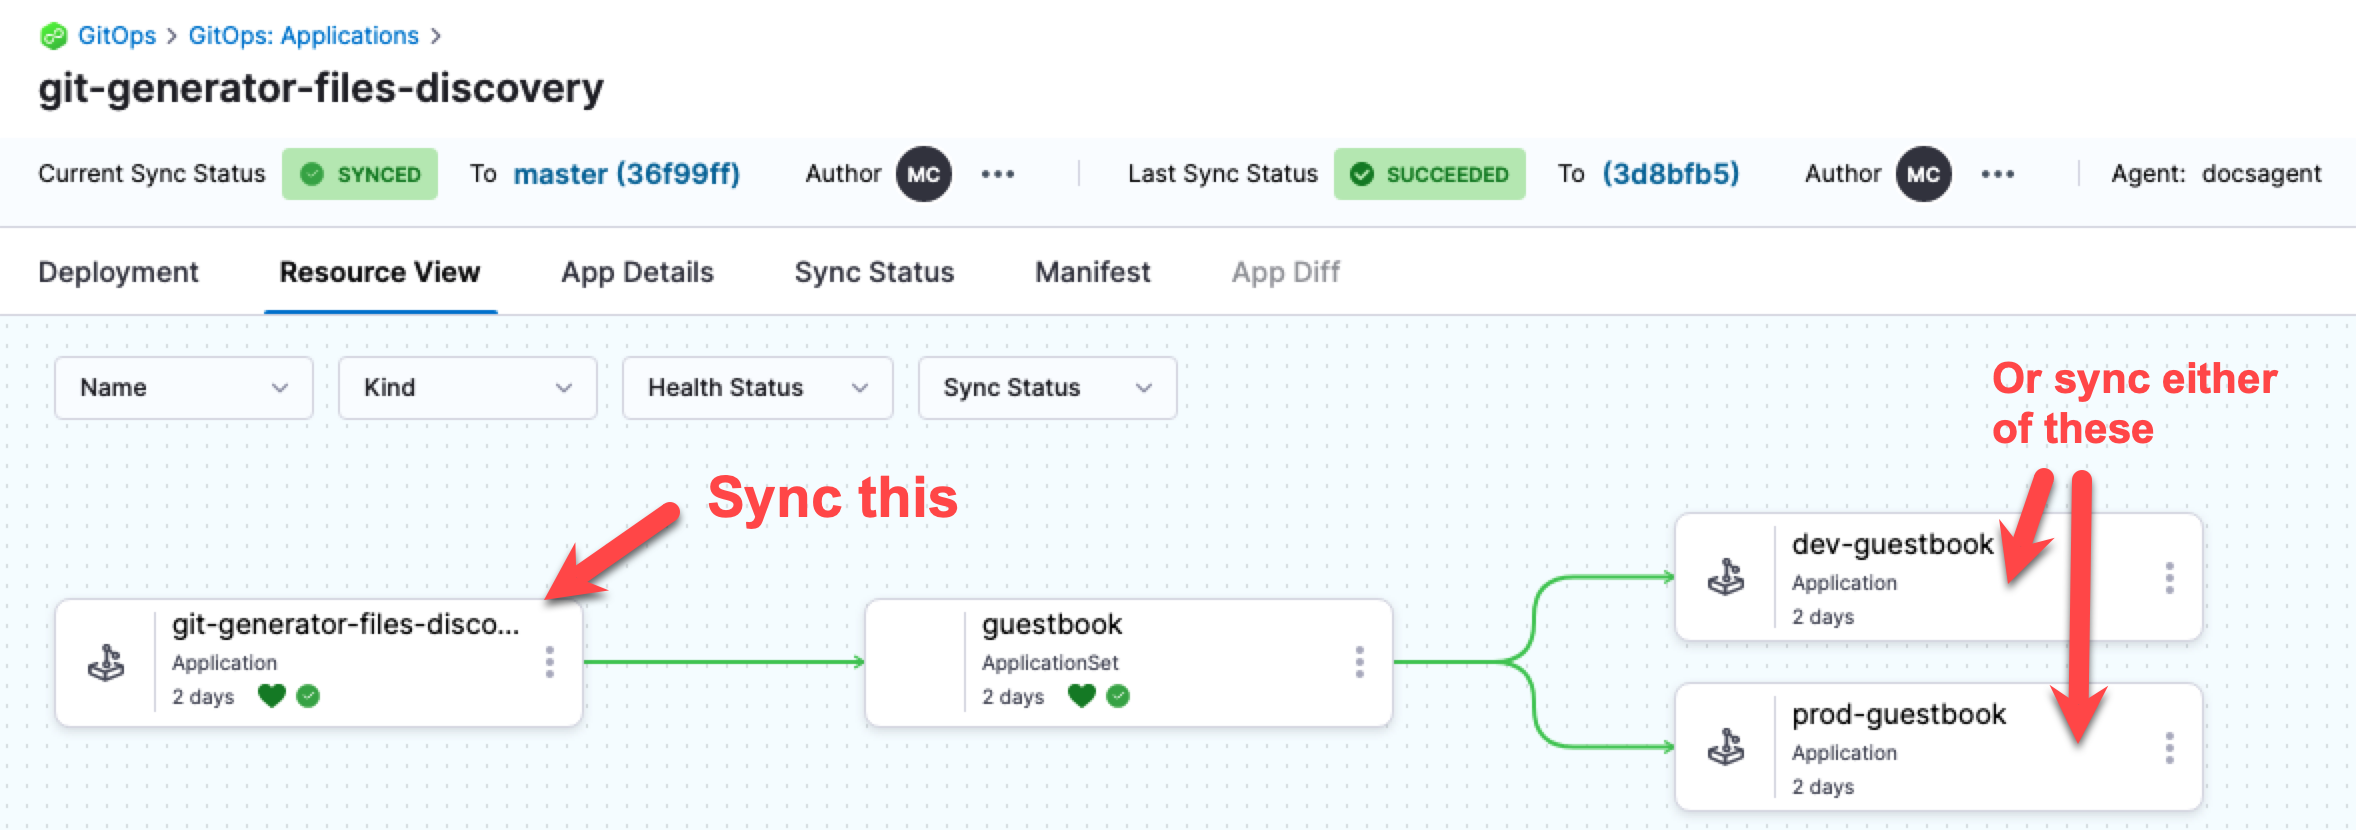
Syncing
You can sync using the Harness ApplicationSet Application or sync the individual Harness Applications independently.
If you configure automatic syncing in the ApplicationSet template, then the Applications will be synced automatically. See syncPolicy.automated here:
  template:
    metadata:
      name: '{{cluster.name}}-guestbook'
    spec:
      project: 191b68fc
      source:
        repoURL: https://github.com/johndoe/applicationset.git
        targetRevision: HEAD
        path: "examples/git-generator-files-discovery/apps/guestbook"
      destination:
        server: '{{cluster.address}}'
        namespace: default
      syncPolicy:
        automated: {}
The syncPolicy.automated is applied to all Applications created by the ApplicationSet because it is part of the template.
If you make a change to one of the target Applications and then perform an ApplicationSet sync, the change to target Application will be preserved.