Install a Harness GitOps Agent
This topic describes how to install a Harness GitOps Agent, a worker process that runs in your environment and performs GitOps tasks.
You need to set up an Agent before you can set up a Cluster, Repository, or Application, as the Agent is selected in all three of these.
Typically, you install the Agent in the target cluster, but you can install it any cluster and it can connect to remote clusters using the credentials you provide.
Requirements
The Harness GitOps Agent has the following requirements:
- vCPUs, Memory, Disk Size: the Harness GitOps Agent only needs 1vCPUs, 2GB memory, 20GB disk, but you'll also be running Kubernetes and your deployed services. Consider the total CPU and memory needs for the Agent and the applications and services in your cluster.
- Networking: outbound HTTPS for the Harness connection to app.harness.io, github.com, and hub.docker.com. Allow TCP port 22 for SSH.
- A Kubernetes service account with the permissions need to create your desired state. The Harness GitOps Agent requires either
cluster-adminor admin permissions in the target namespace:- Create Deployment, Service, StatefulSet, Network Policy, Service Account, Role, ClusterRole, RoleBinding, ClusterRoleBinding, ConfigMap, Secret.
- Permission to apply CustomResourceDefinition.
For more information, see User-Facing Roles from Kubernetes.
- Namespace: The target namespace in the cluster must be created already. Harness will not create the namespace.
Using existing Argo CD projects
Typically, when you set up a Harness GitOps Agent you install a new Harness GitOps Agent in your target cluster along with other services (Repo server, Redis cache, Application controller).
In some cases, you might already have an Argo CD Project running in your target cluster. In this case, you can select this Project when you set up the Harness GitOps Agent.
You can use an existing Argo CD Project when you already have services deployed to different environments from that Argo CD instance.
If you don't use an existing Argo CD Project, you will create GitOps Applications, Repos, Clusters, etc in Harness. You'll also have to delete these from any existing Argo CD Project in the cluster (if necessary).
In both cases, you will install the Harness GitOps Agent process.
If you use an existing Argo CD instance, then Harness will use the following existing processes in the cluster:
- Repo server
- Redis cache
- Application controller
If you do not use an existing Argo CD instance, then Harness will install the following:
- GitOps agent
- Repo server
- Redis cache
- Application controller
Add an Agent
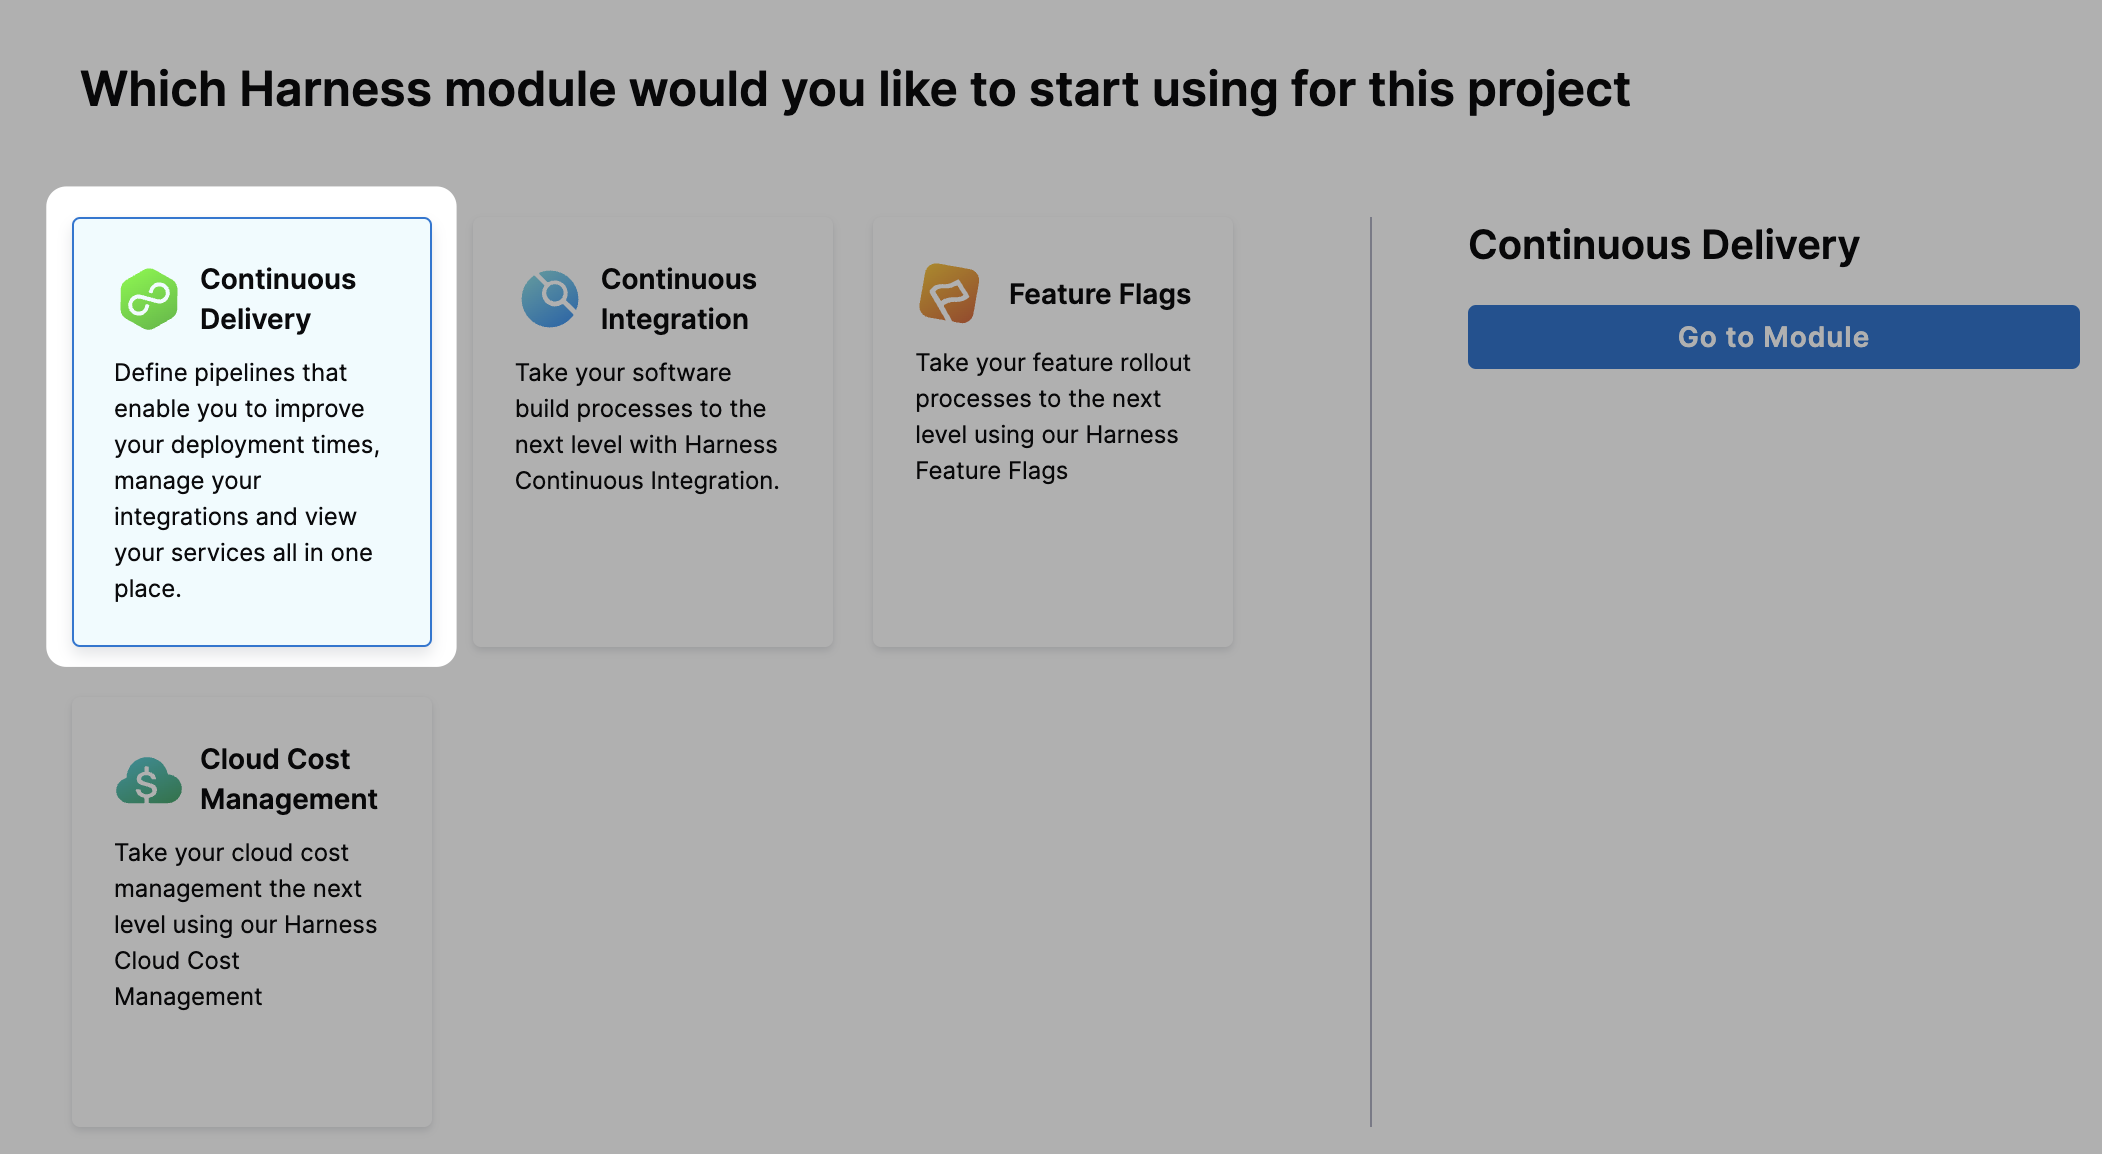
Ensure your Harness Project has the Continuous Delivery module enabled.
In your Harness Project, click GitOps.
The Harness GitOps Overview, Applications, and Settings appear. If this is the first time GitOps has been set up in the Project, the Applications will be empty.
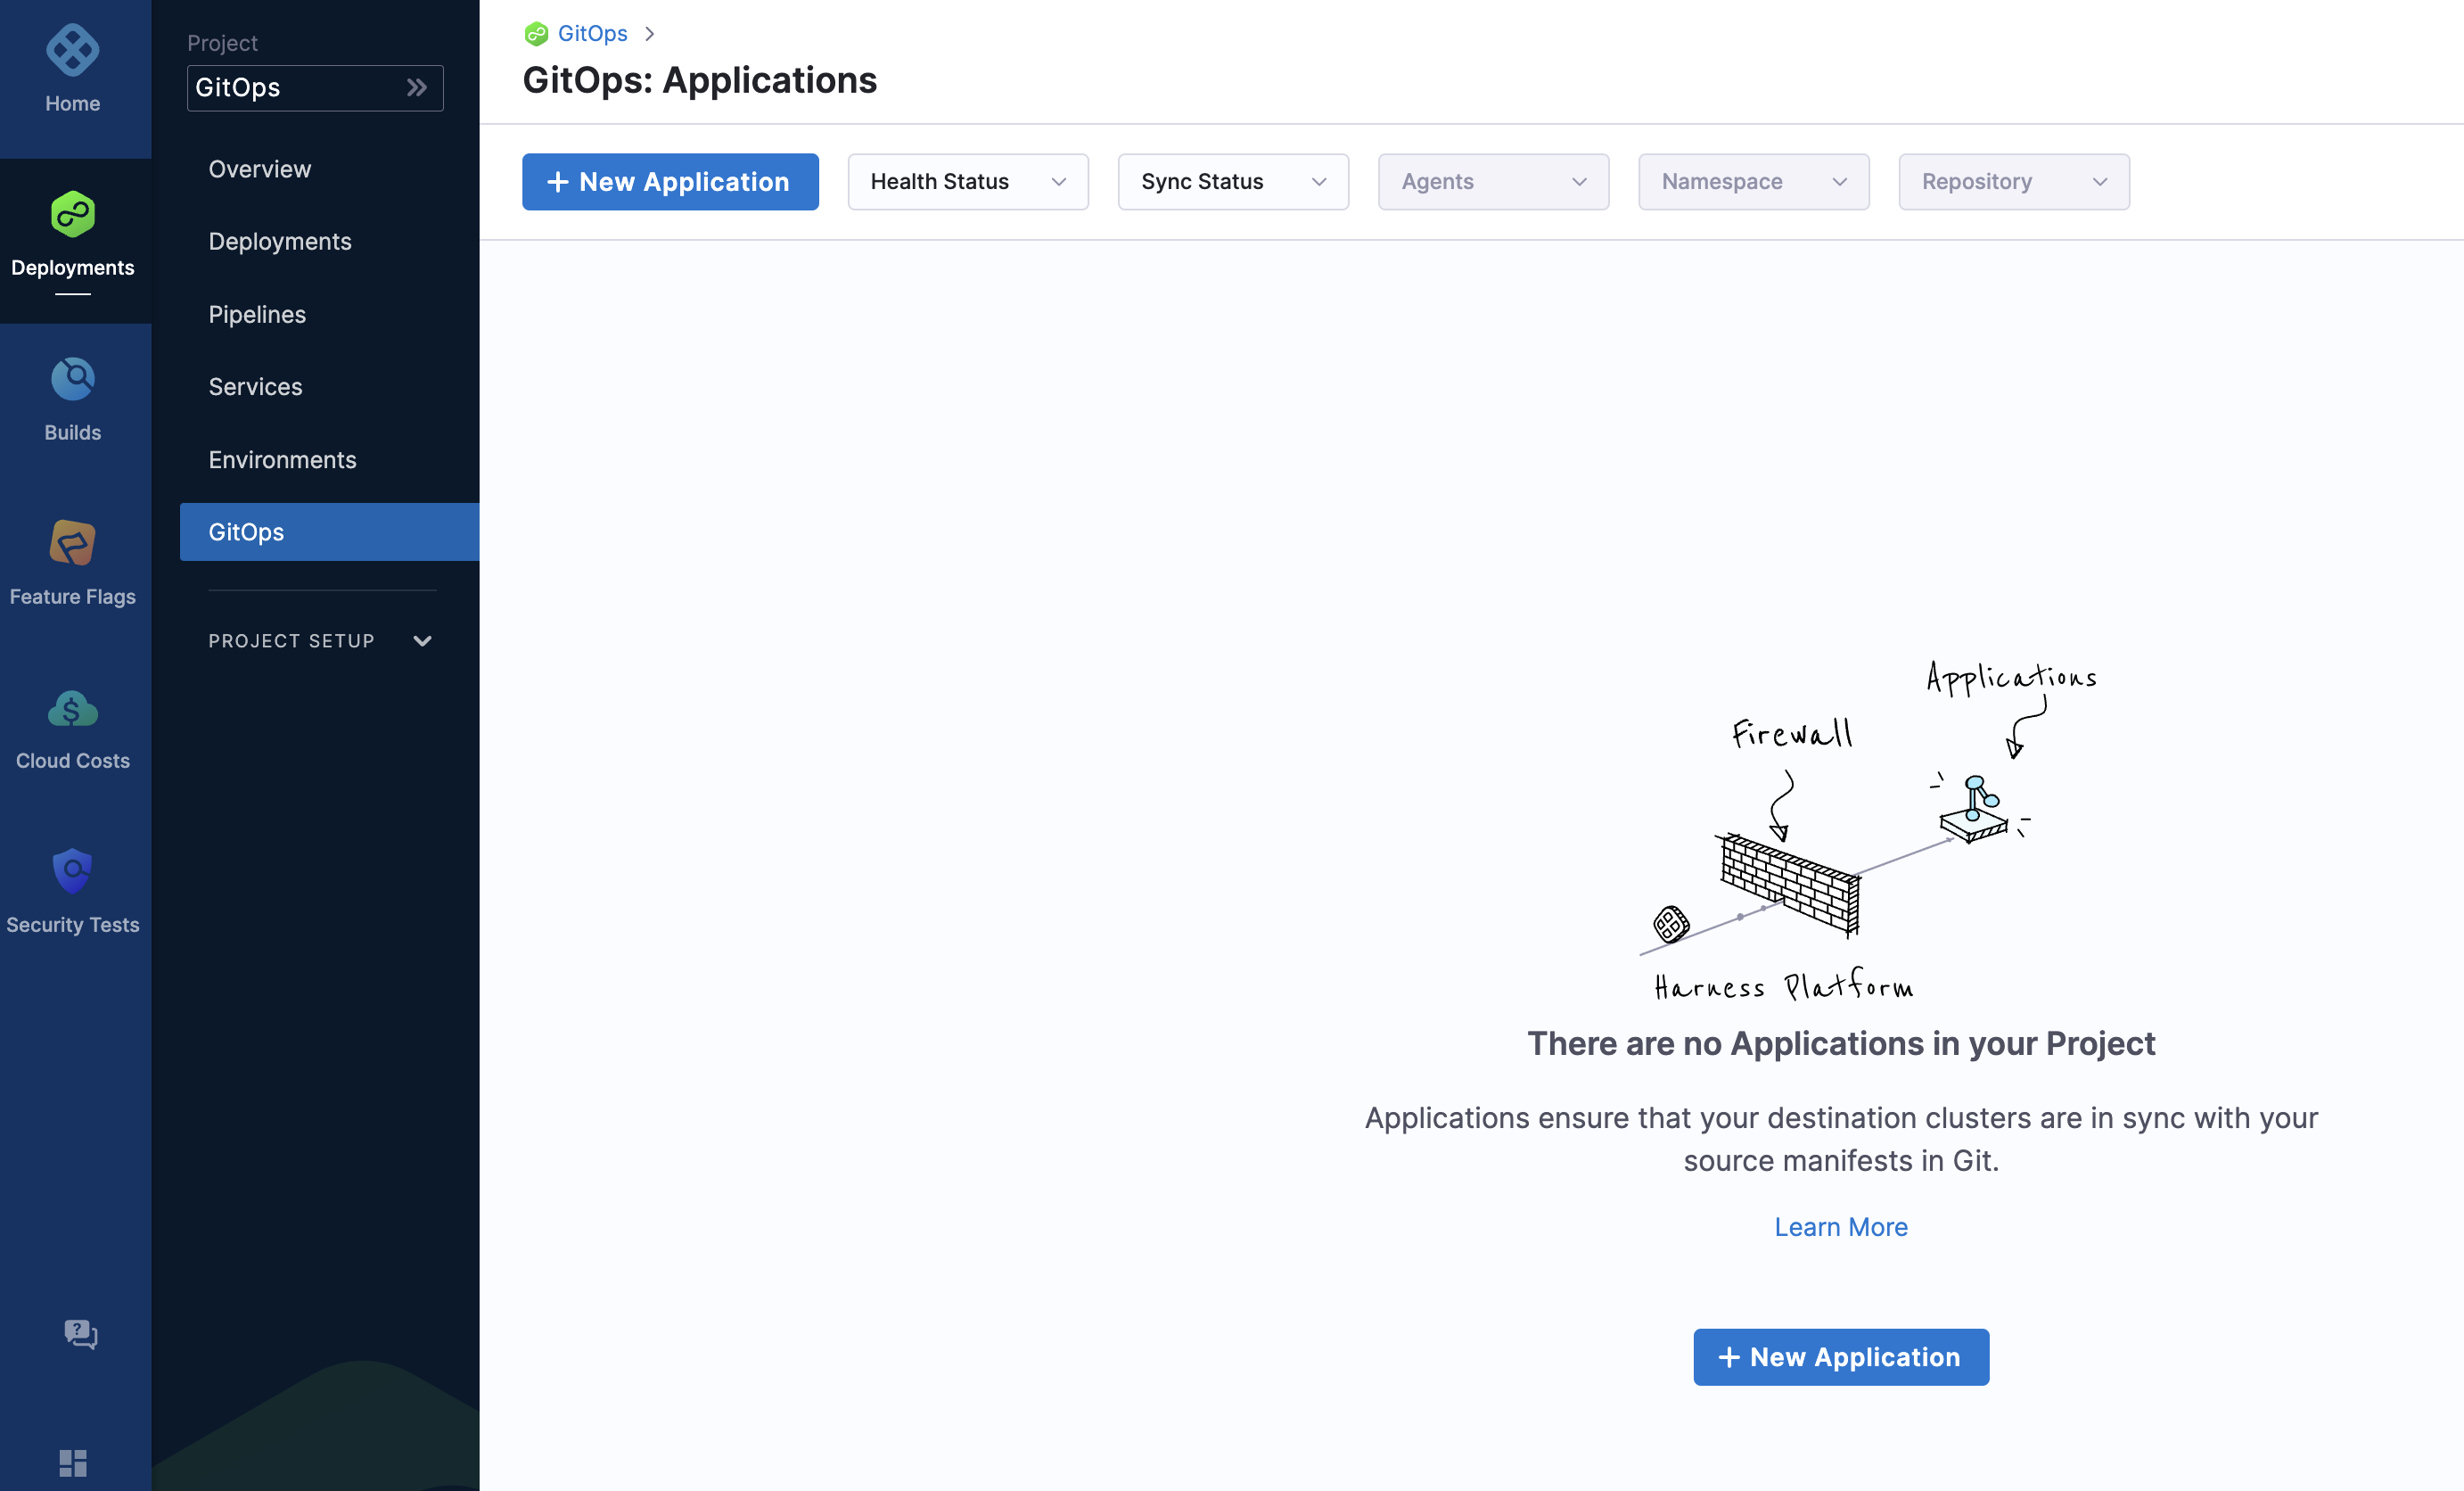
All entities other than Applications are in Settings.
Select Settings. The Harness GitOps settings appear.
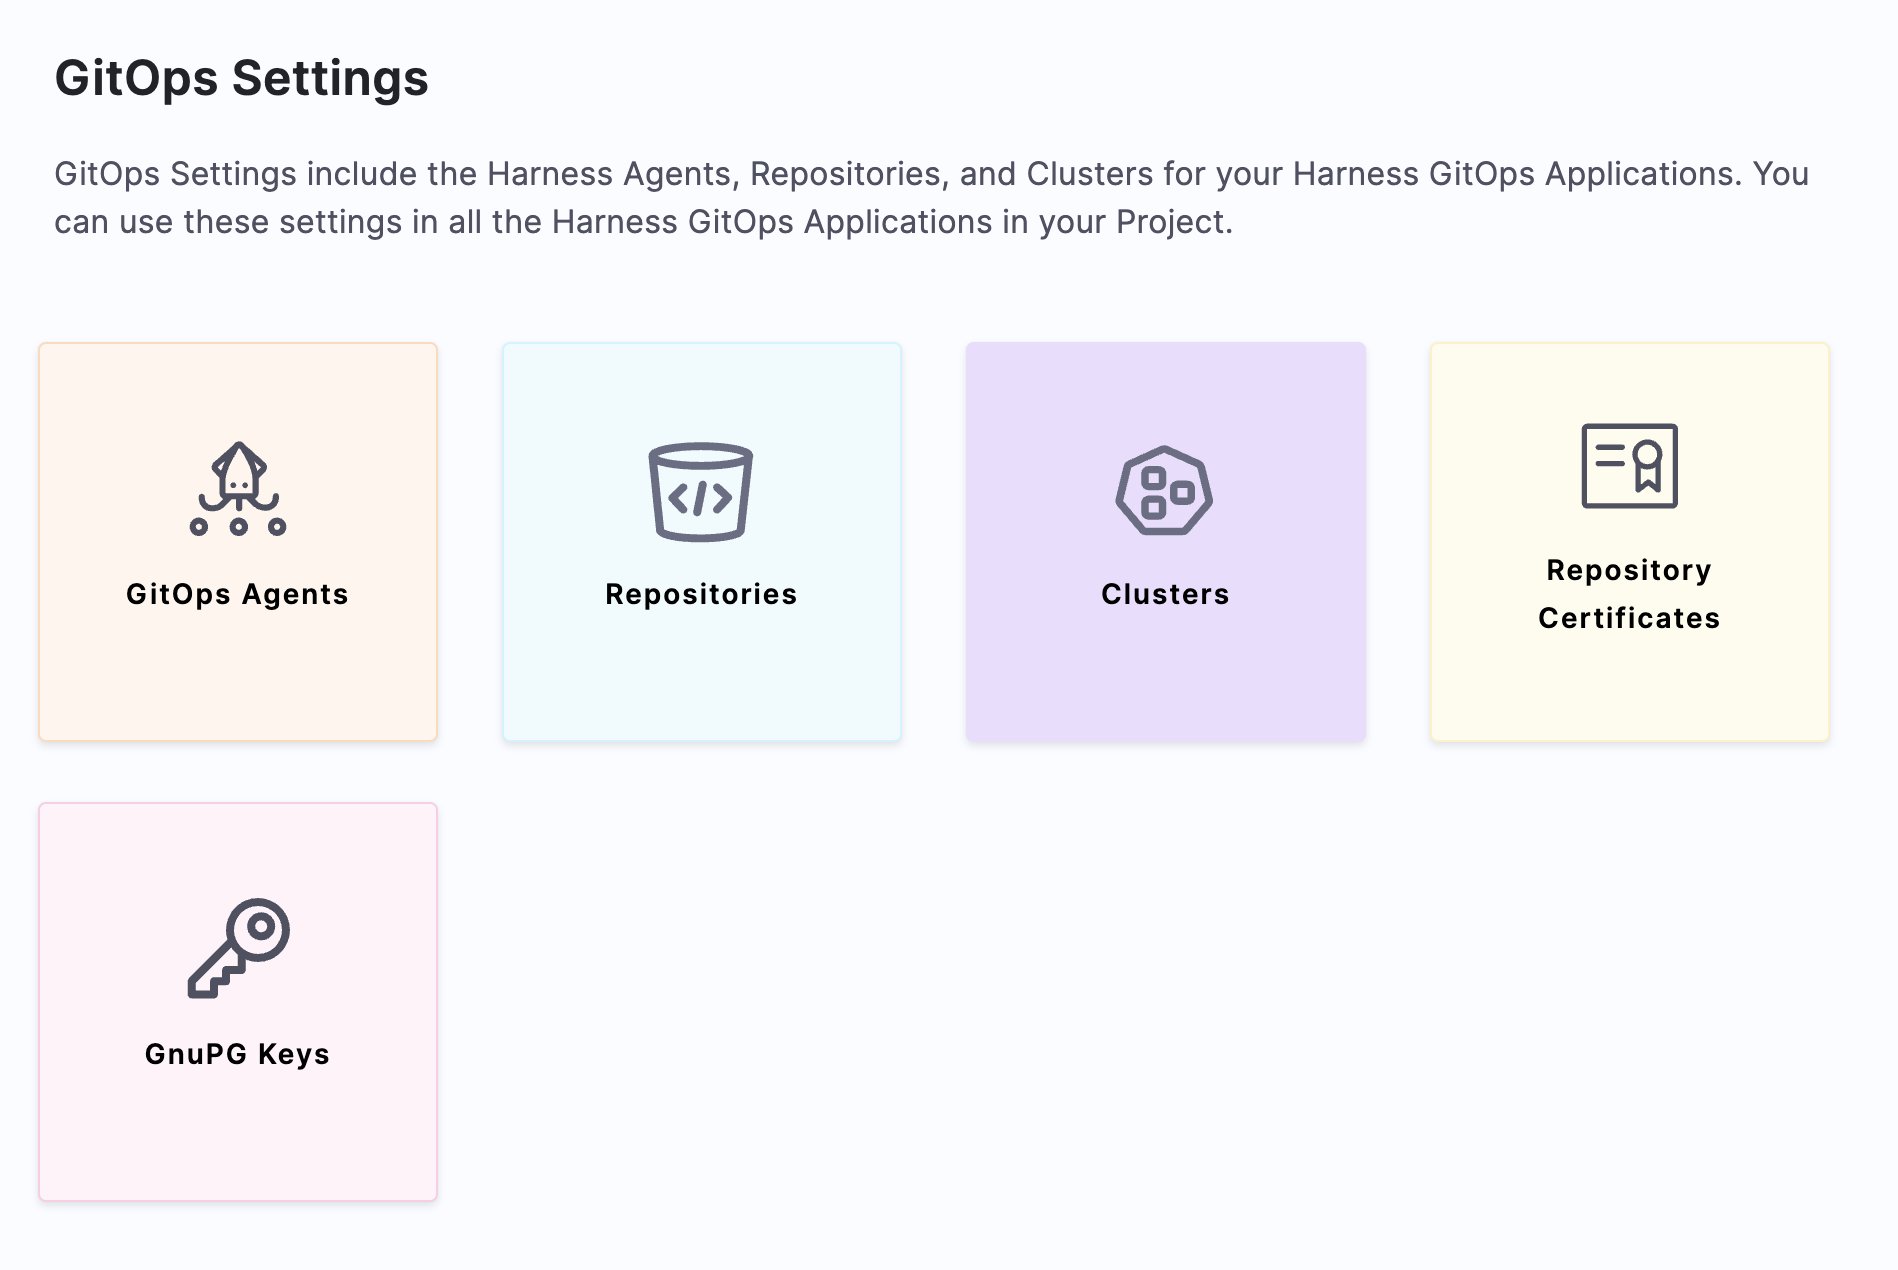
Select GitOps > Agents.
Select New GitOps Agent. The Agent wizard appears.
Harness GitOps Agent without an existing Argo CD project
In Getting started with Harness GitOps, you have the option of installing a new Harness GitOps Agent with or without an existing Argo CD instances.
Select No, and then click Start.
In Name, enter the name for the new Agent.
In Namespace, enter the namespace where you want to install the Harness GitOps Agent. Typically, this is the target namespace for your deployment.
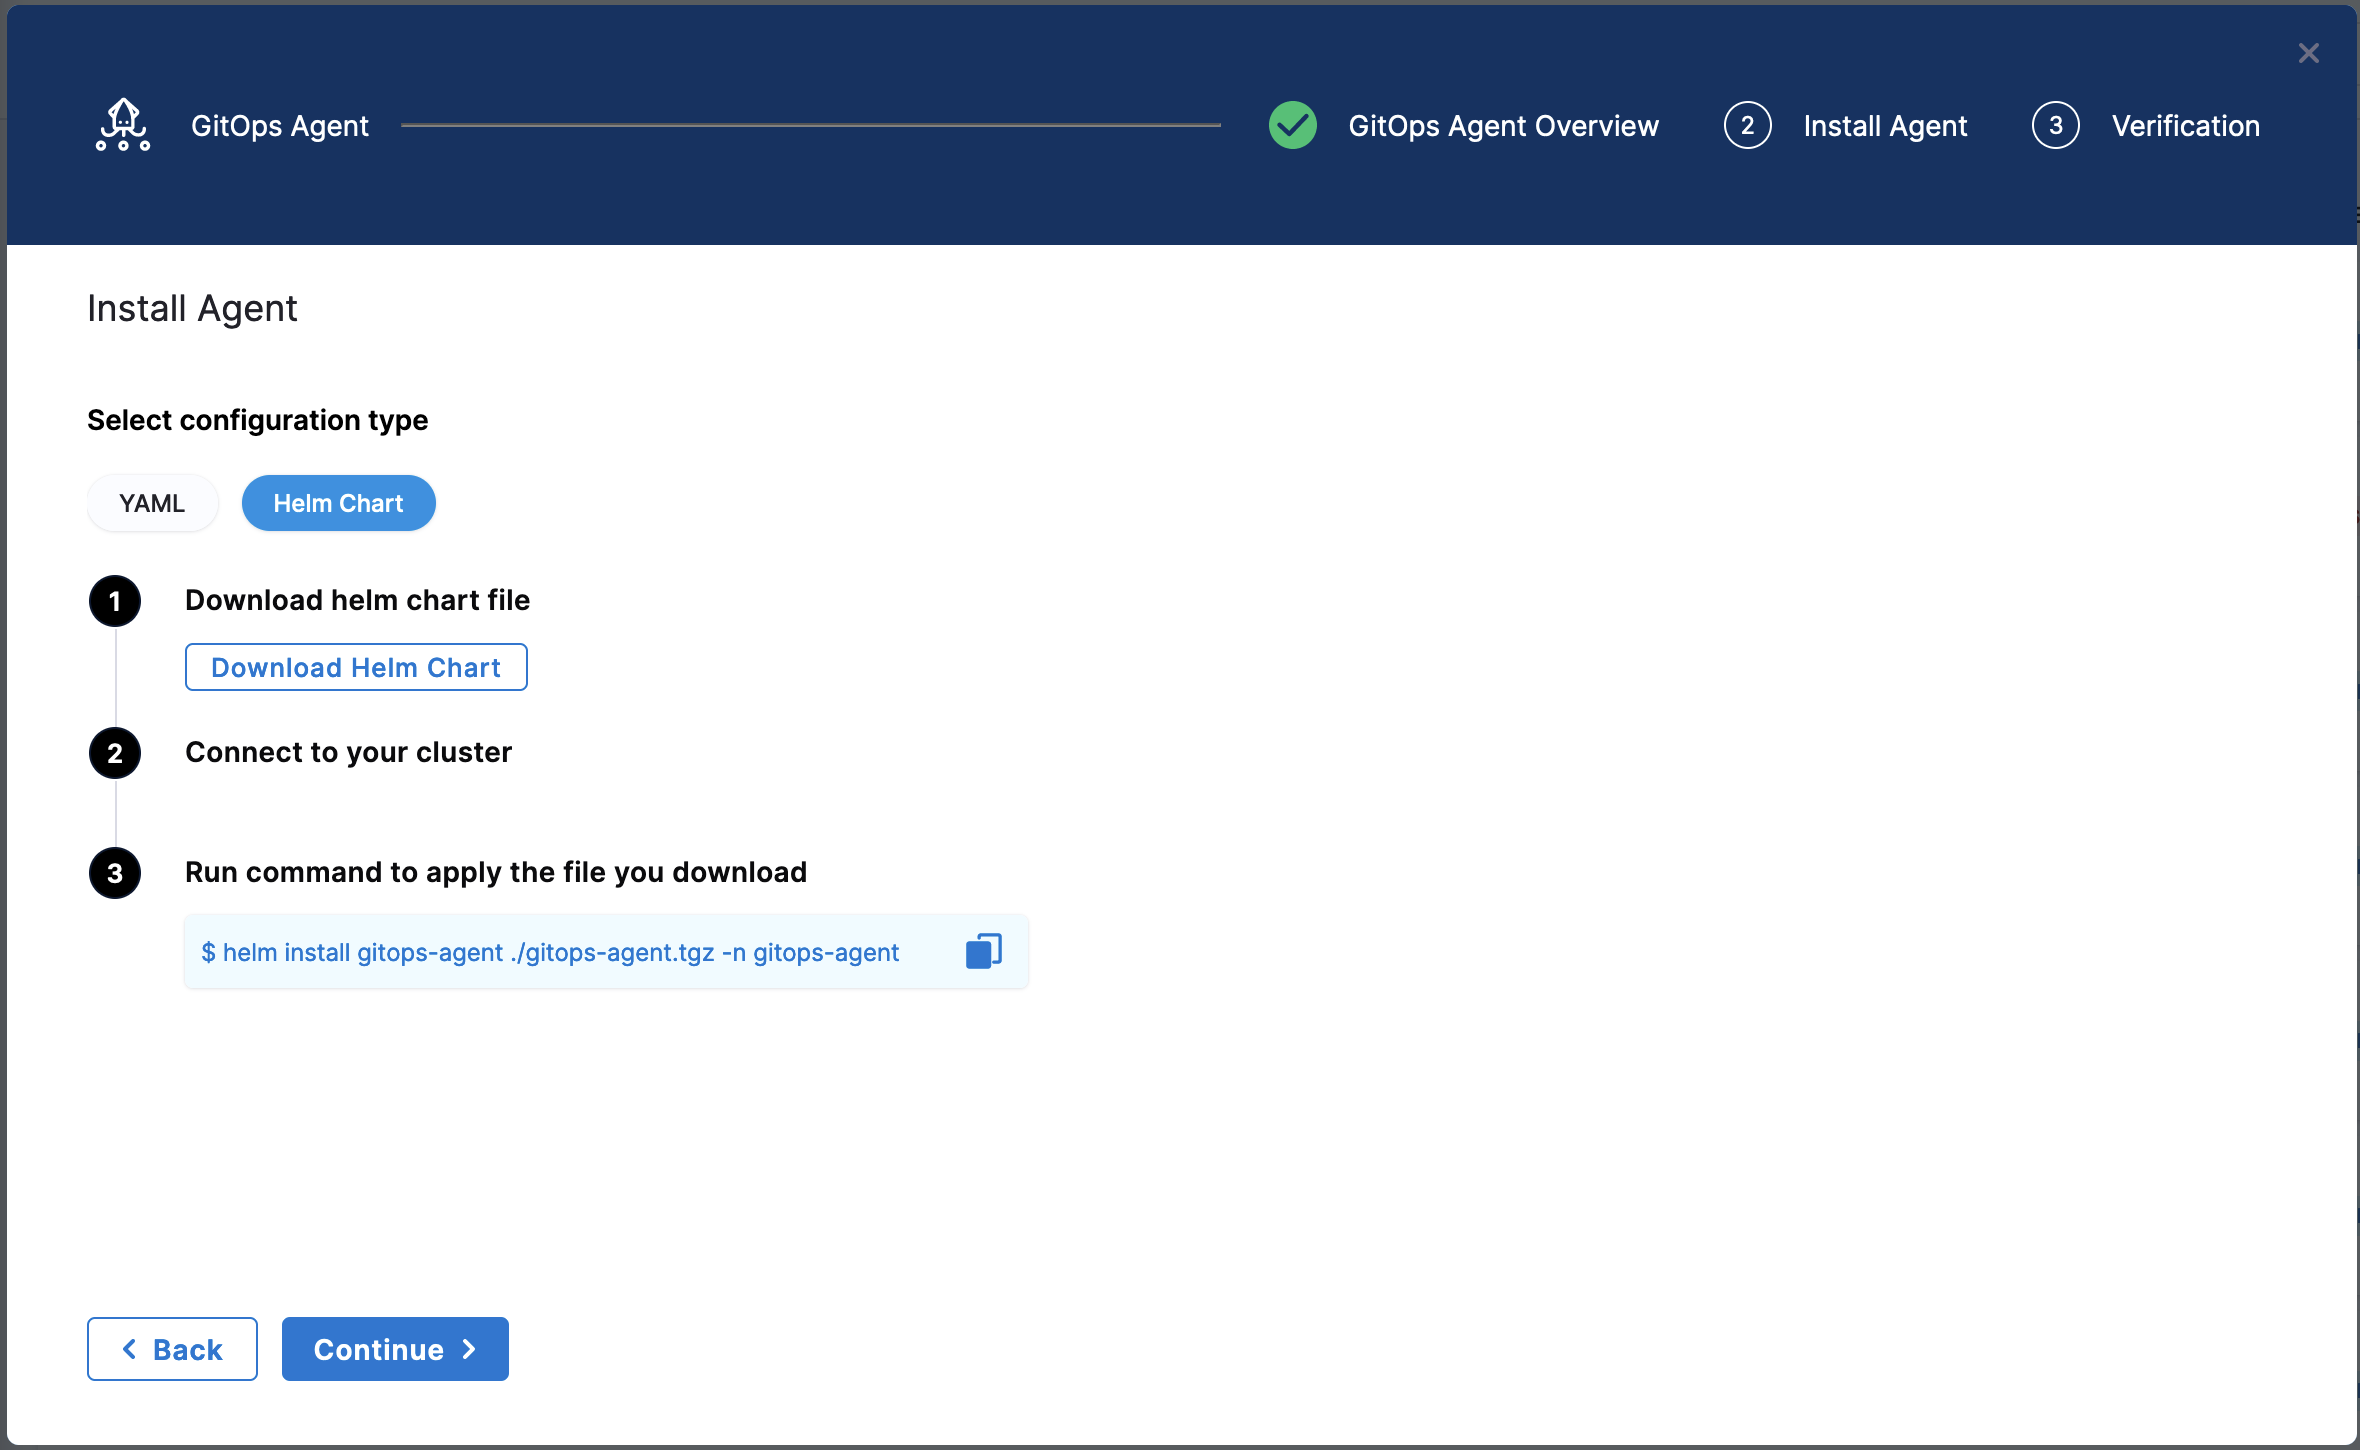
Select Next. The Download YAML or Download Helm Chart settings appear.
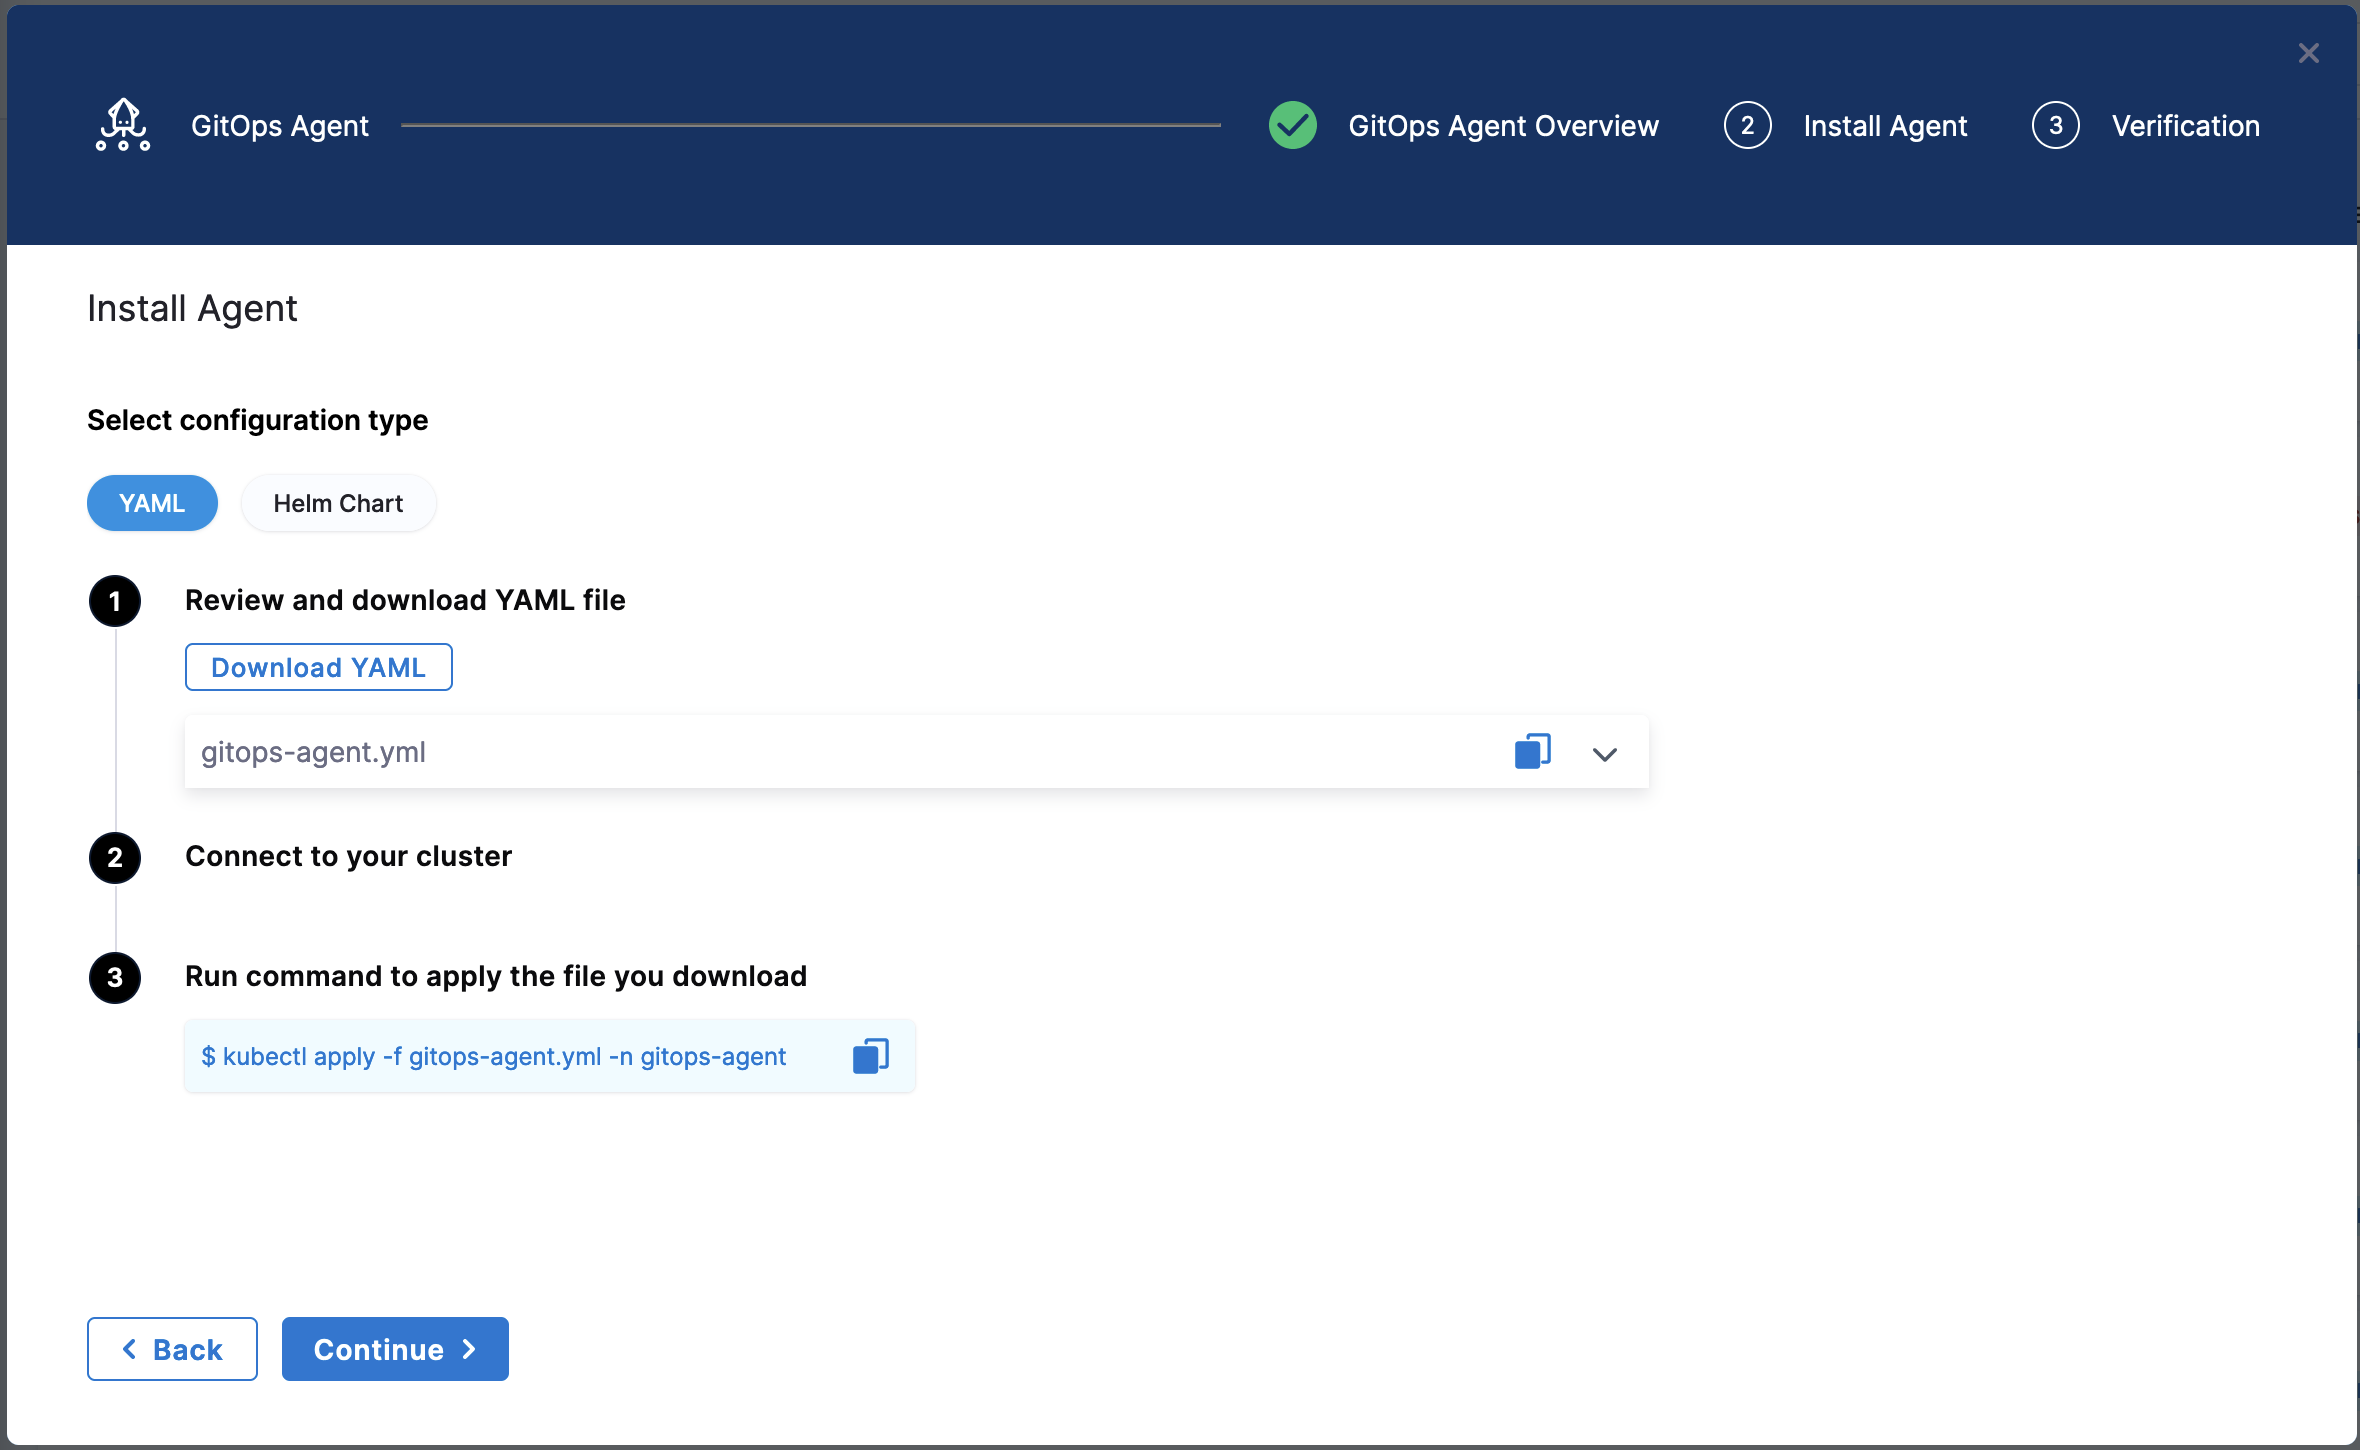
The YAML option lets you download the manifest YAML for the Harness GitOps Agent. You can download this YAML file and run it in your Harness GitOps Agent cluster.
The Helm Chart option lets you download a helm-chart file for the Harness GitOps Agent. You can download this file and install it in your Harness GitOps Agent cluster.
Harness GitOps Agent with Existing Argo CD Project
In Getting started with Harness GitOps, you have the option of installing a new Harness GitOps Agent with or without an existing Argo CD instances.
Select Yes, and then select Start.
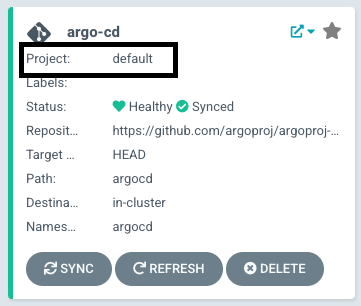
In Name, enter the name for the existing Agent CD Project. For example, default in the this example:
In Namespace, enter the namespace where you want to install the Harness GitOps Agent. Typically, this is the target namespace for your deployment.
Select Next. The Download YAML or Download Helm Chart settings appear.
The YAML option lets you download the manifest YAML for the Harness GitOps Agent. You can download this YAML file and run it in your Harness GitOps Agent cluster.
The Helm Chart option lets you download a helm-chart file for the Harness GitOps Agent. You can download this file and install it in your Harness GitOps Agent cluster.
Once you have installed the Agent by using any of the above options, Harness will start importing all the entities from the existing Argo CD Project.
Make sure that you deploy only one GitOps Agent per Argo CD namespace. Deploying multiple Agents created in different projects or accounts can lead to unpredictable behaviour.
Harness supports mapping Argo CD projects into Harness projects through the Agent that controls the Argo CD deployment. When importing Argo CD projects, Harness maps Argo CD projects into Harness projects that belong to one account.
Enabling multiple Agents in one Argo CD namespace implies cross-account resource sharing which Harness does not support.
Install the Agent
Select Download & Continue. You are prompted to save the YAML file.
Open a terminal and navigate to the folder where you downloaded the YAML file.
In the same terminal, log into the Kubernetes cluster where you want to install the Agent.
For example, here's a typical GKE login:
gcloud container clusters get-credentials <cluster_name> --zone us-central1-c --project <project_name>
In case of YAML, run the following command to apply the YAML file you downloaded (in this example, the namespace entered in the Namespace setting is default):
kubectl apply -f gitops-agent.yaml -n default
In case of Helm Chart, run the following command to install the helm-chart file you downloaded (in this example, the namespace entered in the Namespace setting is default):
helm install gitops-agent ./gitops-agent.tgz -n default
In the following output example you can see all of the Harness GitOps objects created in Kubernetes.
This example output is for installing a new Harness GitOps Agent without using an existing Argo CD instance using the YAML.
% kubectl apply -f harness-gitops-agent.yaml -n default
customresourcedefinition.apiextensions.k8s.io/applications.argoproj.io created
customresourcedefinition.apiextensions.k8s.io/appprojects.argoproj.io created
serviceaccount/argocd-application-controller created
serviceaccount/argocd-redis created
serviceaccount/example-agent created
role.rbac.authorization.k8s.io/example-agent created
role.rbac.authorization.k8s.io/argocd-application-controller created
clusterrole.rbac.authorization.k8s.io/argocd-application-controller-default created
clusterrole.rbac.authorization.k8s.io/example-agent created
rolebinding.rbac.authorization.k8s.io/argocd-application-controller created
rolebinding.rbac.authorization.k8s.io/argocd-redis created
clusterrolebinding.rbac.authorization.k8s.io/argocd-application-controller-default created
rolebinding.rbac.authorization.k8s.io/example-agent created
clusterrolebinding.rbac.authorization.k8s.io/example-agent created
configmap/argocd-cm created
configmap/argocd-cmd-params-cm created
configmap/argocd-gpg-keys-cm created
configmap/argocd-rbac-cm created
configmap/argocd-ssh-known-hosts-cm created
configmap/argocd-tls-certs-cm created
secret/argocd-secret created
service/argocd-metrics created
service/argocd-redis created
service/argocd-repo-server created
deployment.apps/argocd-redis created
deployment.apps/argocd-repo-server created
statefulset.apps/argocd-application-controller created
networkpolicy.networking.k8s.io/argocd-application-controller-network-policy created
networkpolicy.networking.k8s.io/argocd-redis-network-policy created
networkpolicy.networking.k8s.io/argocd-repo-server-network-policy created
secret/example-agent created
configmap/example-agent created
deployment.apps/example-agent created
configmap/example-agent-upgrader created
role.rbac.authorization.k8s.io/example-agent-upgrader created
rolebinding.rbac.authorization.k8s.io/example-agent-upgrader created
serviceaccount/example-agent-upgrader created
Warning: batch/v1beta1 CronJob is deprecated in v1.21+, unavailable in v1.25+; use batch/v1 CronJob
cronjob.batch/example-agent-upgrader created
If the Harness GitOps Agent is being deployed to a cluster running Kubernetes v1.21 or less, Harness requires you replace apiVersion: apiextensions.k8s.io/v1 with apiVersion: apiextensions.k8s.io/v1beta1 in the deployment YAML file.
Back in Harness, select Continue.
Harness indicates that the Harness GitOps Agents is registered.
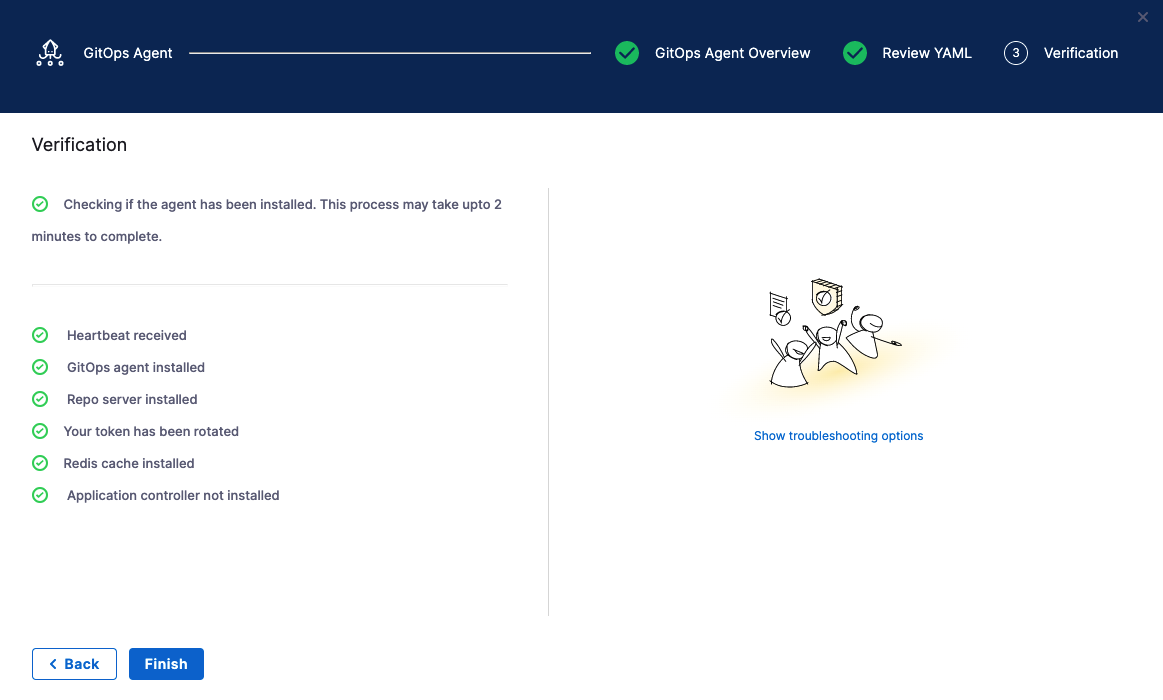
Select Continue.
Mapping Argo CD projects to Harness Projects: See Map Argo projects to Harness GitOps Projects.
When you are finished, the Agents list shows the new Agent as Healthy and Connected.

In your cloud platform Kubernetes cluster you can see the agent workload:
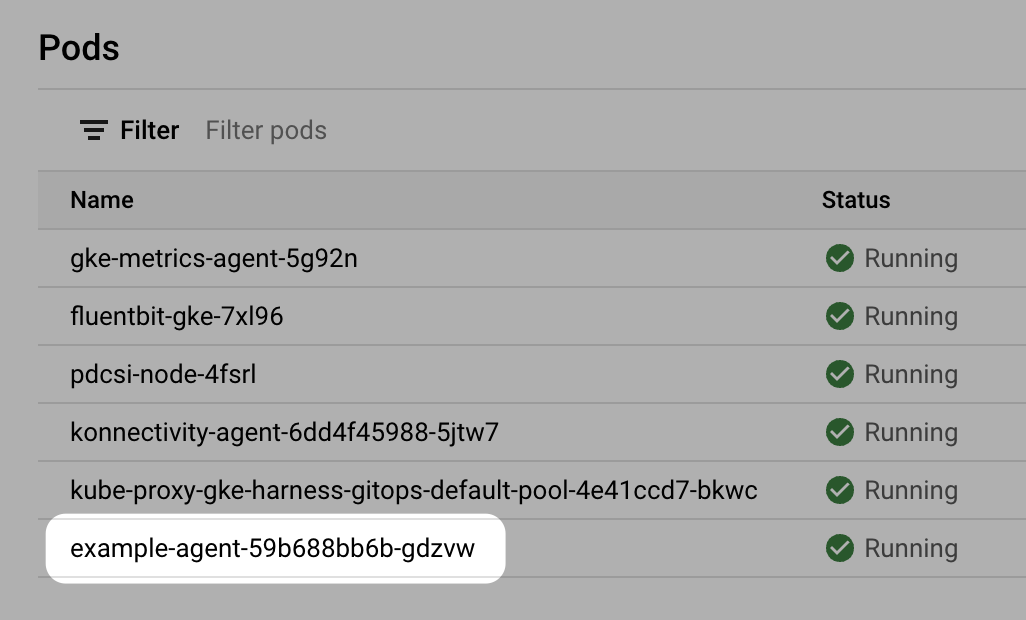
Now that you have the Harness GitOps Agent installed, running, and registered, you can configure the remaining components.
Argo CD and Harness project mapping
Once you have installed the Agent, Harness will create its own Argo CD Project in the cluster and name it with a random string.
Once you use this Agent to add another entity, such as a Cluster or Repository, Harness will then map this new Argo CD project to a Harness Project identifier (Id). You will see this mapping in Harness:

If you used an existing Argo CD Project, you will see the existing Argo CD Project mapped to your Harness Project Id:

See Entity Identifier Reference.
Mapping additional Argo CD projects to Harness projects
When you install a Harness GitOps Agent, Harness can import your existing Argo CD entities into Harness GitOps. We call this Bring Your Own Argo CD (BYOA).
In addition, when you install the Harness GitOps Agent in your existing Argo CD cluster, you can map Argo CD projects to Harness Projects. Harness will import all the Argo CD project entities (applications, clusters, repos, etc) and create them in Harness automatically.
Also, whenever new entities are created in mapped Argo CD projects, they are added to Harness automatically.
For steps on setting up the mapping and import, go to Map Argo projects to Harness GitOps Projects.
Proxy support
The Harness GitOps Agent can work on environments where traffic is routed through a proxy. Perform the following steps to configure proxy support for the agent.
- Make sure that the agent is running in HTTP mode.
To verify, check if the property/configGITOPS_SERVICE_PROTOCOLvalue is set toHTTP1in theconfigmap({agentname}-agent)present in the YAML after you create the agent.GITOPS_SERVICE_PROTOCOL: HTTP1 - Add a property/config
HTTPS_PROXY, and add proxy details, such as URL, port, and auth details as its value in the configmap mentioned in Step 1. For example,HTTPS_PROXY: "https://squid.proxy-test:3128". - Add an environment variable
NO_PROXYin the Harness GitOps Agent deployment with the following value.localhost,argocd-repo-server,argocd-dex-server,argocd-redis,127.0.0.1,$(KUBERNETES_SERVICE_HOST)
Proxy setup for testing
Use the following YAML example to install proxy in any other environment.
---
apiVersion: v1
kind: ConfigMap
metadata:
  name: script-cm
  namespace: proxy-test
data:
  entrypoint.sh: |-
    #!/bin/bash
    echo "Start"
    apt-get -q update && apt-get -qy --no-install-recommends install python squid curl && apt-get clean;
    sed -i "s/^#acl localnet/acl localnet/" /etc/squid/squid.conf;
    sed -i "s/^#http_access allow localnet/http_access allow localnet/" /etc/squid/squid.conf;
    mkdir -p /var/cache/squid;
    cp /etc/squid/squid.conf /etc/squid/squid.conf.in;
    squid
    sleep 15
    cd /var/log/squid
    echo "==========================================ls"
    ls
    tail -f access.log
    echo "==========================================End"
---
apiVersion: apps/v1
kind: Deployment
metadata:
  name: squid
  namespace: proxy-test
  labels:
    app.kubernetes.io/name: squid
spec:
  replicas: 1
  selector:
    matchLabels:
      app.kubernetes.io/name: squid
  template:
    metadata:
      labels:
        app.kubernetes.io/name: squid
    spec:
      containers:
        - name: squid
          image: debian:bullseye
          imagePullPolicy: Always
          command:
            - /bin/entrypoint.sh
          volumeMounts:
          - name: configmap-volume
            mountPath: /bin/entrypoint.sh
            readOnly: true
            subPath: entrypoint.sh
      volumes:
       - name: configmap-volume
         configMap:
          defaultMode: 0700
          name: script-cm
---
apiVersion: v1
kind: Service
metadata:
  labels:
    app.kubernetes.io/name: squid
  name: squid
  namespace: proxy-test
spec:
  ports:
    - name: tcp-proxy
      port: 3128
      targetPort: 3128
  selector:
    app.kubernetes.io/name: squid
---
GitOps Agent FAQs
Here are some answers to commonly asked GitOps Agent questions.
What version of GitOps Agent supports what version of Repo server, Redis cache, and ApplicationSet?
GitOps Agent v0.52.0 supports redis:7.0.8-alpine, Repo server argocd:v2.5.16, and argocd-applicationset:v0.4.1.
How long is a GitOps Agent version supported?
Harness supports GitOps Agent versions that support Argo CD versions n to n-2 minor version (e.g 2.5.4, 2.4.4 2.3.4).
How can I update the GitOps Agent and related components?
The GitOps Agent comes with an upgrader service that performs upgrades and automatically detects when an upgrade is needed.
If you disable automatic upgrades, we recommend you manually update often since Harness is actively rolling out bug fixes and feature enhancements.
The Argo CD components upgrade must be done manually.
Troubleshooting
The following solutions can help with Agent installation errors.
Agent took too long to respond
If you see the error the Agent took too long to respond during installation of an Agent with an existing Argo CD instance, the Agent cannot connect to the Redis/repo server and needs additional NetworkPolicy settings.
Add the following podSelector settings to the NetworkPolicy objects defined in your existing Argo CD argocd-redis and argocd-repo-server services.
The following table lists the NetworkPolicy objects for HA and non-HA Agents, and include the YAML before and after the new podSelector is added.
| NetworkPolicy | HA Agent |
|---|---|
argocd-redis-ha-proxy-network-policy | 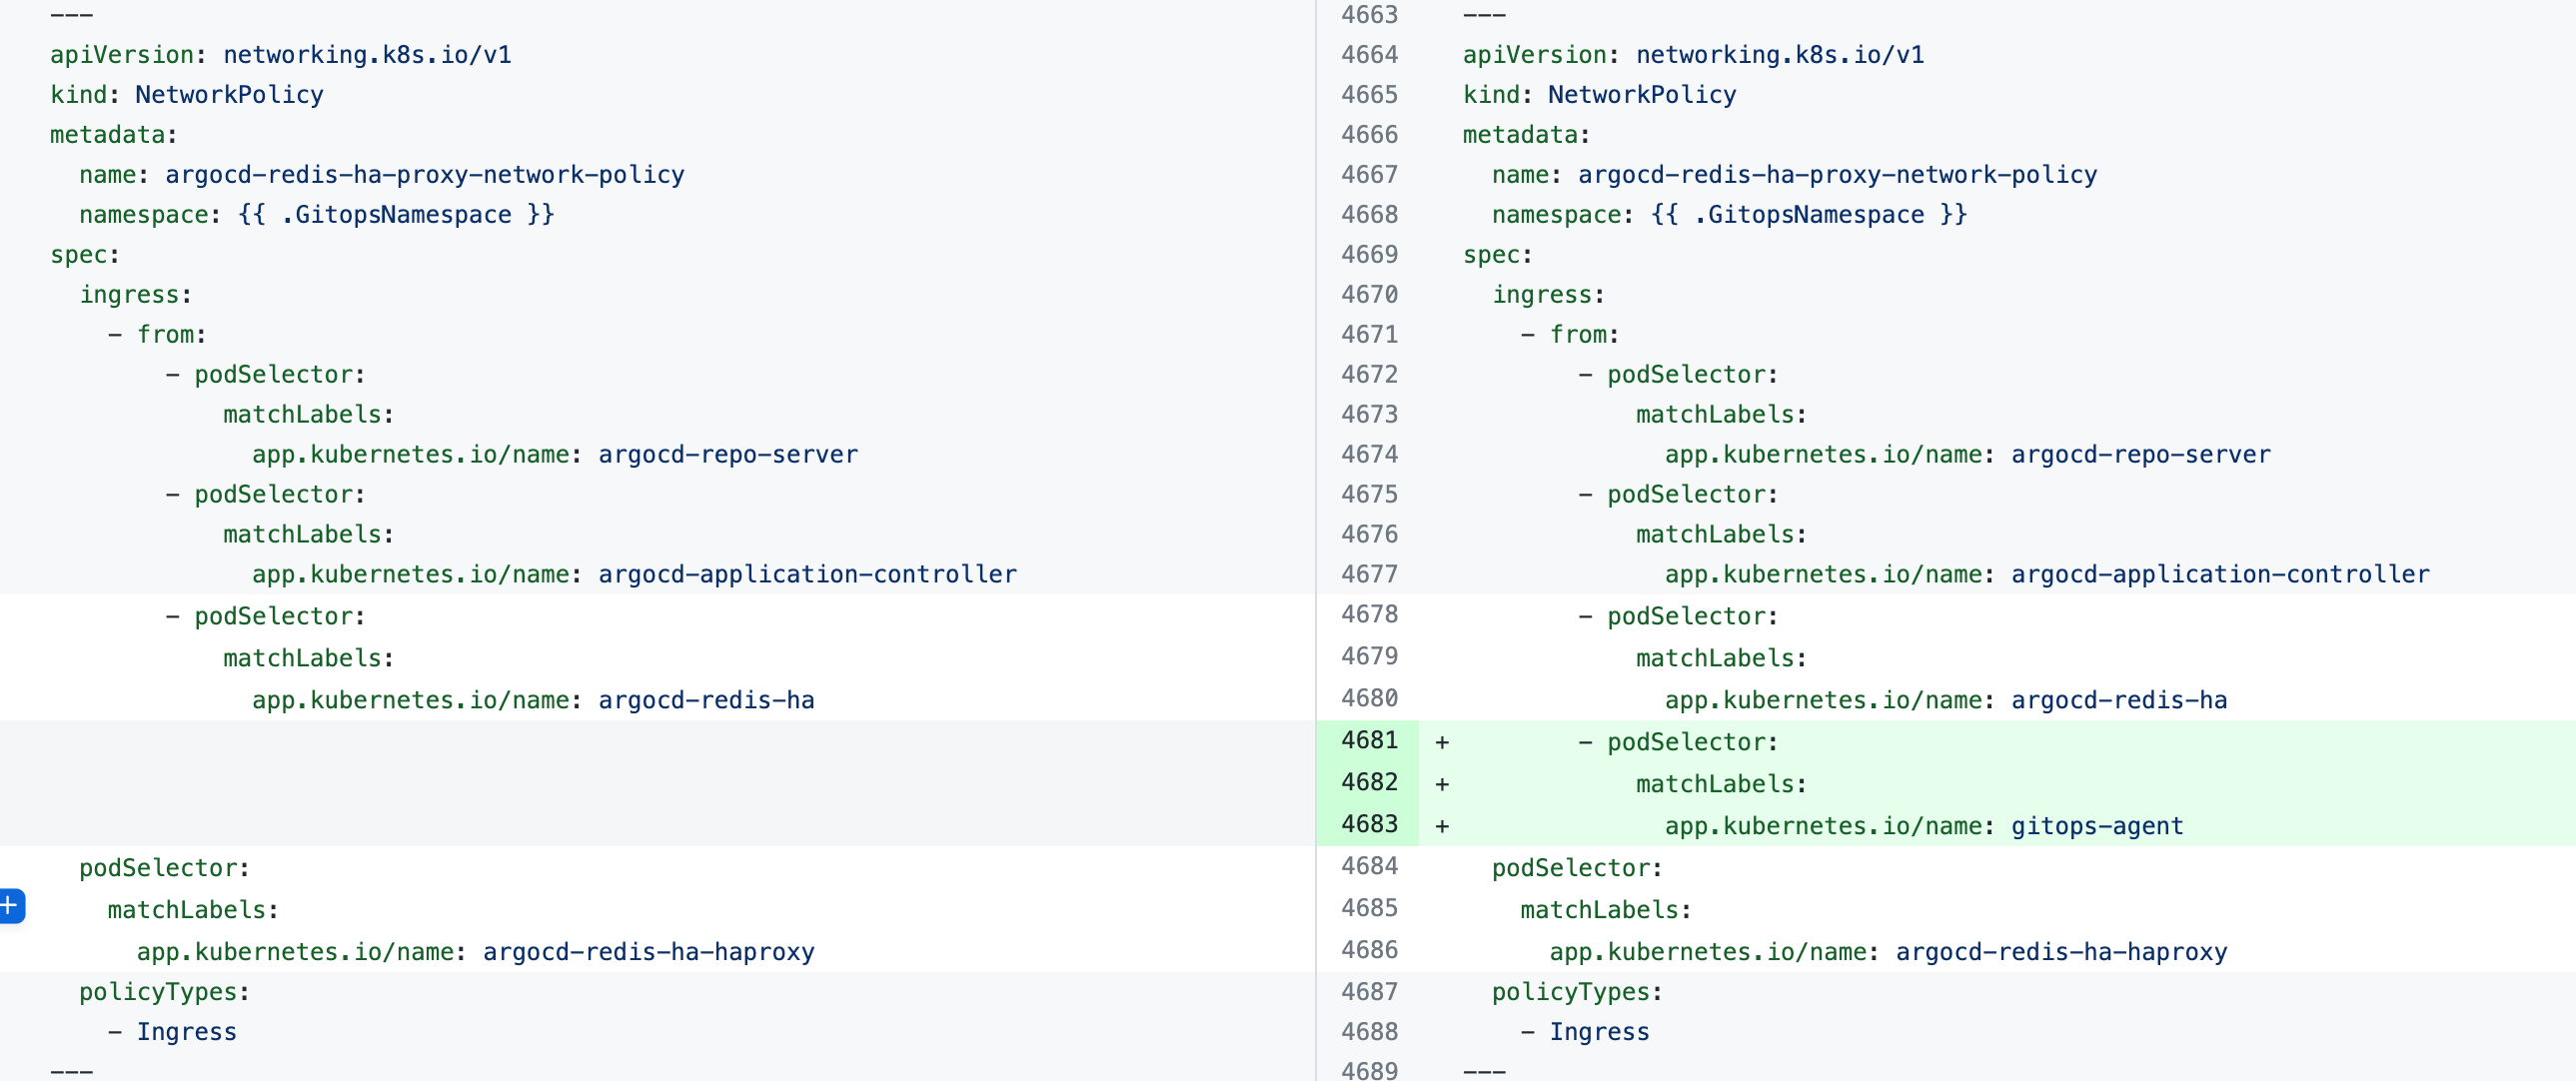 |
argocd-repo-server-network-policy | 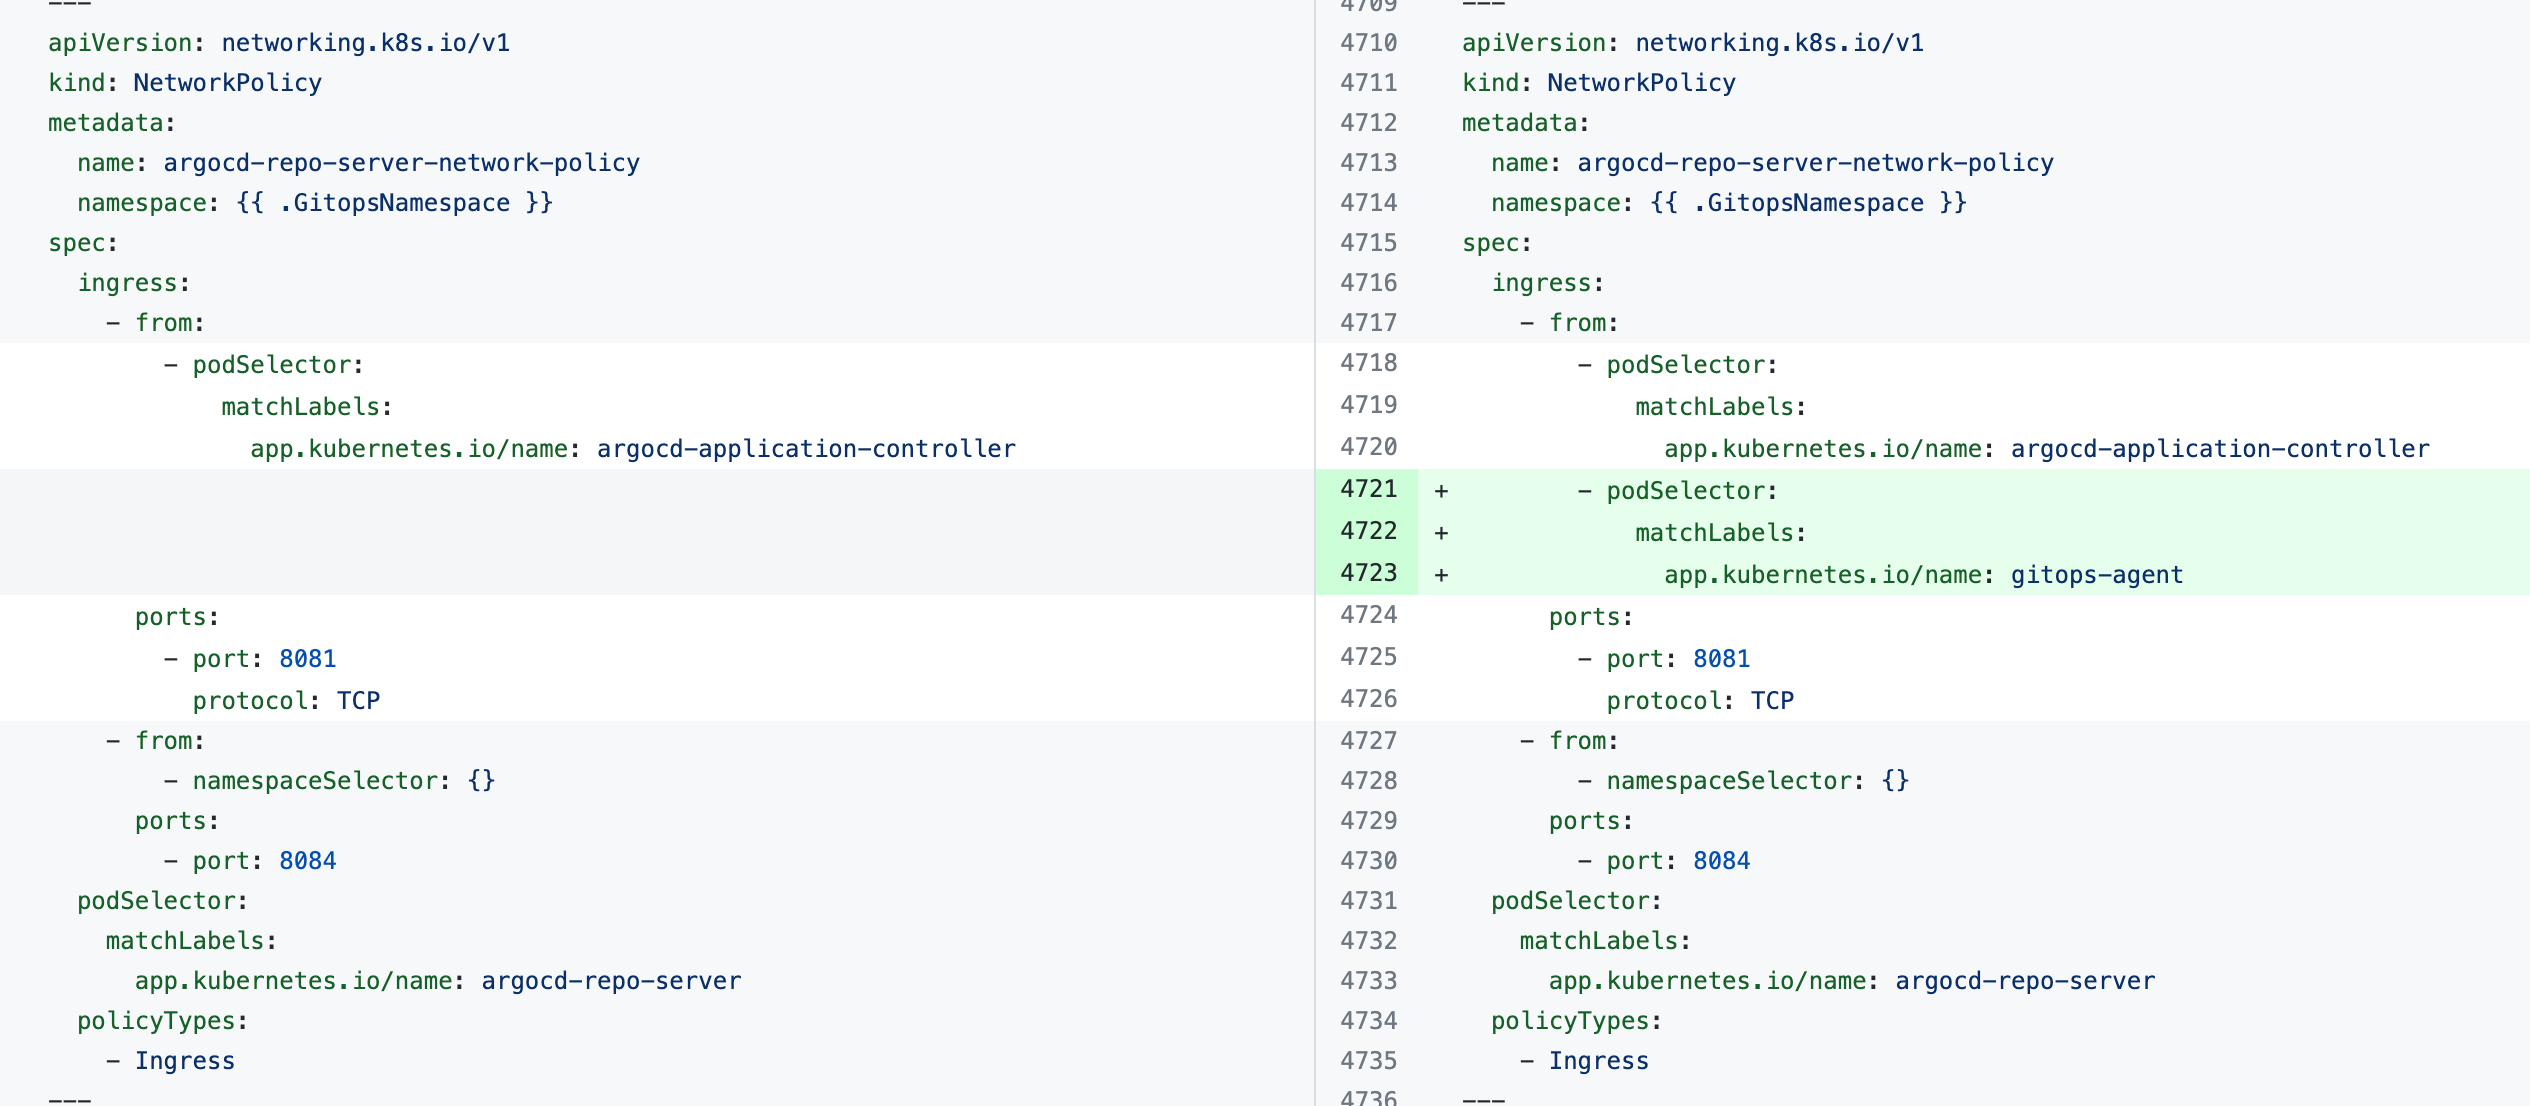 |
| Non-HA Agent | |
argocd-redis-network-policy | 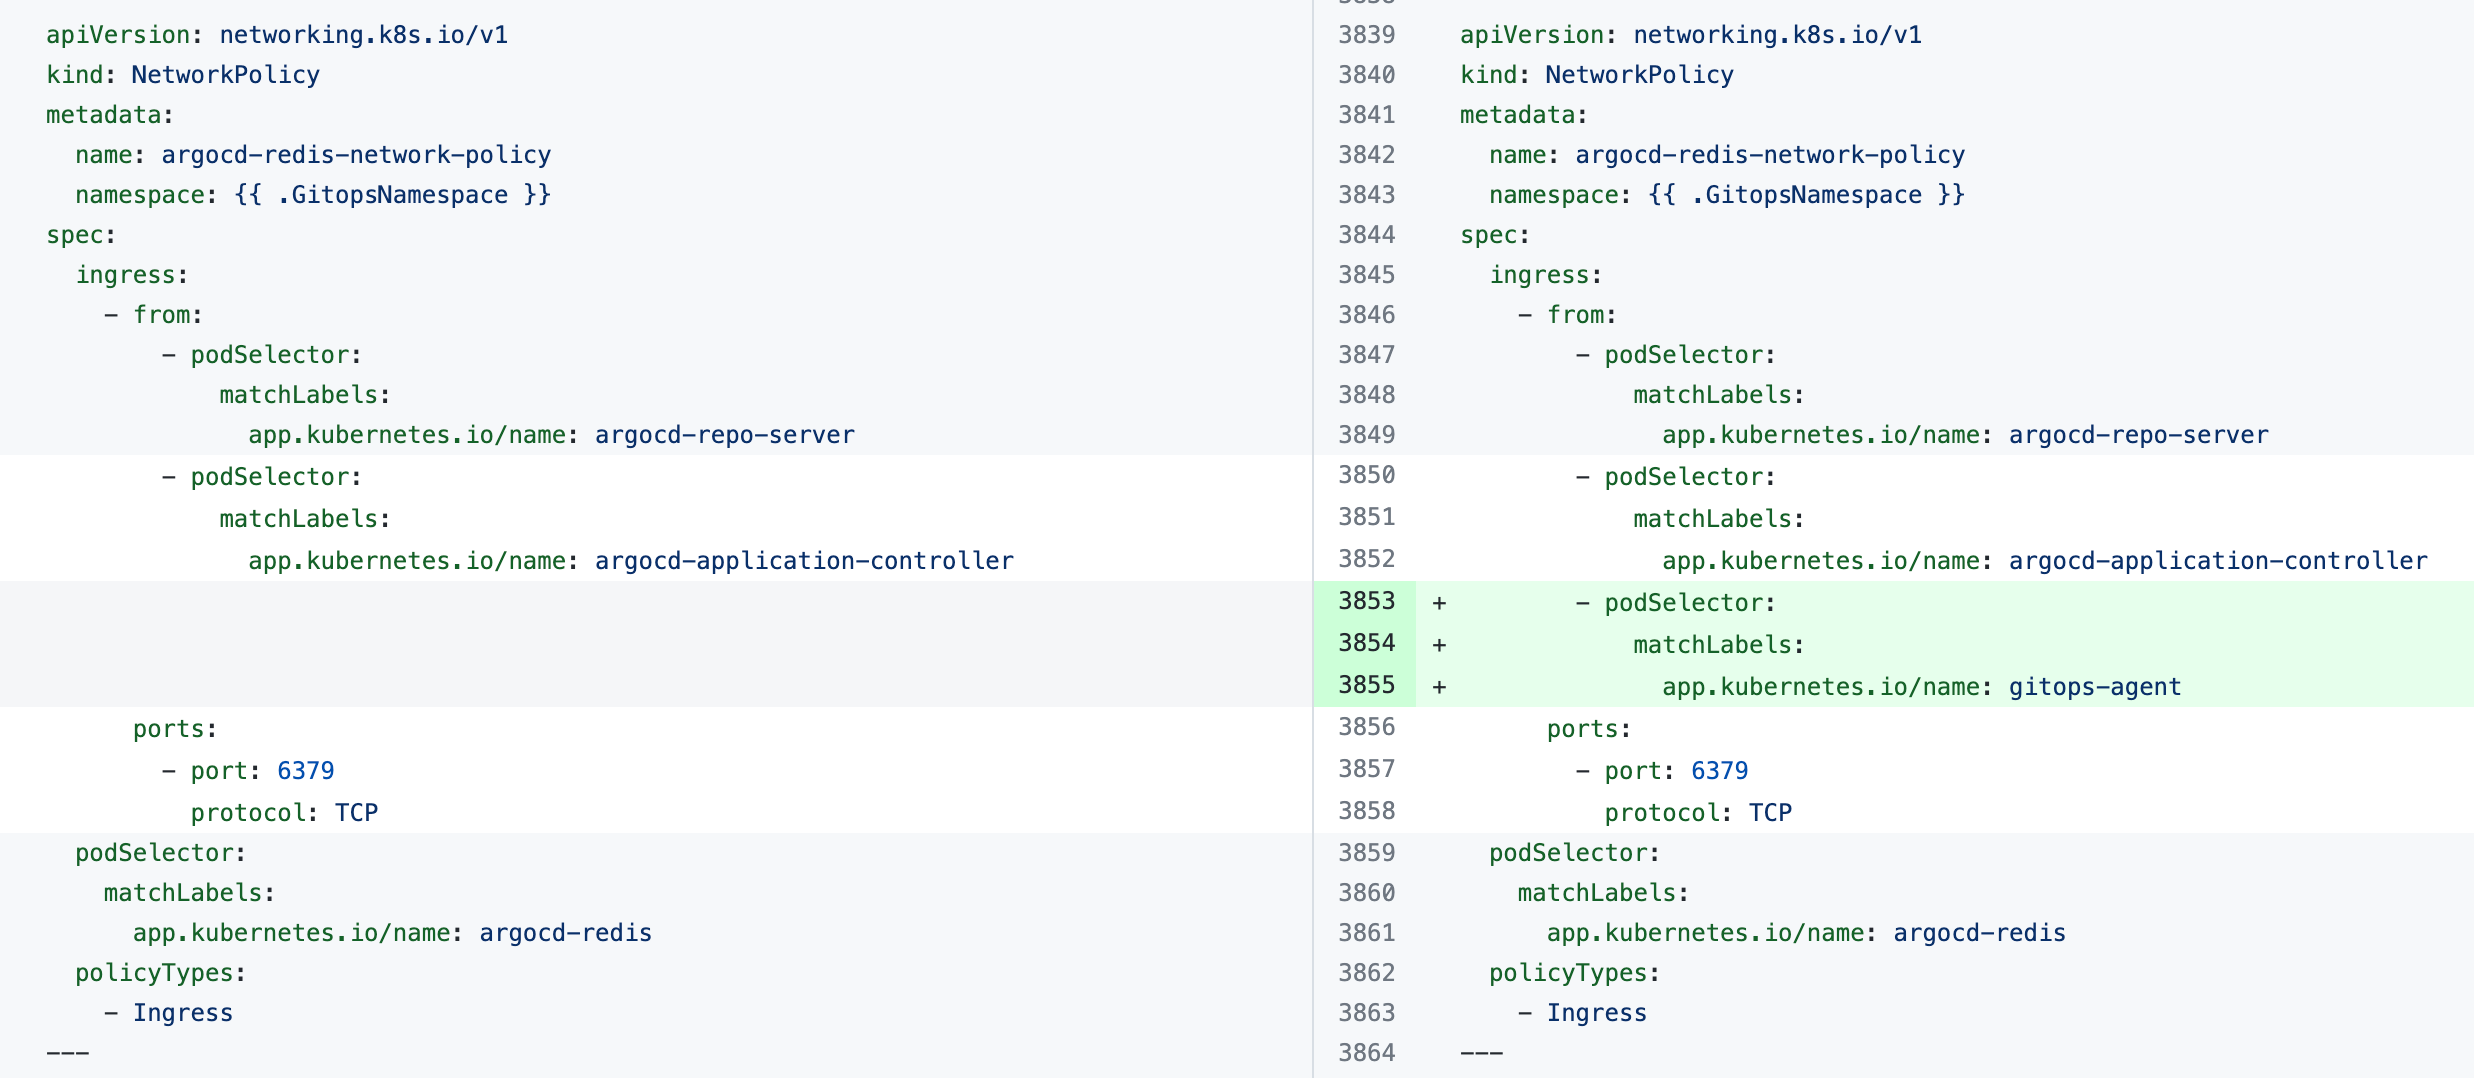 |
argocd-repo-server-network-policy |  |