Set Up Cost Visibility for AWS
Harness Cloud Cost Management (CCM) monitors the cloud costs of your Amazon Web Services (AWS). Connect your AWS account to Harness to get insights into your expenses across your cloud infrastructure and AWS services, such as EC2, S3, RDS, Lambda, and so on. Harness uses a secure, cross-account role with a restricted policy to access the cost and usage reports and resources for cost analysis.
Before You Begin
- Cloud Cost Management Overview
- AWS Access Permissions
- The same connector cannot be used in FirstGen and NextGen. NextGen Connectors are recommended for the best experience of CCM capabilities and features. For information on creating an AWS connector in the NextGen see Set Up Cloud Cost Management for AWS.
After enabling CCM, it takes about 24 hours for the data to be available for viewing and analysis.
Prerequisites
Create an organization that starts with your AWS account as the master account. When you create an organization, you can choose whether the organization supports all features (recommended) or only consolidated billing features. For more information, see Creating an organization.
AWS Access Permissions
If you have a consolidated billing process enabled, then CCM needs read-only access to the cost and usage reports (CUR) stored in the S3 bucket in the master or payer account. This gives access to the cost data for all the accounts (linked/member) in the organization.
If you don't have consolidated billing enabled at the organization level then you can create the CUR at a linked account level.
If you don't have access to your master account, contact your IT or security teams to get the following permissions.
Master Account: The following permissions are needed:
- Provides access to your S3 bucket:
 "s3:GetBucketLocation",
 "s3:ListBucket",
"s3:GetObject"- Validates CUR parameters:
"cur:DescribeReportDefinitions"- Provides access to all the linked accounts:
"organizations:Describe*",

"organizations:List*"- For more information on the policies, see AWS master account template.
Stack Set (optional): Provide the following permissions to the stack set deployed in your master account. For more information on the policies, see AWS linked account template.
"eks:Describe*",
"eks:List*",
"ecs:ListServices",
"ec2:DescribeInstances",
"cloudwatch:GetMetricData",
"ecs:ListTasks",
"ecs:ListContainerInstances",
"ecs:DescribeTasks"
You can also limit visibility into specific accounts:
- Contact the Harness Support team to whitelist or blacklist those accounts for which you want to limit visibility.
- Deploy stack set to those linked accounts for which you want to limit visibility into event collection and watching clusters. However, it is recommended to deploy a stack set to the entire organization.
Connect to Your AWS Master Account
To enable CCM for your AWS services (such as EC2, S3, RDS, Lambda, and so on), you simply need to connect Harness to your AWS accounts.
Perform the following steps to connect to your AWS master account:
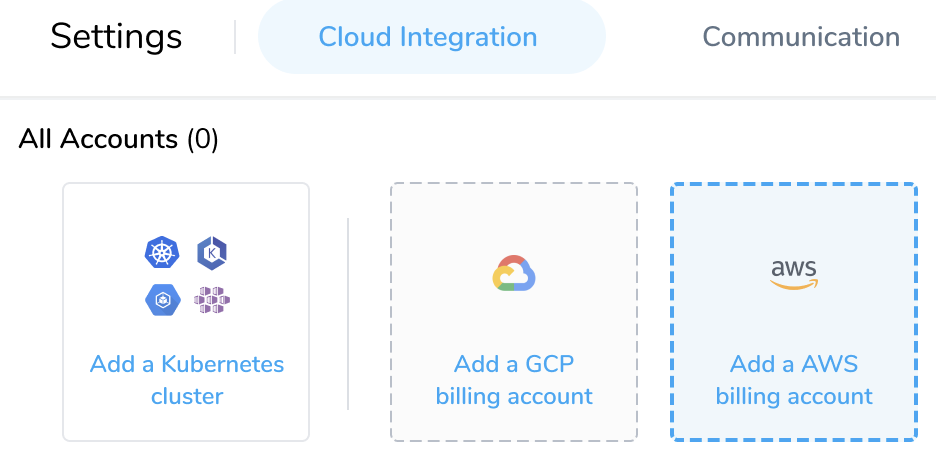
In Cloud Cost Management, click Settings and then click Cloud Integration.
In Cloud Integration, click Add a AWS billing account.
Connect to your AWS Master Account. This involves the following steps:
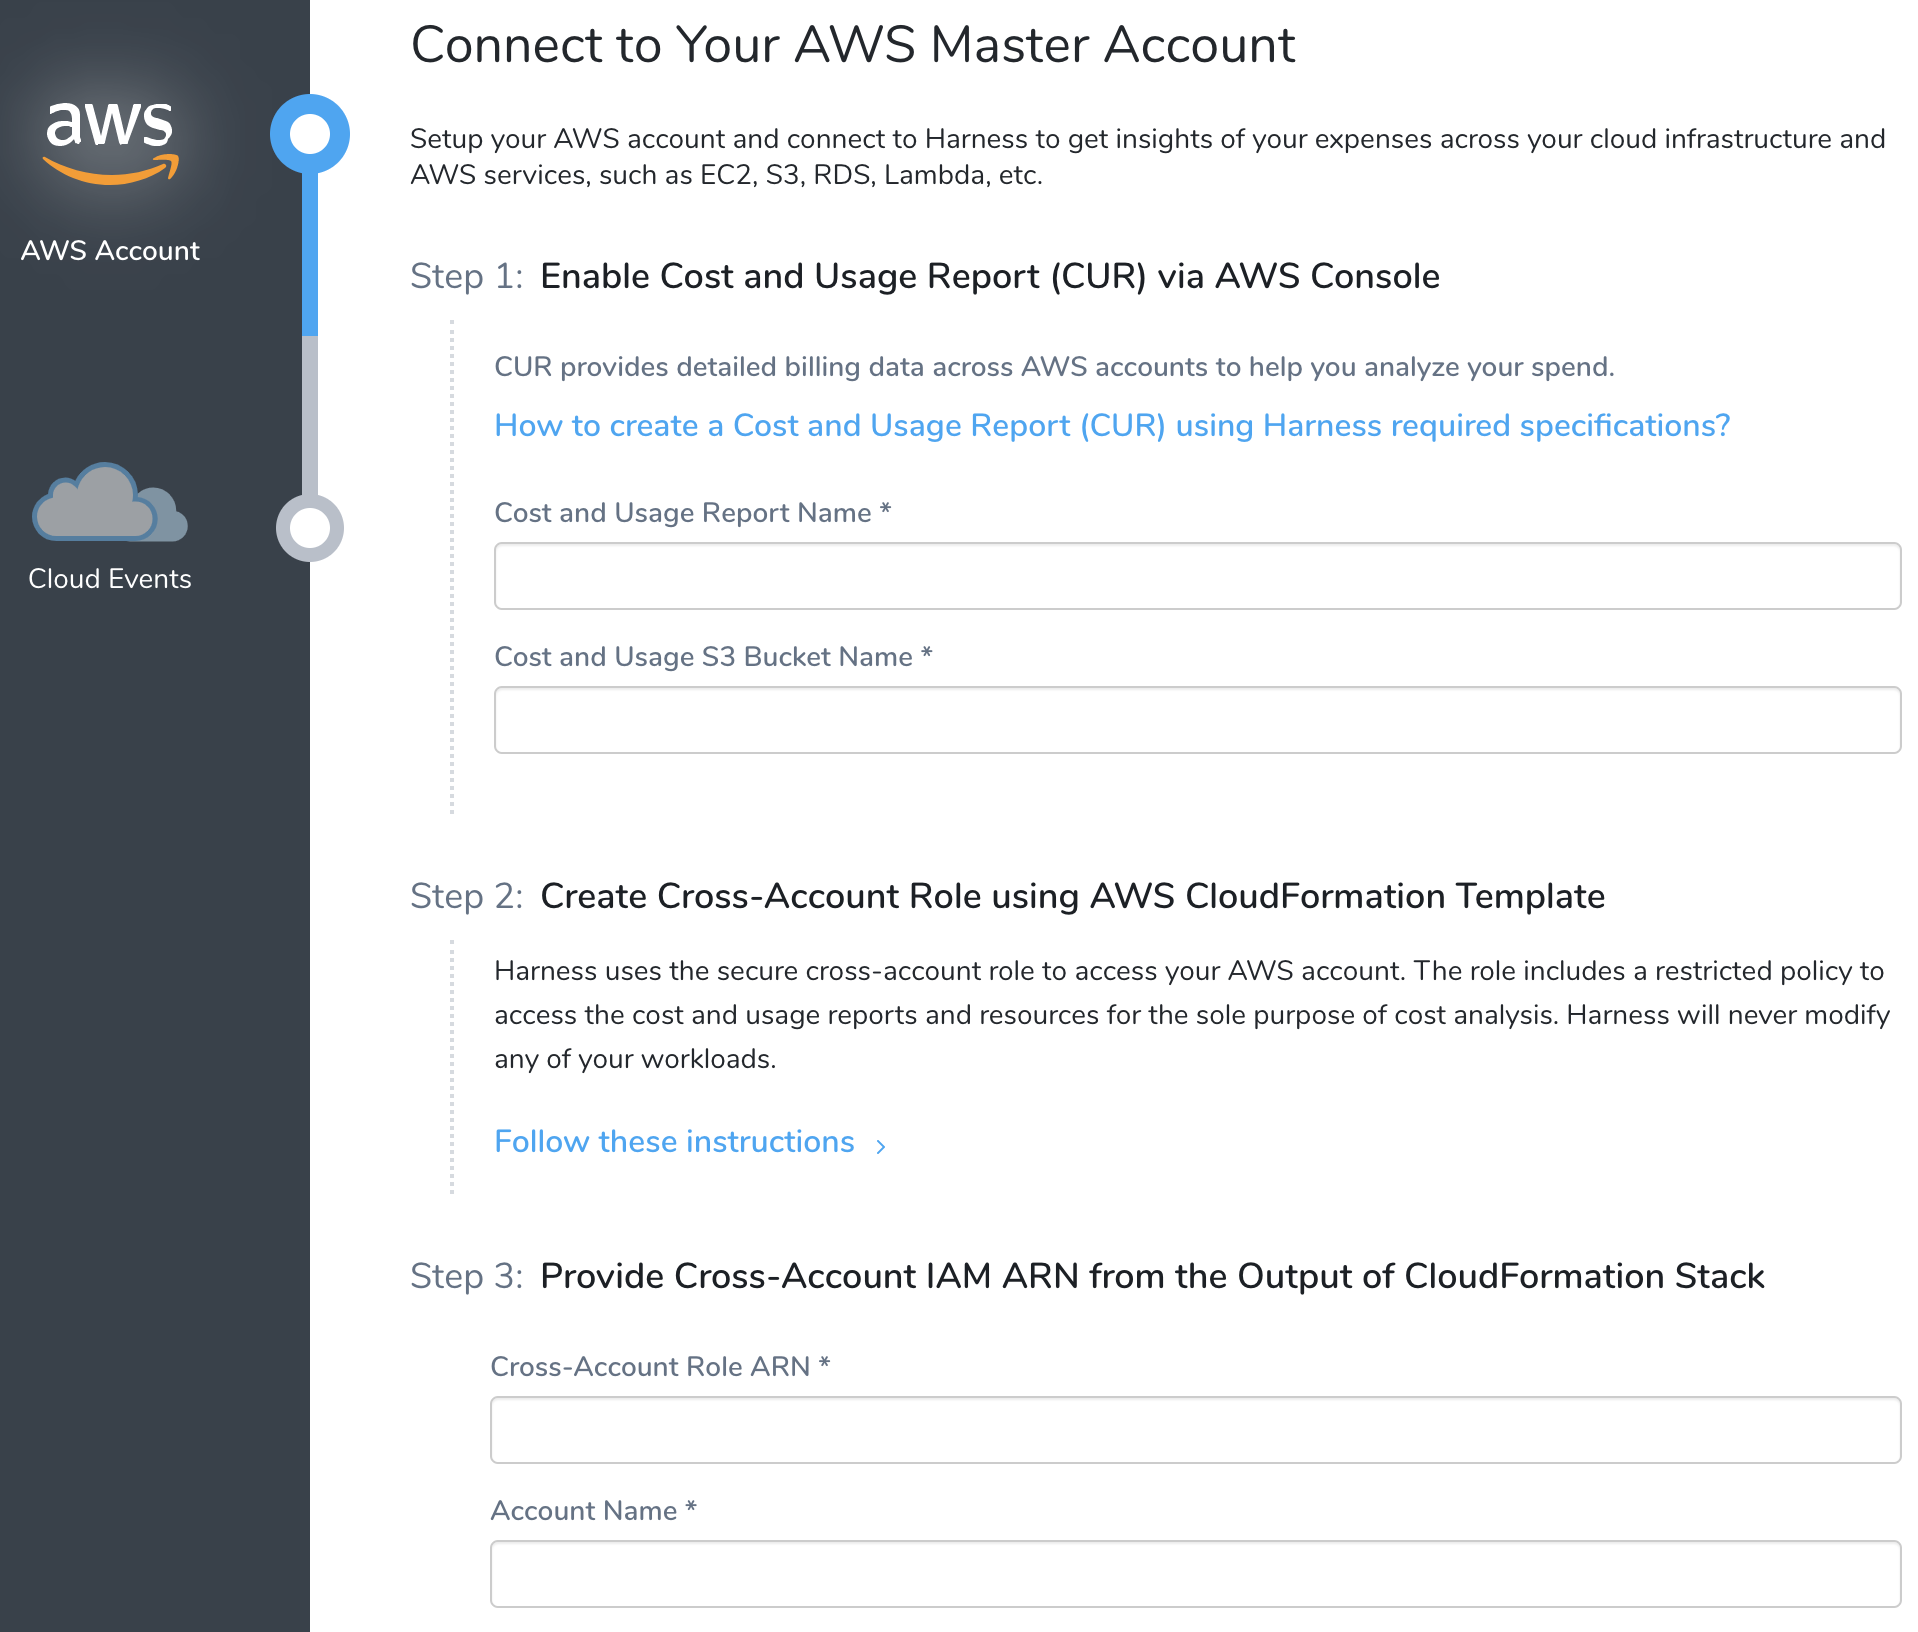
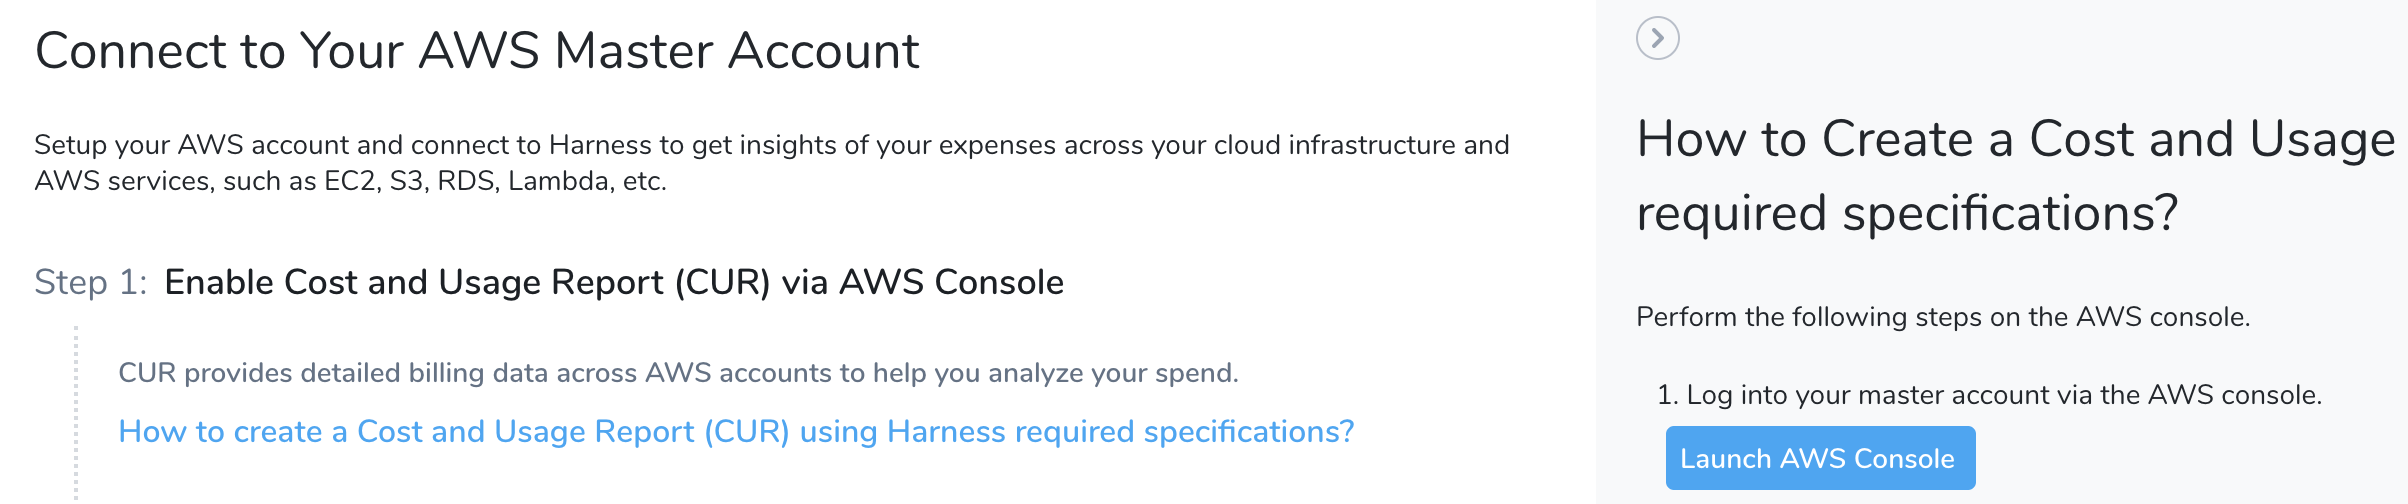
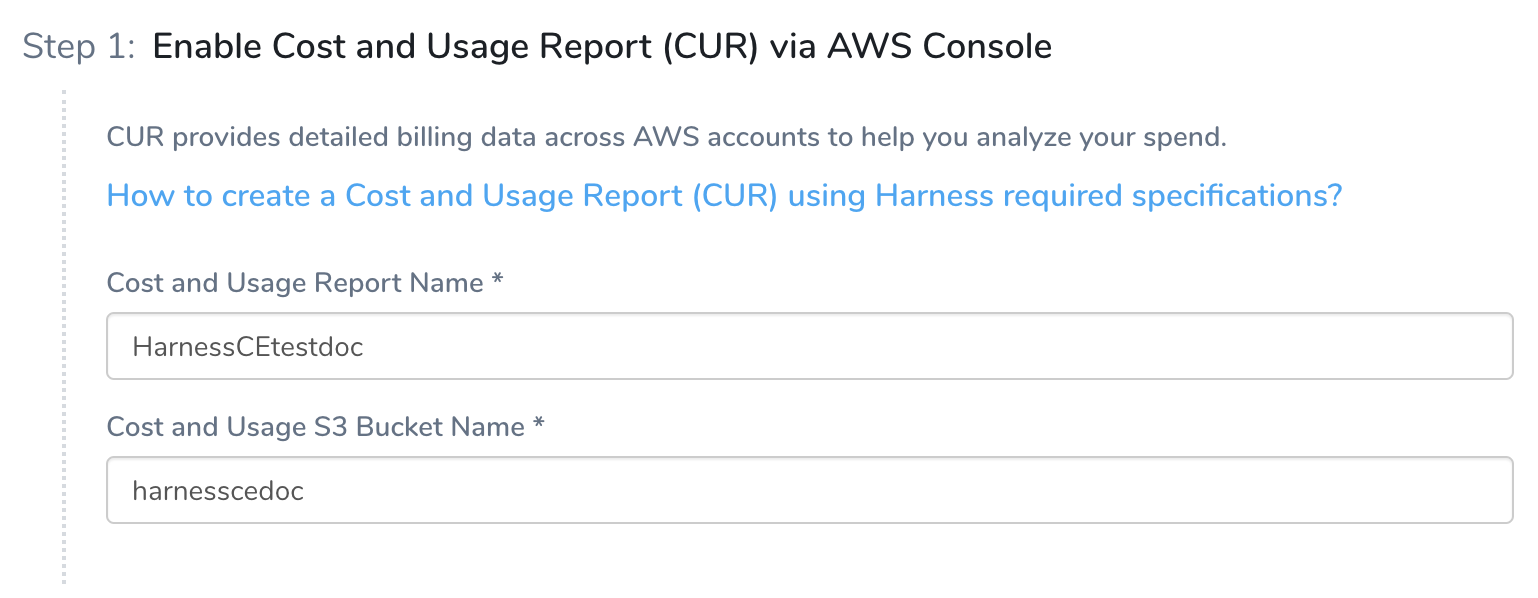
Step 1: Enable Cost and Usage Report (CUR) via AWS console
CUR provides detailed billing data across AWS accounts to help you analyze your spend.
You need to enter the cost and usage report name and cost and usage S3 bucket name in Harness. To get these details, do the following:
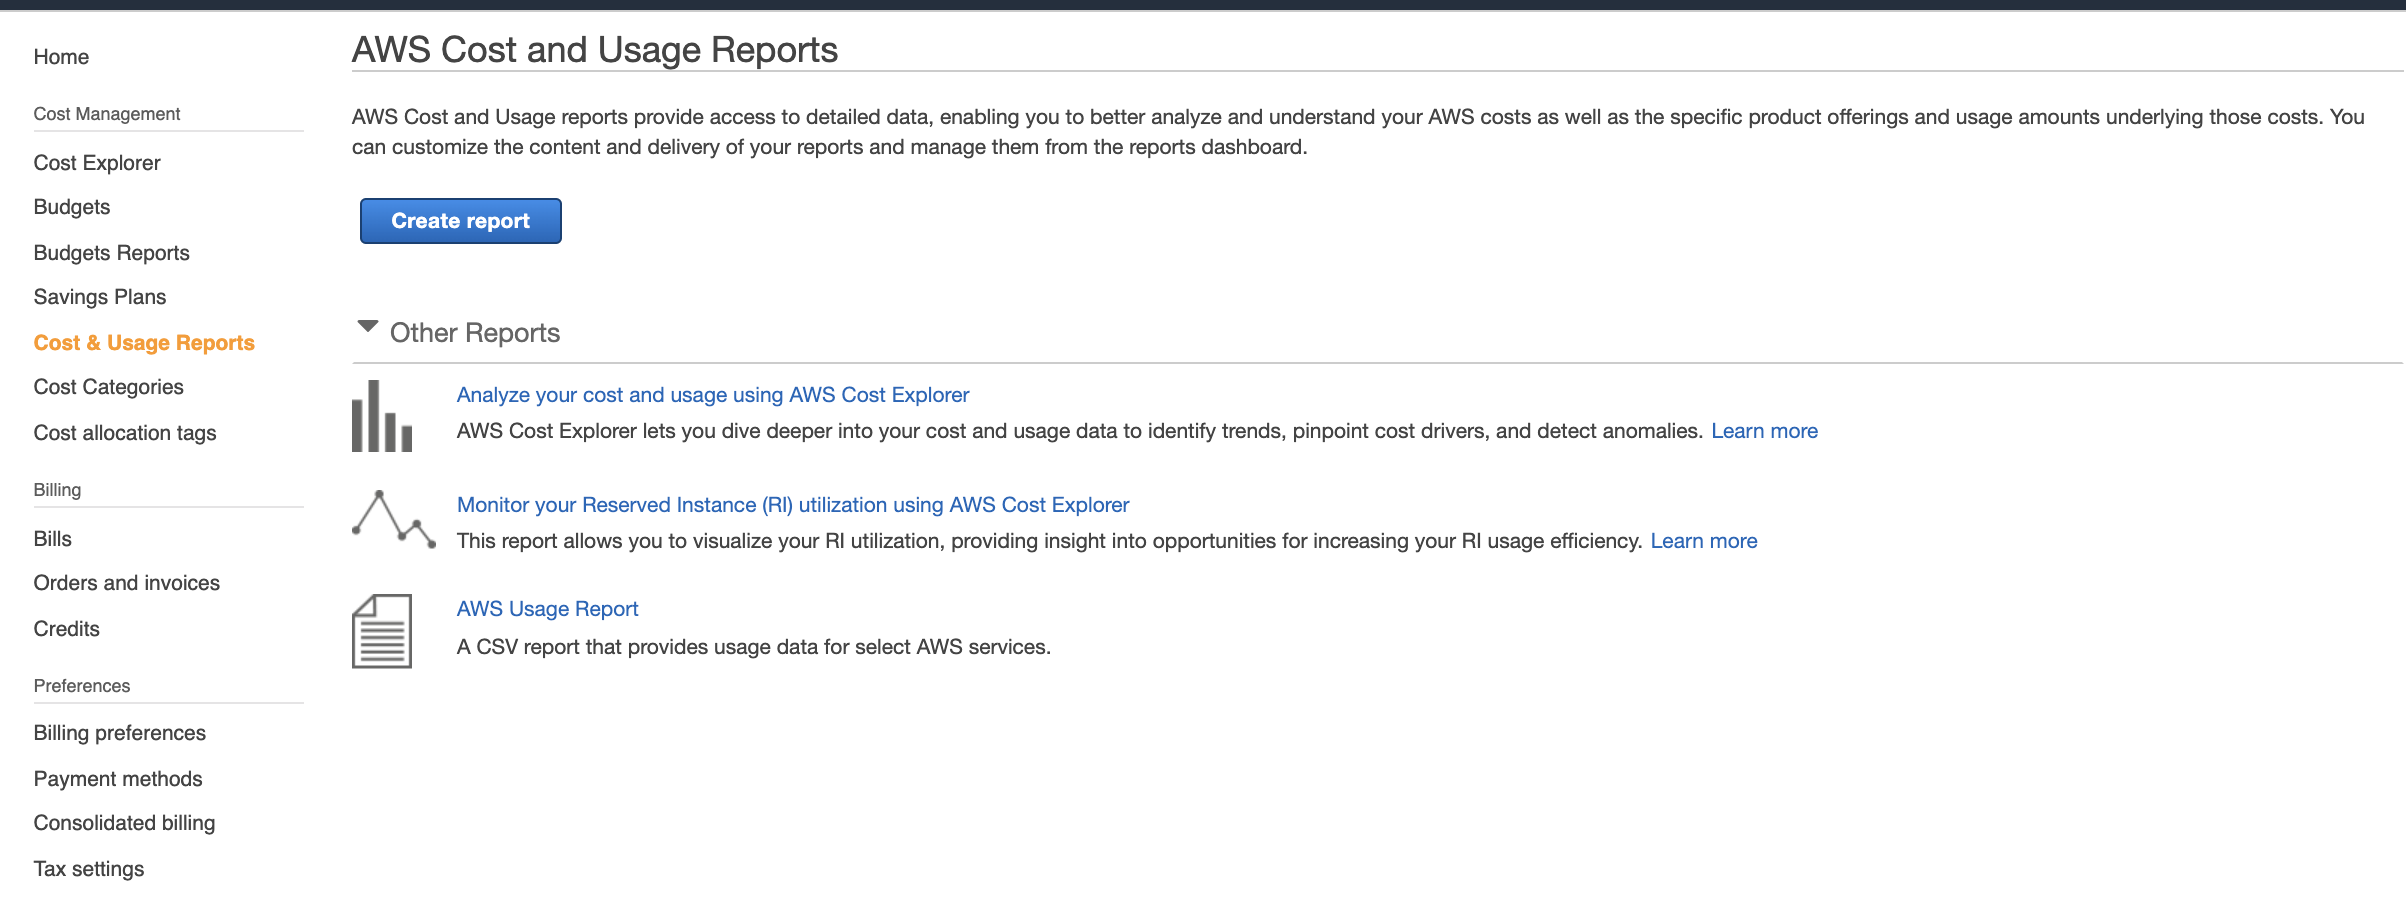
Log into your AWS Master Account via AWS console. To launch the AWS console, click How to create a Cost and Usage Report (CUR) using Harness required specifications? and click Launch AWS Console.
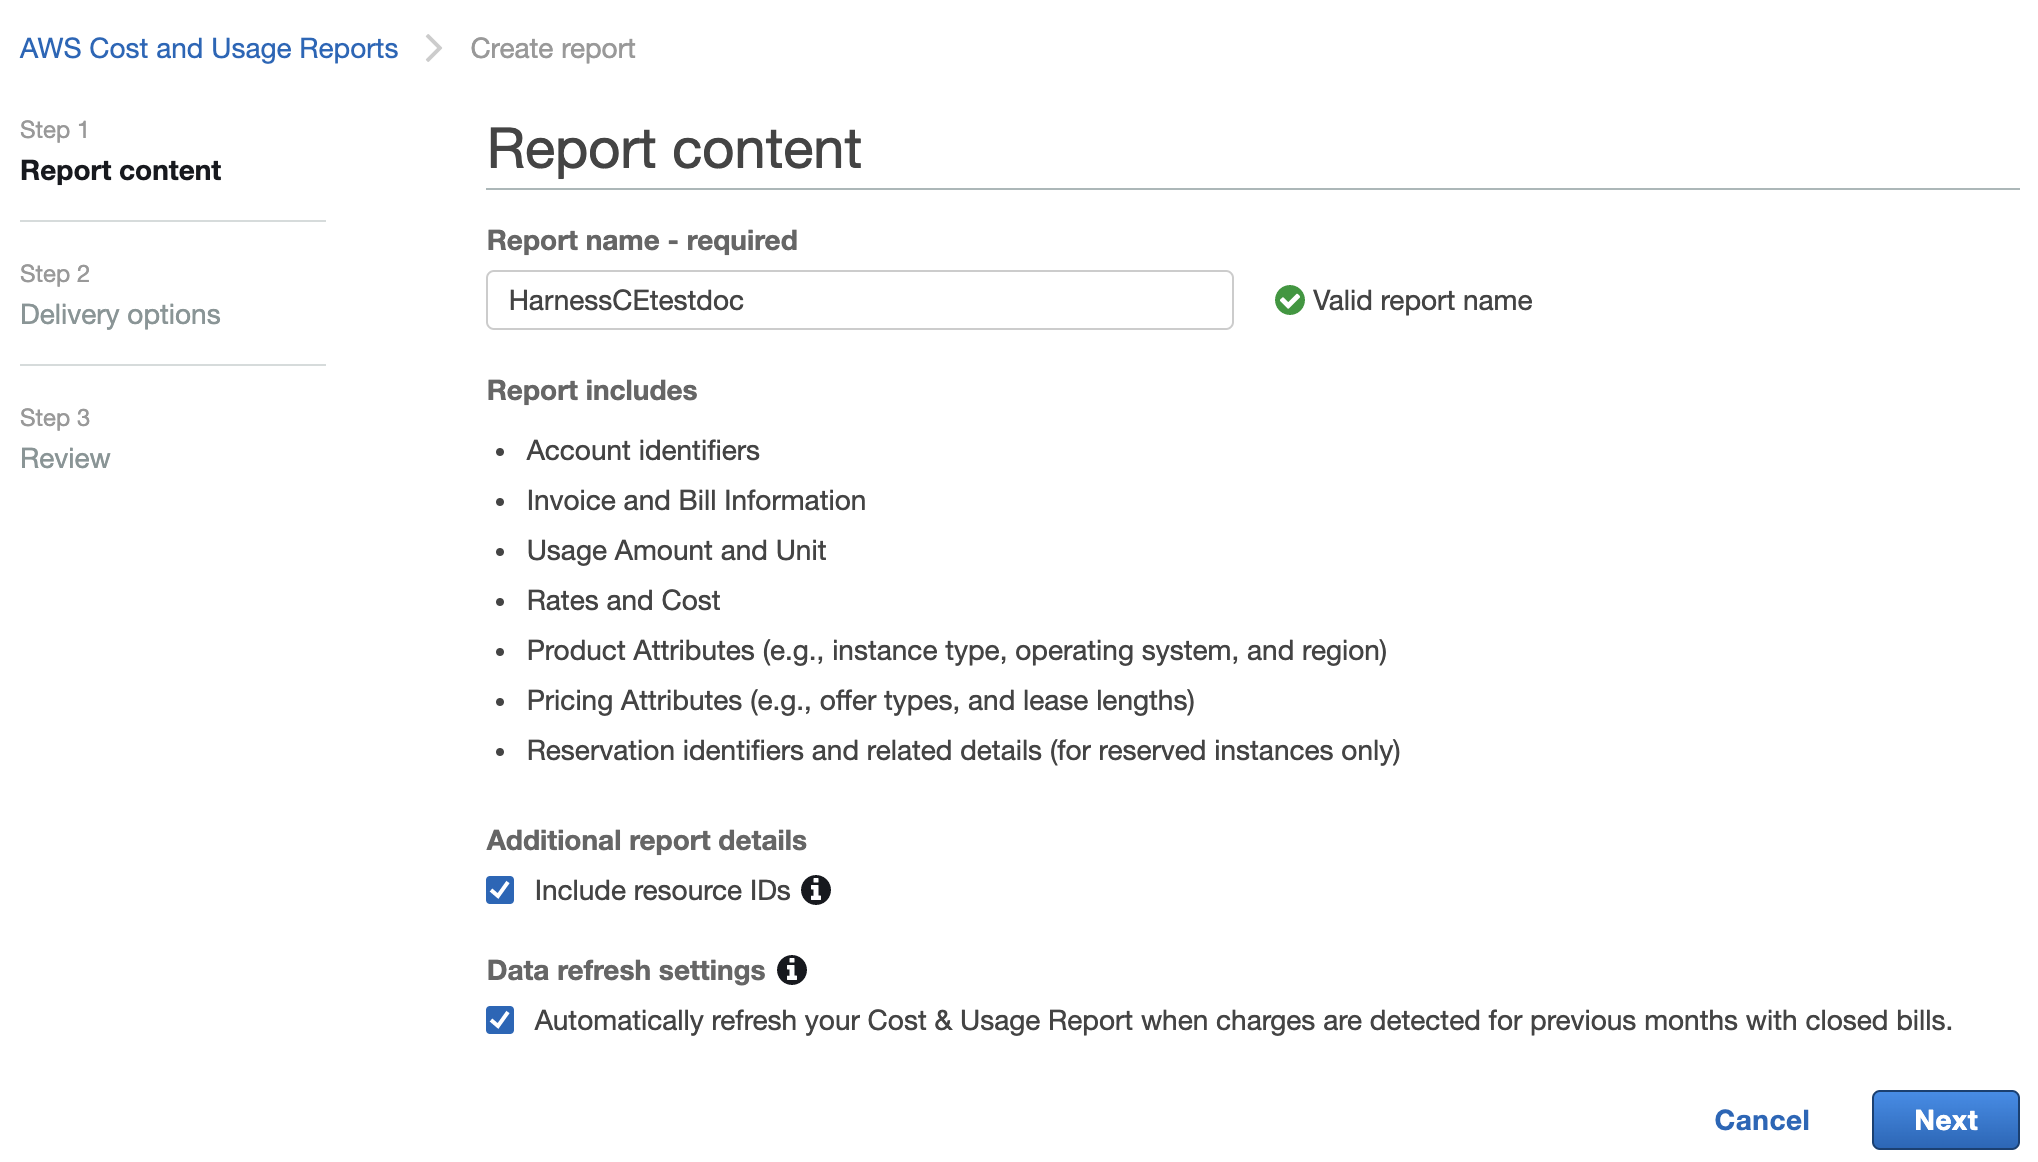
In AWS Cost and Usage Reports, click Create Report.
Enter the Report Name. This is the CUR name that you need to enter in Harness.
In Additional report details, select the checkbox Include resource IDs to include the IDs of each individual resource in the report.
In Data refresh settings, select the checkbox Automatically refresh your Cost & Usage Report when charges are detected for previous months with closed bills.
Click Next.
When you are done with the Report content step, it will look something like this:
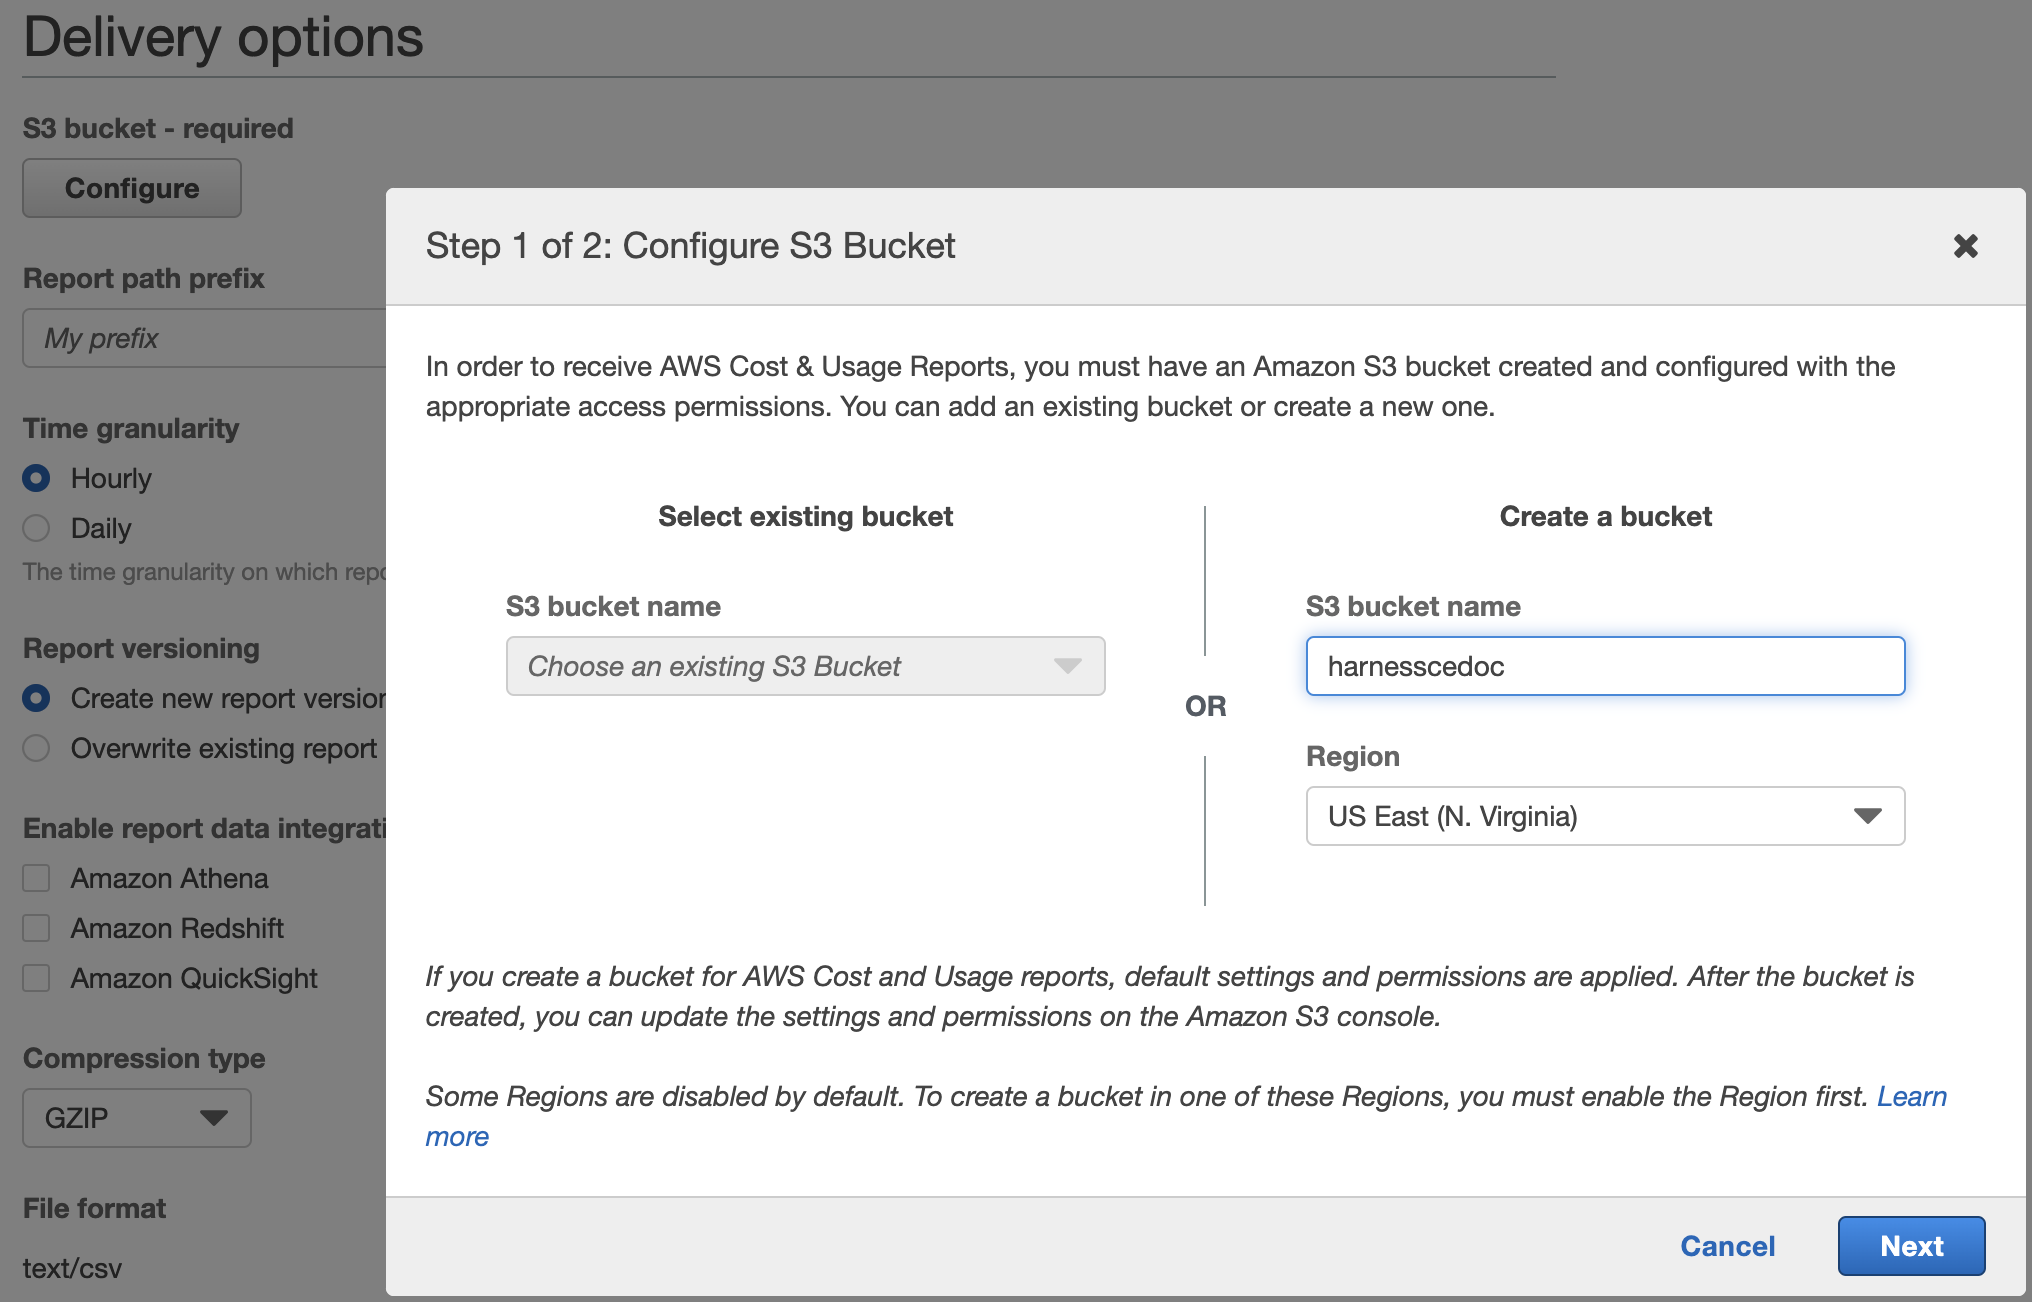
In the S3 bucket, click Configure.
In Configure S3 Bucket, in Create a bucket, enter S3 bucket name. This is the cost and usage S3 bucket name that you need to enter in Harness. For more information on S3 bucket naming requirements, see Amazon S3 Bucket Naming Requirements.
Select Region from the drop-down list and click Next. It is recommended to select US East (N. Virginia).
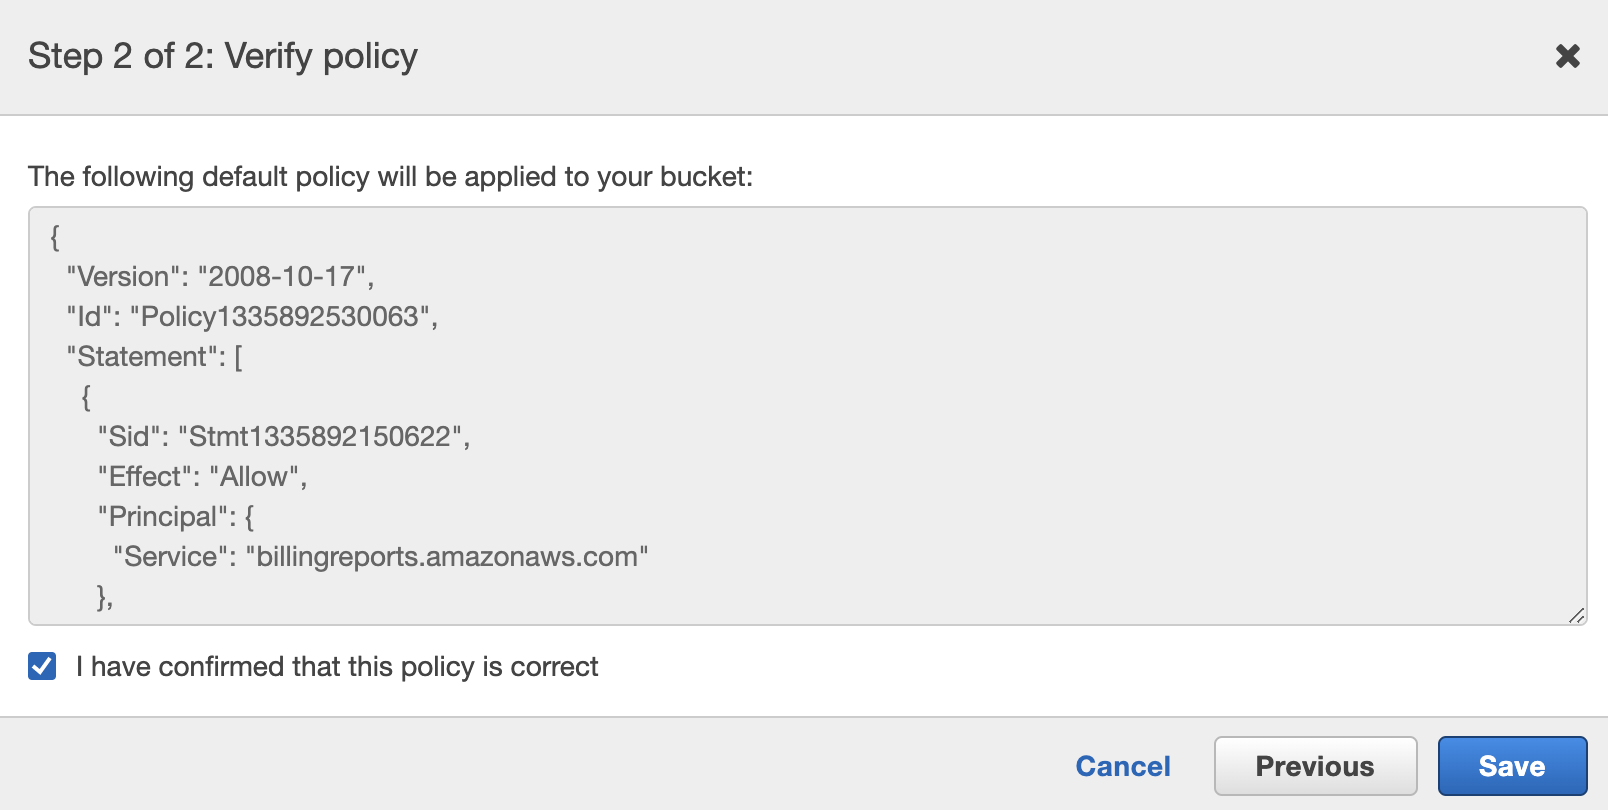
In Verify policy, select the checkbox I have confirmed that this policy is correct and click Save.
Enter the report path prefix that you want prepended to the name of your report.
Select Hourly in Time granularity.
Select Overwrite Existing Report in Report versioning.
Do not select any value in Enable report data integration for.
Select GZIP in the Compression type.
Click Next.
When you are done with the Delivery options step, it will look something like this:

- Review your report details and click Review and Complete.
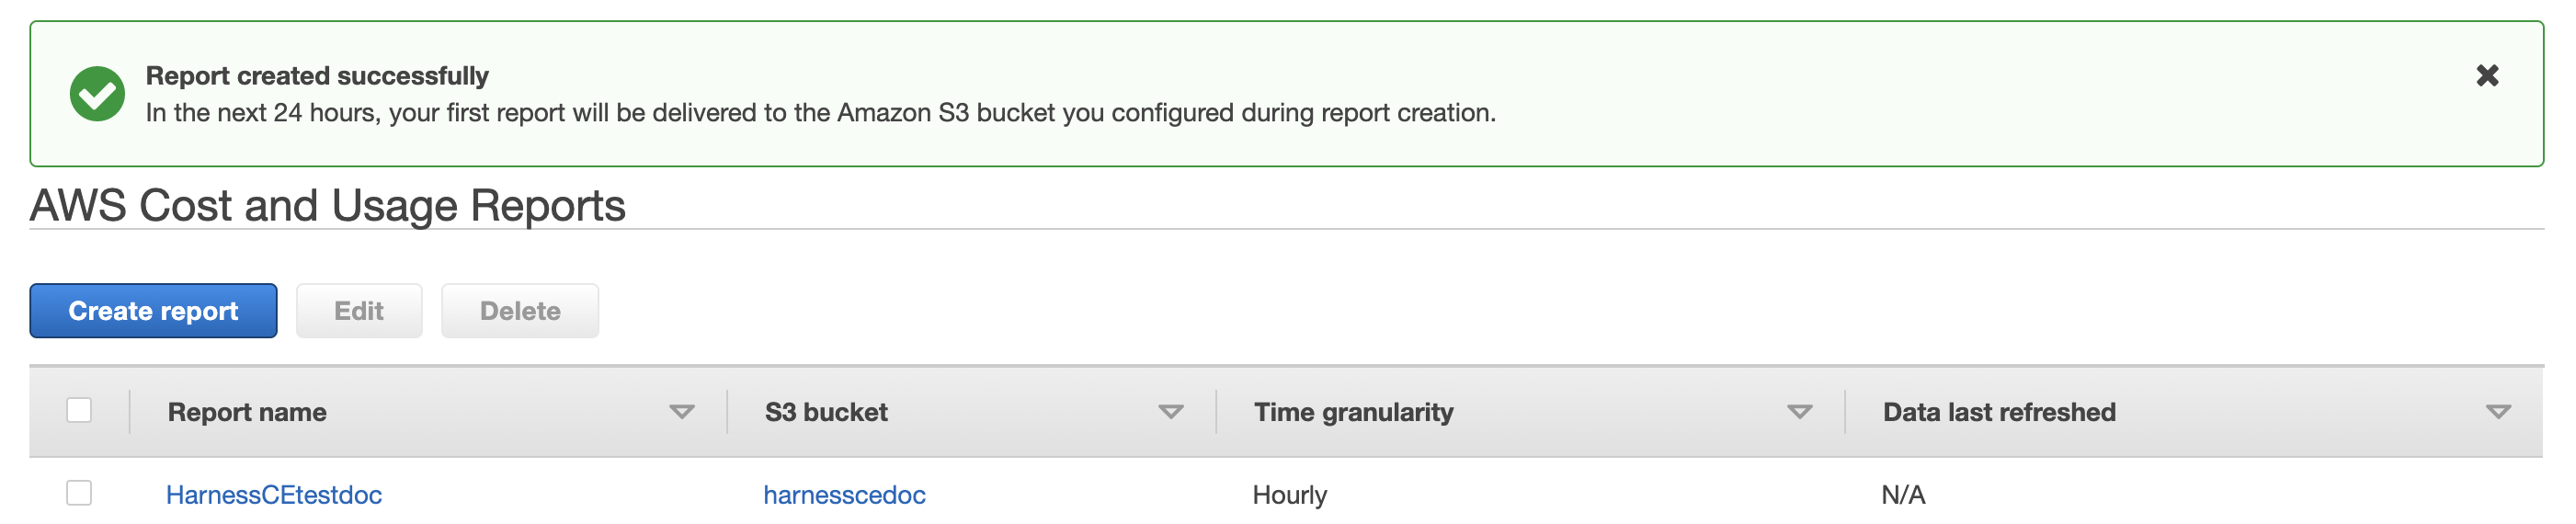
Enter the Cost and Usage Report Name (as entered in step 3) and Cost and Usage S3 Bucket Name (as entered in step 8) in Harness.
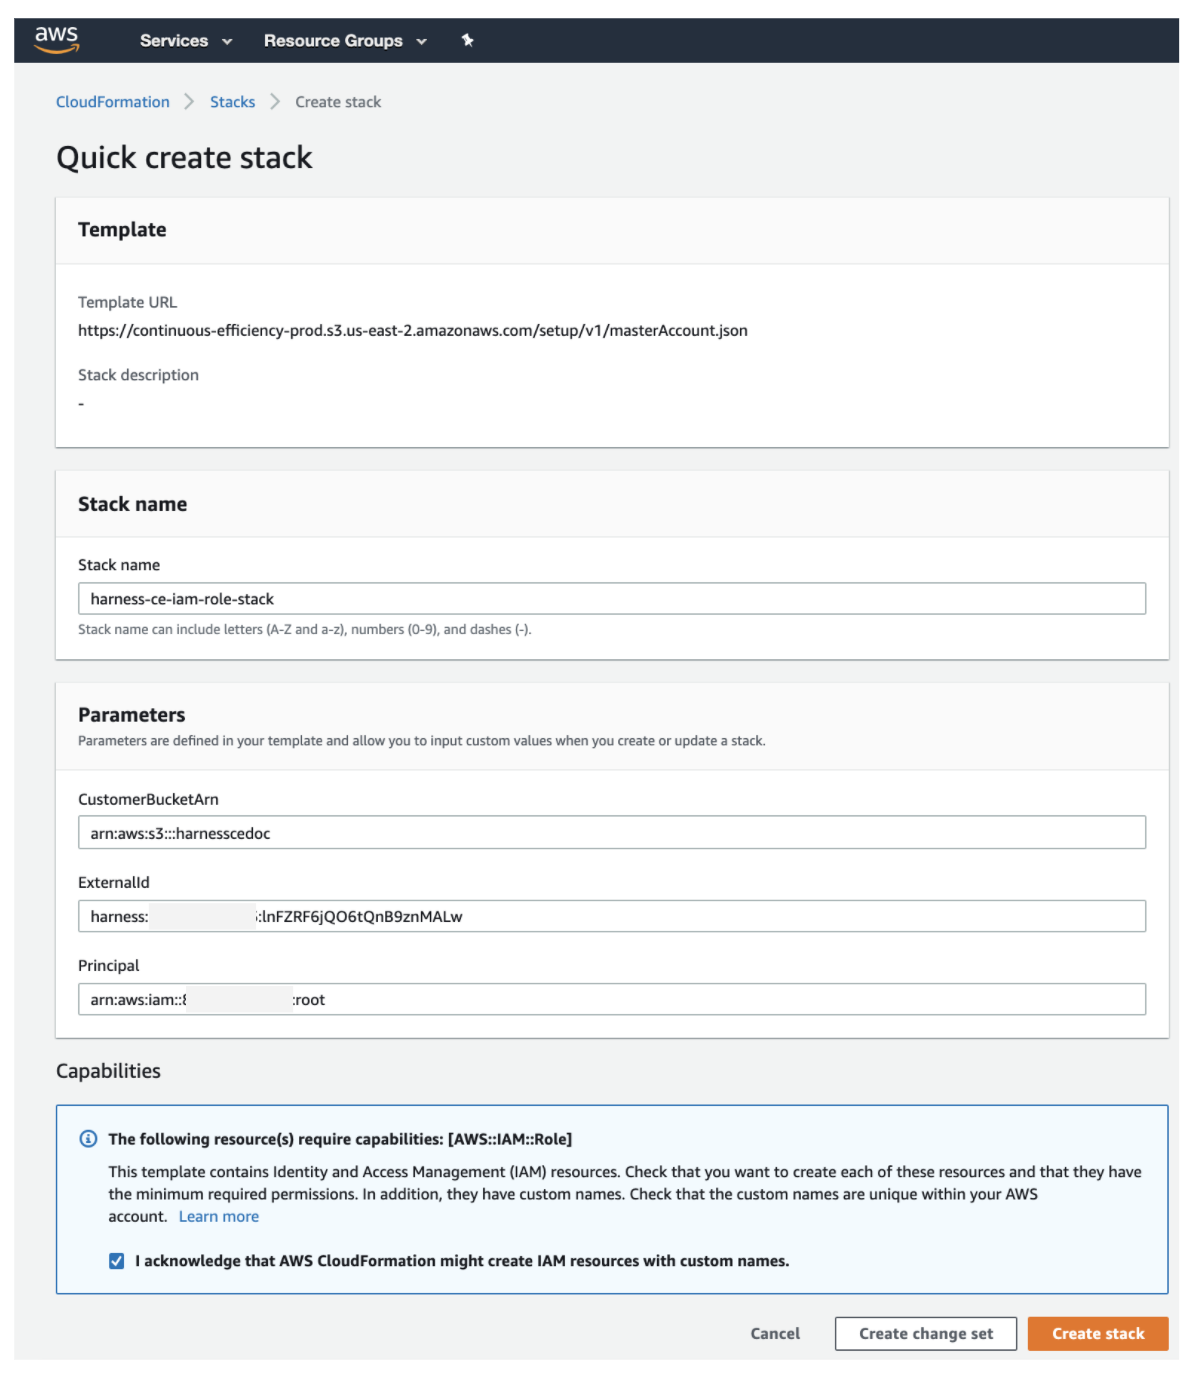
Step 2: Create Cross-Account IAM Role using the AWS CloudFormation Template
Harness uses the secure cross-account role to access your AWS account. The role includes a restricted policy to access the cost and usage reports and resources for cost analysis. Harness will never modify any of your workloads.
Click Follow these instructions and click Launch Template. You can review the template before launching it. To review, click View Template.Ensure that you are logged into your AWS master account. The master account is the account that creates the organization.
In Quick create stack, in Capabilities, select acknowledgment, and click Create stack.
In the Stacks page, from Outputs tab copy Value.
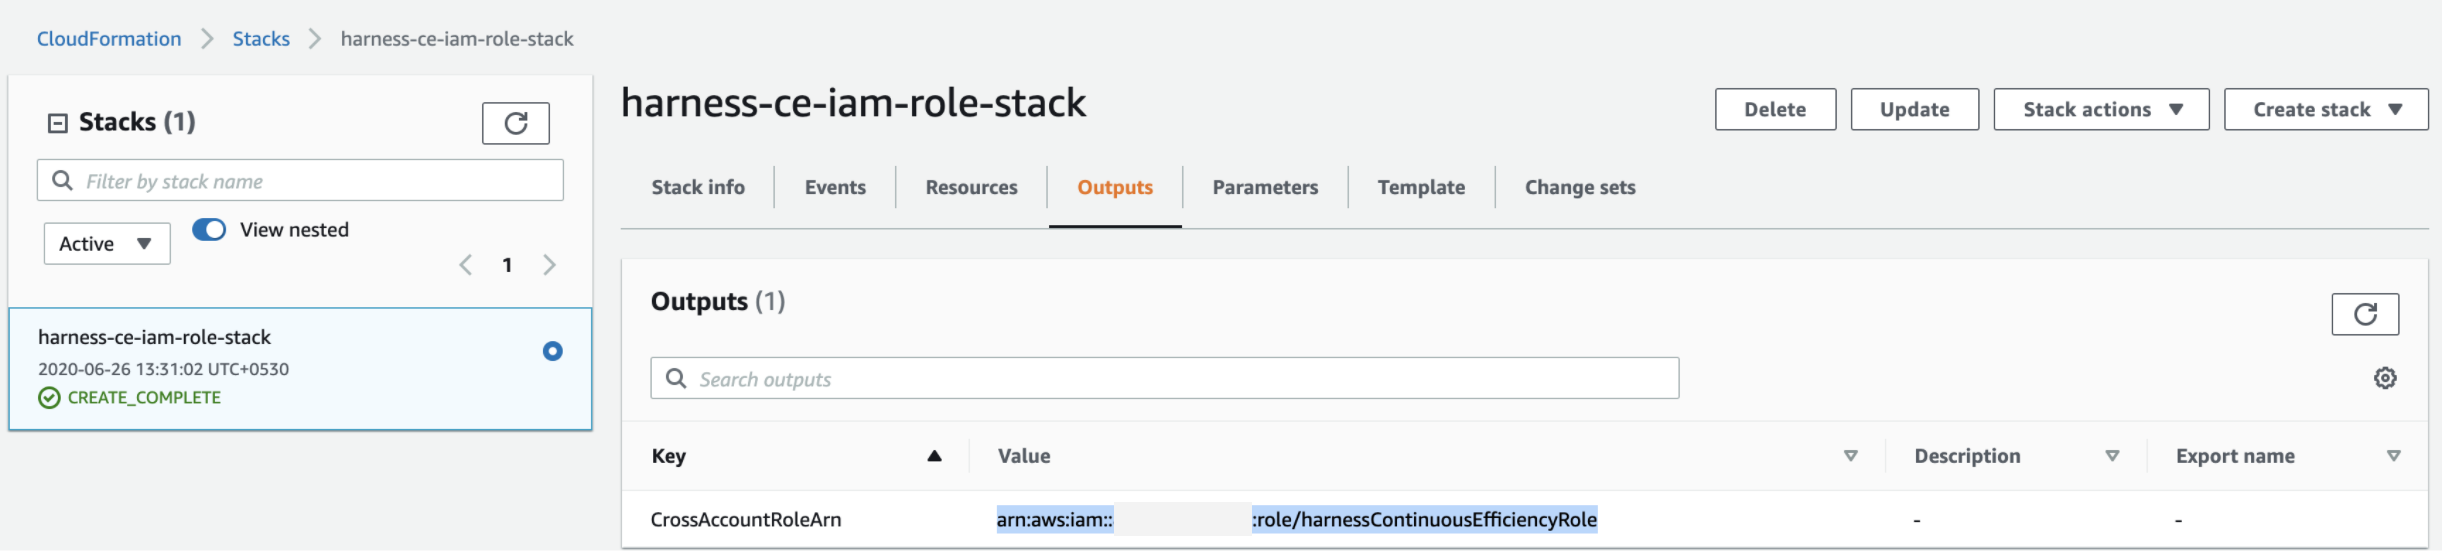
Step 3: Provide Cross-Account IAM ARN from the Output of CloudFormation Stack
Enter the Cross-Account Role ARN that you copied from the Outputs tab (previous step) in Harness.
Enter the Account Name.
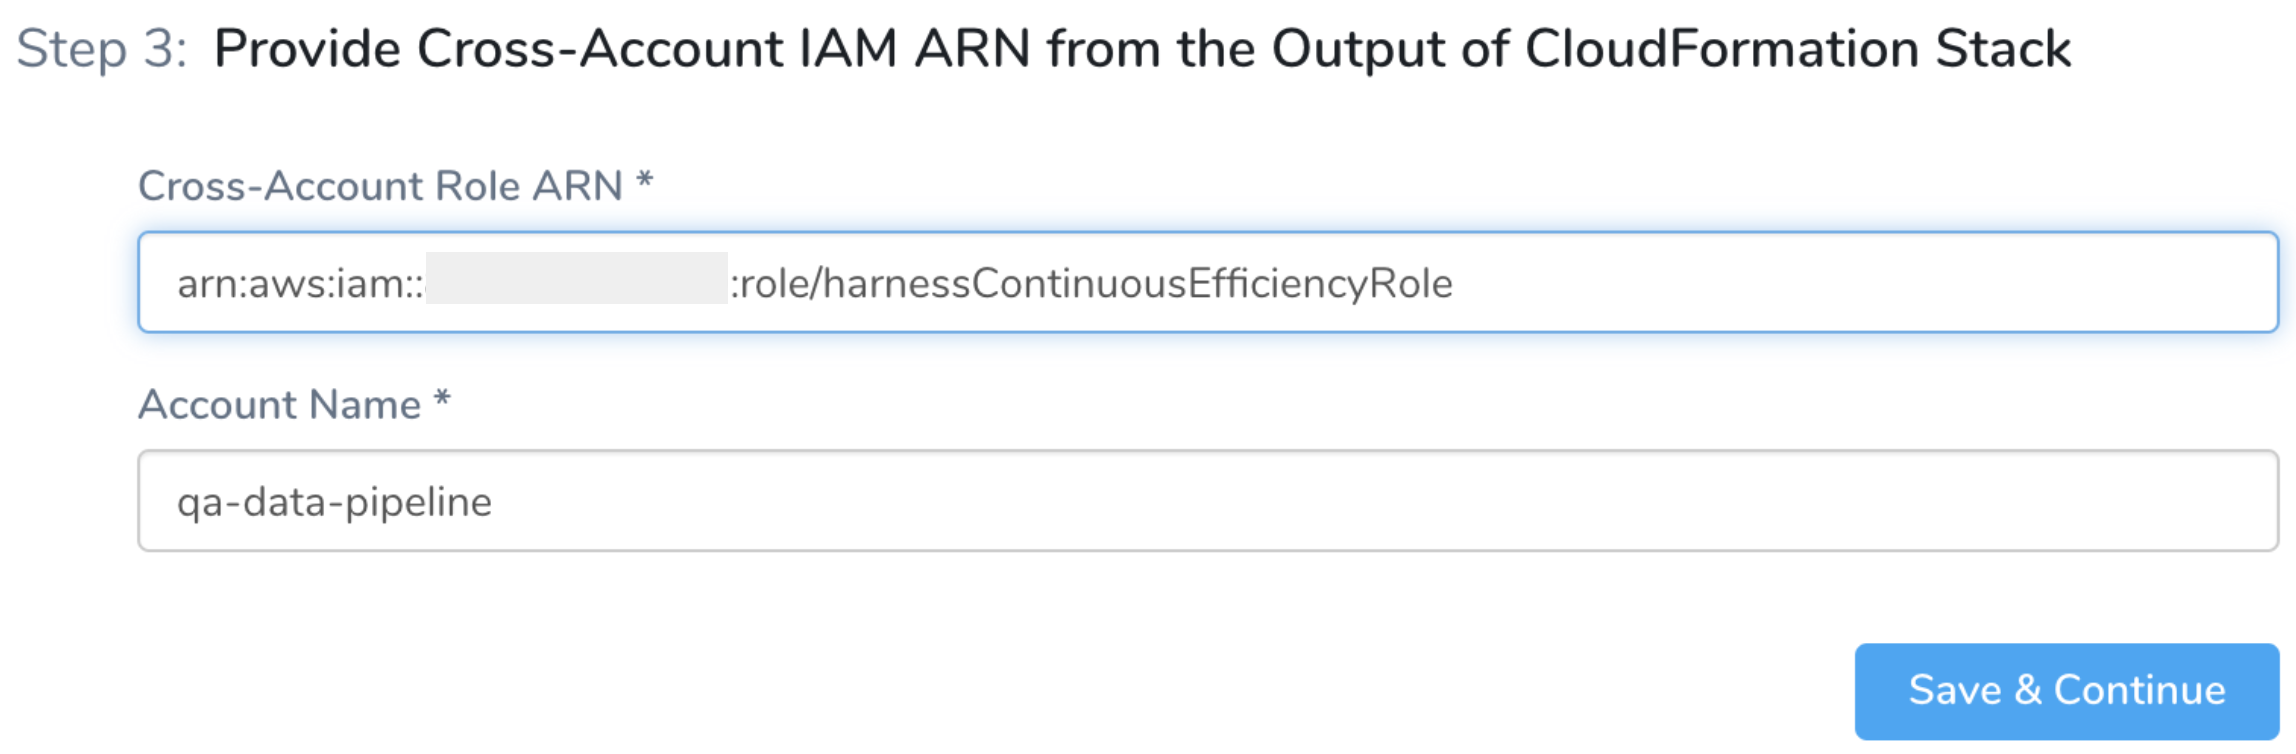
Click Save & Continue.
When you are done, it will look something like this: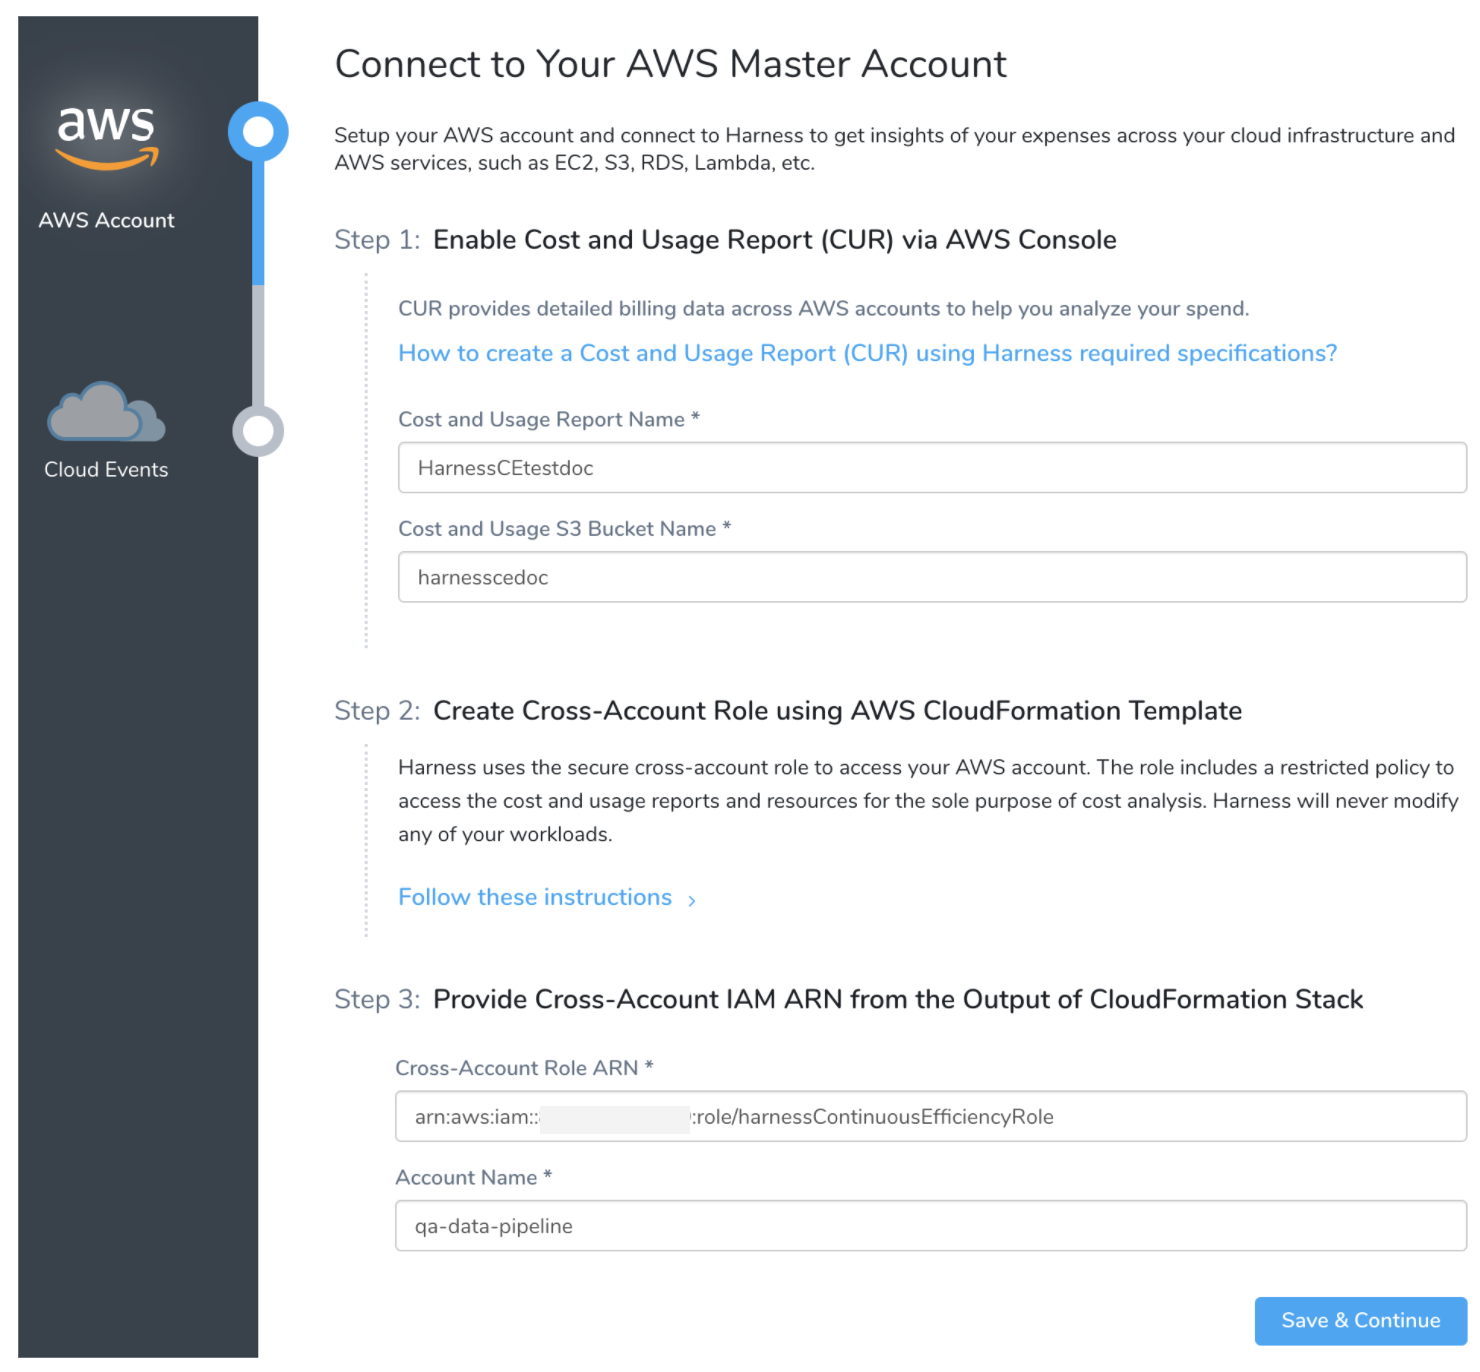
(Optional): Provide Access to Member Accounts
With access to AWS member accounts, CCM provides cost impact data on member accounts events.
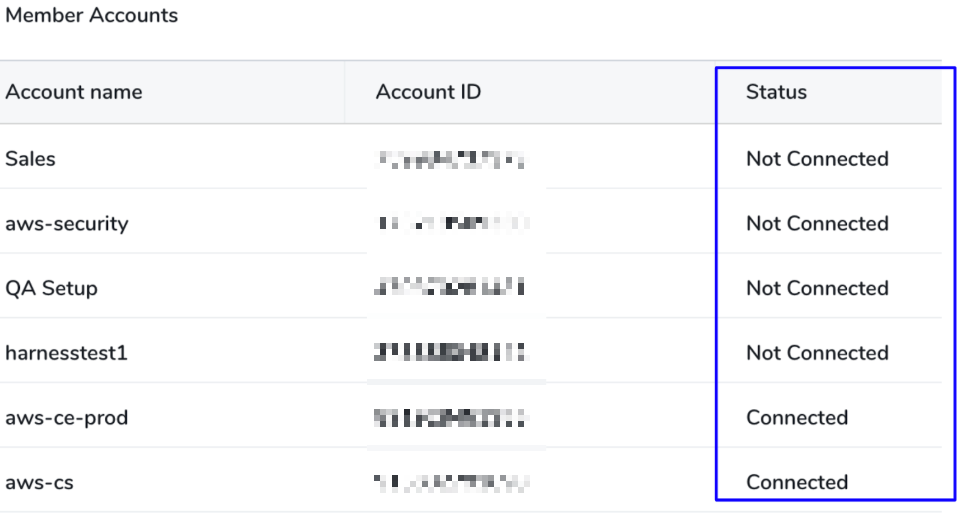
Once setup, the list of the member accounts linked to your AWS master account along with their status is displayed. To provide access to member accounts you need to create an IAM Role using the CloudFormation Template provided in the CCM AWS setup. This IAM role provides access to member accounts.
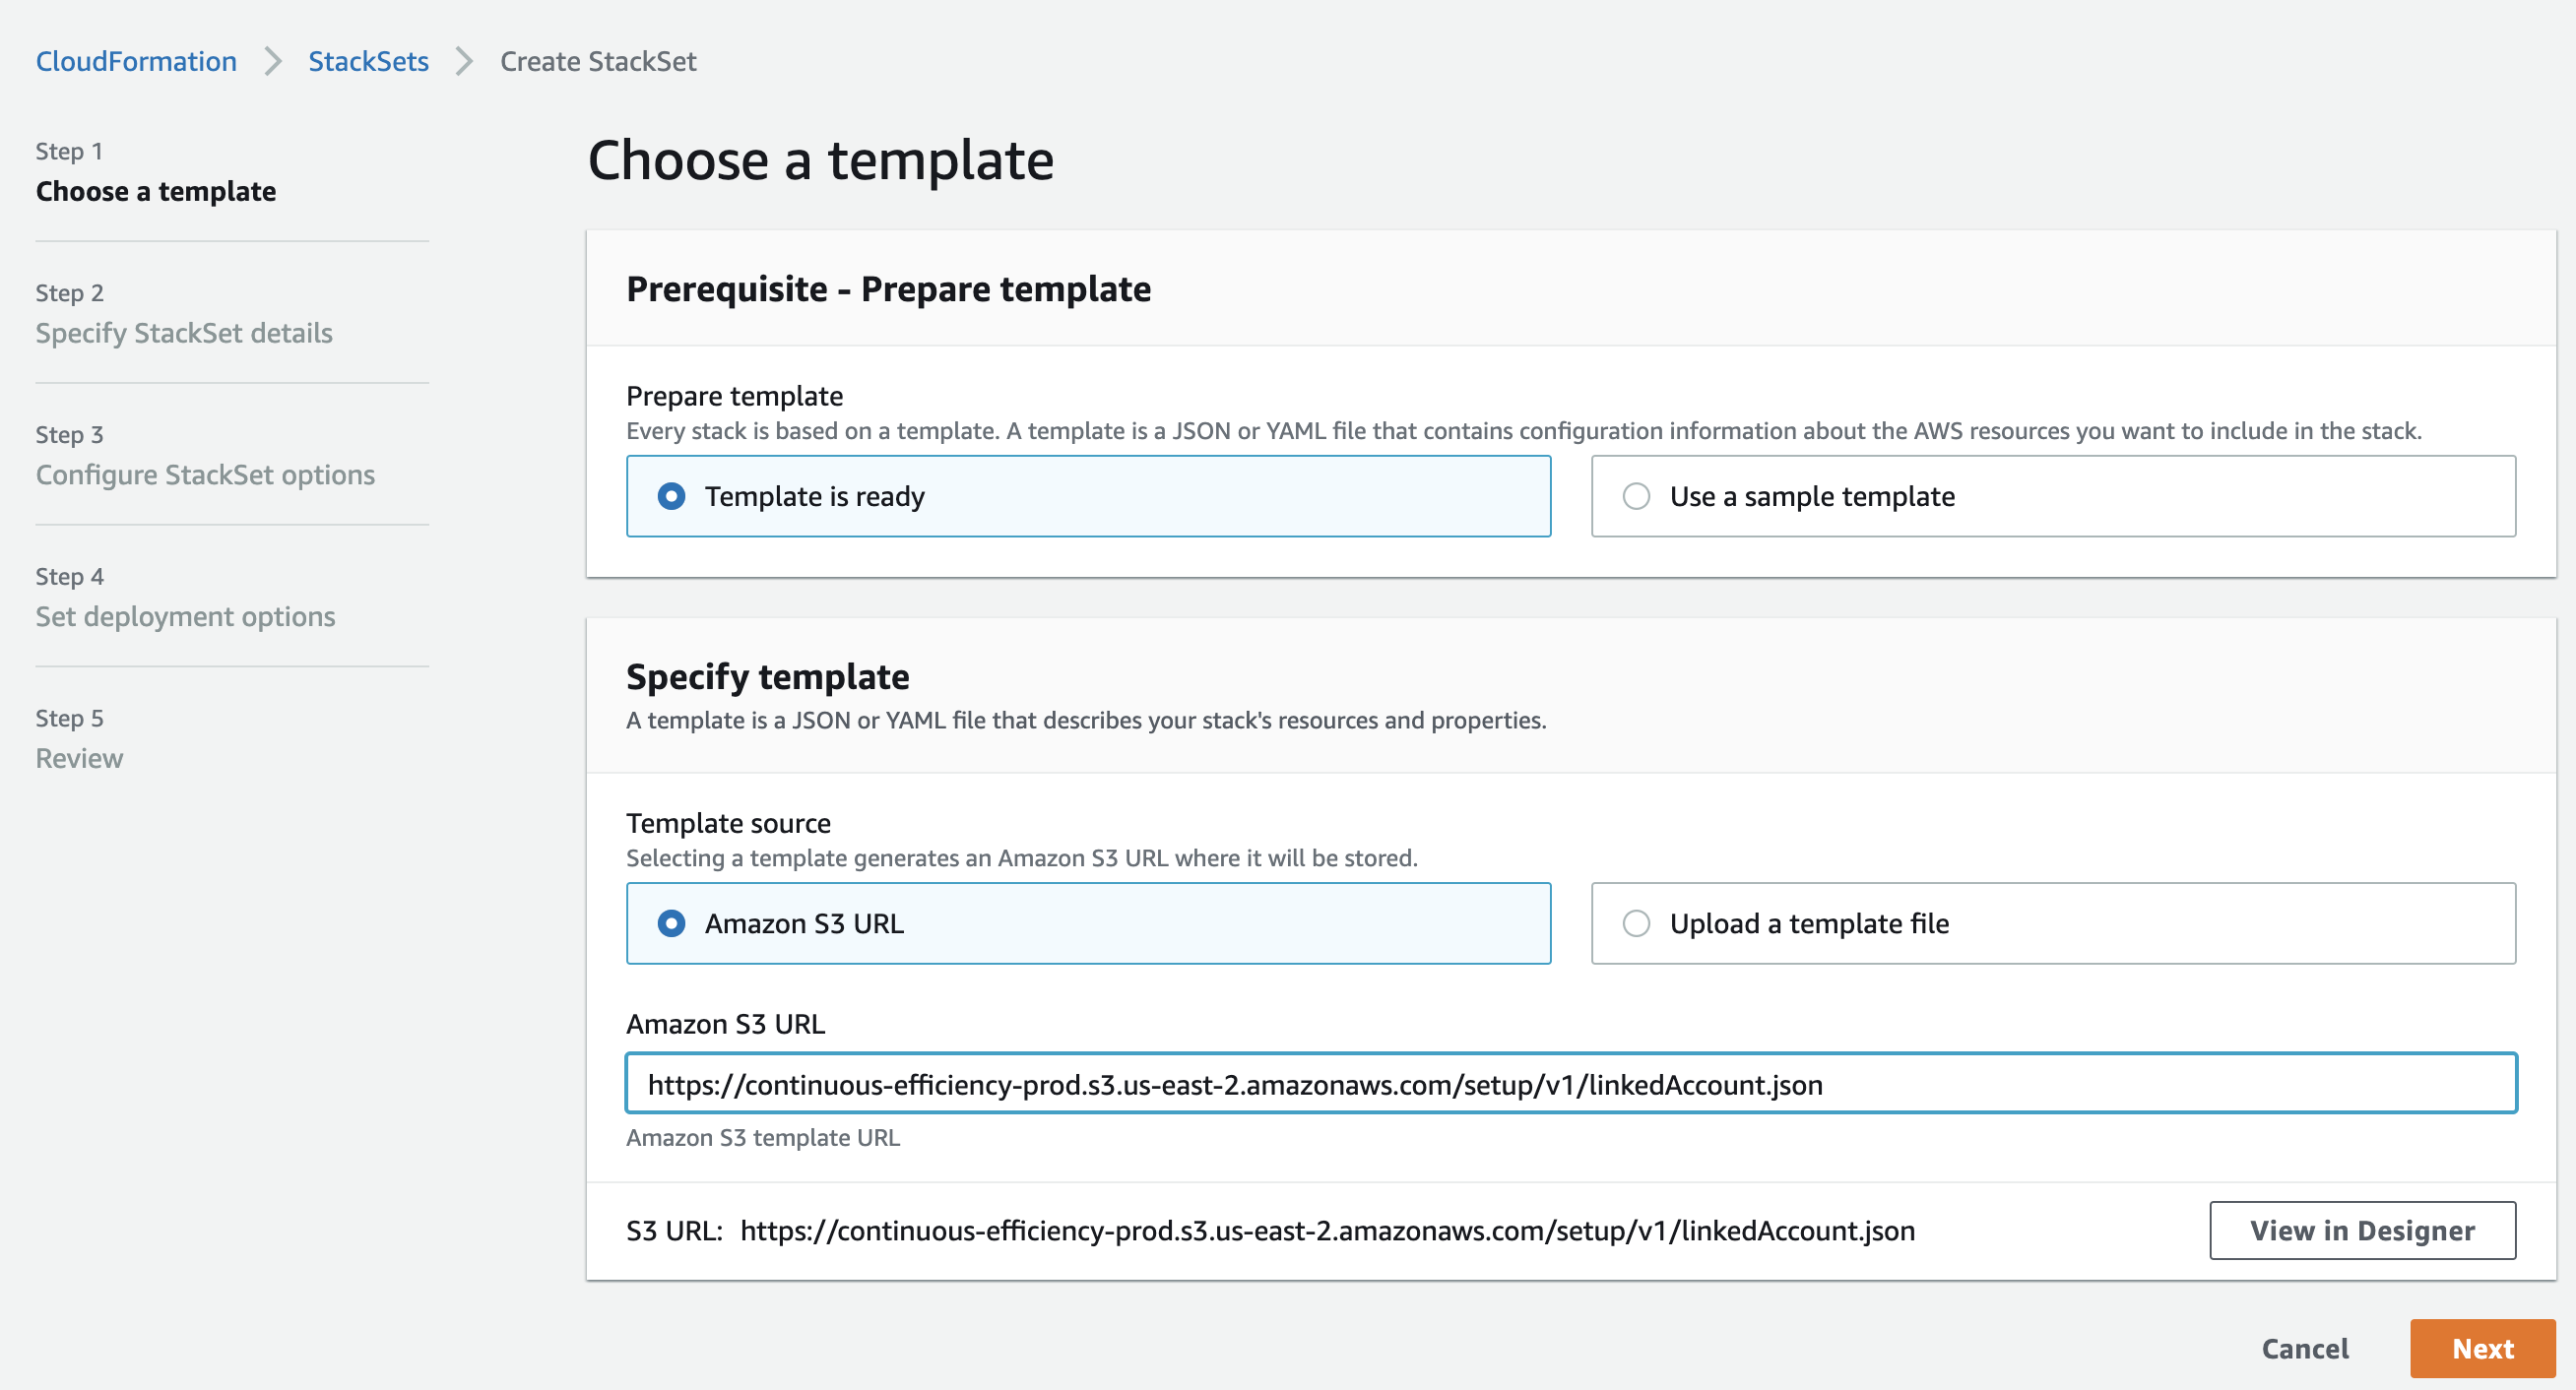
The ECS clusters are monitored without creating the connectors. Providing access to linked accounts creates an IAM role to monitor ECS clusters.1. Click Follow these instructions and click Launch Template. The StackSets settings appear.
StackSets provides IAM access across linked member accounts.Ensure that you are logged into your AWS master account. The master account is the account that creates the organization.
Step 1: Choose a Template
- In Prerequisite - Prepare template, select Template is ready.
- In the Specify template, select the Amazon S3 URL and enter the following URL and click Next.
https://continuous-efficiency-prod.s3.us-east-2.amazonaws.com/setup/v1/linkedAccount.json
Step 2: Specify StackSet Details
Enter Stack set name
harness-ce-iam-stackset.In Parameters, in ExternalID enter the External ID. Copy the external ID from Harness. The external ID is generated dynamically for your account, for example,
harness:111111111111:lnFZRF6jQO6tQnB9xxXXXx.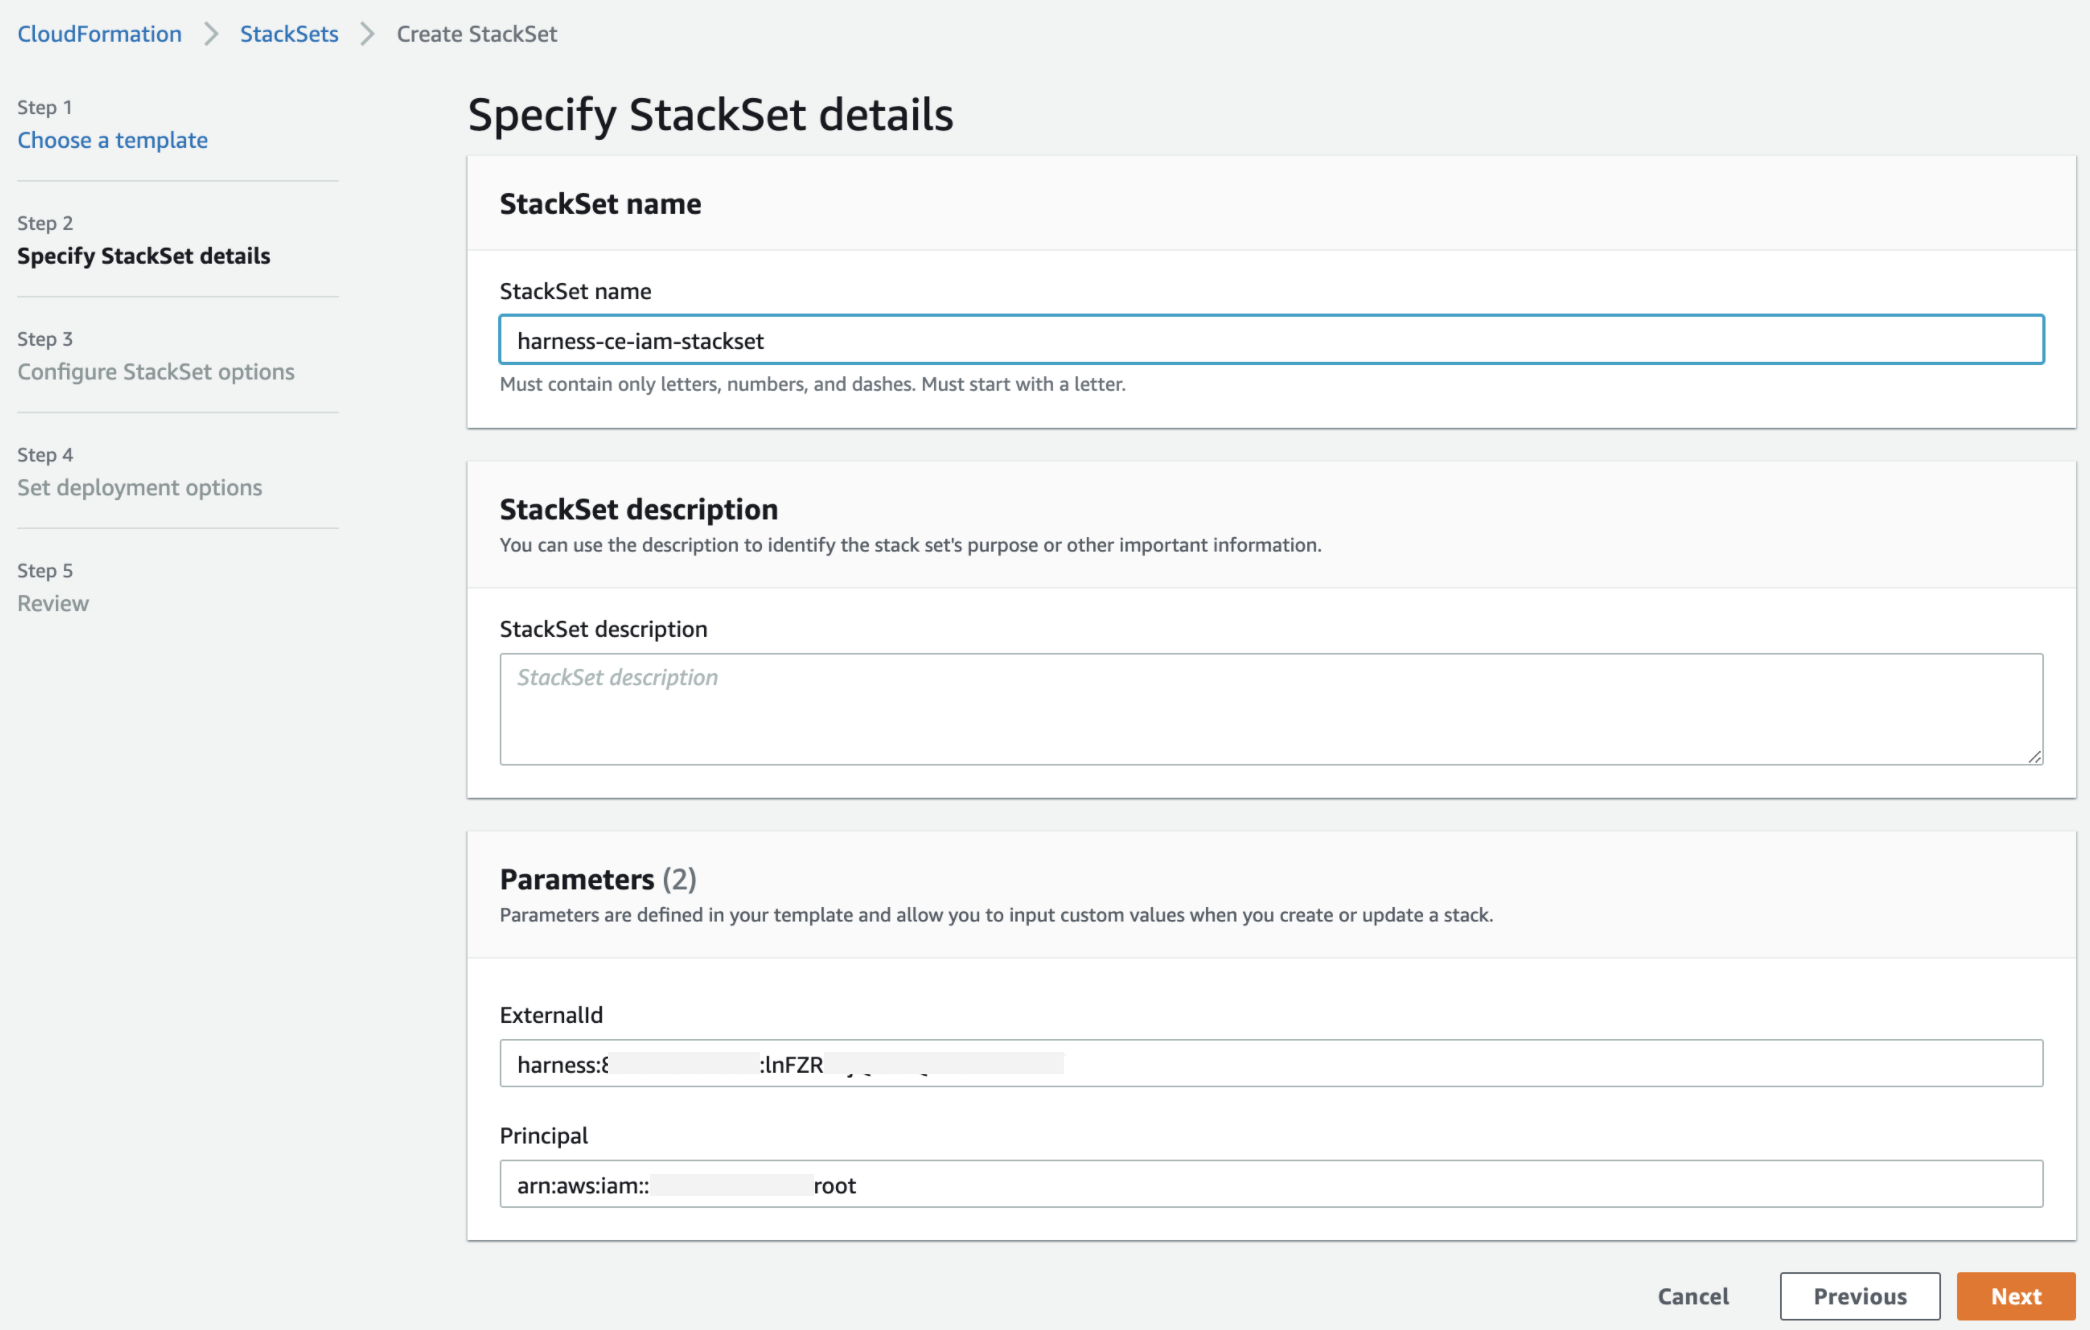
Click Next.
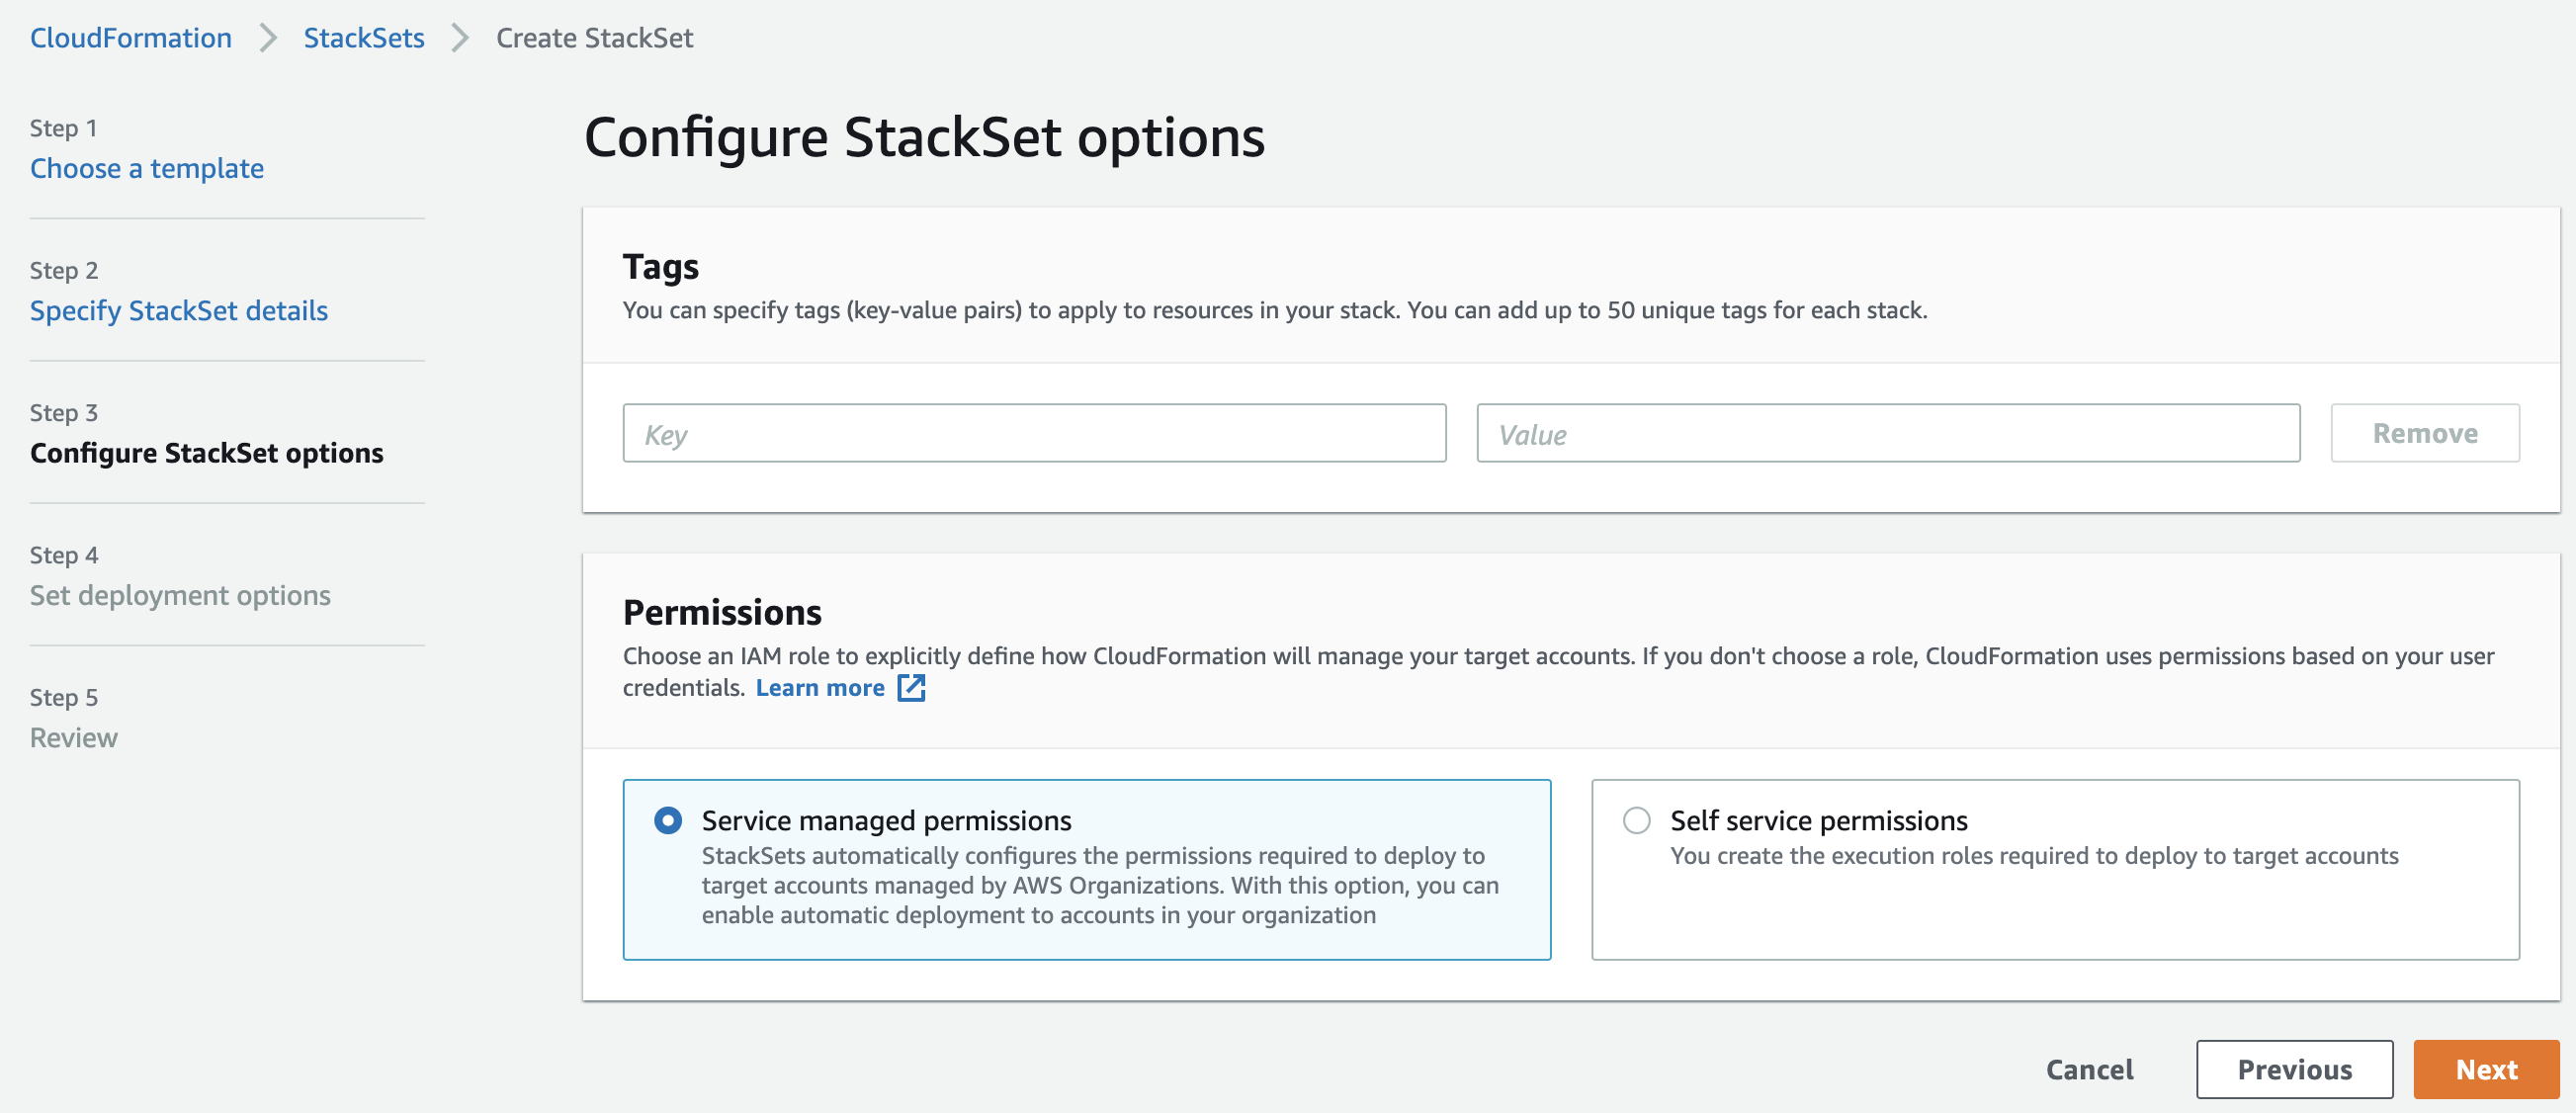
Step 3: Configure StackSet Options
In Permissions, select Service-managed permissions and click Next.
Ensure that All features feature set is enabled in your AWS organization.
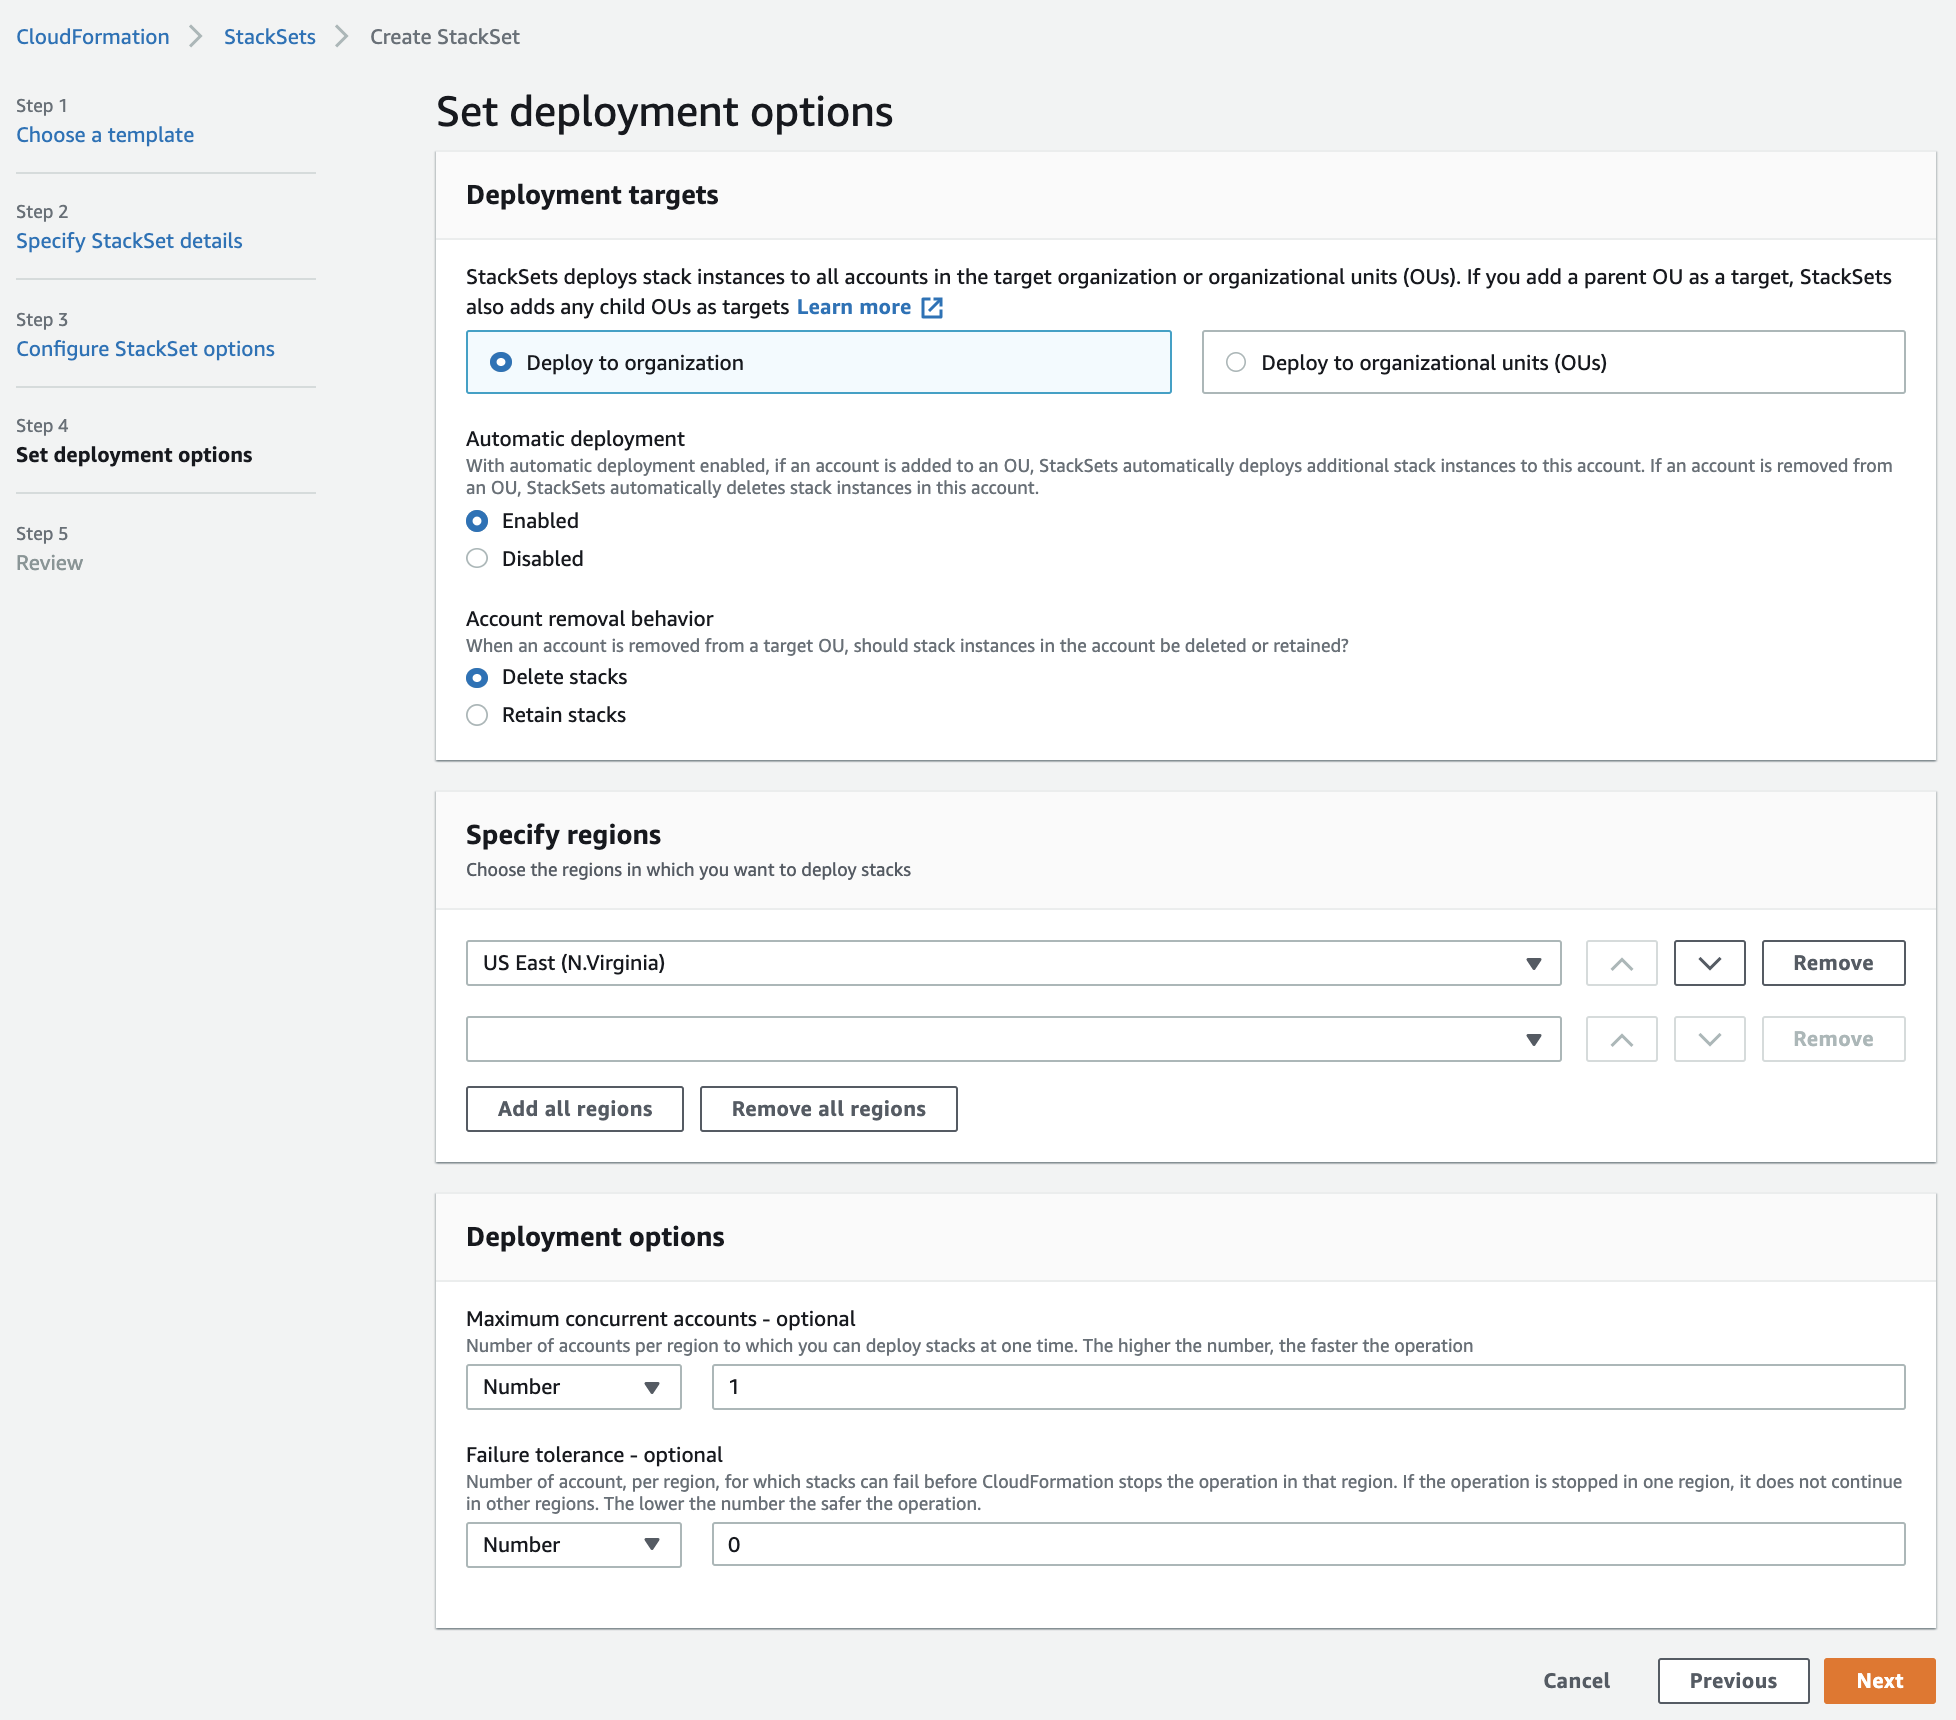
Step 4: Set Deployment Options
In Deployment targets, select Deploy to organization (recommended). You can select Deploy to Organizational Units (OUs) to limit the monitoring clusters to a particular OU or a subset of linked accounts.
In Automatic deployment, select Enabled.
In Account removal behavior, select Delete Stacks.
Select a region from the drop-down list and click Next.
Step 5: Review
Review the details, select acknowledgment, and click Submit.
- In Harness, click Verify Access to check the status of the connected member accounts. The following status is displayed:
Connected: Harness has access to your linked member accounts.
Not Connected: Harness does not have access to your linked member accounts.
Not Verified: Harness is not able to verify linked member accounts.
 2. To modify any of the master account settings, click Back.
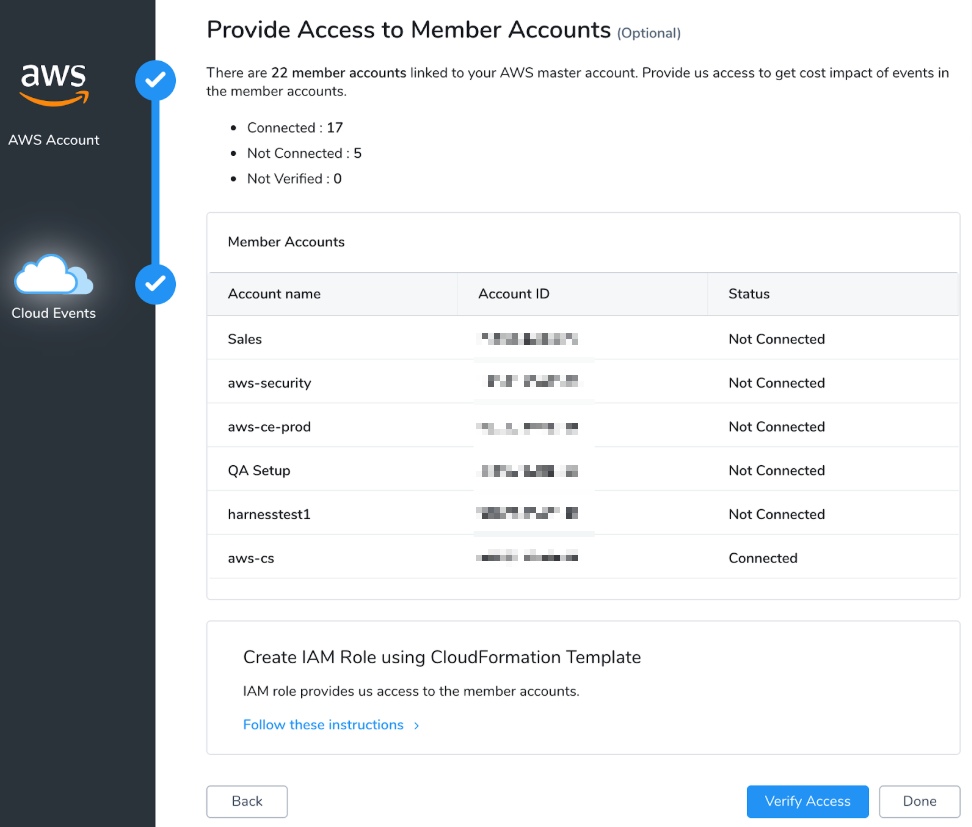
When you have provided access to Harness for all of the member accounts you want to analyze, click Done.
The connected AWS master account along with the member account details are displayed.
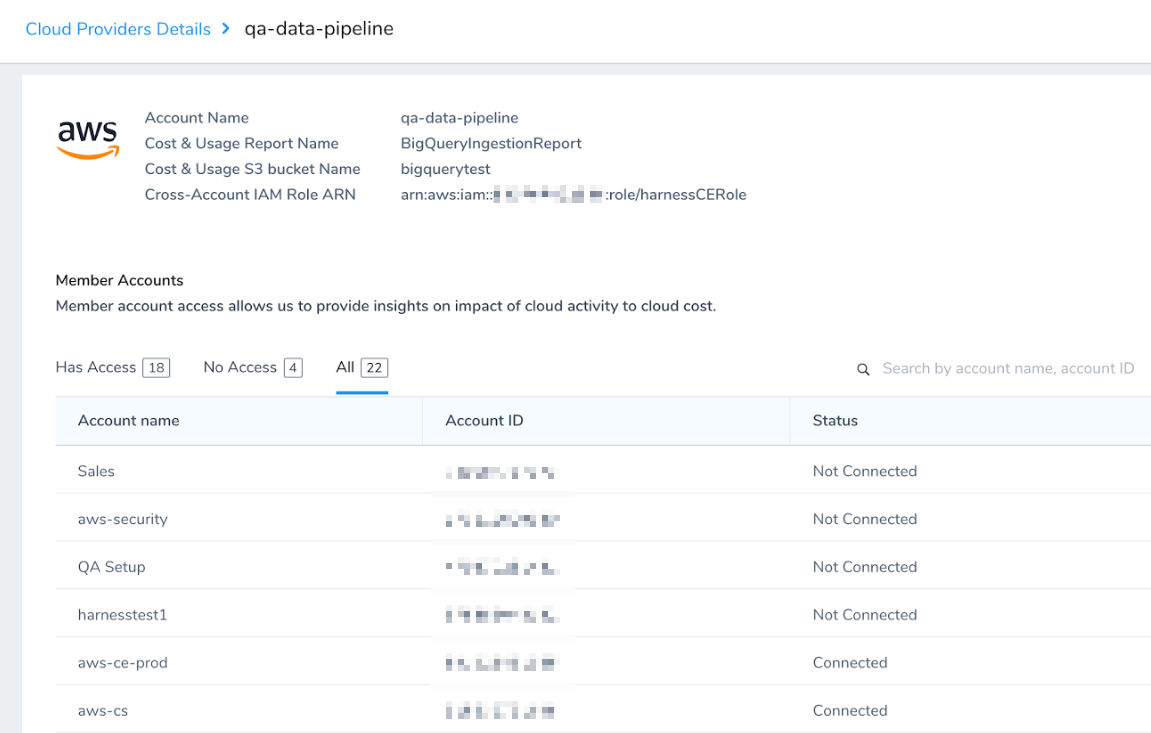
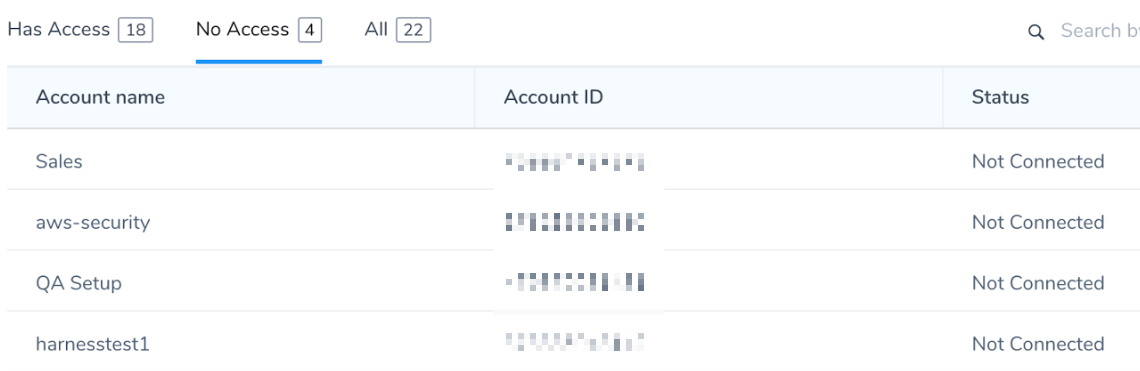
Use Has Access, No Access, or All filters to sort the members accounts for which Harness has the access.
The AWS Cloud Provider is now listed under Efficiency Enabled.
As noted earlier, after enabling CCM, it takes about 24 hours for the data to be available for viewing and analysis in Cost Explorer.
Troubleshooting
If you get Linked Accounts are in NOT_CONNECTED state error, try the following:
Log in to the AWS linked account.
Check if
harnessContinuousEfficiencyRolerole exists.If the role exists, check if in the Trust relationships:
- In Trusted entities, the account value is updated
891xxxxxxx55. - In Conditions, the values for Condition, Key, and Value are updated. The condition of
StringEqualsonsts:ExternalId=<Your Harness AccountId>.

- In Trusted entities, the account value is updated
If the role does not exist, go to the stack creation and create a stack to create the IAM Role.