Create an AMI/ASG Canary Deployment
This guide will walk you through configuring and executing an AMI (Amazon Machine Image) Canary deployment in Harness. You will create a multi-phase Workflow that progressively deploy your new instances to a new Auto Scaling Group incrementally.
Before You Begin
Overview
A Harness AMI Canary Workflow provides a framework for progressively deploying and verifying your Amazon Machine Image (AMI) instances via Auto Scaling Groups. As shown in our example Workflow below, you'll typically build out this framework to create a structure like the following:
- A Canary phase, containing steps that define your Auto Scaling Group (ASG), deploy a percentage or partial count of the ASG's instances, and verify this partial deployment.
- (Optionally:) Further Canary phases that expand the partial deployment, with further verification.
- A Primary phase that deploys your image to the full count of instances defined in your ASG.
Prerequisites
Before creating an AMI Canary Workflow, you'll need to set up the same AWS and Harness resources that Harness requires for an AMI Basic deployment. If you've already set up those resources, you can proceed to define your Canary Workflow.
Otherwise, please use the following links to the AMI Basic deployment prerequisites. Within AWS, you'll need:
- A working AMI that Harness will use to create your instances.
- A base Auto Scaling Group (ASG) that Harness will use as a template for the Auto Scaling Group it will create and deploy. For information on launch configuration and launch template support, see Launch Configuration and Launch Template Support.
- An AWS instance or ECS cluster in which to install the Harness Delegate(s).
- IAM role for the Harness Cloud Provider connection to AWS. Typically, you will set up the Harness Cloud Provider to assume the roles used by the installed Harness Delegate, whether that's an ECS or a Shell Script Delegate. The required policies for an ECS connection are listed in ECS (Existing Cluster).
Within Harness, you'll need the following resources:
- A Delegate installed and running in an AWS instance or ECS cluster.
- An AWS Cloud Provider that is configured either to provide account credentials, or to assume the Delegate's IAM role for the connection to AWS.
- A Harness Application.
- An AMI-based Service.
- An Environment with an Infrastructure Definition that specifies your base ASG.
Harness specifically supports AWS target tracking scaling policies. For details, see AWS' Dynamic Scaling for Amazon EC2 Auto Scaling topic.
Limitations
- If your base Auto Scaling Group is configured in AWS with scaling policies, Harness will apply those policies in your Workflow's final Upgrade AutoScaling Group step.
- Harness does not support copying ASG scaling policies with Metric Type value Application Load Balancer request count per target.
- Harness specifically supports AWS target tracking scaling policies. For details, see AWS' Dynamic Scaling for Amazon EC2 Auto Scaling topic.
Create a Canary Workflow
To set up a Canary Workflow:
- In your Application, click Workflows > Add Workflow. The Workflow dialog appears.
- Enter a Name, and (optionally) enter a Description of this Workflow's purpose.
- In Workflow Type, select Canary Deployment.
- Select the Environment that you configured earlier. (This Environment defines your base ASG.)
The dialog will now look something like this: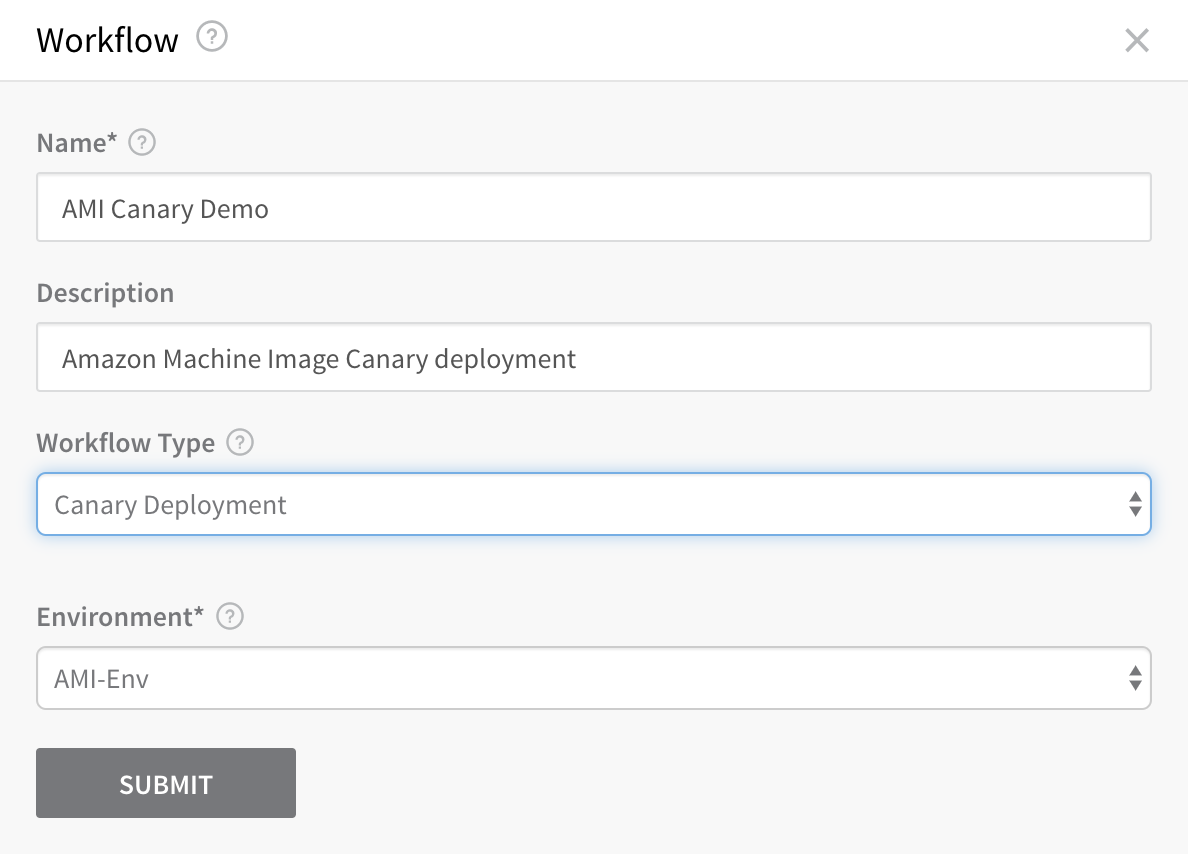 5. Click SUBMIT. You've now created your new Canary Workflow.
Default Structure
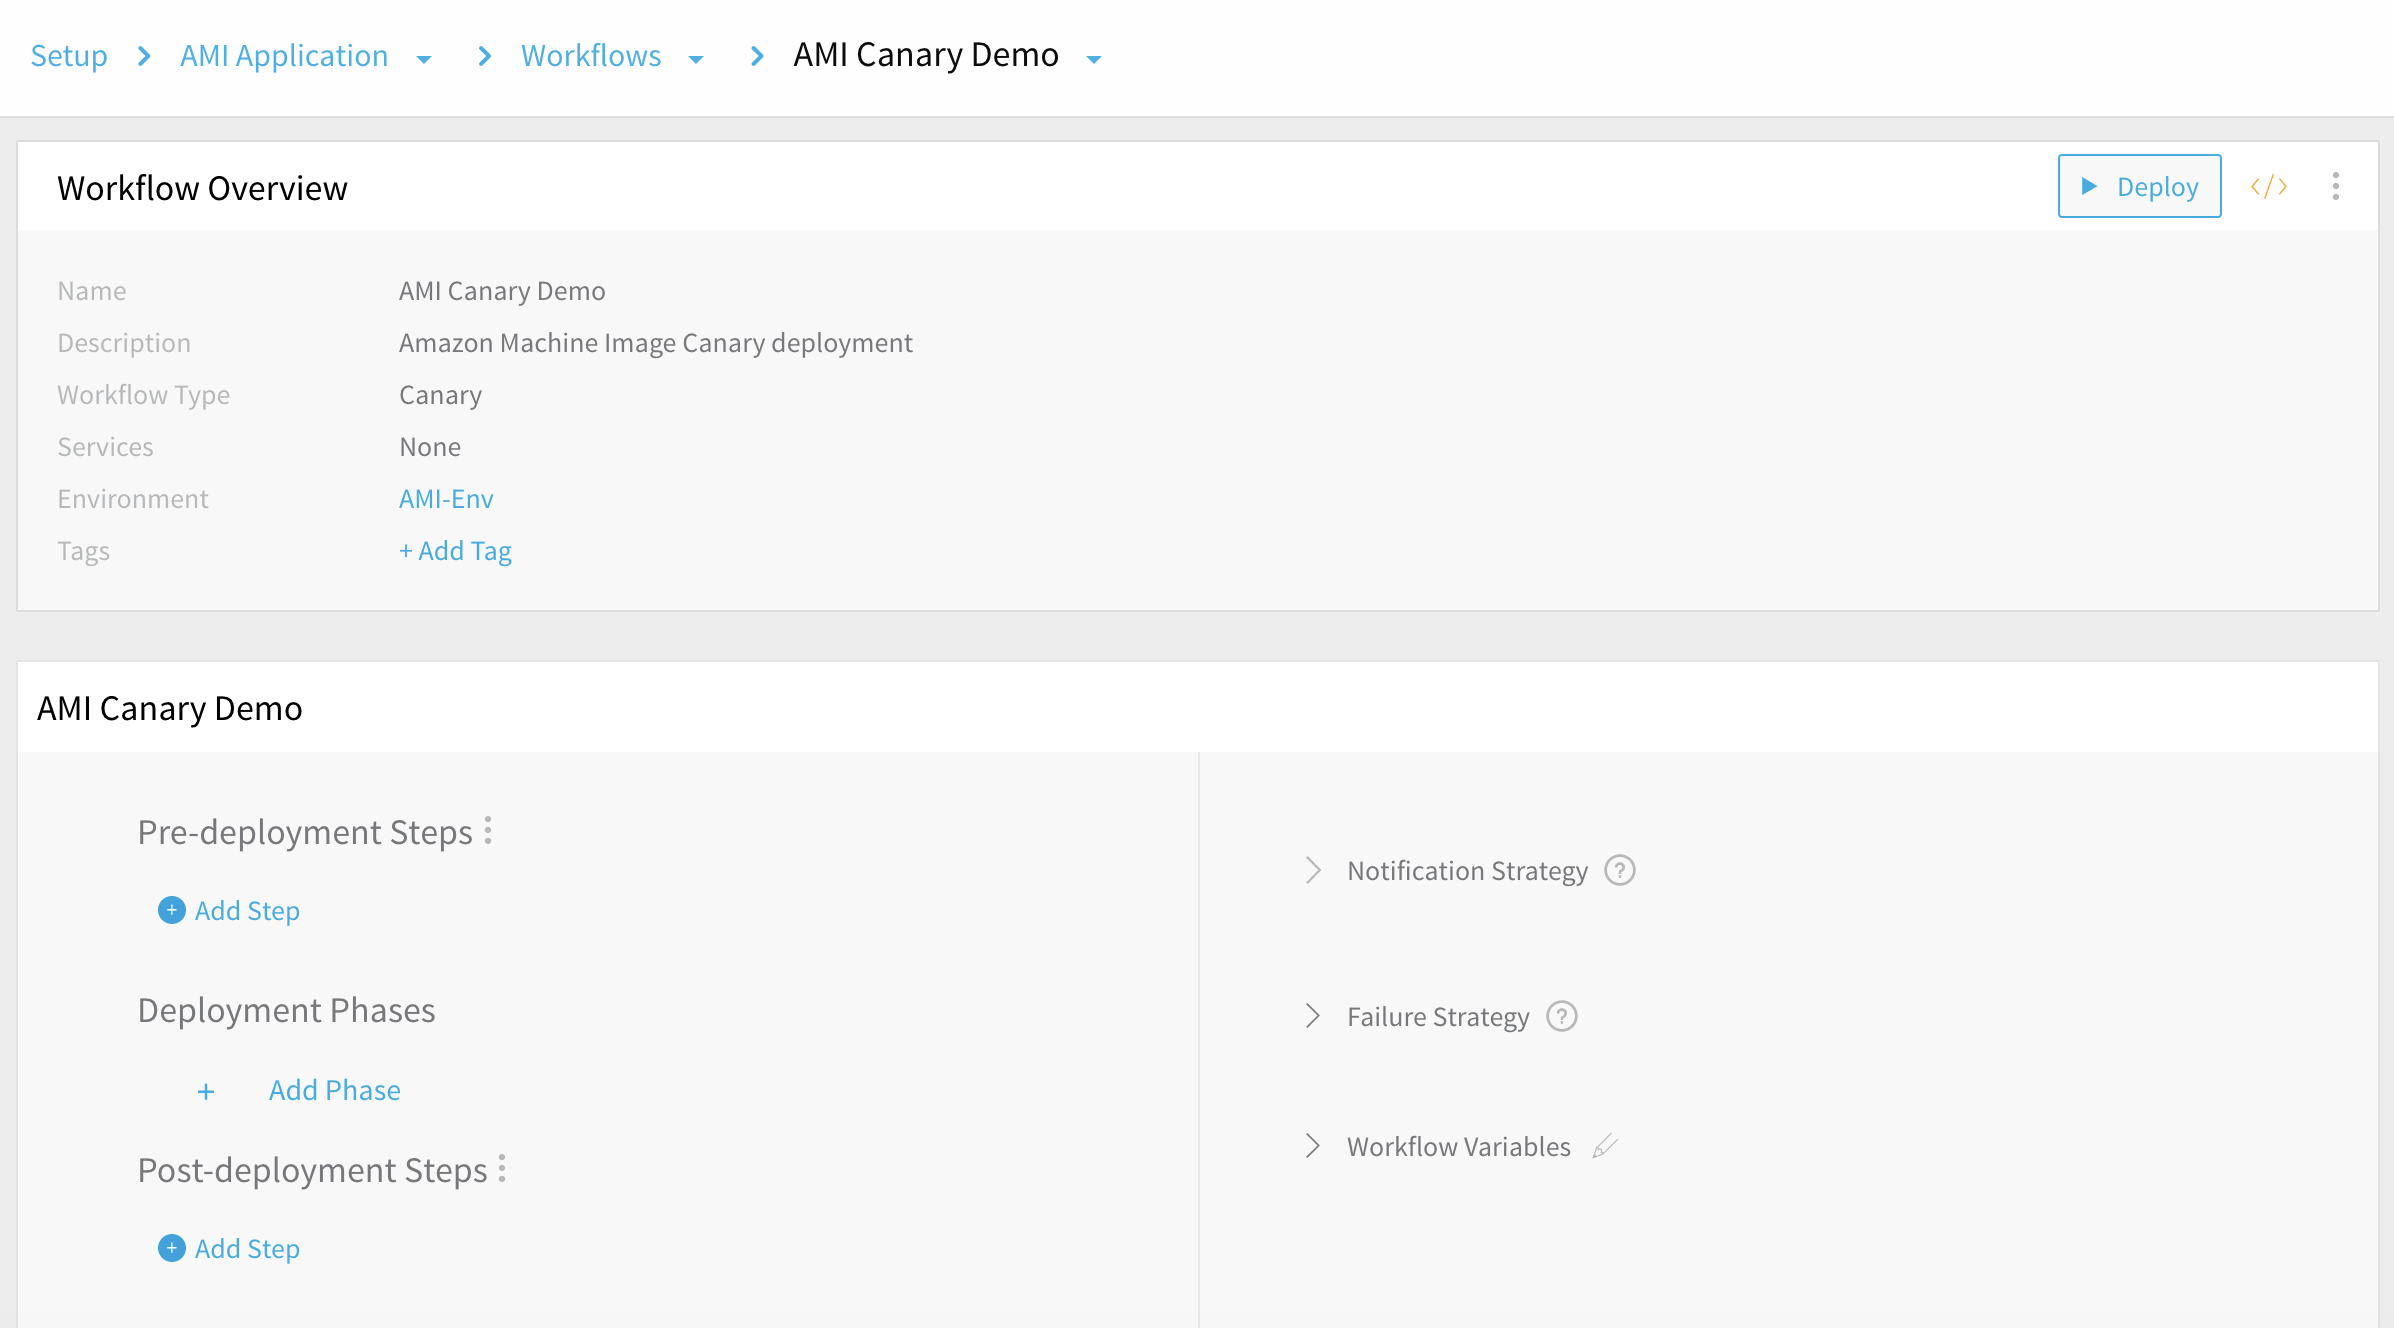
As you can see, a Harness AMI Canary Workflow's default structure is very simple:
| An empty placeholder for Deployment Phases is surrounded by two empty placeholders, for Pre- and Post-deployment Steps. | |
| The Workflow also contains a default Notification Strategy and Failure Strategy.You can edit each of these Strategies, and add further Strategies. |
Example Structure
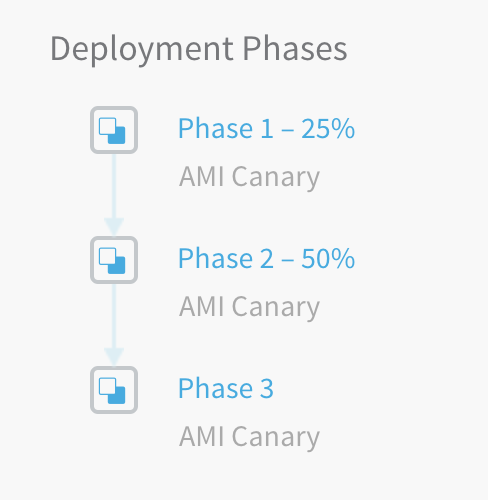
In this guide's remaining sections, we will expand only the Workflow's Deployment Phases—adding multiple phases, each deploying a portion of the instance count specified in the first phase. We will demonstrate how to build the following structure:
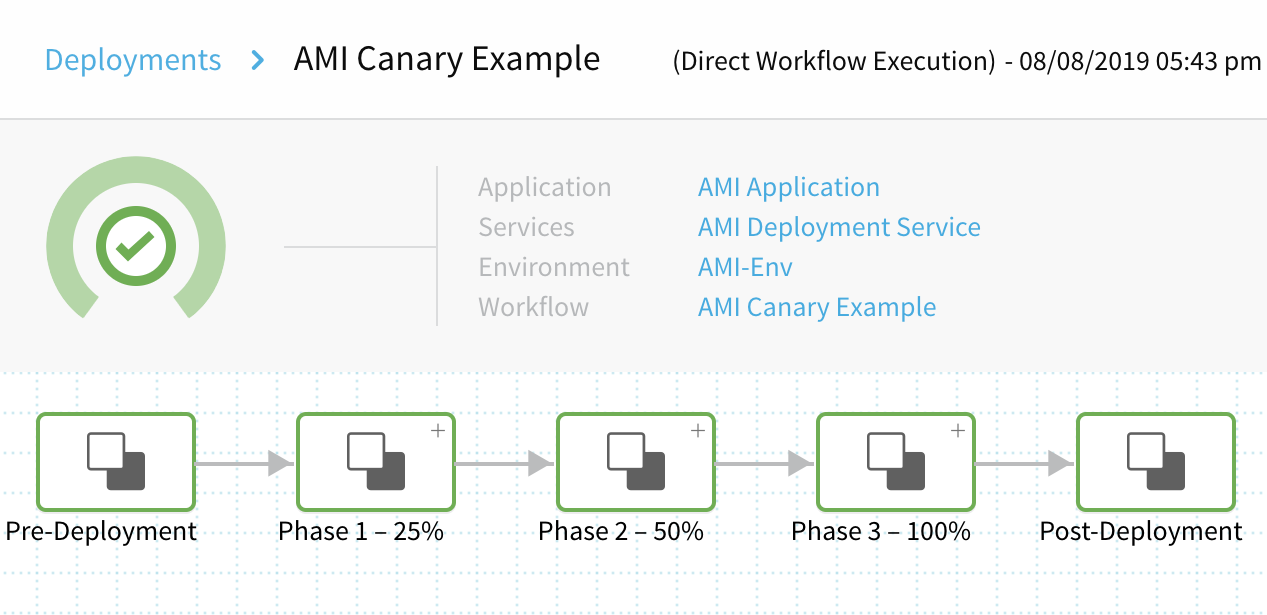
Here are the phases and steps we'll build:
- Phase 1: Canary
- Set Up AutoScaling Group: Specify how many EC2 instances to launch in the ASG that Harness deploys at the end of the Workflow. This step also specifies their resizing order and their steady state timeout.
- Deploy Service: Specify the percentage of instances to deploy in this phase. When you add additional phases, each phase automatically includes a Deploy Service step, which you must configure with the count or percentage of instances you want deployed in that phase.
- Verify Service: This example uses CloudWatch verification. (You can add any Verification Provider that Harness supports.)
- Rollback Steps: Roll back the ASG if deployment fails. (Rollback steps are automatically added here, and to each of the remaining phases. This guide covers them only in this first phase.)
- Phase 2: Canary
- Deploy Service: Upgrade the ASG to a higher percentage of instances.
- Verify Service: This example uses a second round of CloudWatch tests.
- Phase 3: Primary
- Deploy Service: Upgrade the ASG to its full target capacity.
Ready to deploy? Let's examine the configuration and execution of each of the Workflow's three phases.
Phase 1: Canary
This example Workflow's first phase defines your Auto Scaling Group, upgrades it to a 25% Canary deployment, and evaluates this partial deployment using (in this example) CloudWatch verification.
To add a Canary Phase:
In Deployment Phases, click Add Phase. The Workflow Phase dialog appears.
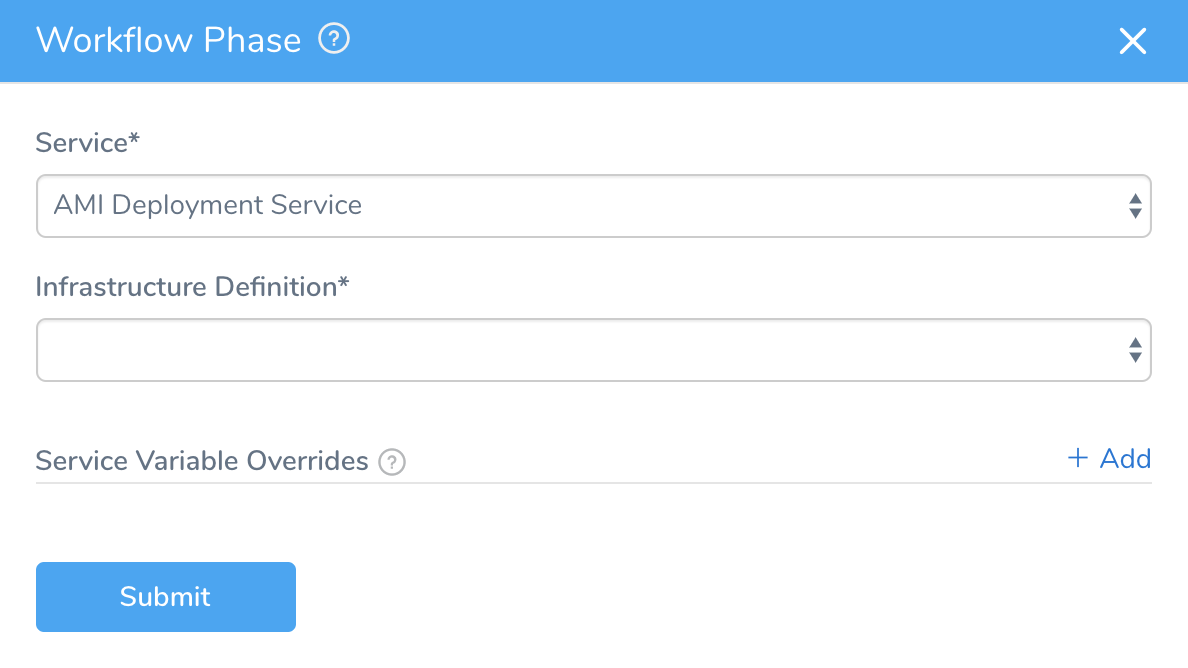
In Service, select the Service you previously set up for this AMI.
Select the Infrastructure Definition that specifies your base Auto Scaling Group
In Service Variable Overrides, you can add values to overwrite any variables in the Service you selected. Click Add, then enter the Name of the variable to override, and the override Value. (For details, see Workflow Phases.)
Click SUBMIT. The new Phase is created.
Click Phase 1 to define this Phase's Steps.
On the resulting page, we'll fill in the predefined structure for Steps 1 and 2, and add a Verification provider in Step 3.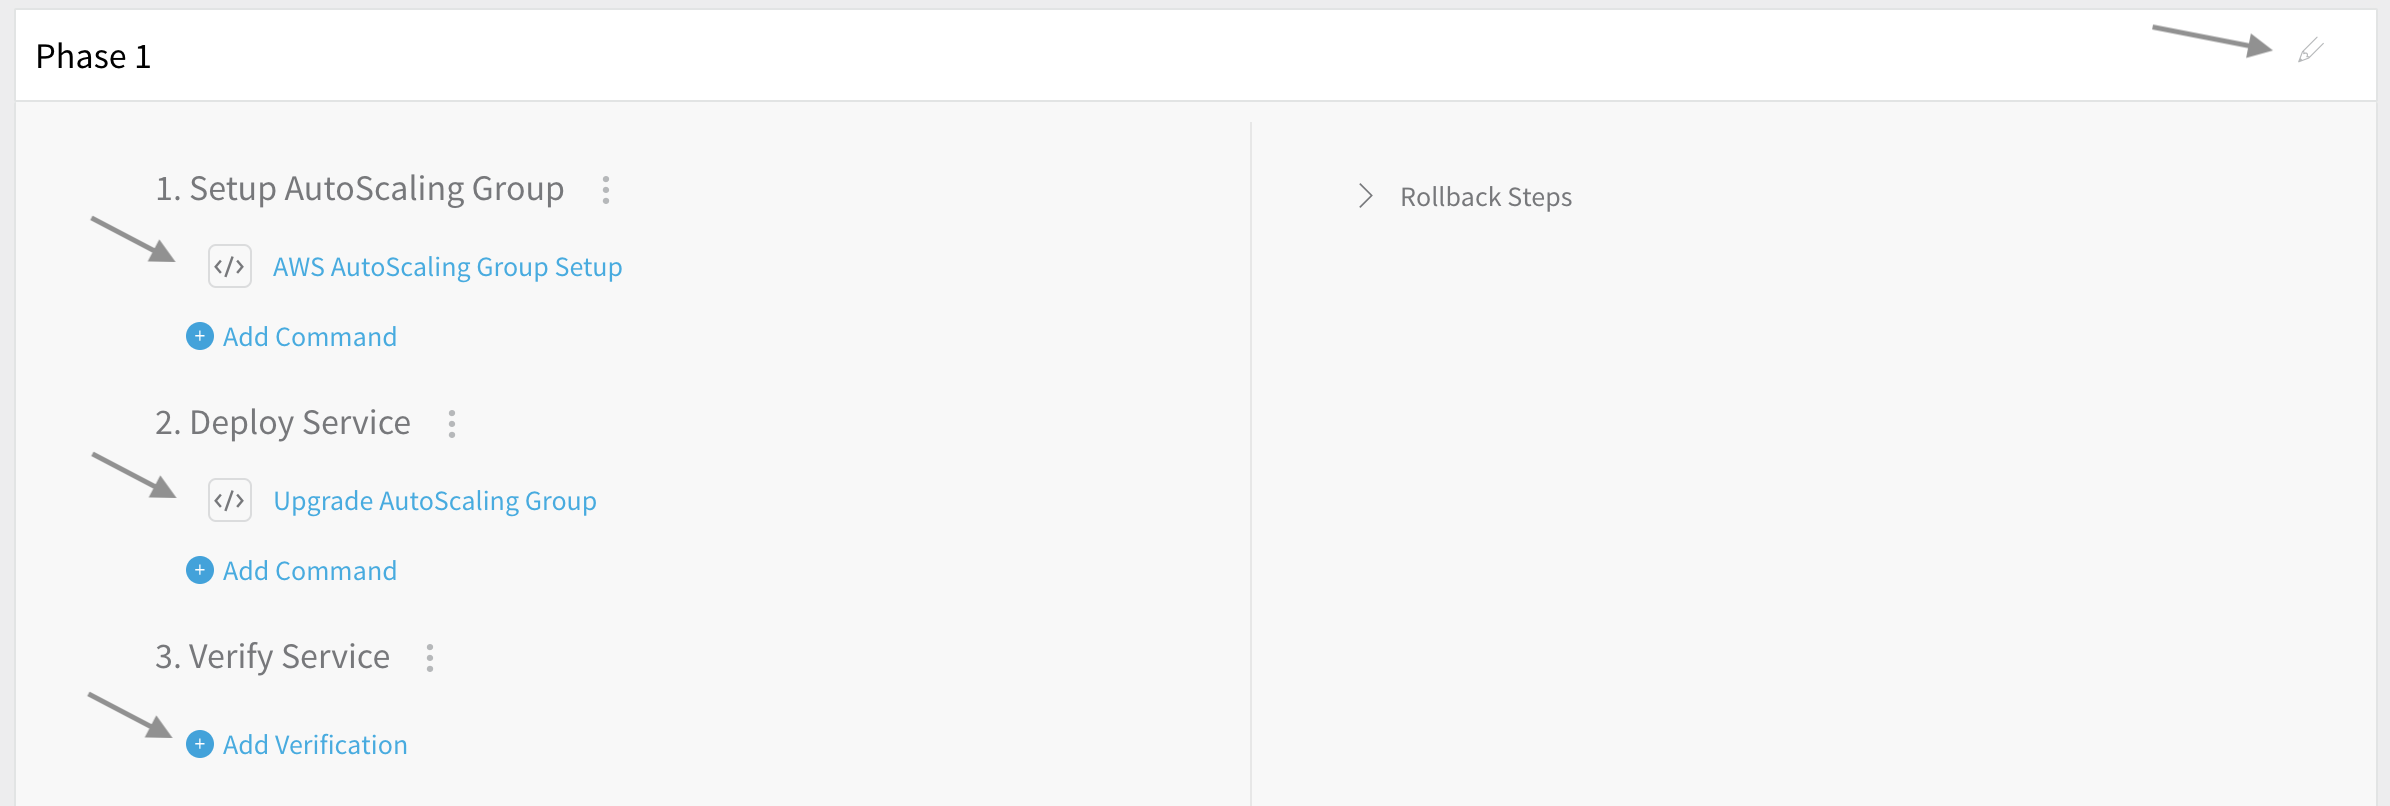
You can give each Phase a descriptive name by clicking the pencil icon at the top right.
Step 1: Setup AutoScaling Group
In Step 1, select AWS AutoScaling Group Setup to open a dialog where you define major settings of the Auto Scaling Groups (ASGs) that Harness will create to deploy your AMI instances:
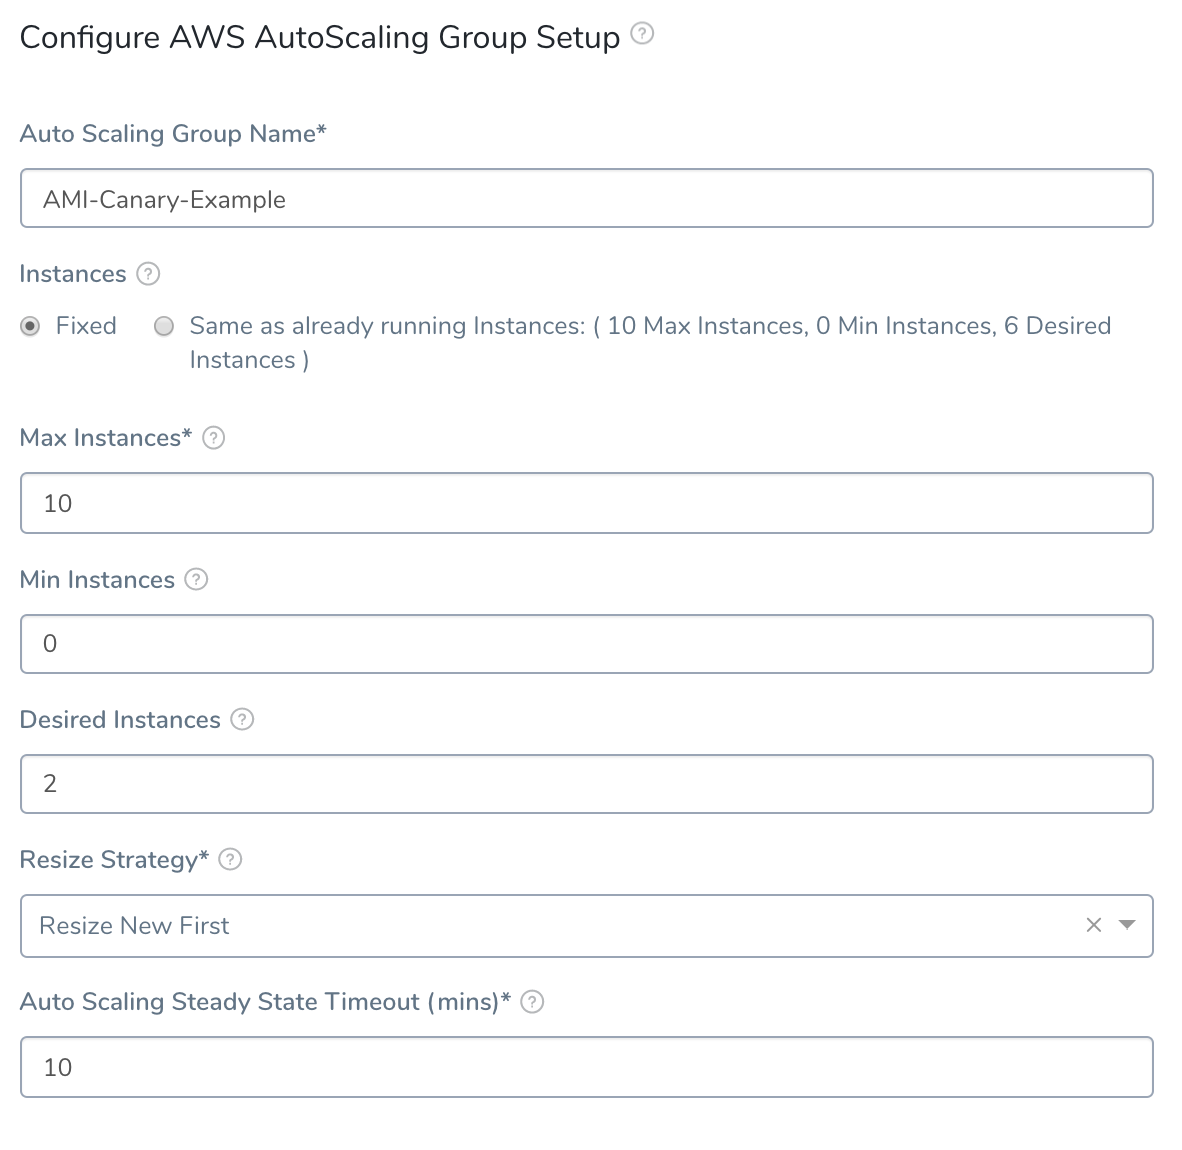
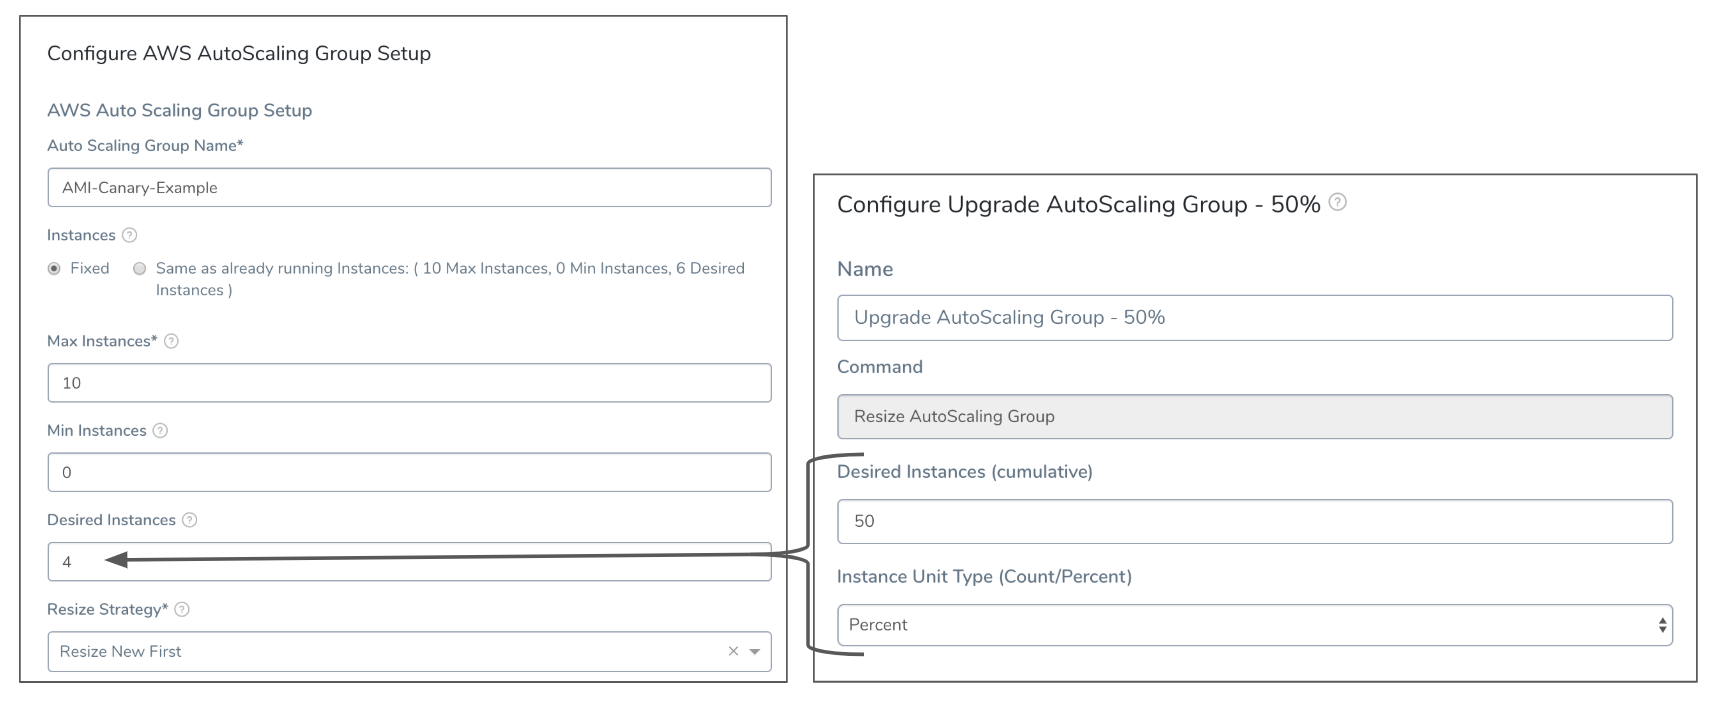
The Instances settings support Harness variable expressions, such as Workflow variable expressions.For details about this dialog's fields, see the corresponding AMI Basic Workflow instructions. For this Workflow, we've selected Fixed Instances, and have set Max Instances to 10 and Desired Instances to 4.
All Canary counts or percentages specified later in the Workflow are based on the Desired Instances setting. So, when we later deploy 25% in this phase's Upgrade Autoscaling Group step, that will be 25% of this Desired Instances setting.
Setup AutoScaling Group in Deployment
Let's look at an example of deploying the AWS AutoScaling Group Setup we configured above. Here's the step in the Harness Deployments page:
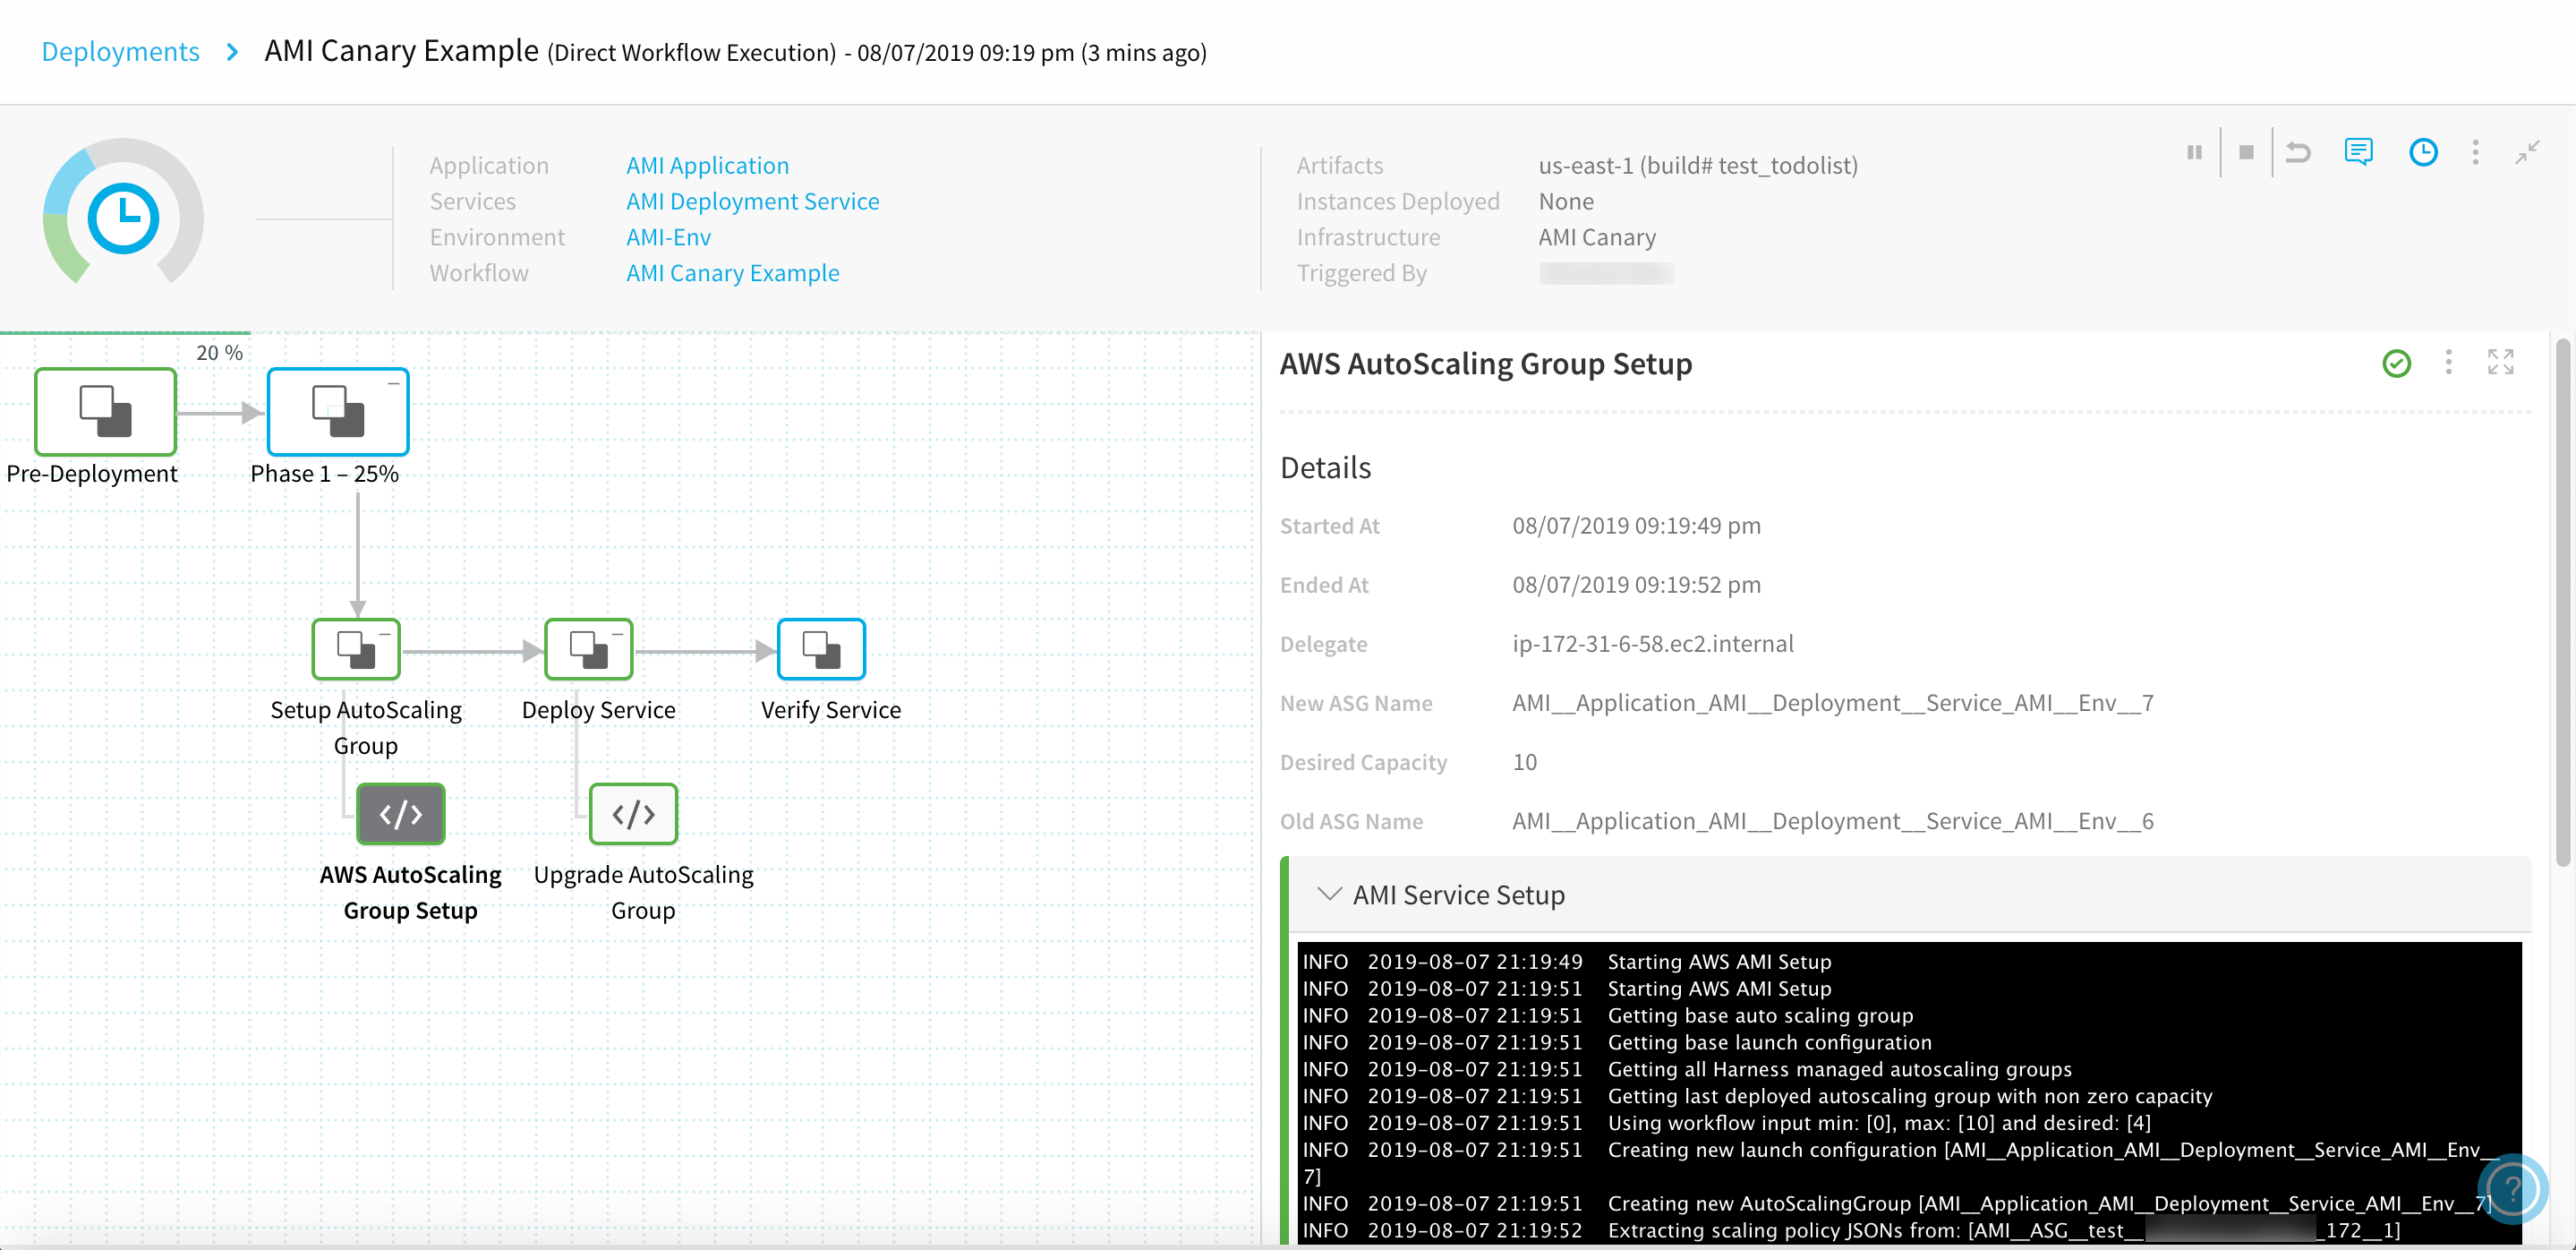
Here's partial output, showing a successful setup:
Starting AWS AMI Setup
Getting base auto scaling group
Getting base launch configuration
Getting all Harness managed autoscaling groups
Getting last deployed autoscaling group with non zero capacity
Using workflow input min: [0], max: [10] and desired: [4]
Creating new launch configuration [AMI__Application_AMI__Deployment__Service_AMI__Env__7]
Creating new AutoScalingGroup [AMI__Application_AMI__Deployment__Service_AMI__Env__7]
Extracting scaling policy JSONs from: [AMI__ASG__test__XXXXXXXXXXXXX__172__1]
No policies found
Extracting scaling policy JSONs from: [AMI__Application_AMI__Deployment__Service_AMI__Env__6]
No policies found
...
Sending request to delete old auto scaling groups to executor
Completed AWS AMI Setup with new autoScalingGroupName [AMI__Application_AMI__Deployment__Service_AMI__Env__7]
The new ASG is set up, but no instances are deployed yet. Instances will be deployed in this phase's following Upgrade AutoScaling Group step, and in future phases' similar steps.
If your base Auto Scaling Group is configured in AWS with scaling policies, Harness will apply those policies in your Workflow's final Upgrade AutoScaling Group step.
Step 2: Deploy Service
In Step 2, select Upgrade AutoScaling Group to open a dialog where you can define how many (by Count or Percent) of the ASG's instances to deploy:
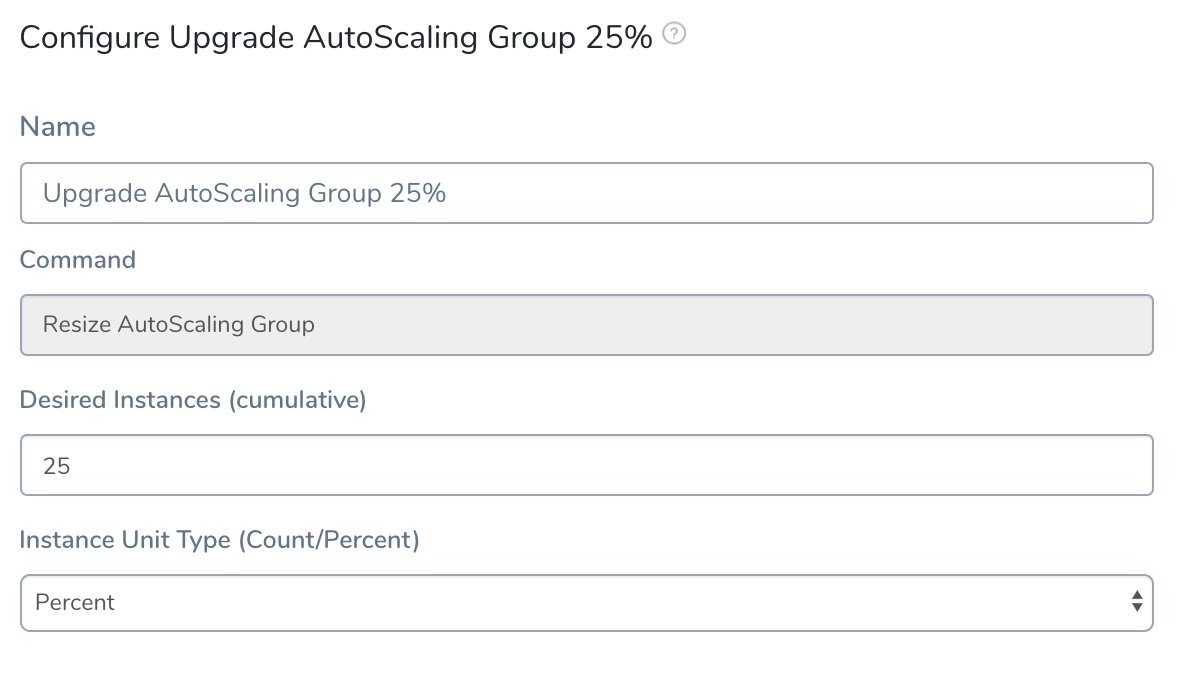
In this example, we've selected Percent units, and 25 percent of the Desired Instances we set in the previous step's AWS AutoScaling Group Setup.
For general information on customizing this dialog's settings, and on how they correspond to AWS parameters, see the corresponding AMI Basic Workflow section.
Deploy Service Step in Deployment
Using the Upgrade AutoScaling Group configuration shown above, here is the Deploy Service step in the Harness Deployments page:
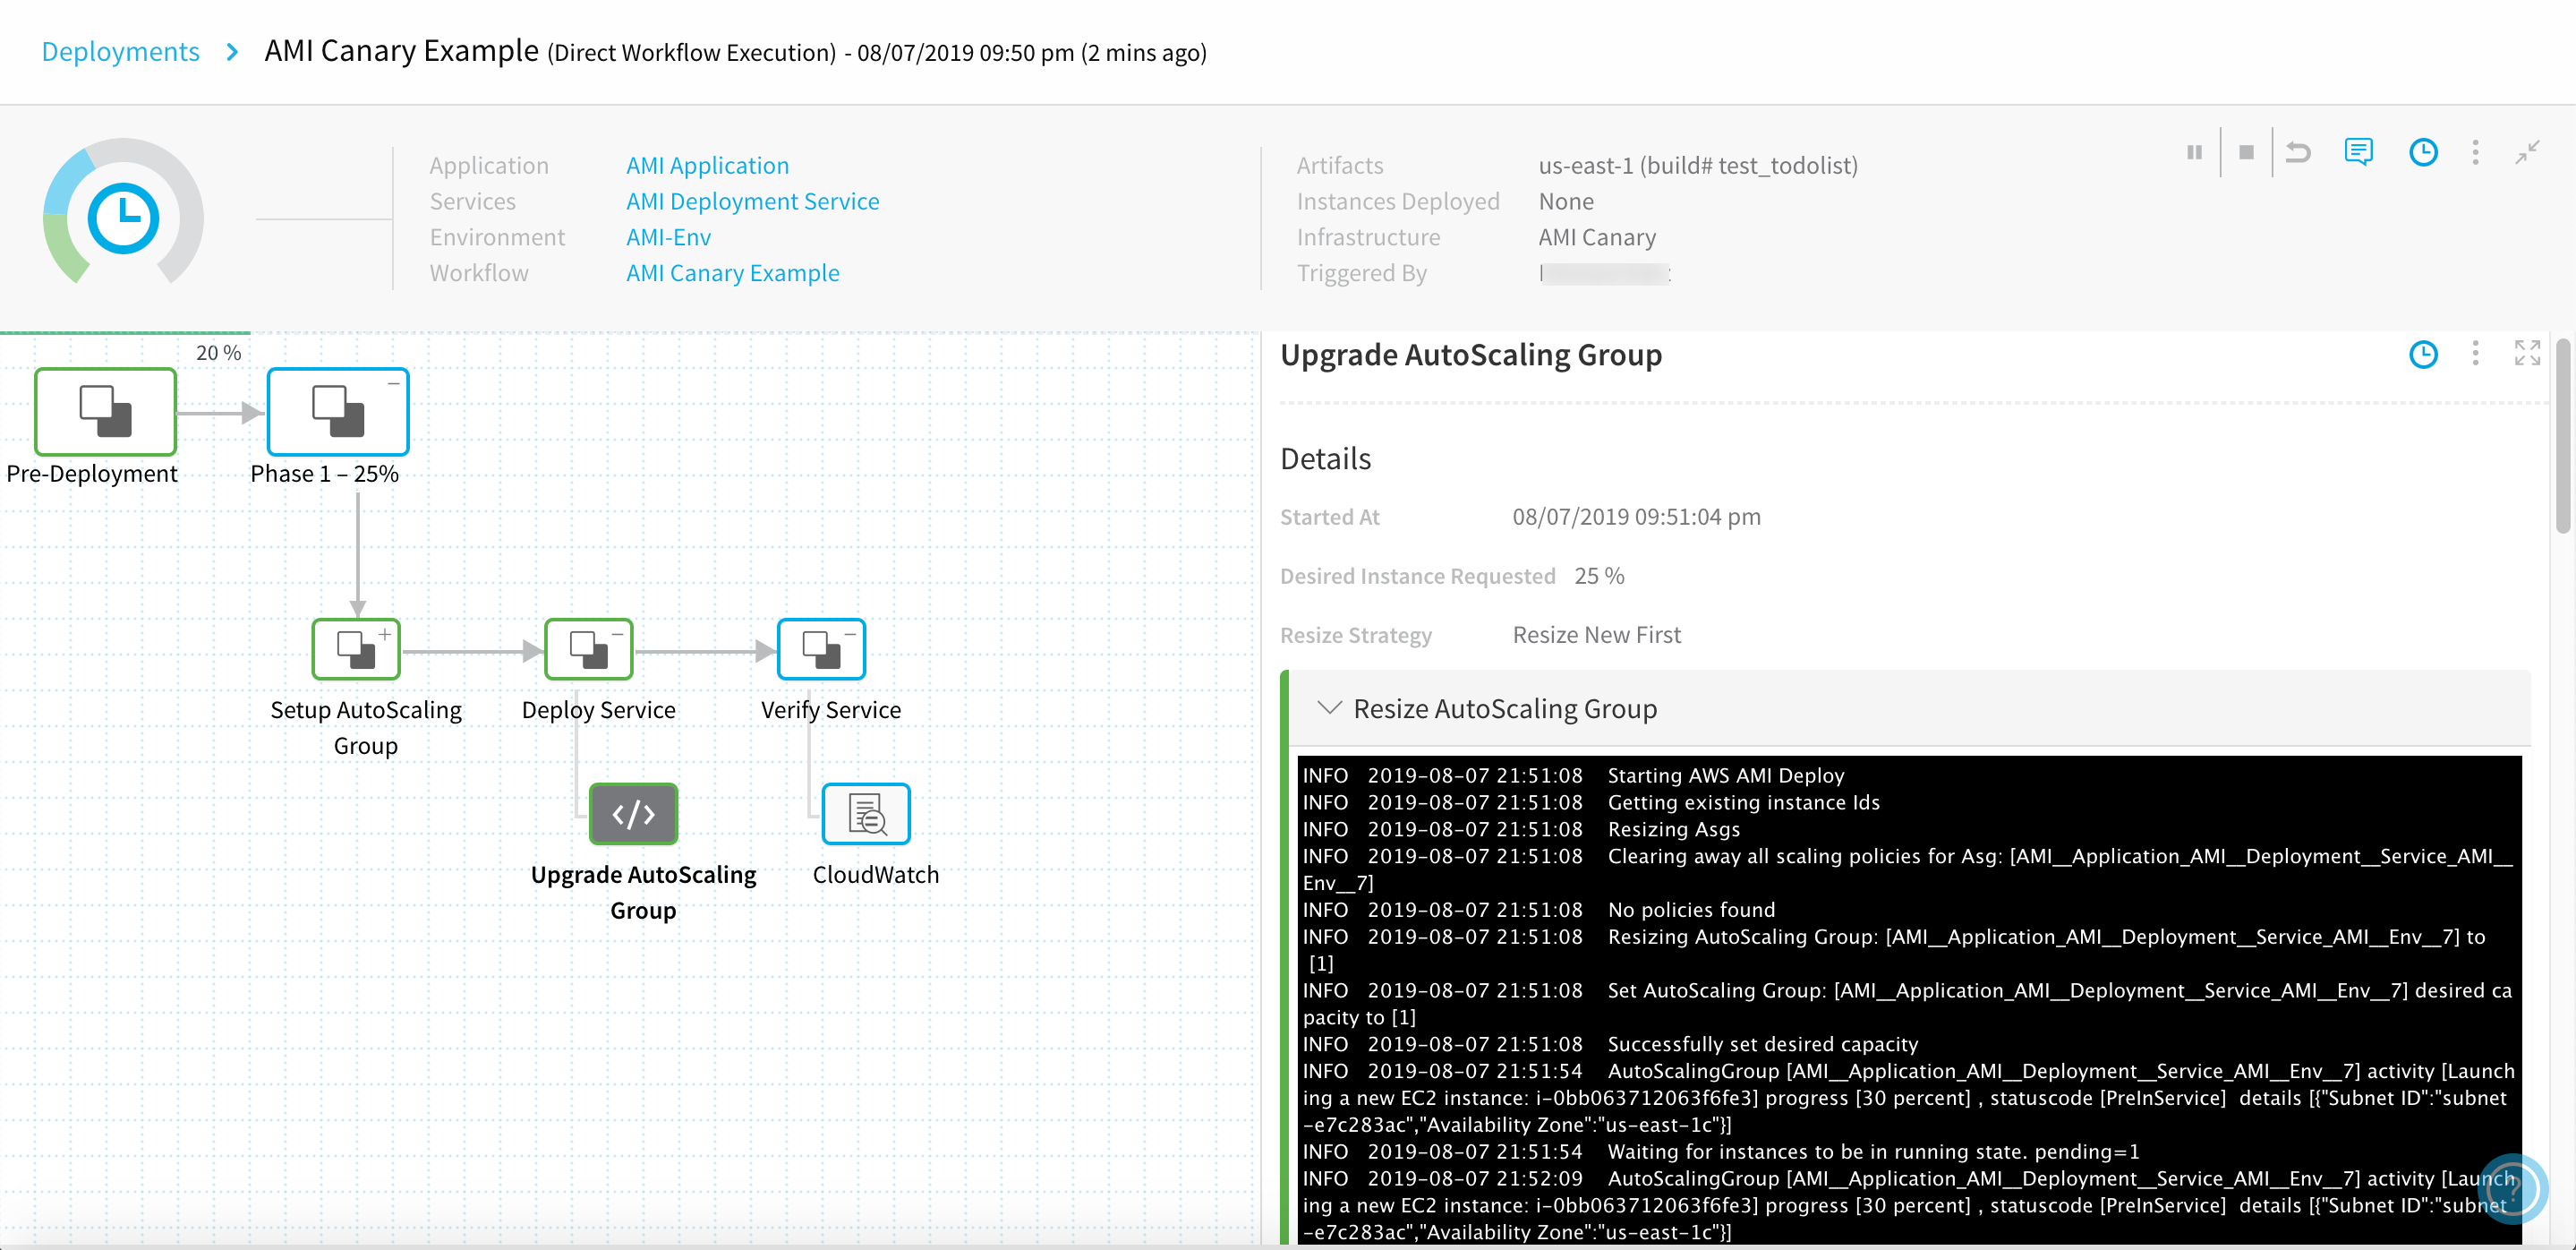
Here is partial output, showing the new Auto Scaling Group successfully resized and at steady state. We requested 25 Percent of 4 Desired Instances, and indeed, the log shows that AWS has set the desired capacity to [1]:
Starting AWS AMI Deploy
Getting existing instance Ids
Resizing Asgs
Clearing away all scaling policies for Asg: [AMI__Application_AMI__Deployment__Service_AMI__Env__7]
No policies found
Resizing AutoScaling Group: [AMI__Application_AMI__Deployment__Service_AMI__Env__7] to [1]
Set AutoScaling Group: [AMI__Application_AMI__Deployment__Service_AMI__Env__7] desired capacity to [1]
Successfully set desired capacity
AutoScalingGroup [AMI__Application_AMI__Deployment__Service_AMI__Env__7] activity [Launching a new EC2 instance: i-0bb063712063f6fe3] progress [30 percent] , statuscode [PreInService]  details [{"Subnet ID":"subnet-e7c283ac","Availability Zone":"us-east-1c"}]
Waiting for instances to be in running state. pending=1
...
AutoScaling group reached steady state
...
AutoScaling Group resize operation completed with status:[SUCCESS]
Any percent references that appear in such AWS log data refer only to percentages of pending AWS tasks. They're unrelated to the Canary percentage targets we've set in any Harness Upgrade AutoScaling Group steps.
Step 3: Verify Service
In Step 3, select Add Verification to open a dialog where you can add Harness Continuous Verification monitoring for your Canary phase.
In this example, we've selected CloudWatch verification, with monitoring for a single EC2 metric:
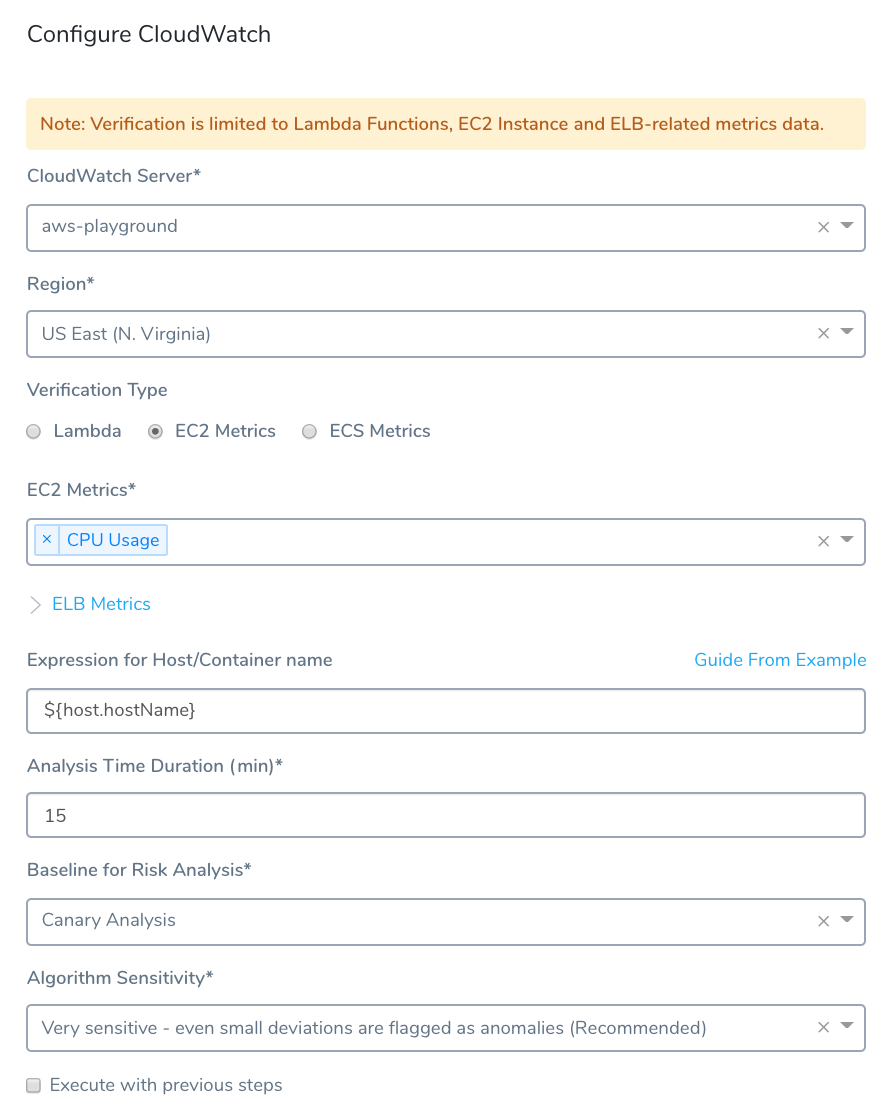
Within a Canary Workflow, Canary phases are the ideal places to add verification steps, using the Canary Analysis strategy. It's pointless to defer verification until the Primary (final) phase—because if the Canary phases are verified, you can assume that the Primary phase will proceed successfully.
Verify Service Step in Deployment
Using the configuration shown above, here is the Verify Service step in the Harness Deployments page:
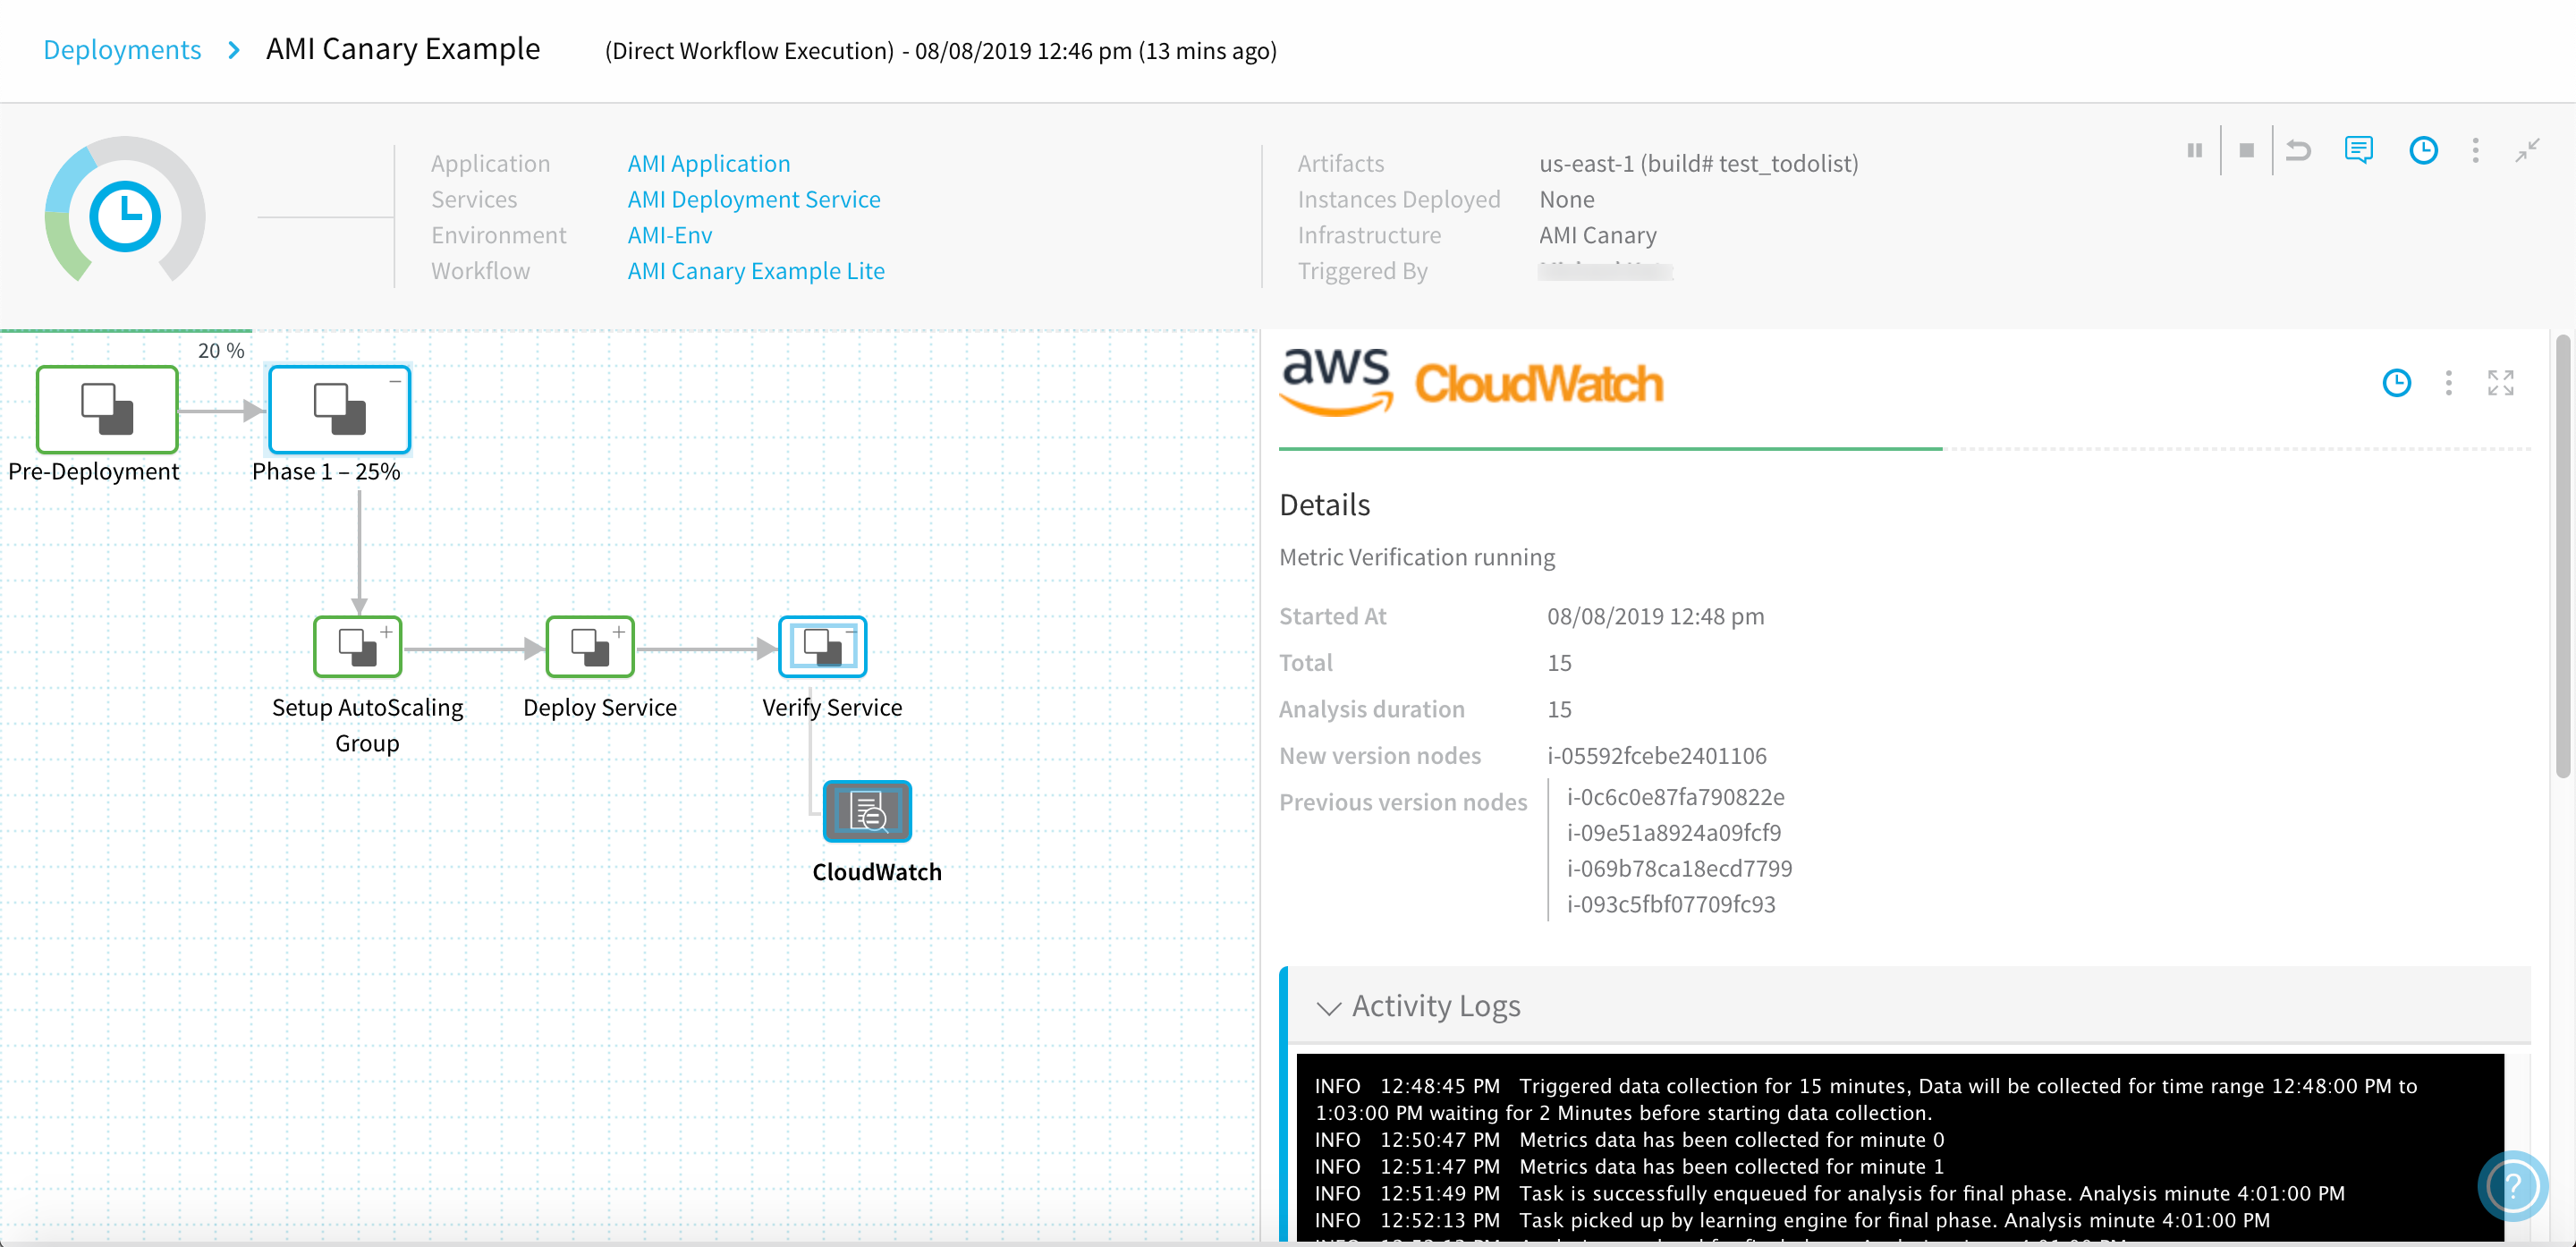 The Details panel shows the selected verification provider's analysis, with logging over the Analysis Time (duration) we specified:
Triggered data collection for 15 minutes, Data will be collected for time range 5:46:00 PM to 6:01:00 PM waiting for 2 Minutes before starting data collection.
Metrics data has been collected for minute 0
Metrics data has been collected for minute 1
Task is successfully enqueued for analysis for final phase. Analysis minute 4:01:00 PM
Metrics data has been collected for minute 2
Task picked up by learning engine for final phase. Analysis minute 4:01:00 PM
Analysis completed for final phase. Analysis minute 4:01:00 PM
...
Rollback Steps
By default, each AMI Canary phase includes a Rollback Steps section, containing a Rollback AutoScaling Group step.
For details about this step's Rollback all phases at once option, see the corresponding AMI Basic Deployment section:

The Rollback step's default presence here is unlike the default for other Harness Canary Workflows, such as Kubernetes Canary. If an AMI Canary phase fails to deploy, its Rollback step will roll back the whole Workflow to its state prior to this deployment. This will delete its newly created instances, conserving AWS resources and costs.
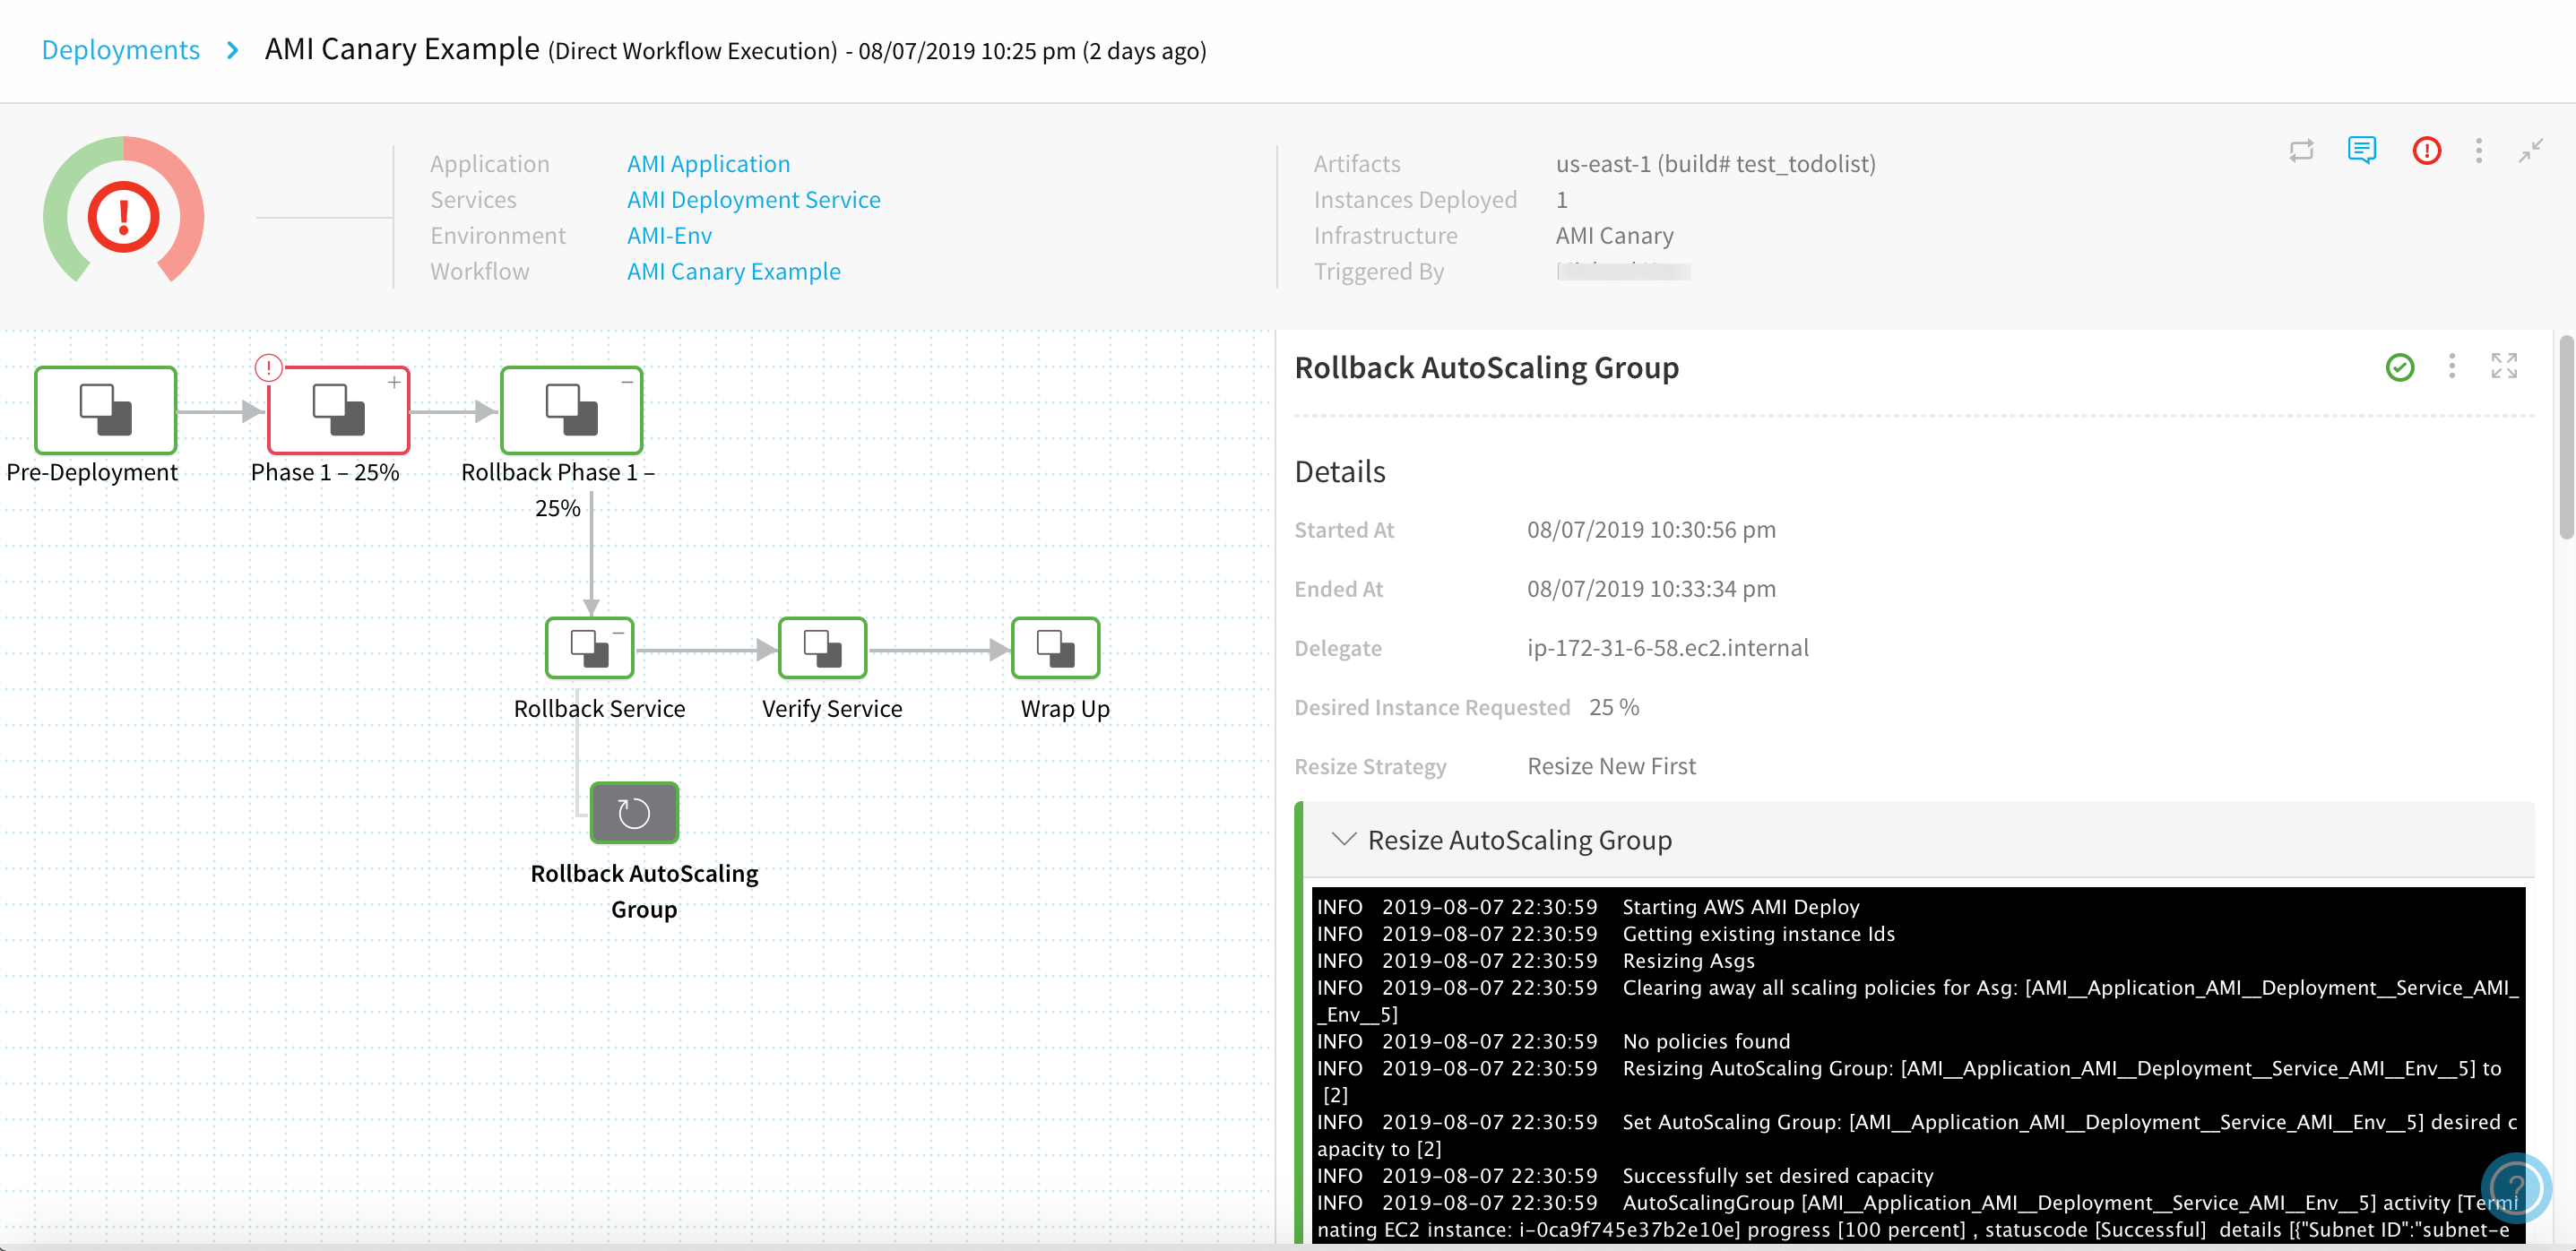
Here is partial output, showing the shutdown and deletion of this failed phase's ASG:
Asg: [AMI__Application_AMI__Deployment__Service_AMI__Env__8] being deleted after shutting down to 0 instances

AutoScalingGroup [AMI__Application_AMI__Deployment__Service_AMI__Env__8] activity [Terminating EC2 instance: i-0cf3ecb7b561eafb4] progress [100 percent] , statuscode [Successful]  details [{"Subnet ID":"subnet-e962248d","Availability Zone":"us-east-1a"}]
...
AutoScaling Group resize operation completed with status:[SUCCESS]
Rollbacks and Downsizing Old ASGs
For details on how previous ASGs are downsized and what happens during rollback, see How Does Harness Downsize Old ASGs?
Phase 2: Canary
In this example Workflow, we'll add a second Canary phase. Here, we'll define a second Upgrade AutoScaling Group step, and add a second Verify Service step. To add the second phase:
- In Deployment Phases, again click Add Phase.
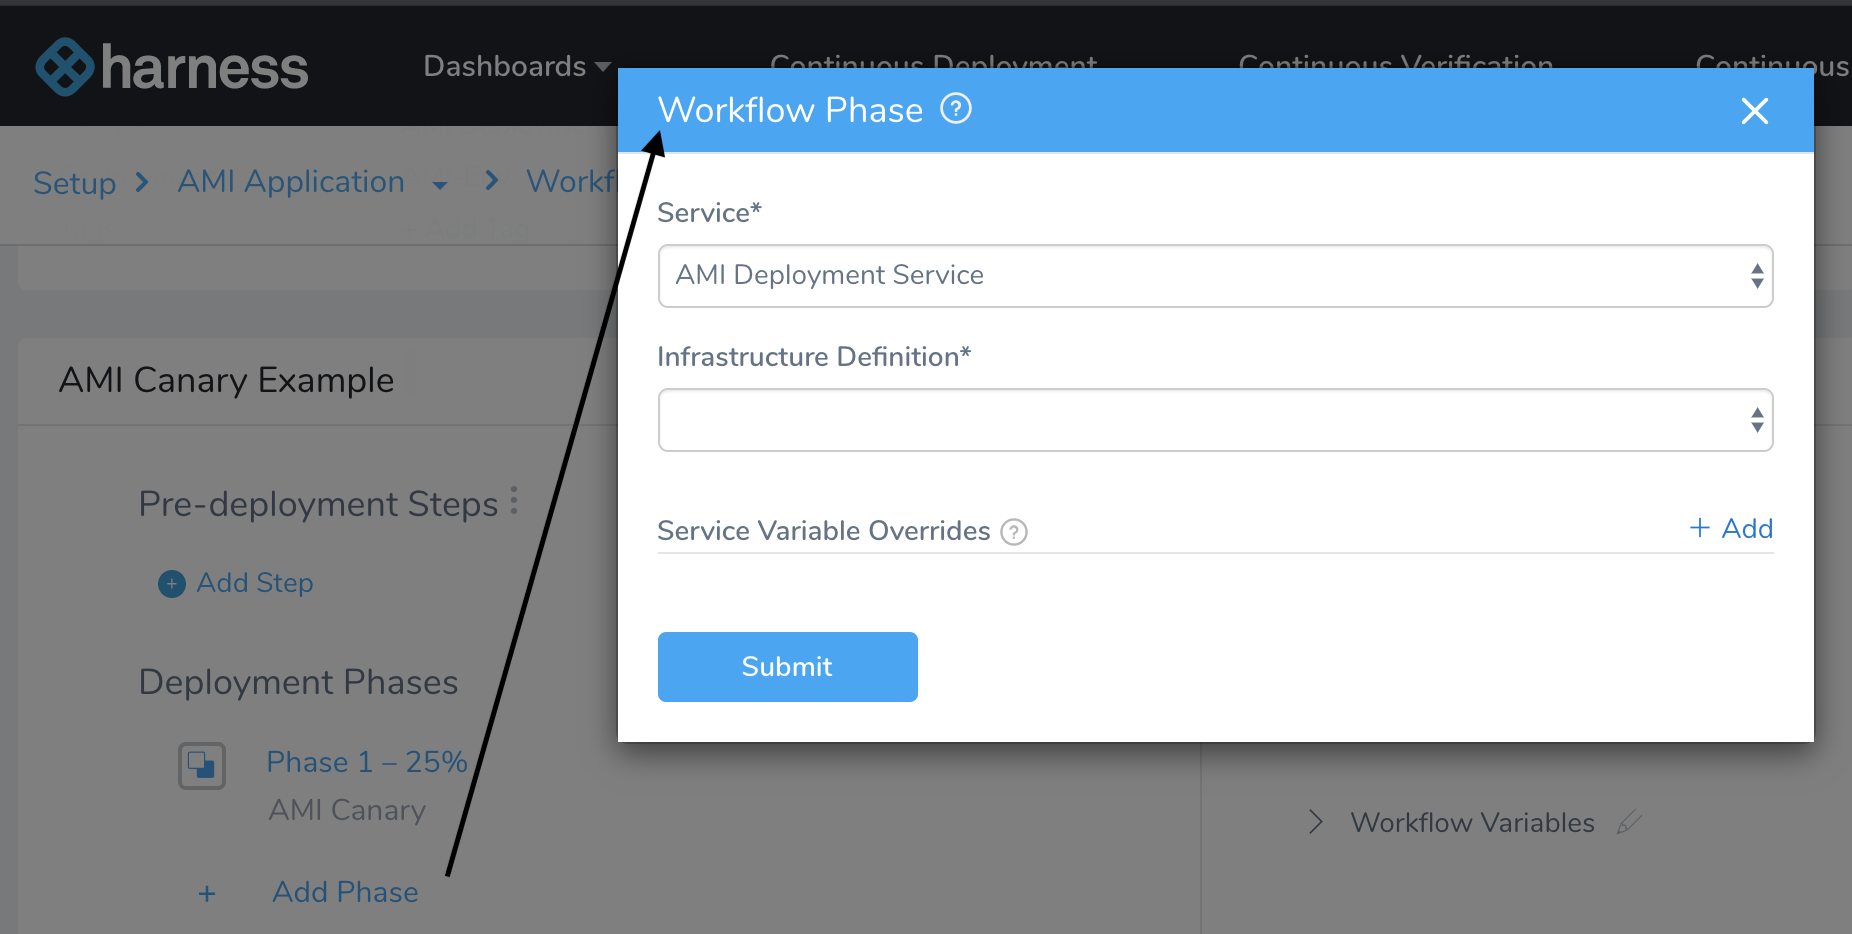
- In the resulting Workflow Phase dialog, select the same Service, Infrastructure Definition, and any Service Variable Overrides that you selected in Phase 1.
- Click Submit to create the new Phase.
Step 1: Deploy Service
Since we already set up the ASG in Phase 1, this new phase's Step 1 defaults directly to Upgrade AutoScaling Group.
Click the Upgrade AutoScaling Group link to open this dialog, where we're again using Percent scaling, but doubling the percentage to 50**Percent of the ASG's Desired Instances before clicking SUBMIT**:
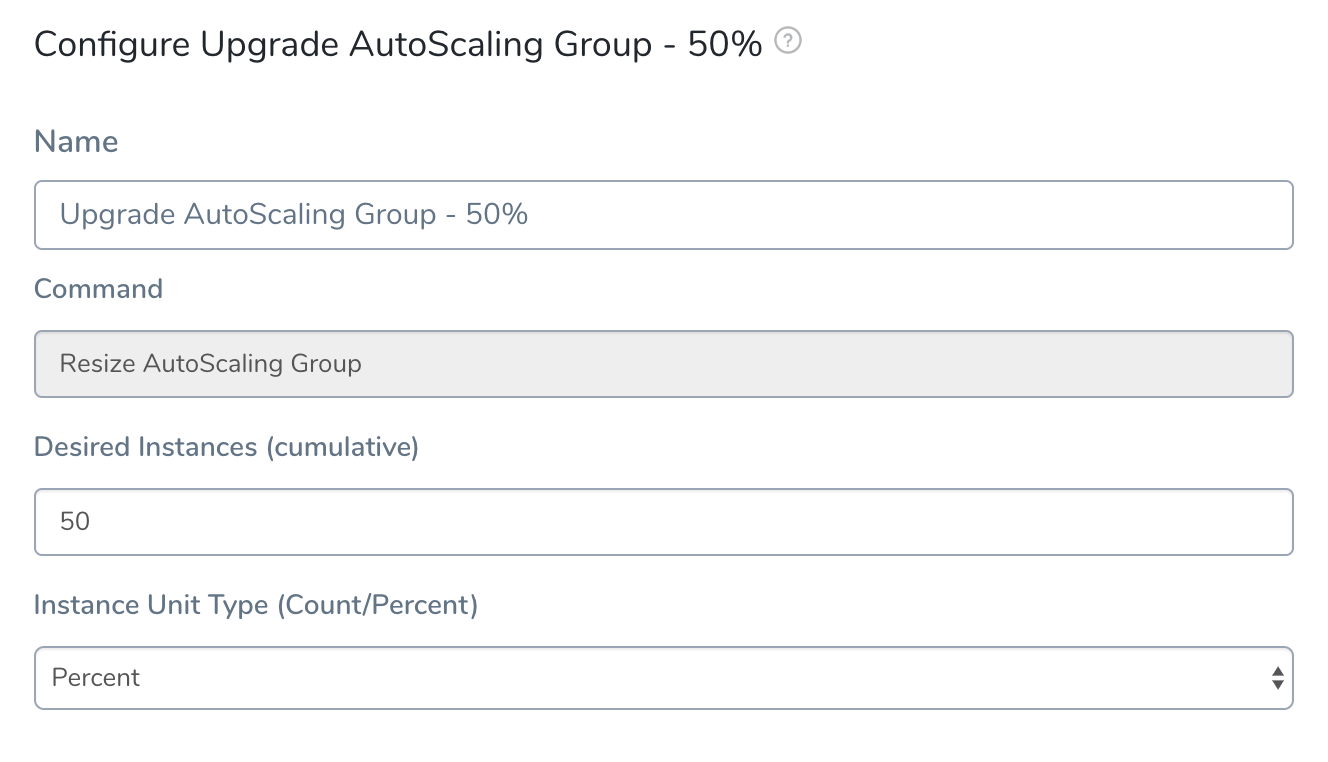
To review: This means we're requesting 50 percent of the 4 Desired Instances that we specified in Phase 1's Setup AutoScaling Group step.
Deploy Service Step in Deployment
Using the Upgrade AutoScaling Group configuration shown above, here is the Deploy Service step in the Harness Deployments page:
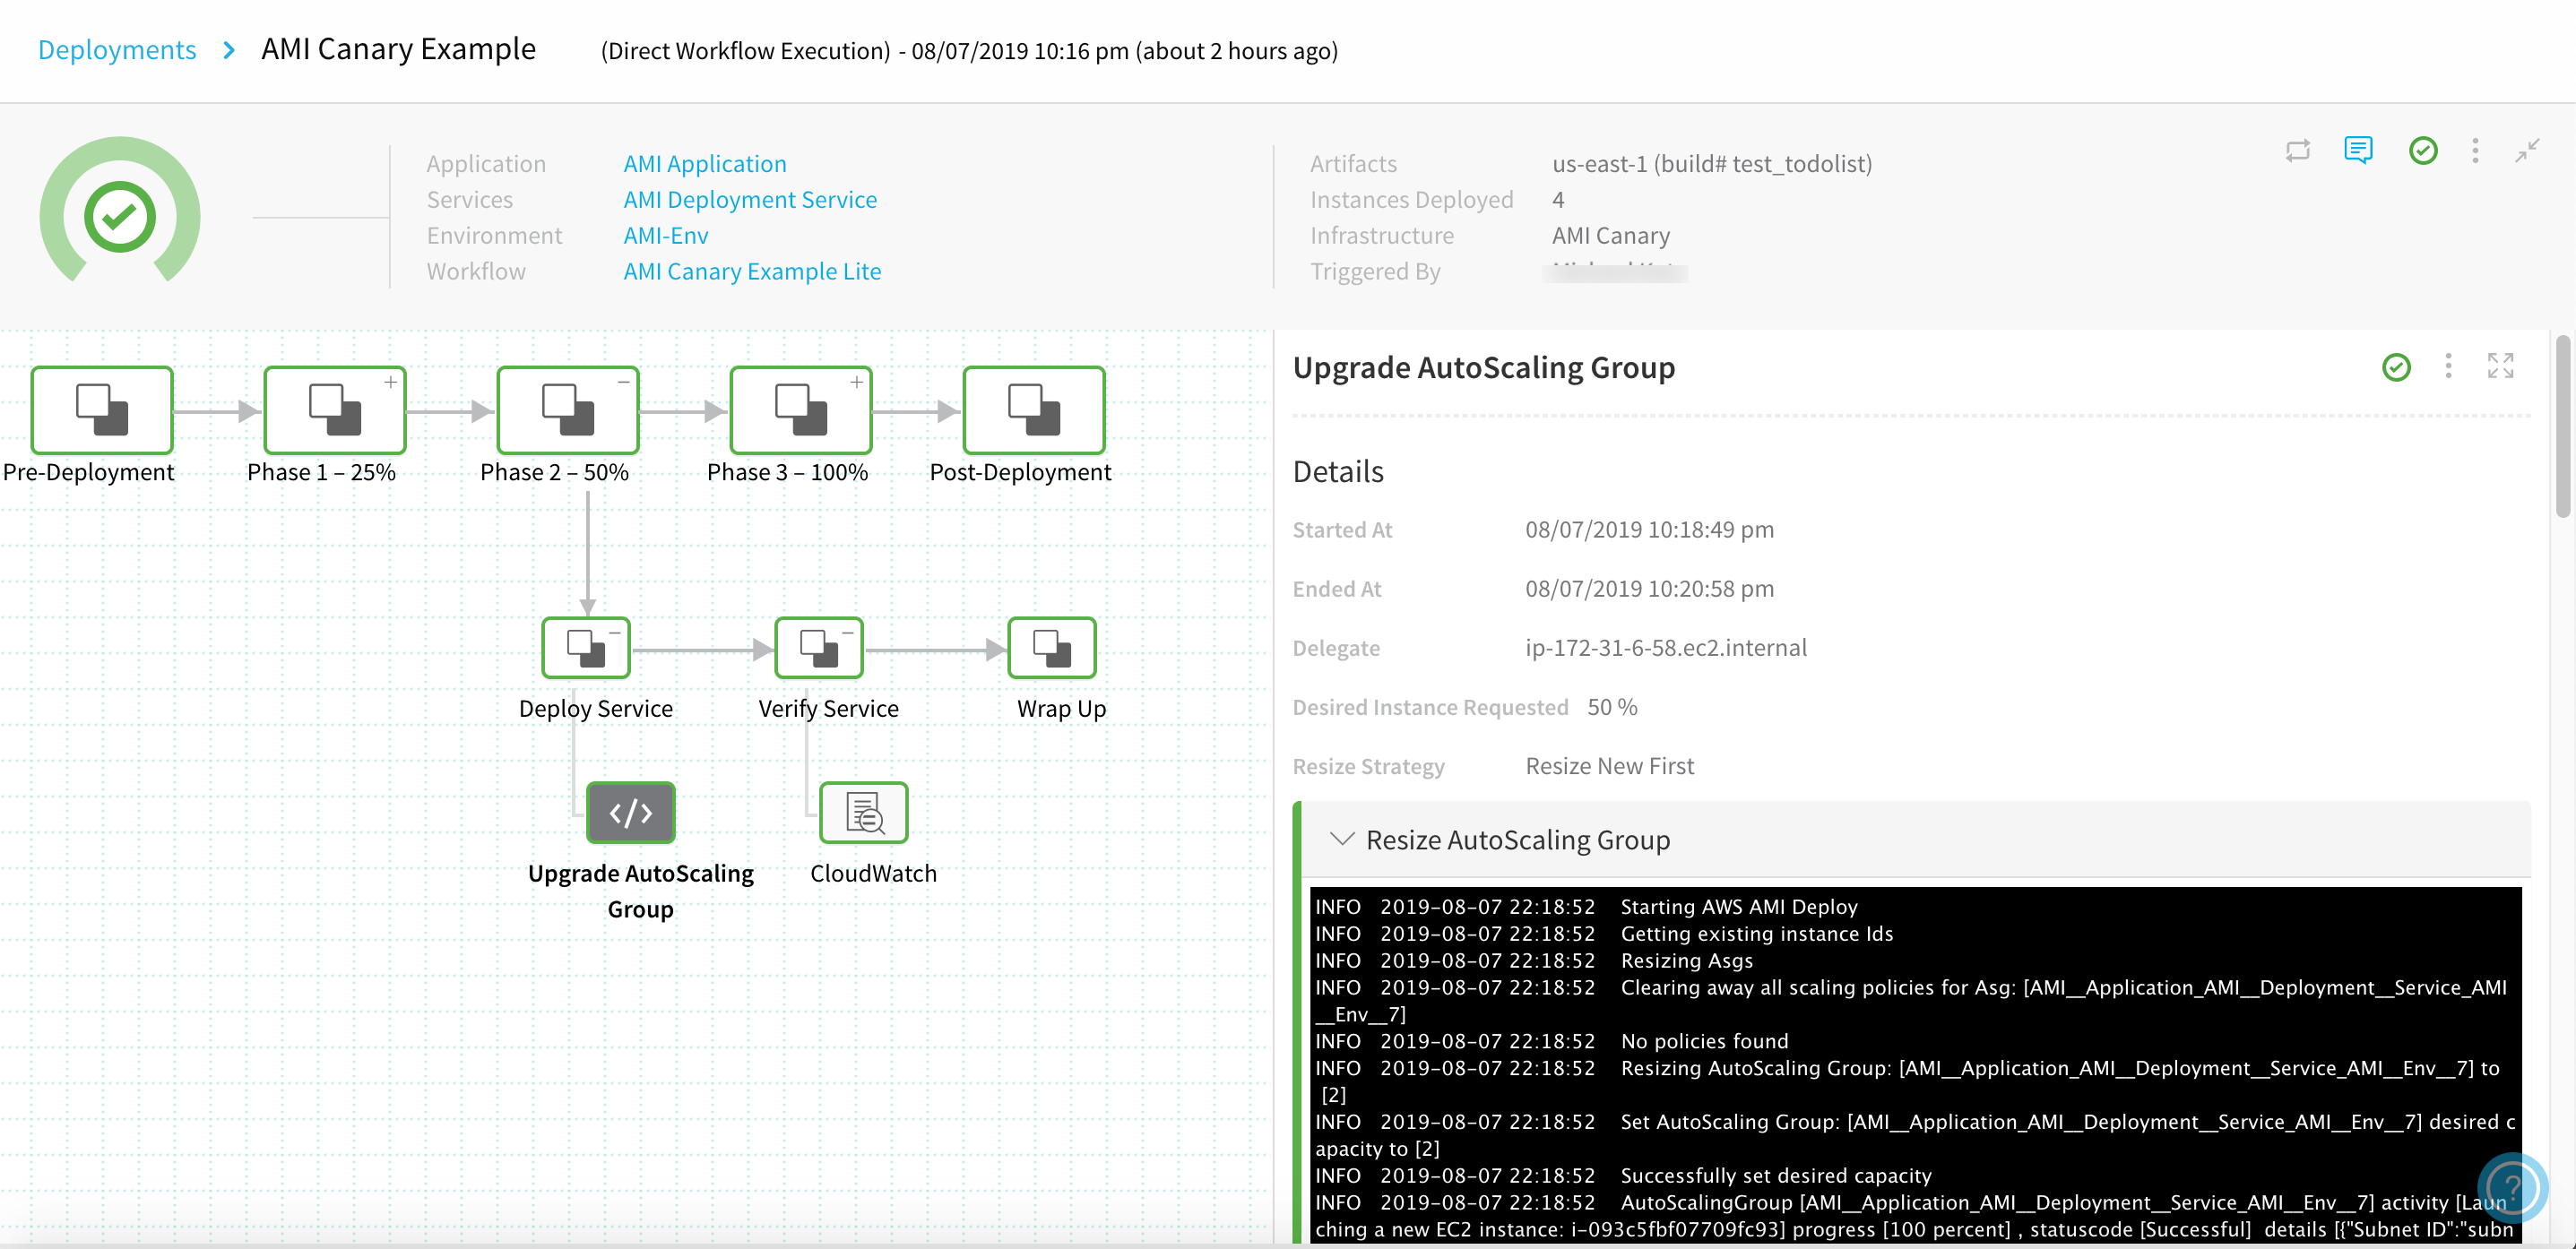
Here is partial output, showing the Auto Scaling Group successfully resized and at steady state. The upgrade of the desired capacity to [2] corresponds to our request for 50 Percent of 4 Desired Instances:
Starting AWS AMI Deploy
Getting existing instance Ids
Resizing Asgs
Clearing away all scaling policies for Asg: [AMI__Application_AMI__Deployment__Service_AMI__Env__7]
No policies found
Resizing AutoScaling Group: [AMI__Application_AMI__Deployment__Service_AMI__Env__7] to [2]
Set AutoScaling Group: [AMI__Application_AMI__Deployment__Service_AMI__Env__7] desired capacity to [2]
Successfully set desired capacity
AutoScalingGroup [AMI__Application_AMI__Deployment__Service_AMI__Env__7] activity [Launching a new EC2 instance: i-093c5fbf07709fc93] progress [100 percent] , statuscode [Successful]  details [{"Subnet ID":"subnet-e962248d","Availability Zone":"us-east-1a"}]
AutoScalingGroup [AMI__Application_AMI__Deployment__Service_AMI__Env__7] activity [Launching a new EC2 instance: i-0c6c0e87fa790822e] progress [30 percent] , statuscode [PreInService]  details [{"Subnet ID":"subnet-5c0fe853","Availability Zone":"us-east-1f"}]
Waiting for instances to be in running state. running=1,pending=1
...
AutoScaling group reached steady state
...
AutoScaling Group resize operation completed with status:[SUCCESS]
Step 2: Verify Service
In this example Workflow, we've defined Phase 2's Verify Service step identically to Phase 1's Step 3. (See specific instructions there.) This specifies a second round of CloudWatch monitoring.
In Workflows that you build, you could select other Harness Continuous Verification providers for monitoring, or you could choose to omit verification in this Canary phase.
Verify Service Step in Deployment
Using the configuration shown above, here is the Verify Service step in the Harness Deployments page:
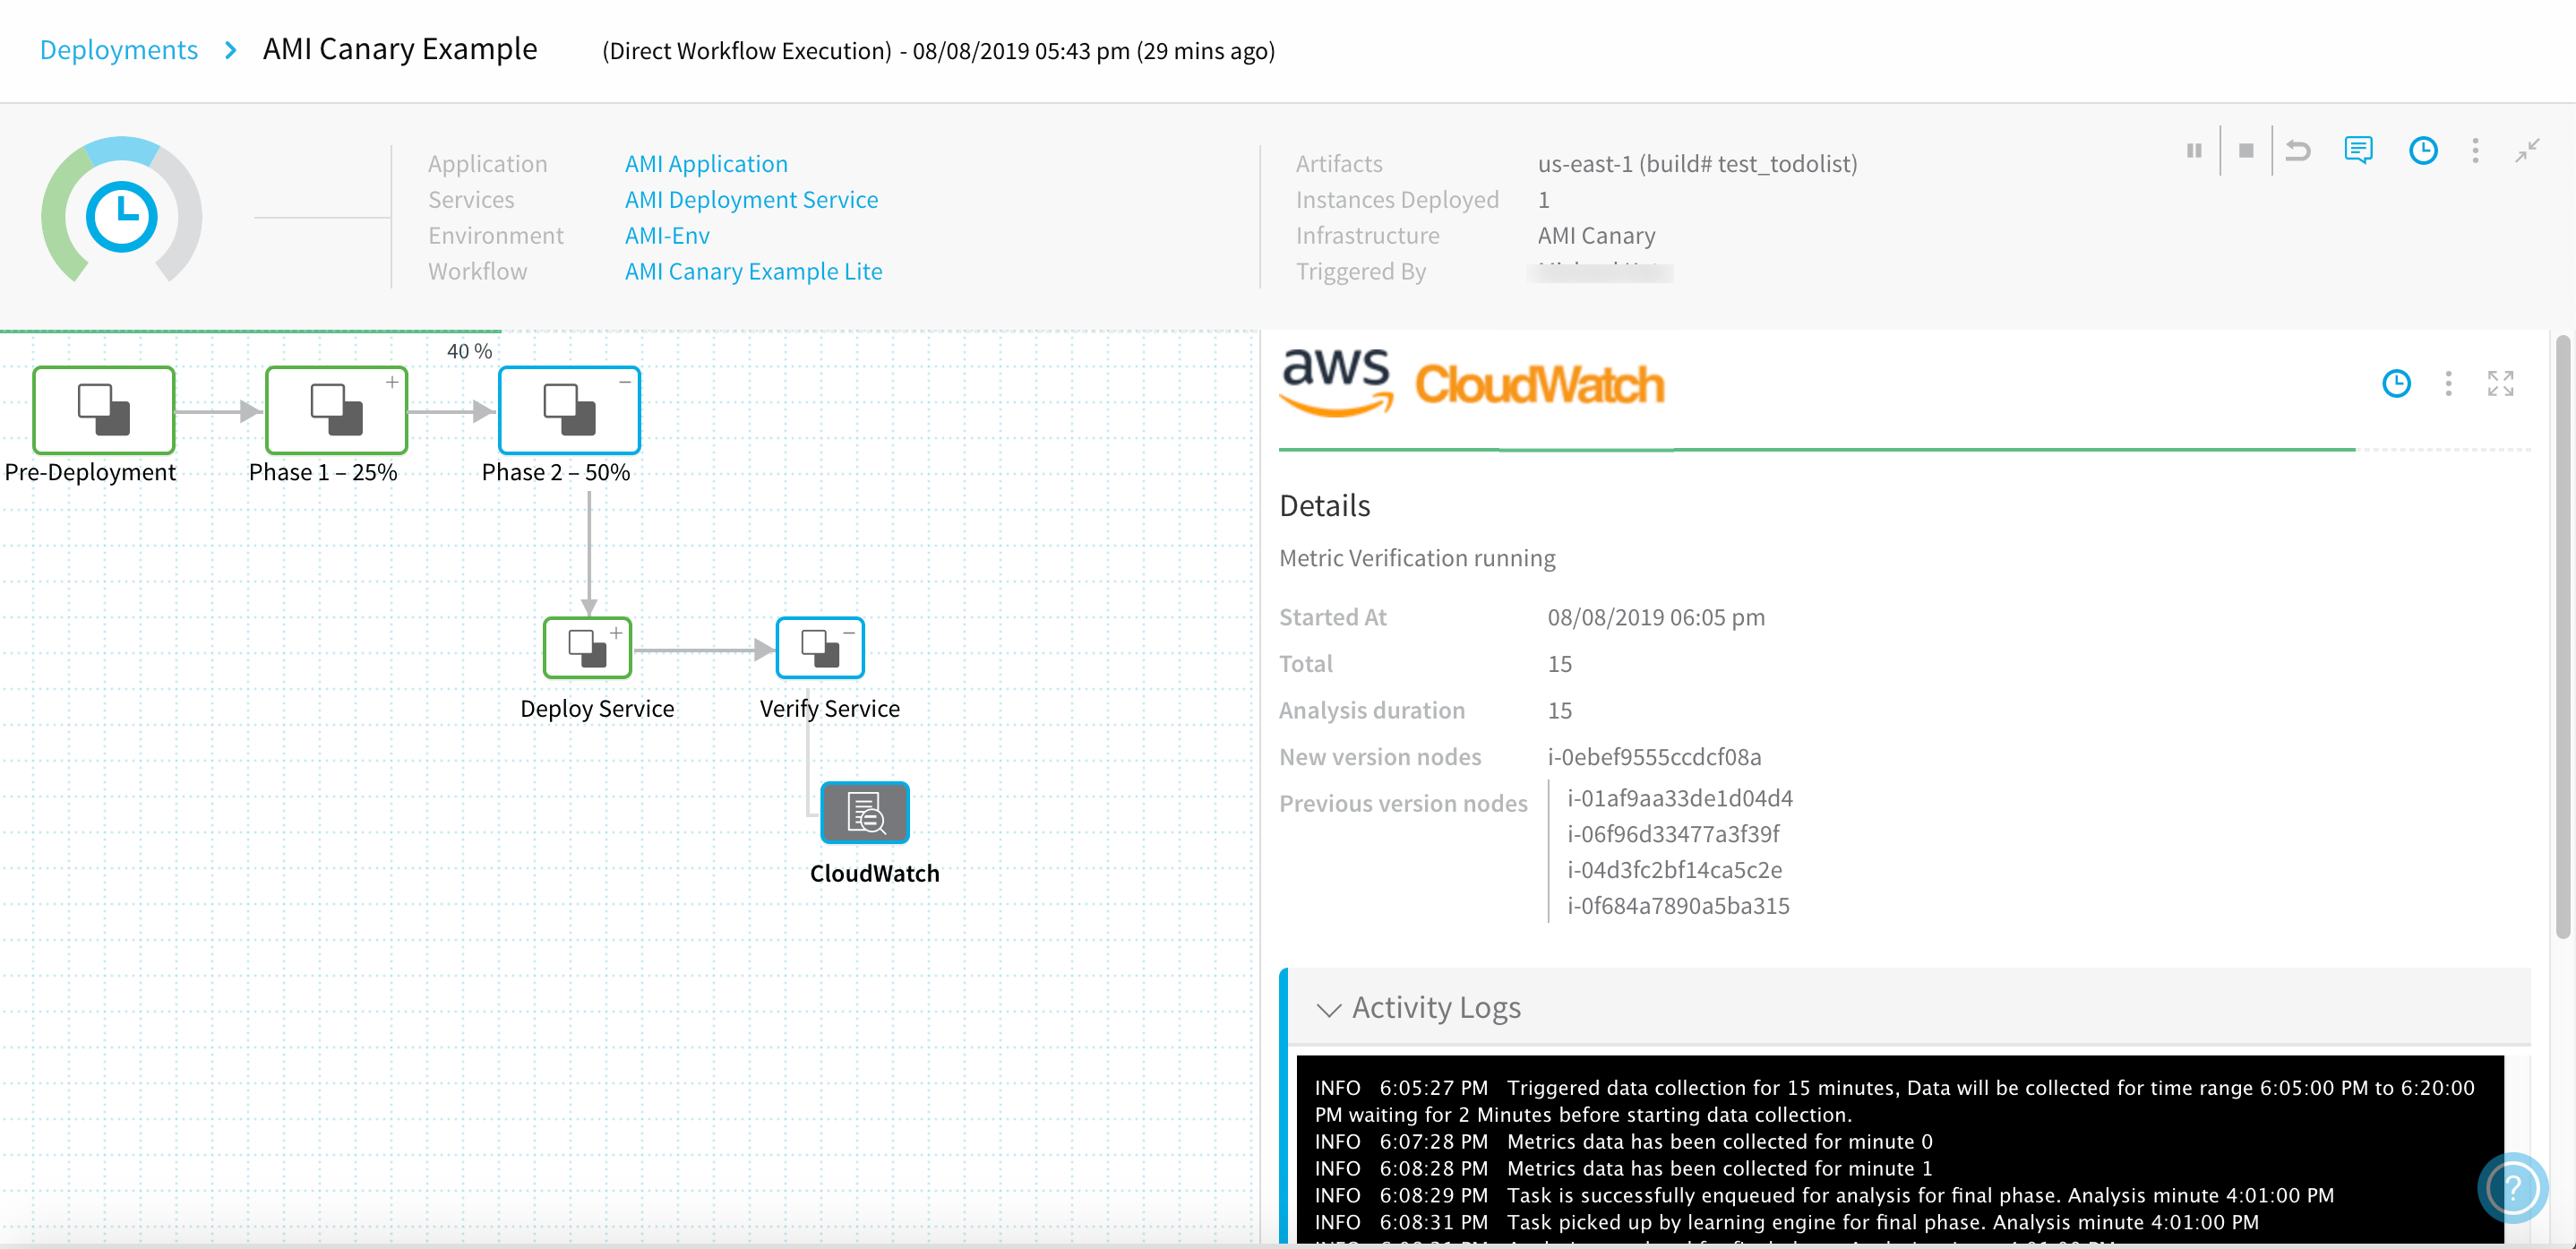
If the 50% deployment is as healthy as the 25% deployment, the Details panel's output should resemble the display in Phase 1's Verification step.
Phase 3: Primary
If prior Canary phases succeed, the Workflow's final phase runs the actual deployment—creating an Auto Scaling Group with the full number of instances you specified in the AWS AutoScaling Group Setup step.
To add this final phase:
- In Deployment Phases, below your two existing Phases, again click Add Phase.
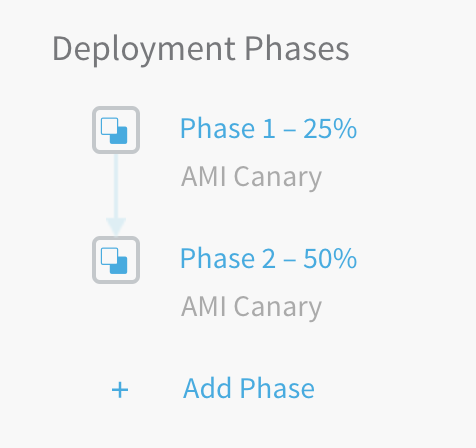
- In the resulting Workflow Phase dialog, select the same Service, Infrastructure Definition, and any Service Variable Overrides that you selected in Phase 1.
- Click SUBMIT to create the new Phase.
The resulting Phase 3 page provides structure only for an Upgrade AutoScaling Group step, and that's the only step we'll define.
Step 1: Deploy Service
To define this phase's scaling:
- In Step 1, select Upgrade AutoScaling Group.
- In the resulting dialog, again select Percent scaling, and set the Desired Instances to 100 percent of the ASG's Desired Instances:
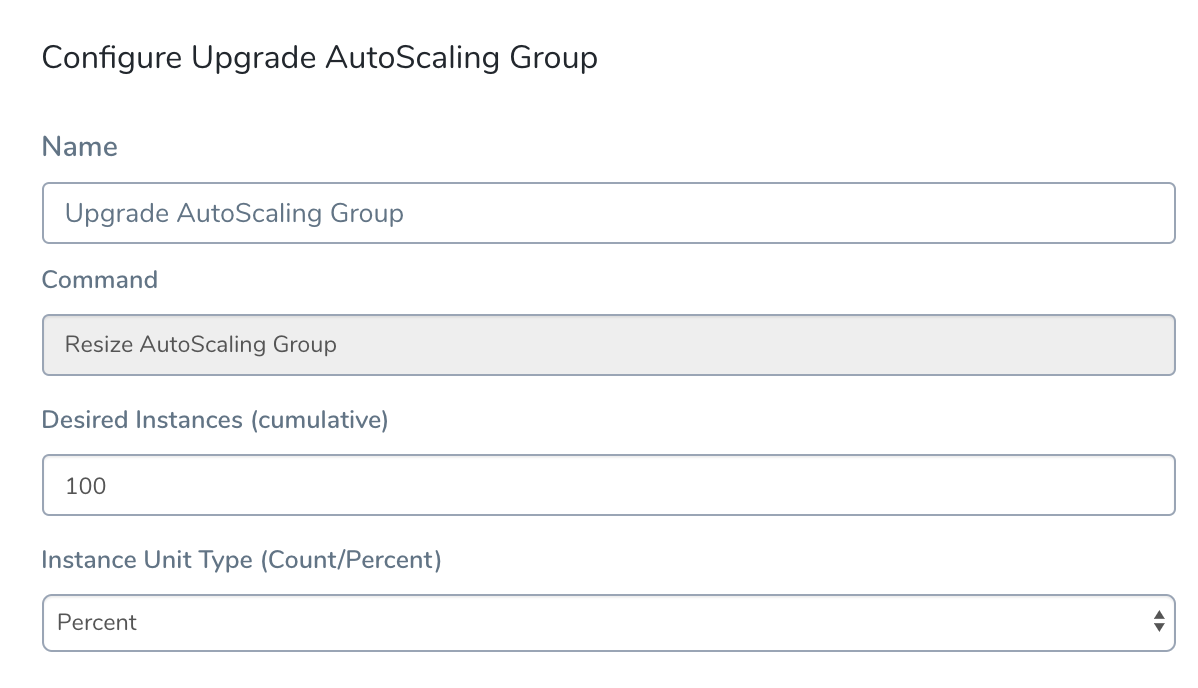
- Click SUBMIT to complete this Workflow's three-phase configuration.
Deploy Service Step in Deployment
Using the Upgrade AutoScaling Group configuration shown above, here is this final Deploy Service step in the Harness Deployments page:
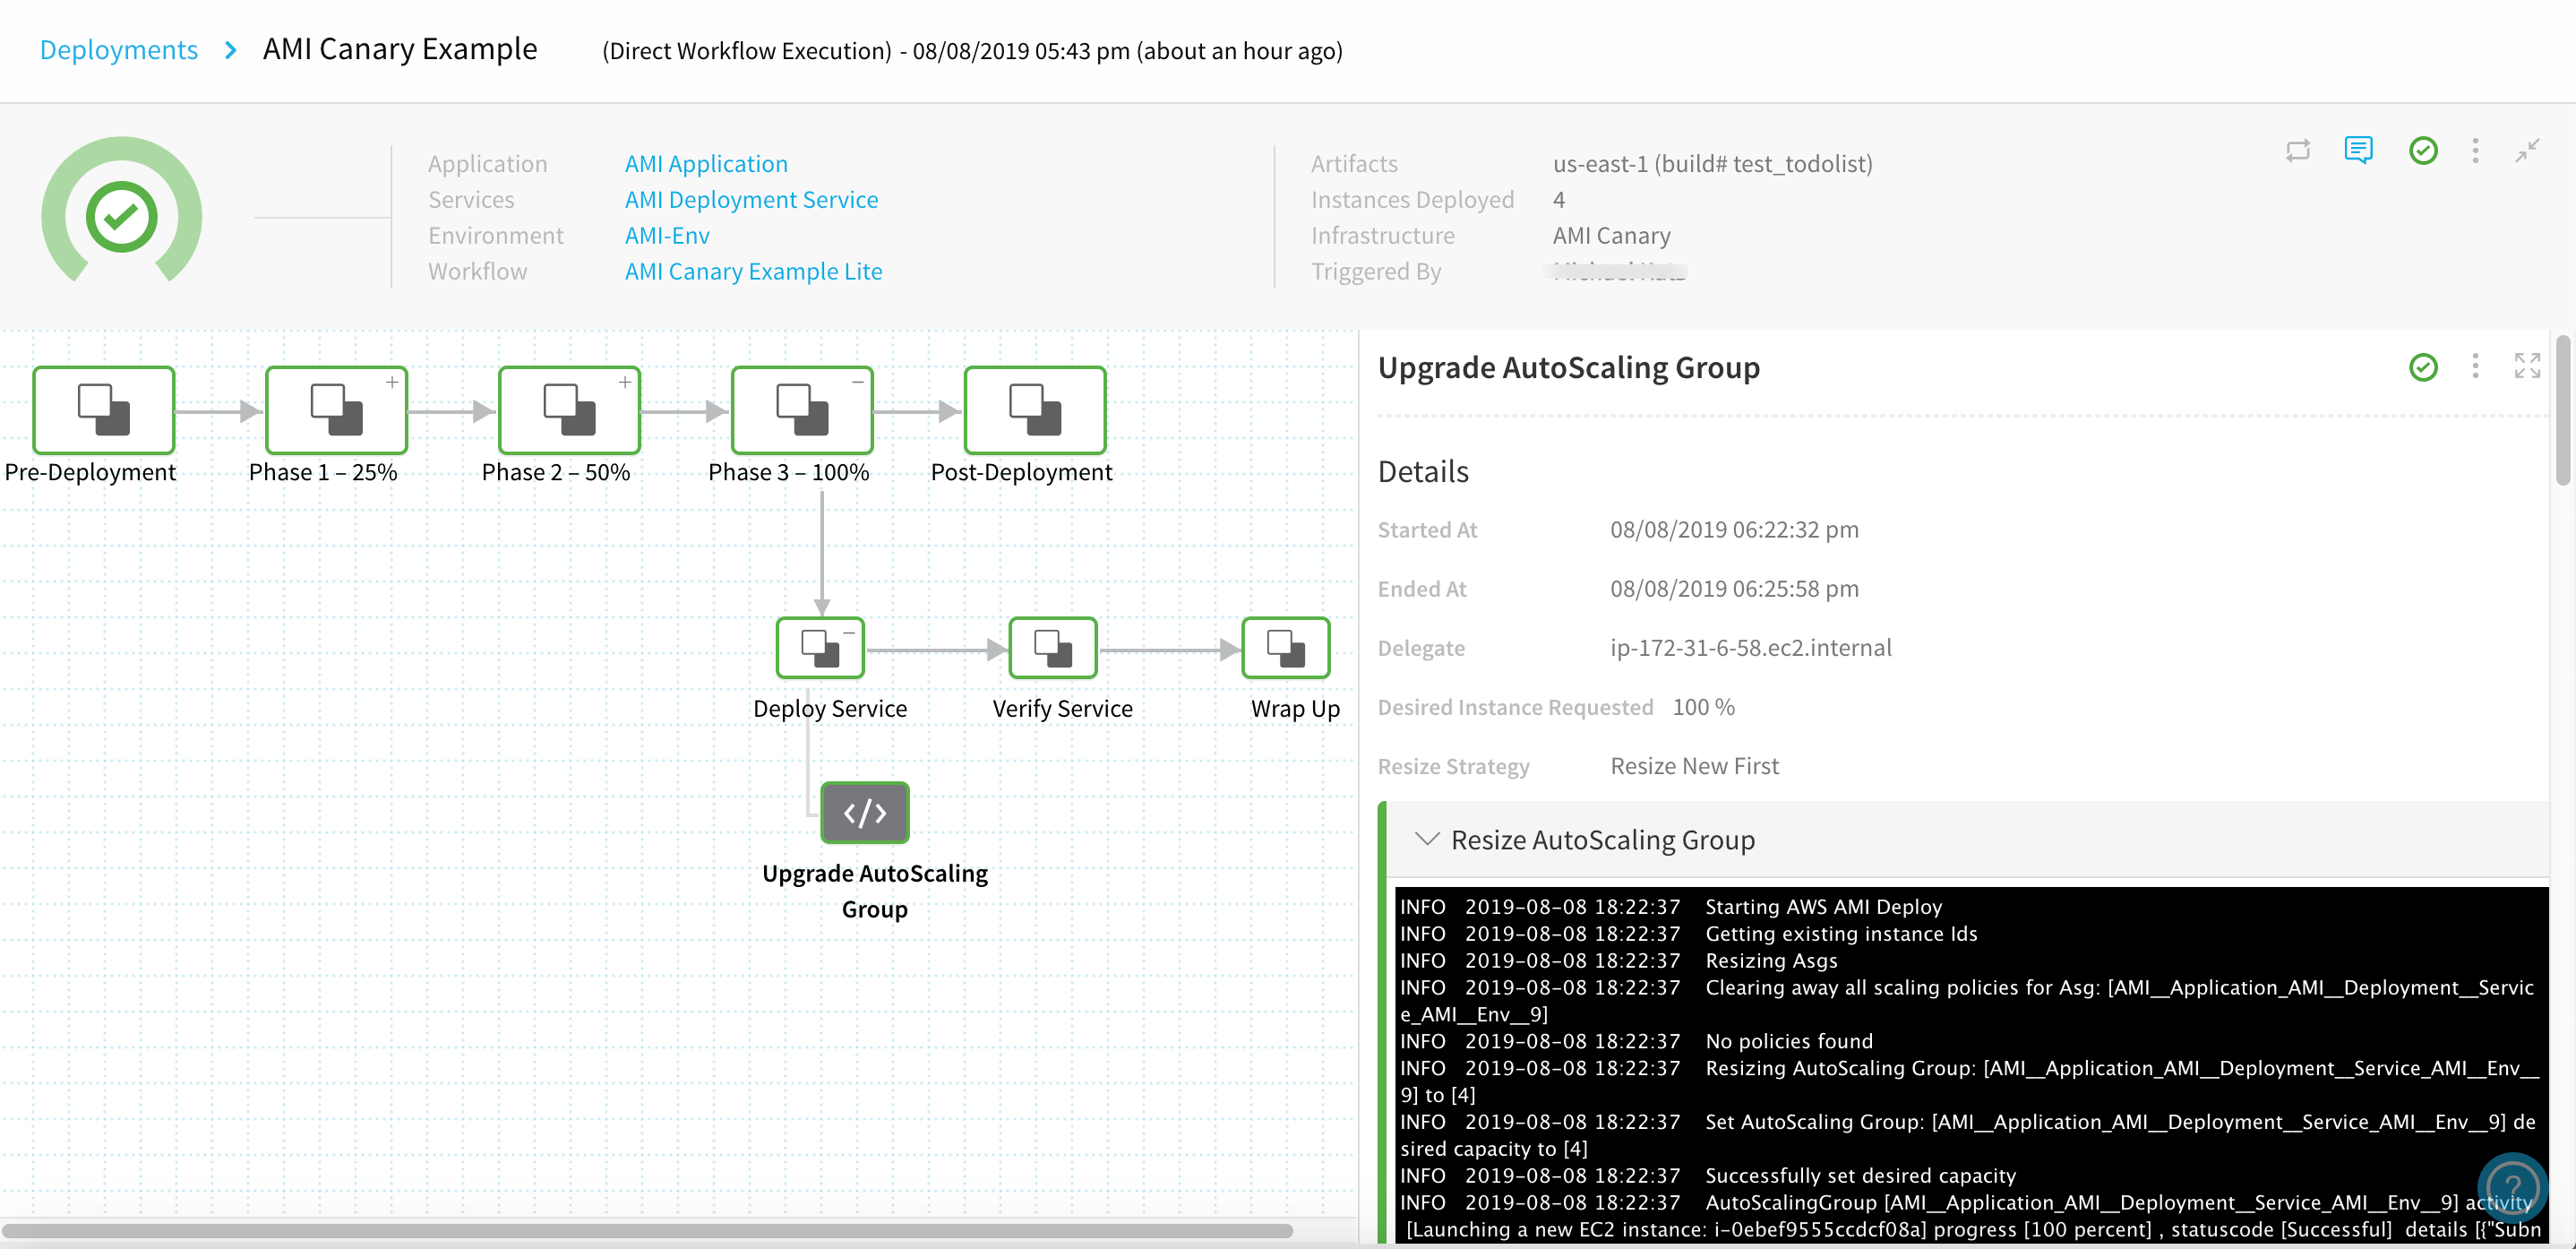
Here is partial output, showing the Auto Scaling Group fully increasing its desired capacity to [4]. Note that AWS retains the two instances that it created in prior phases:
Resizing AutoScaling Group: [AMI__Application_AMI__Deployment__Service_AMI__Env__7] to [4]
Set AutoScaling Group: [AMI__Application_AMI__Deployment__Service_AMI__Env__7] desired capacity to [4]
Successfully set desired capacity
AutoScalingGroup [AMI__Application_AMI__Deployment__Service_AMI__Env__7] activity [Launching a new EC2 instance: i-0c6c0e87fa790822e] progress [100 percent] , statuscode [Successful]  details [{"Subnet ID":"subnet-5c0fe853","Availability Zone":"us-east-1f"}]
AutoScalingGroup [AMI__Application_AMI__Deployment__Service_AMI__Env__7] activity [Launching a new EC2 instance: i-093c5fbf07709fc93] progress [100 percent] , statuscode [Successful]  details [{"Subnet ID":"subnet-e962248d","Availability Zone":"us-east-1a"}]
Remember that each percent entry in these logs indicates AWS' percentage completion of its pending tasks—not to the scaling percentages that we've specified per Phase.Next, AWS adds two more instances, and scales them up, eventually reaching steady state:
AutoScalingGroup [AMI__Application_AMI__Deployment__Service_AMI__Env__7] activity [Launching a new EC2 instance: i-069b78ca18ecd7799] progress [30 percent] , statuscode [PreInService]  details [{"Subnet ID":"subnet-09229d54","Availability Zone":"us-east-1d"}]
AutoScalingGroup [AMI__Application_AMI__Deployment__Service_AMI__Env__7] activity [Launching a new EC2 instance: i-09e51a8924a09fcf9] progress [30 percent] , statuscode [PreInService]  details [{"Subnet ID":"subnet-ed0a96d2","Availability Zone":"us-east-1e"}]
Waiting for instances to be in running state. running=2,pending=2
AutoScalingGroup [AMI__Application_AMI__Deployment__Service_AMI__Env__7] activity [Launching a new EC2 instance: i-069b78ca18ecd7799] progress [30 percent] , statuscode [PreInService]  details [{"Subnet ID":"subnet-09229d54","Availability Zone":"us-east-1d"}]
AutoScalingGroup [AMI__Application_AMI__Deployment__Service_AMI__Env__7] activity [Launching a new EC2 instance: i-09e51a8924a09fcf9] progress [30 percent] , statuscode [PreInService]  details [{"Subnet ID":"subnet-ed0a96d2","Availability Zone":"us-east-1e"}]
AutoScaling group reached steady state
...
AutoScaling Group resize operation completed with status:[SUCCESS]
And here...our AMI is fully deployed.
Deploy the Workflow
As with the AMI Basic deployment, once your setup is complete, you can click the Workflow's Deploy button to start the Canary deployment.
In the resulting Start New Deployment dialog, select the AMI to deploy, and click SUBMIT.
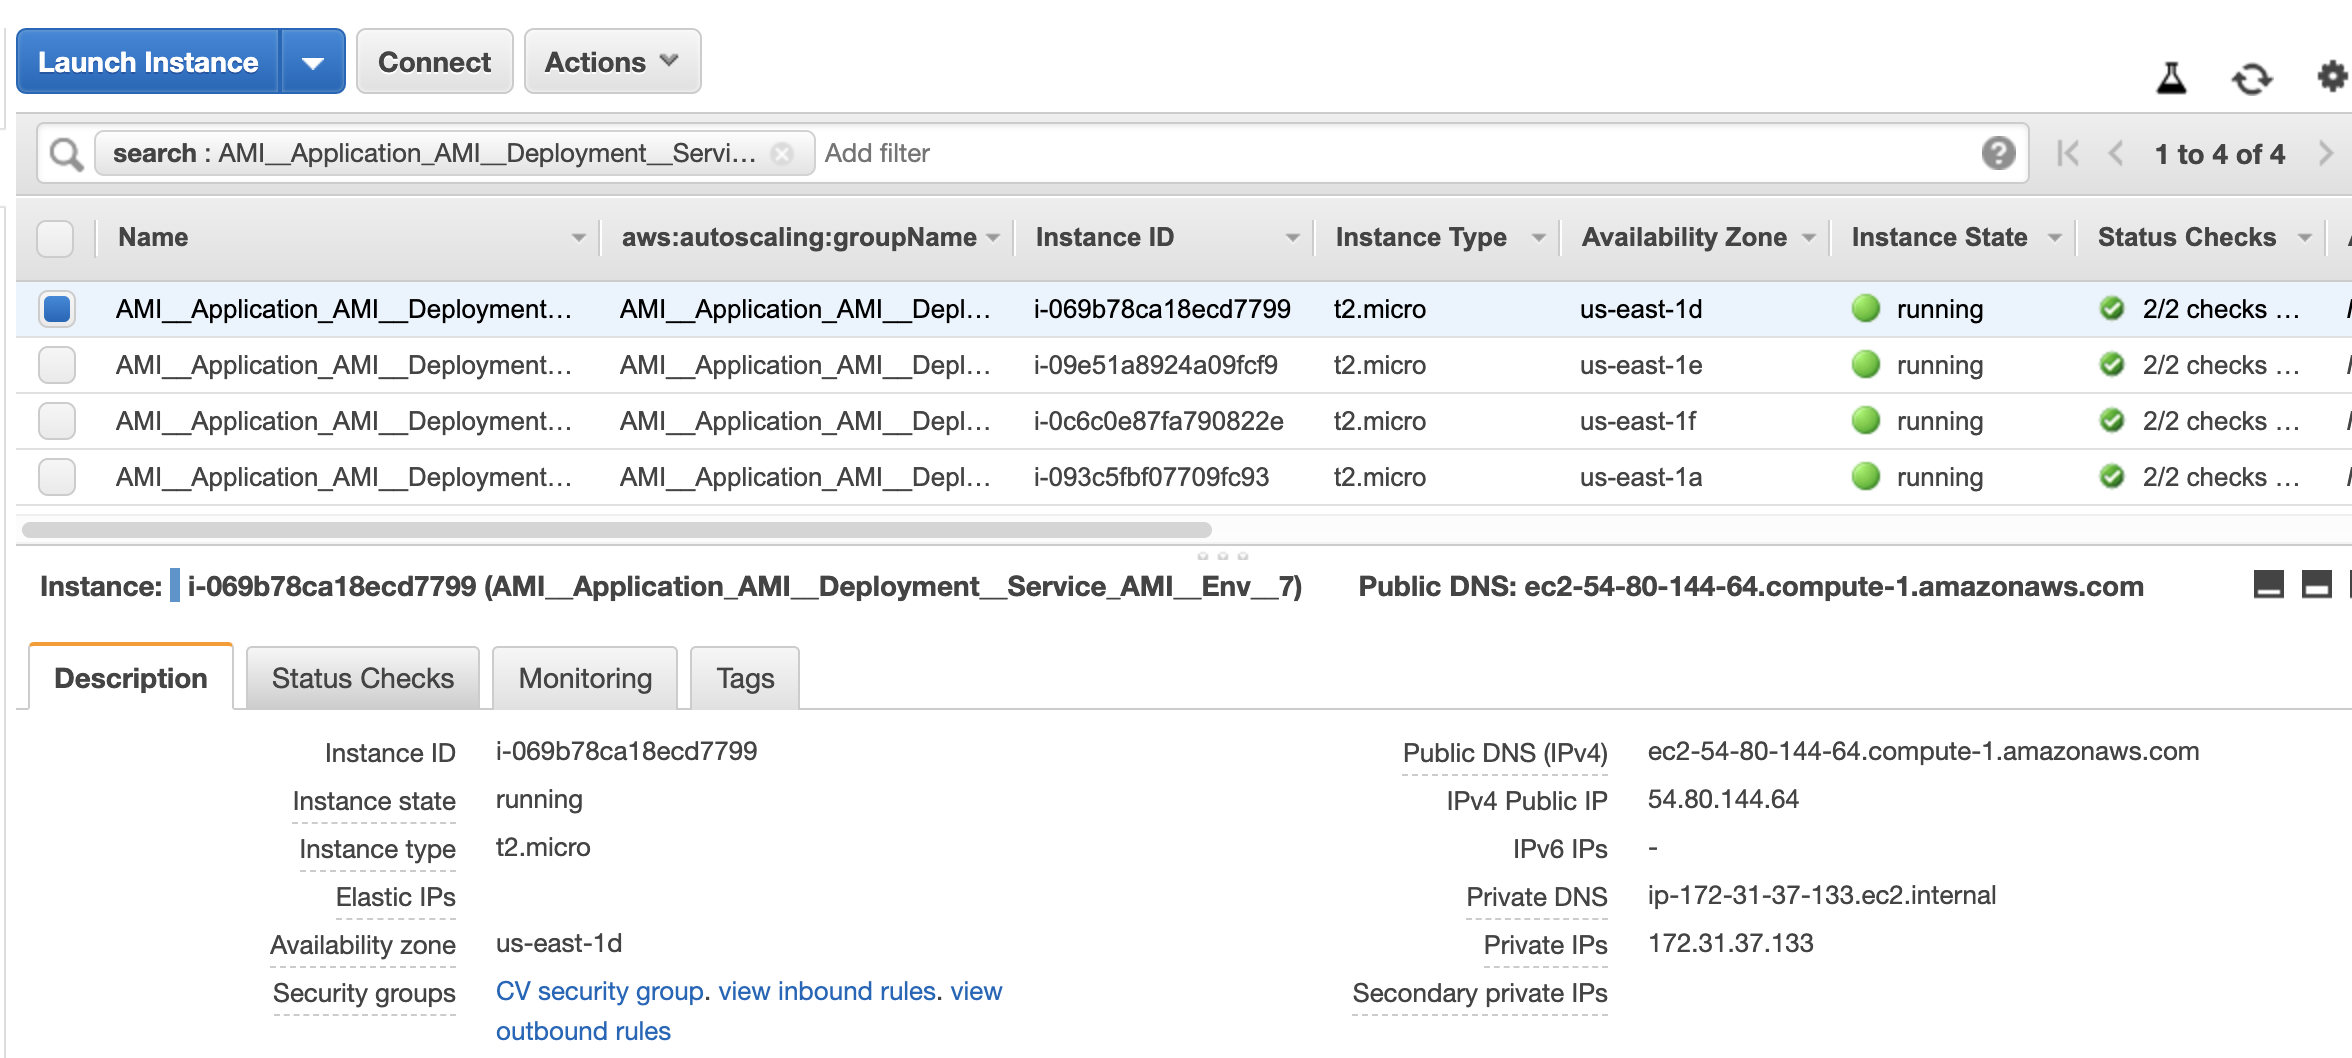
The Workflow deploys. The Deployments page displays details about the deployed instances.
To verify the completed deployment, log into your AWS Console and locate the newly deployed instance(s).
Support for Scheduled Scaling
Currently, this feature is behind the Feature Flag AMI_ASG_CONFIG_COPY.The Base ASG you provide to Harness for creating the new ASG can use AWS Scheduled Scaling (scheduled scaling with scheduled actions).
There are a few important considerations:
- When configuring the base ASG, the
ScheduledActionsprocess must be suspended so that it won’t scale the base ASG. Once Harness creates the new ASG from the base, Harness will enable theScheduledActionsprocess in the new ASG (if the base ASG had it). See Suspending and resuming a process for an Auto Scaling group from AWS. - Harness currently supports only the UTC timezone format in scheduled actions. Time values in scheduled actions in the base ASG need to be configured in UTC.