Connect to Elasticsearch (ELK)
The first step in using Elasticsearch (ELK) with Harness is to set up an Elasticsearch Verification Provider in Harness.
A Harness Verification Provider is a connection to monitoring tools, such as Elasticsearch. Once Harness is connected, you can use Harness 24/7 Service Guard and Deployment Verification with your Elasticsearch data and analysis.
Before You Begin
- See the Elasticsearch Verification Overview.
Step 1: Add Elasticsearch (ELK) Verification Provider
To add Elasticsearch as a Harness Verification Provider, do the following:
In Harness, click Setup.
Click Connectors, and then click Verification Providers.
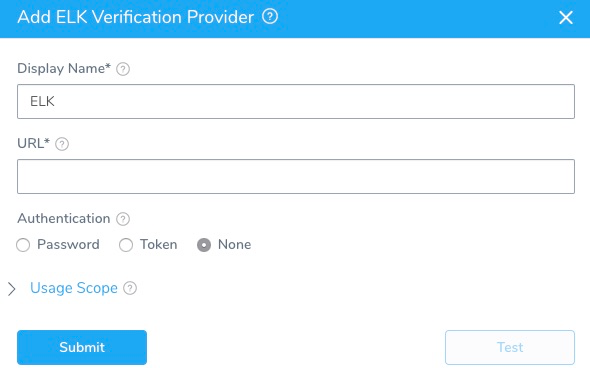
Click Add Verification Provider, and select ELK. The Add ELK Verification Provider dialog for your provider appears.

Step 2: Display Name
Enter a display name for the provider. If you are going to use multiple providers of the same type, ensure you give each provider a different name.
Step 3: URL
Enter the URL of the server. The format is http(s)://***server*:*port*/. The default port is 9200**.
Step 4: Username and Encrypted Password
For secrets and other sensitive settings, select or create a new Harness Encrypted Text secret.
Enter the credentials to authenticate with the server.
Step 5: Token
For secrets and other sensitive settings, select or create a new Harness Encrypted Text secret.
Some systems provide Elasticsearch as a service and use access tokens.If you have token based authentication, provide the authentication header that is passed when making the HTTP request.
Header: APITokenKey. Example: x-api-key (varies by system).
Value: APITokenValue. Example: kdsc3h3hd8wngdfujr23e23e2.
Step 6: Usage Scope
Usage scope is inherited from the secrets used in the settings.
If you selected None in Authentication, then you can scope this connection to Harness Applications and Environments.