Onboard Teams Using Git
This topic shows you how to create a Harness Application template you can sync and clone in Git for onboarding new teams.
Often, teams create an Application template for engineering leads or DevOps engineers. Each team then gets a clone of the Application in Git that they can modify for their purposes.
Development teams can then deploy consistently without using the Harness UI to create their Applications from scratch. They simply change a few lines of YAML vis scripts and deploy their application.
Before You Begin
- Harness Key Concepts — Ensure you know Harness Key Concepts.
- Configuration as Code — Review Harness YAML interface.
- Harness Git Integration Overview — Review Harness support for Git.
Review: Why Git-based Onboarding?
Here are a few examples of why Harness customers use Git for onboarding:
- Developers working in Git don't want to navigate to another screen to configure their deployment Workflows and Pipelines.
- For some developers, UI's take too long to navigate when coding rapidly. The Harness YAML interface uses a simply folder structure for easy navigation.
- Segmenting Applications from overall Harness management. In a single repo, developers can manage their Applications, container specifications and manifests, and Harness component configuration.
- Create a Golden Template Application and use it to onboard Applications for teams.
Step 1: Set Up Git Connector
Set up a Source Repo Provider connection in Harness that connects to the Git repo you want to use. For details, see Add Source Repo Providers.
For example, here is a new GitHub repo named Golden Template Application and its corresponding set up in Harness as a Source Repo Provider:
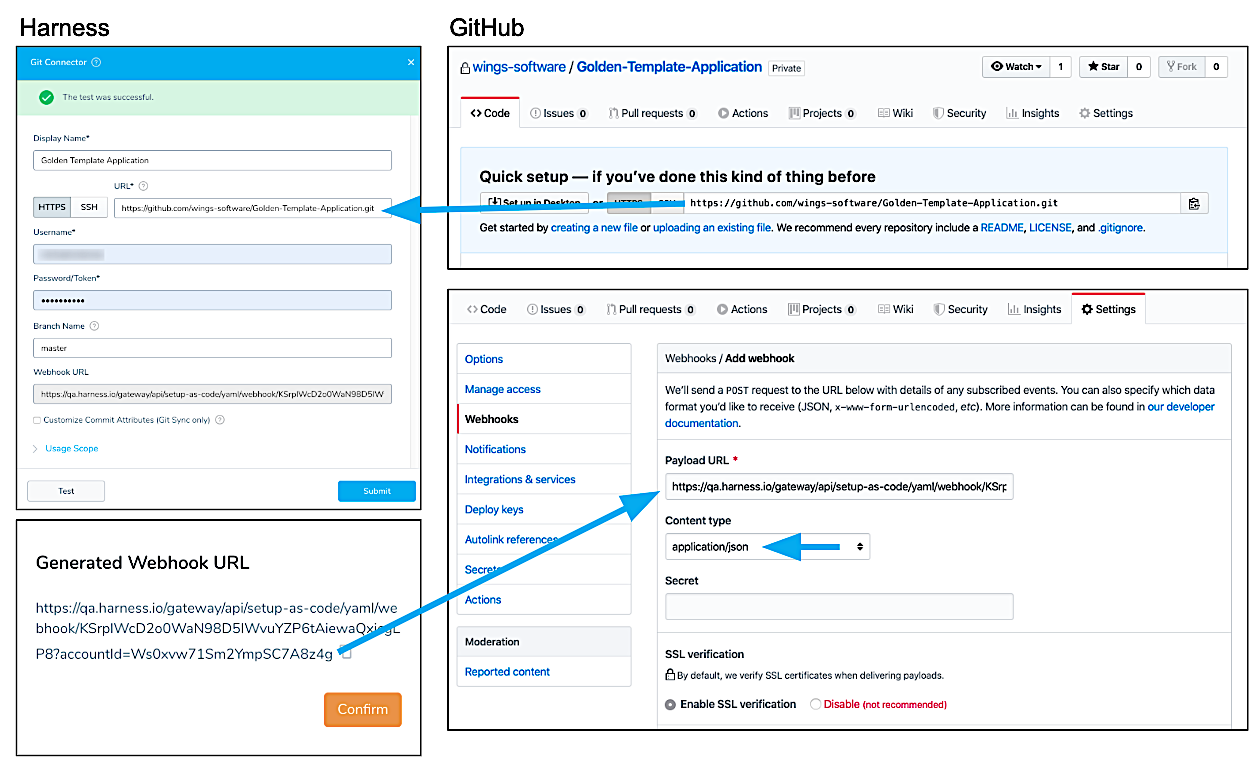
Remember the following important settings:
- Repo URL — The HTTPS repo URL is pasted into the Harness Source Repo Provider URL. The HTTPS setting is selected for both.
- Harness Webhook URL — The Generate Webhook URL setting was enabled when the Source Repro Provider was created, and the Webhook URL was pasted into the repo's Webhook Payload URL.
- Content type — The Content type in the repo is application/json.
- Just the push event — In the repo Webhook's Which events would you like to trigger this webhook? setting, only the Just the push event option is selected.
For details, see Configuration as Code.
Step 2: Create Application Template
First, you will create the Application template in Harness. You will sync it with the Golden Template Application repo and enable all of its template settings.
Create an Application named Golden Template Application. When you create it, select Set up Git Sync, and select the Source Repo Provider in Git Connector:
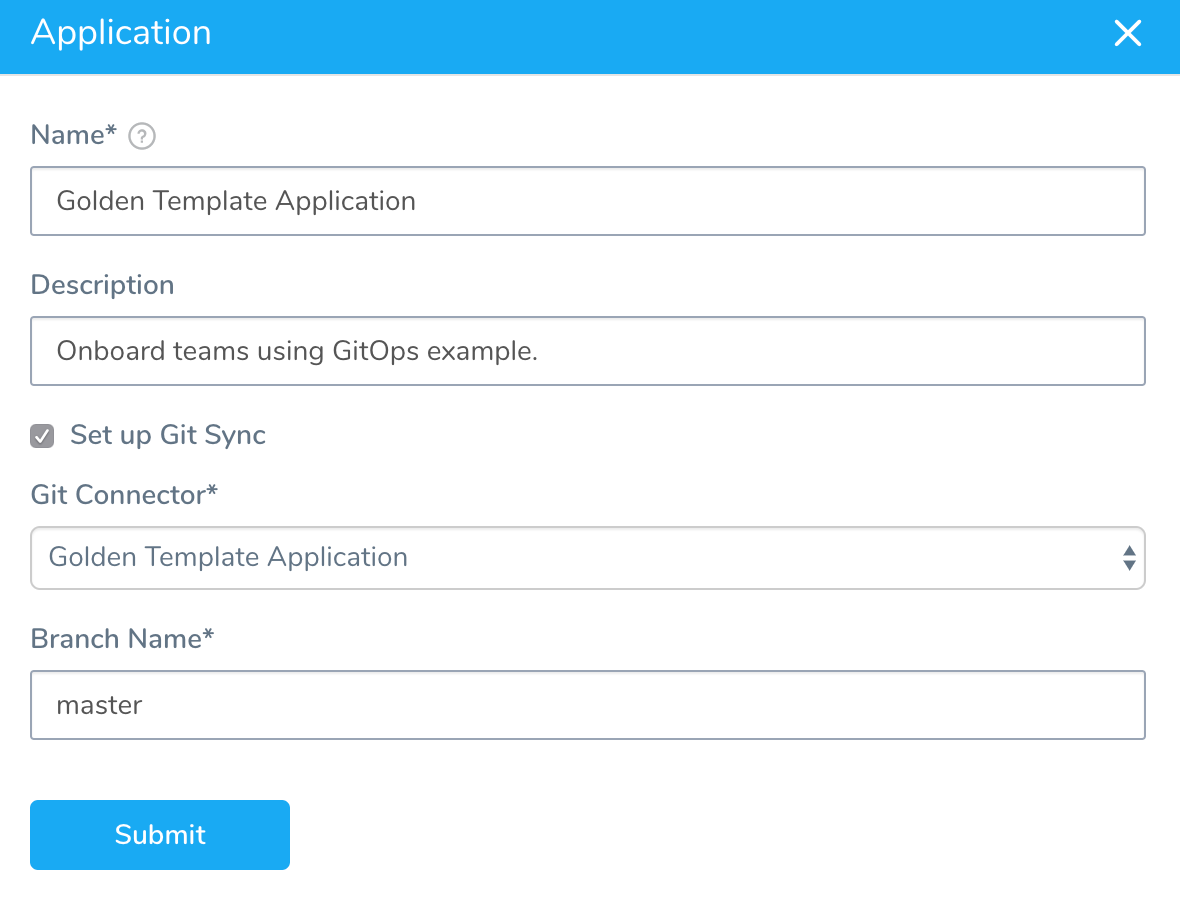 For information on creating Applications, see Create an Application.
Once you click Submit you will see the Application in your repo:
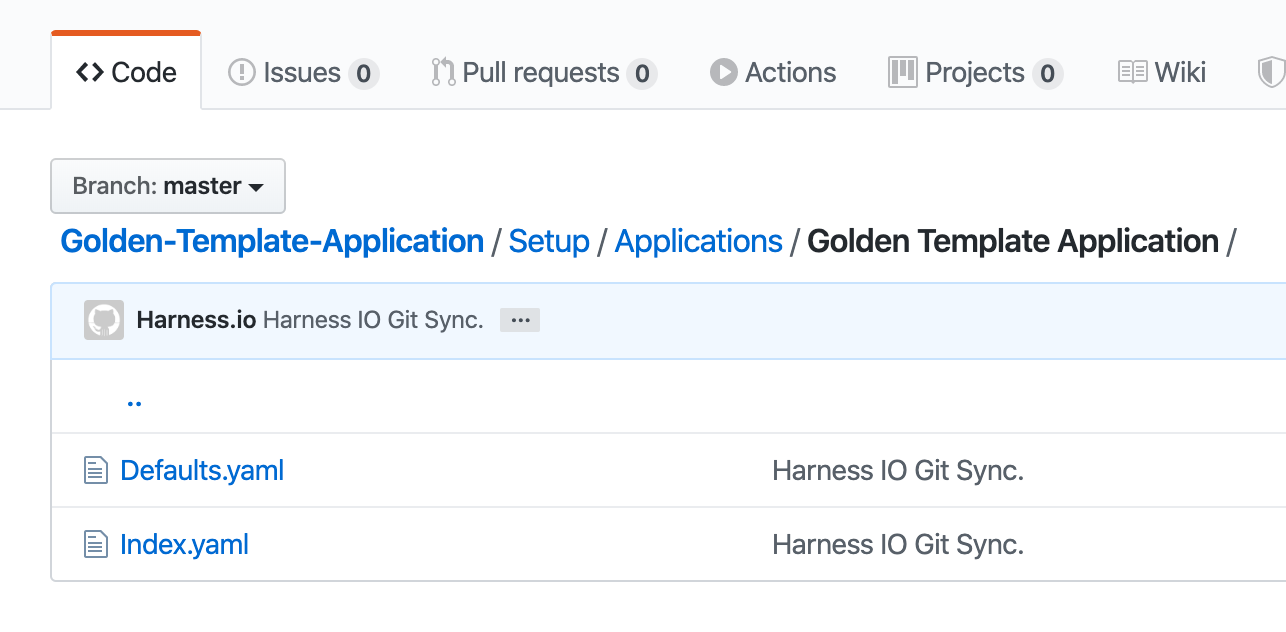 The repo will be updated with Application components as you create them in Harness.
Service Template
Next, create a Harness Service in the Application. For this example, we'll create a Kubernetes Service named SampleK8s. For details, see Kubernetes Quickstart.
The Service is set up with the following:
- Artifact Source placeholder — We'll add a publicly-available Nginx Docker image from Docker Hub. When teams clone this Application, they can update the Artifact Source. See Add Container Images for Kubernetes Deployments
- Remote manifests — When teams clone this Application, they can update the link to point to their own manifests. See Link Resource Files or Helm Charts in Git Repos.
- Service Config Variable for the namespace — A Service Config Variable is created for the namespace used in the manifests. This will enable teams to simply update the variable in their clones with their own namespaces. See Using Harness Config Variables in Manifests.
Once you create the Service it is synced with your repo automatically:
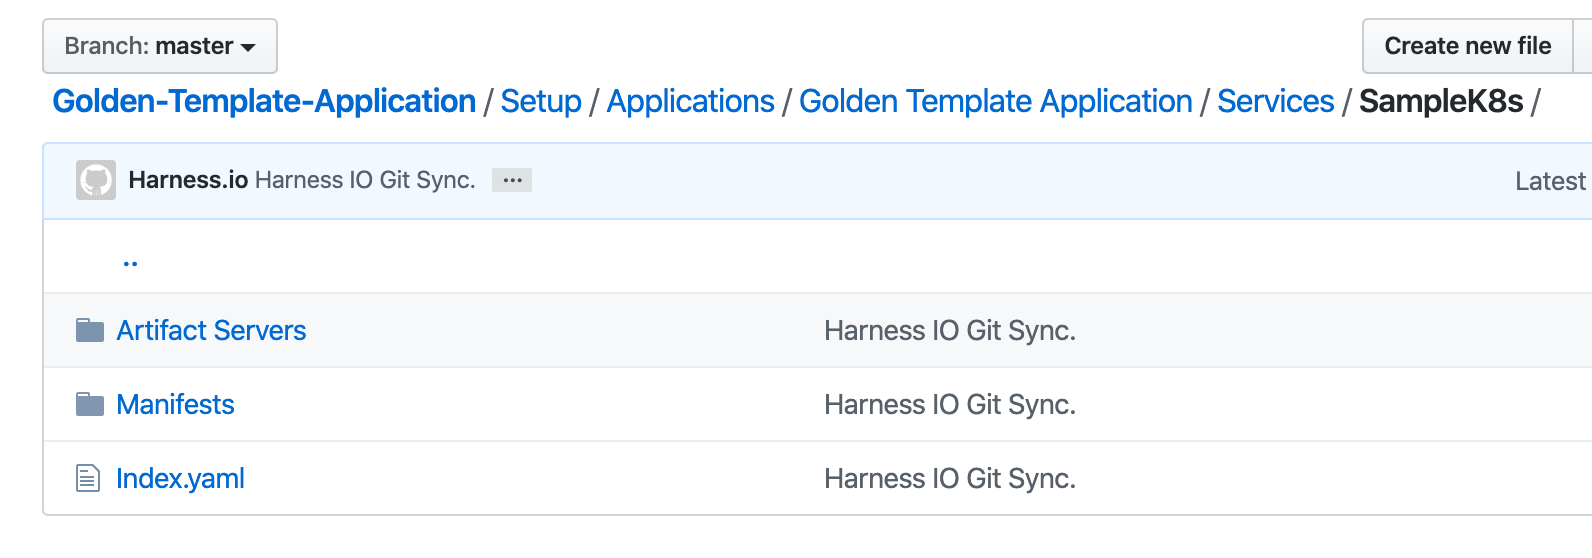 The default manifests are also synced with your repo.
First, set up an Artifact Source placeholder in the Service. Here we use a publicly-available Nginx Docker image from Docker Hub:
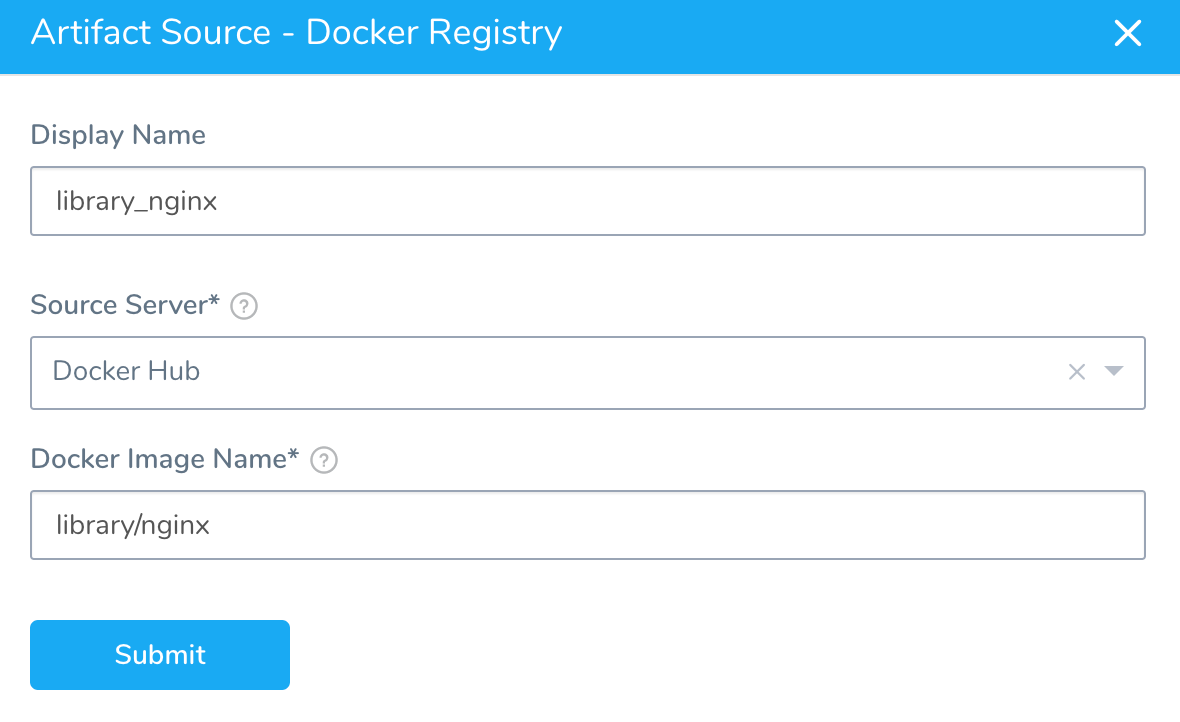 For details on setting up the Artifact Server connection to Docker Hub in Harness, see Add Artifact Servers.
Next, we'll configure the SampleK8s Manifests section to use remote manifests.
If you use remote manifest, you typically need to add another Source Repro Provider for the repo where they are stored. Here is how it is mapped in our example:
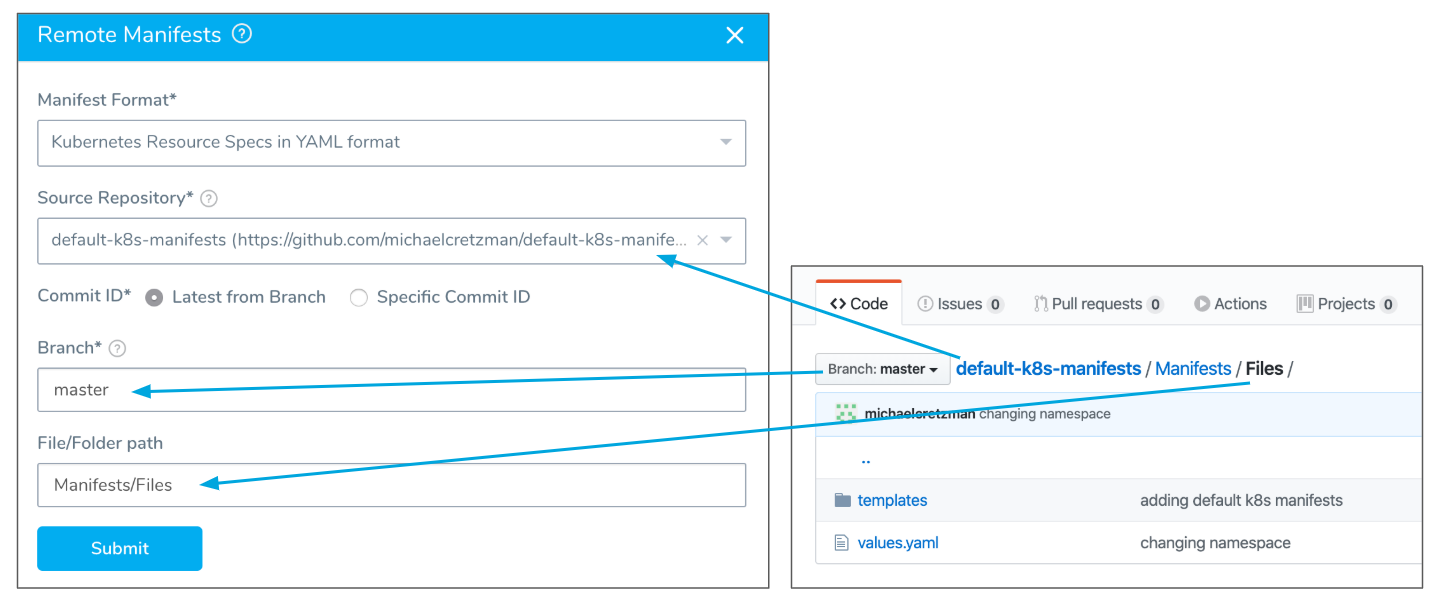
Once you have set up the remote manifests, the default manifest files that were synched when you created the Service will be ignored. You can delete them if you like.
Once this template Application is cloned and used by other teams, we want them to have a simple way to change the target namespace for the deployment. There are different options (see Create Kubernetes Namespaces based on InfraMapping, Create Kubernetes Namespaces with Workflow Variables), but for this example, we will use a Service variable.
Create a Service variable and then reference it in the values.yaml file in your remote manifests repo. Here's an example using a Service variable named namespace:
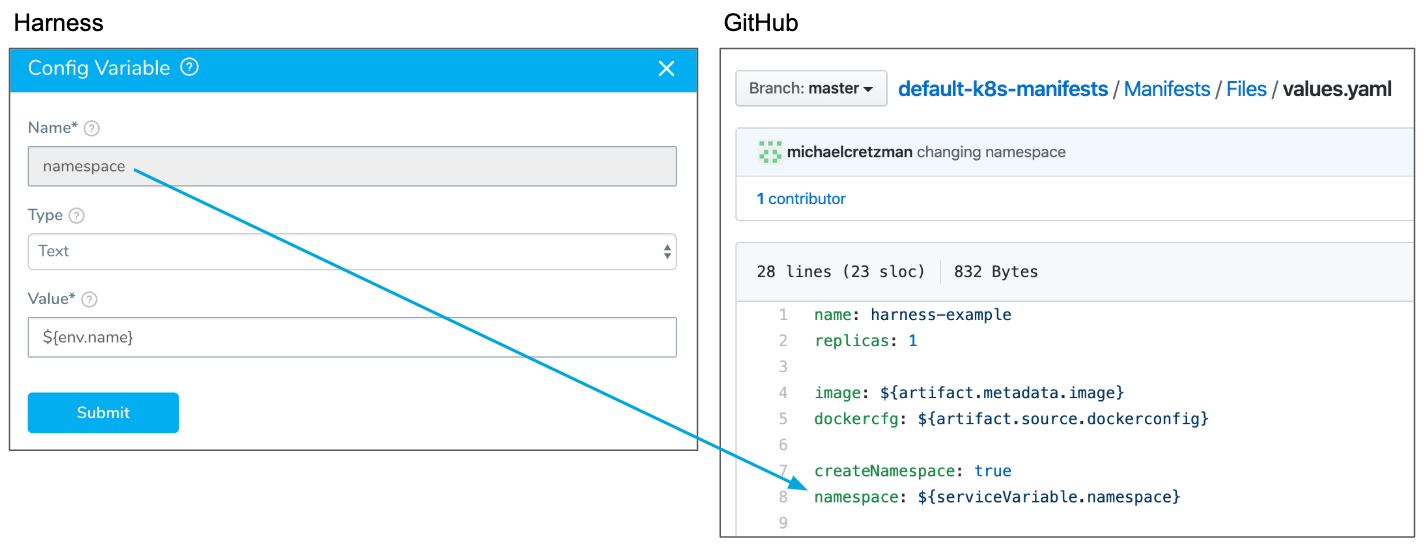 The value of the namespace Service variable is
 ${env.name}. The ${env.name} expression references the name of the Environment used by the Workflow that deploys this Service. This is a useful default value because Environments are often named after the namespaces teams use, such as dev and prod.
We use lowercase names for Environments because the names will be used for namespaces and Kubernetes requires lowercase names for namespaces.
The Service template is complete. Next, we'll create the Environment and Infrastructure Definition templates.
Environment and Infrastructure Definition Templates
We'll add two Environments: one Environment for prod and one for dev.
Prod Environment and Infrastructure Definition
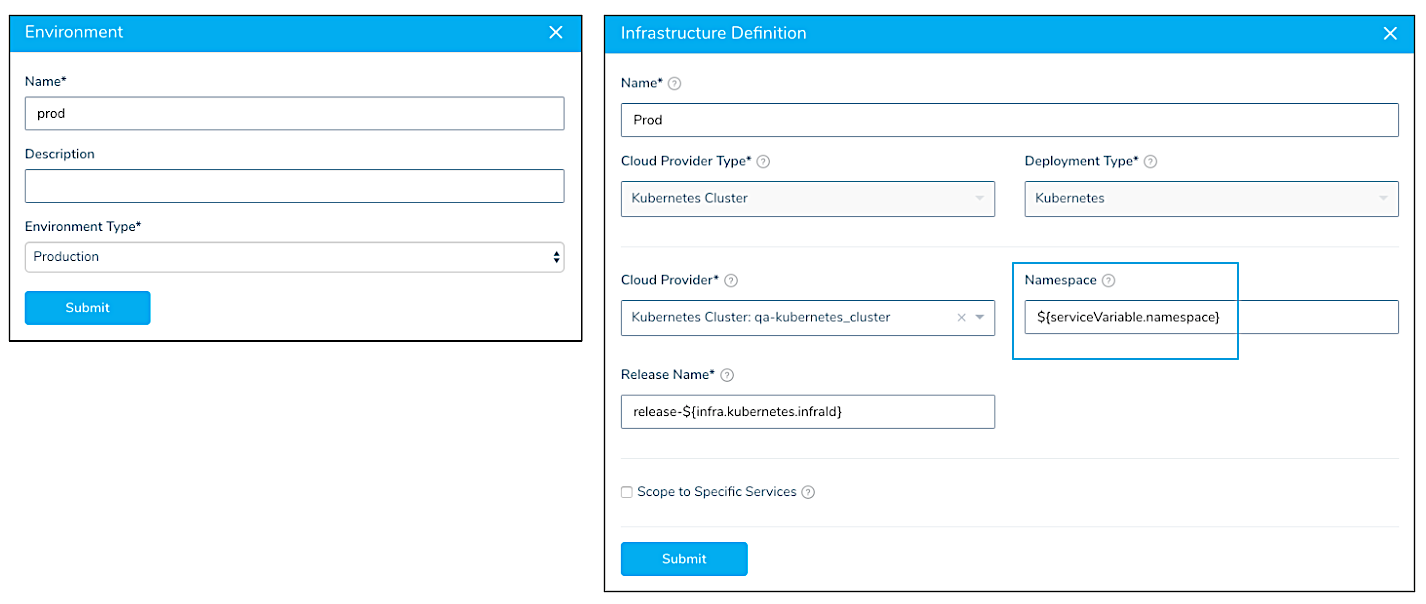
Note how the ${serviceVariable.namespace} we created is used in the Namespace setting.
Dev Environment and Infrastructure Definition
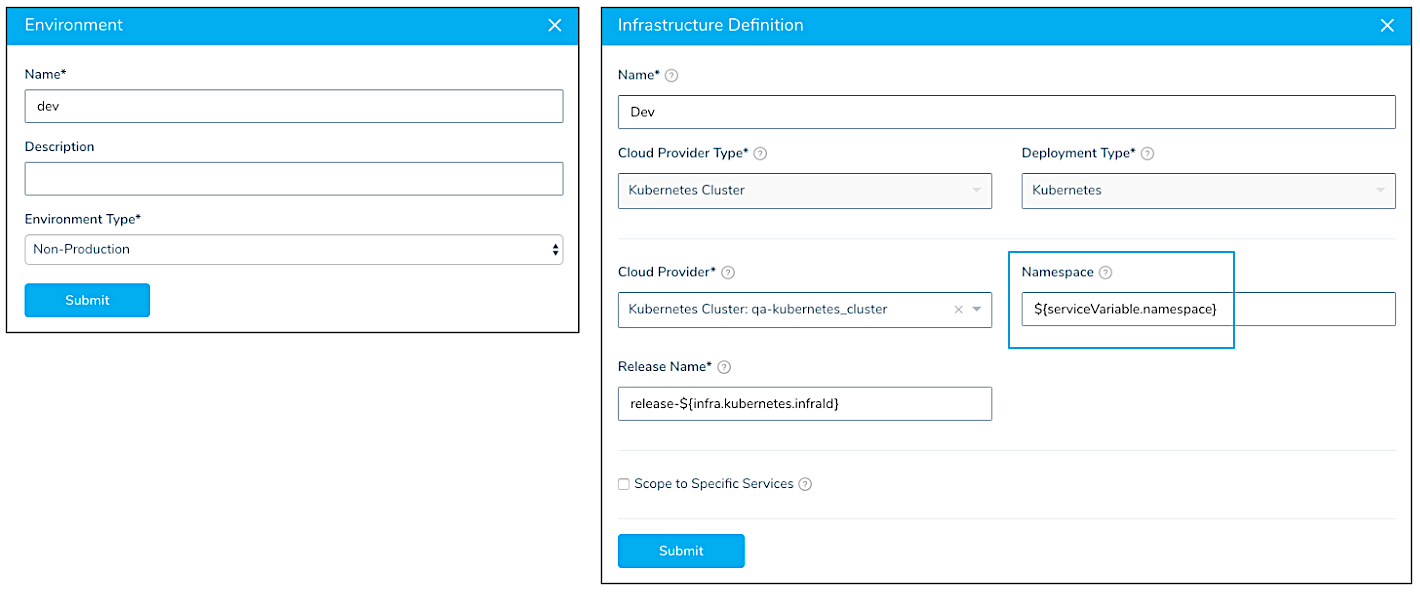
Note how the ${serviceVariable.namespace} we created is used in the Namespace setting.
When the Environments and Infrastructure Definitions are created they are synced with Git automatically:

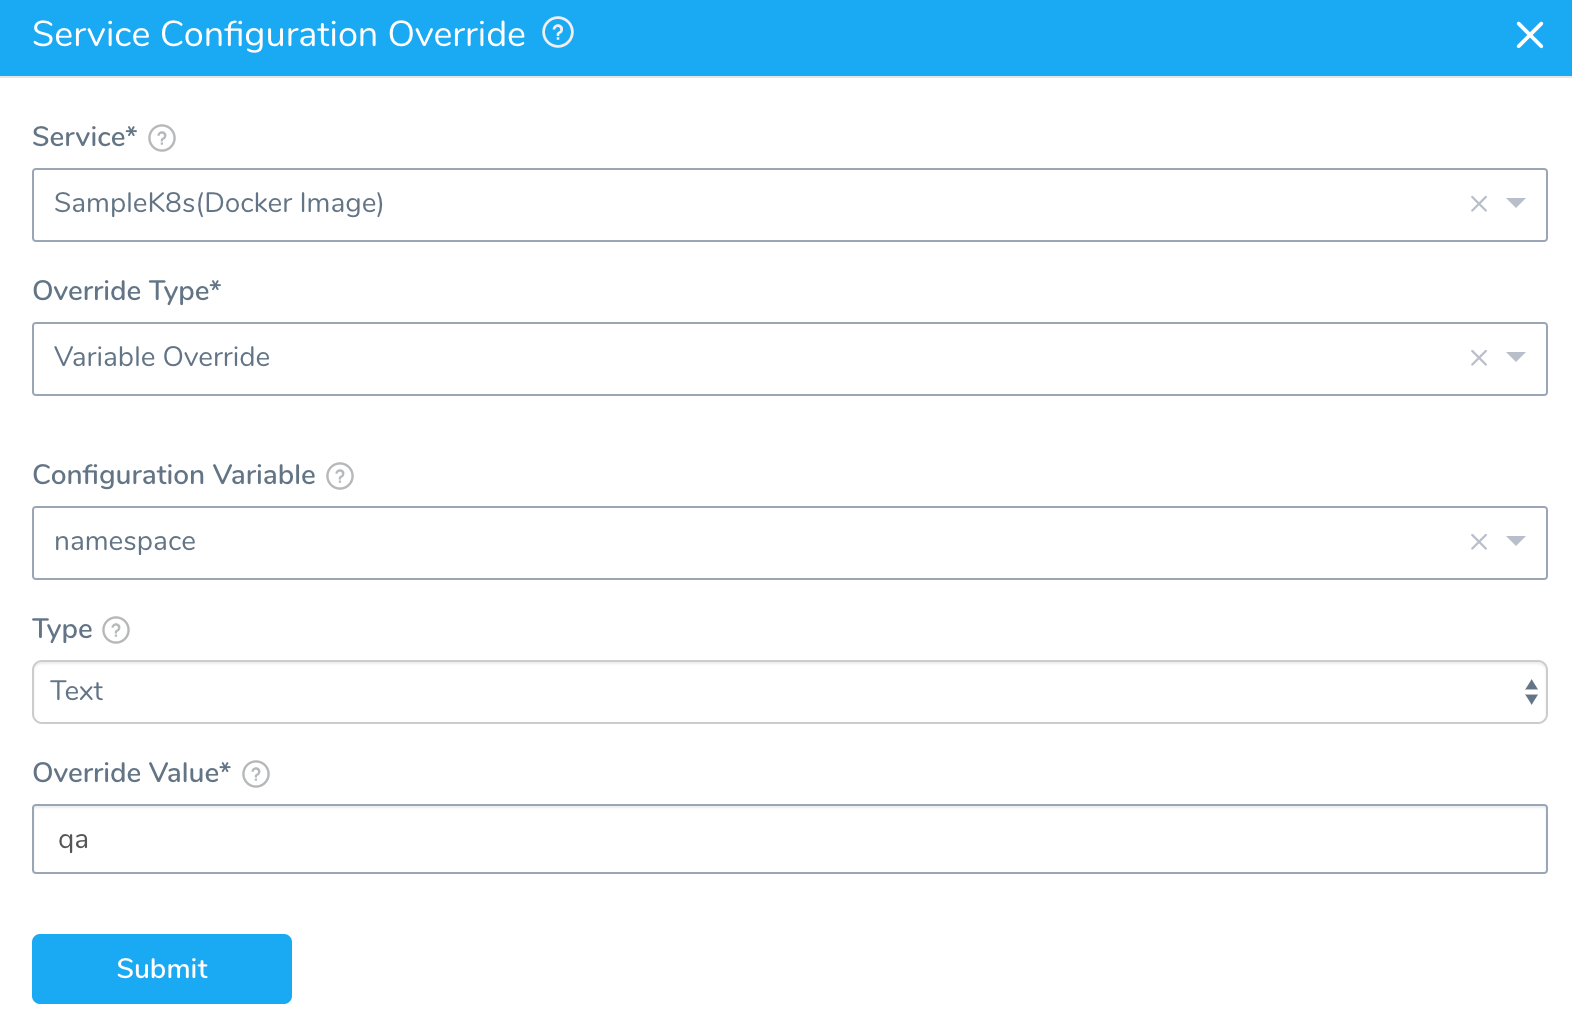
If you want to overwrite the namespace value used in the Namespace setting for the prod or dev Infrastructure Definitions, you can use a Service Configuration Override in the Environment.
Workflow Template
For this example, we create a Kubernetes Rolling Deployment template. Create the Workflow type(s) you expect your teams will need. You can always remove unneeded Workflows from Git later.
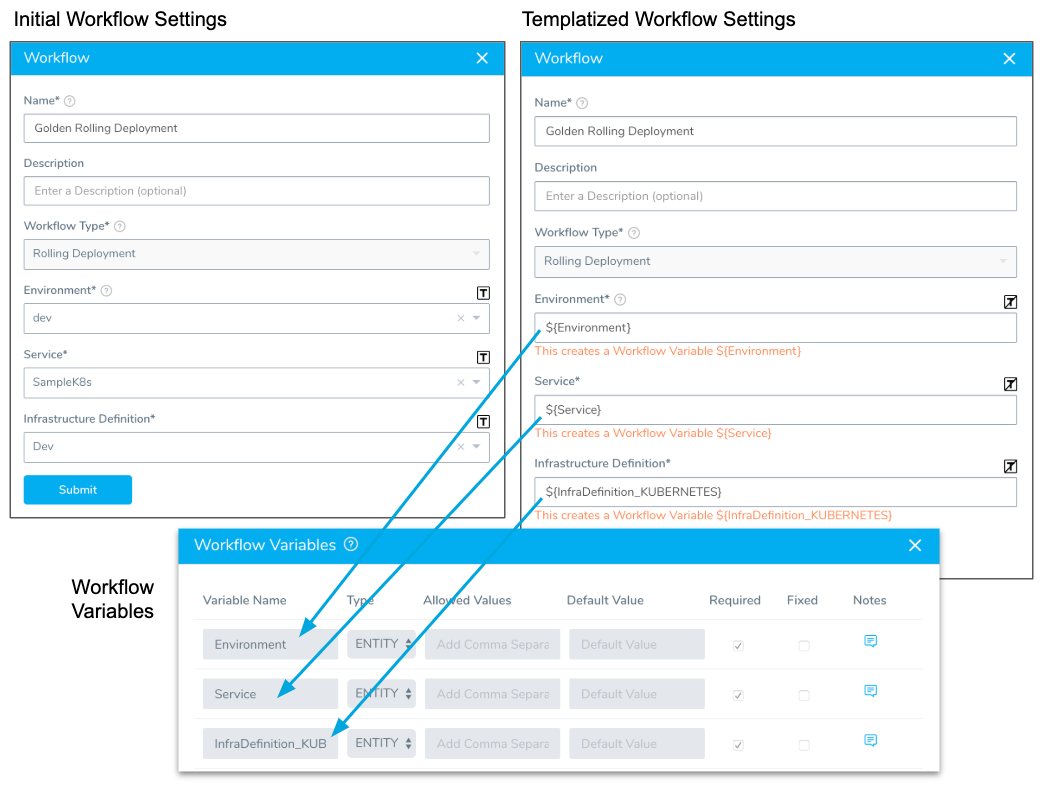
All of the major settings of Harness Workflows can be templated, but first you need to set up the Workflow with actual values.
Create the Workflow by selecting the Environment, Service, and Infrastructure Definition you created earlier.
Next, open the settings again and click the [T] button for all of the settings. This will replace the settings with Workflow variables, thereby templating the Workflow.
Now that the Workflow is templated, you will see the Workflow variables in the repo Workflow YAML and the templatized: true key.
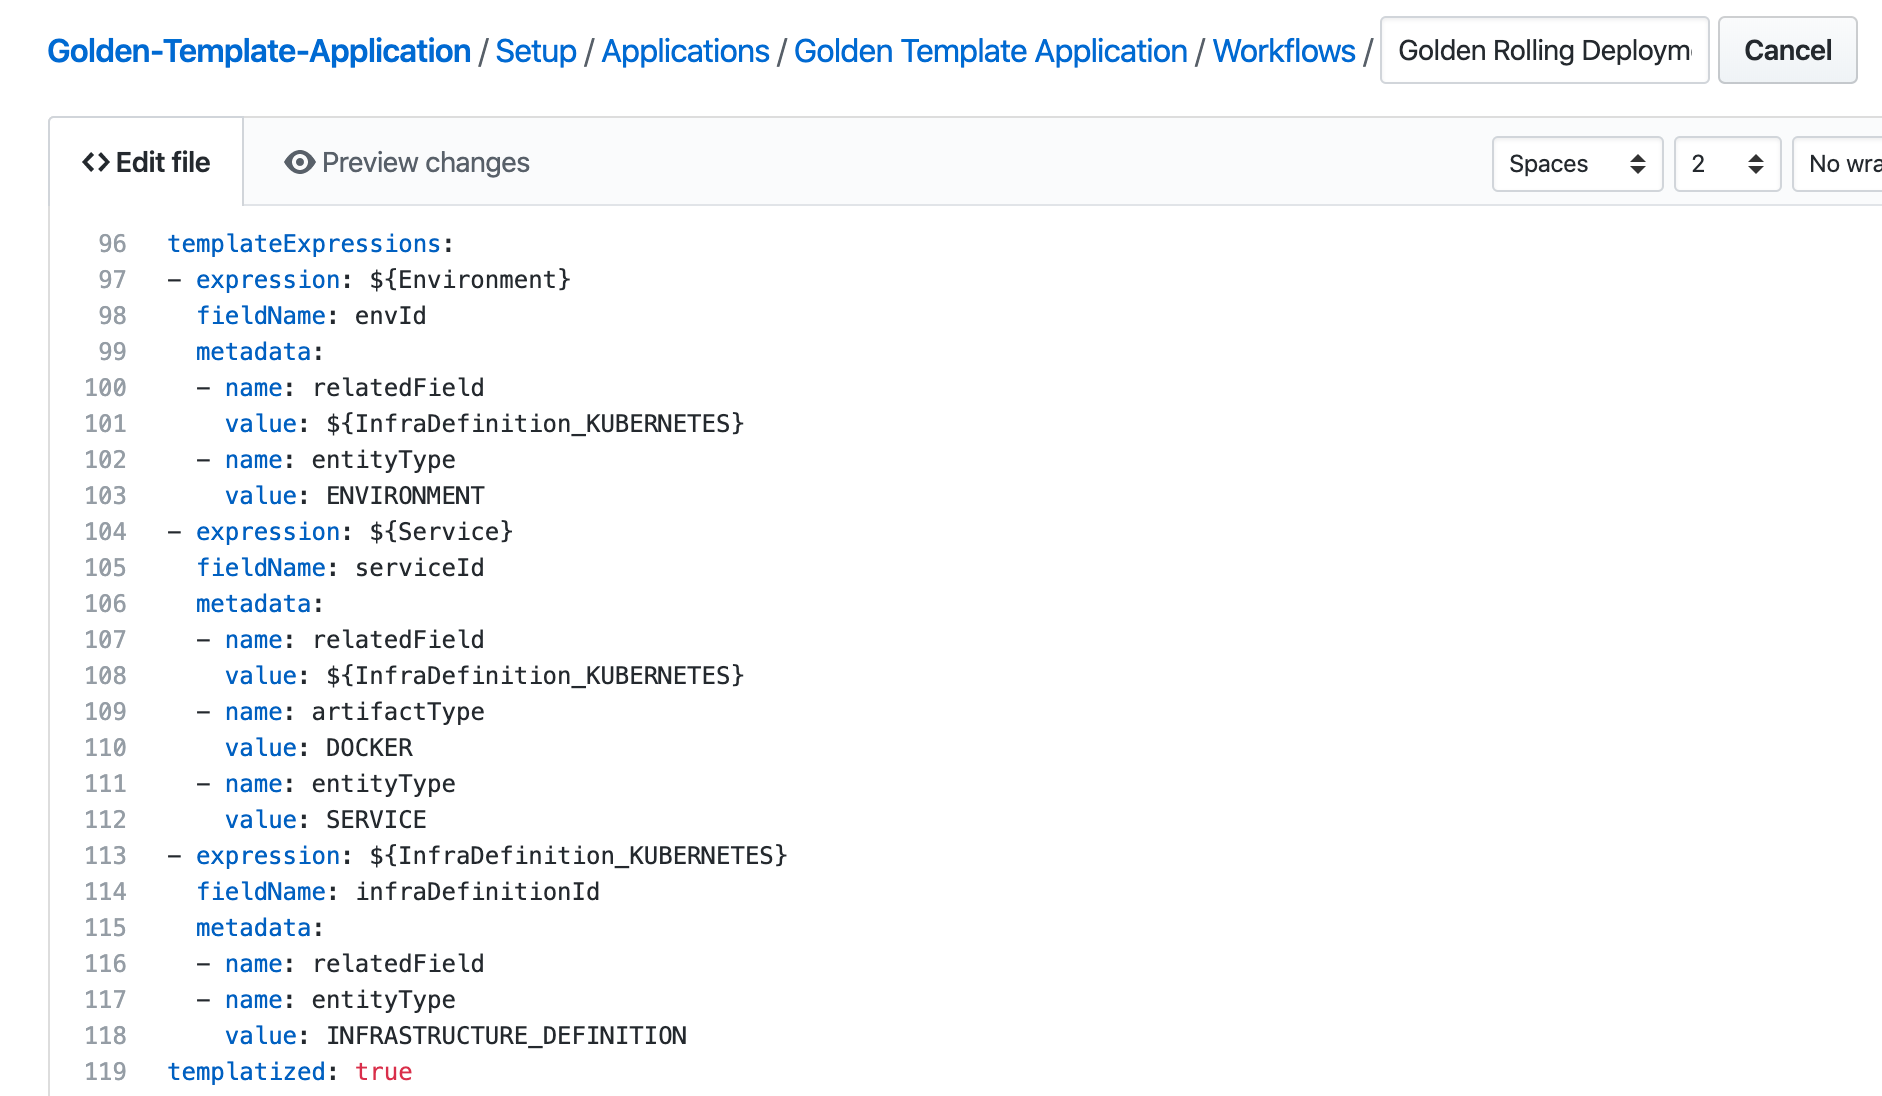
Now the templated Workflow can be used by any Service, Environment, and Infrastructure Definition.
Next, we'll create a Pipeline for the deployment.
Pipeline Template
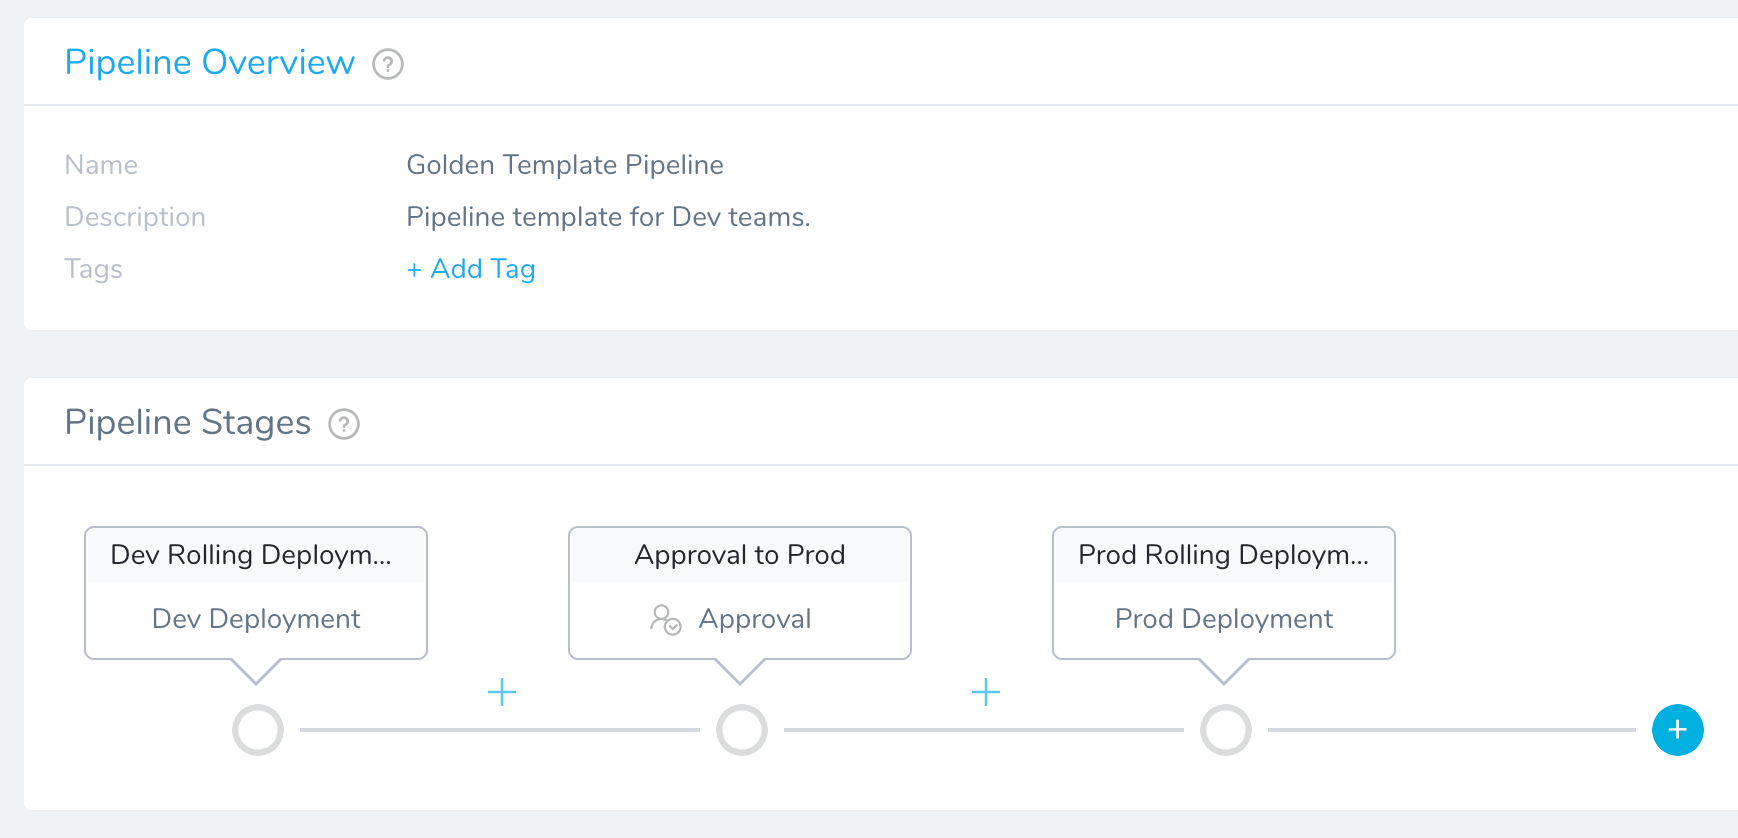
For this example, we create a three Stage Pipeline:
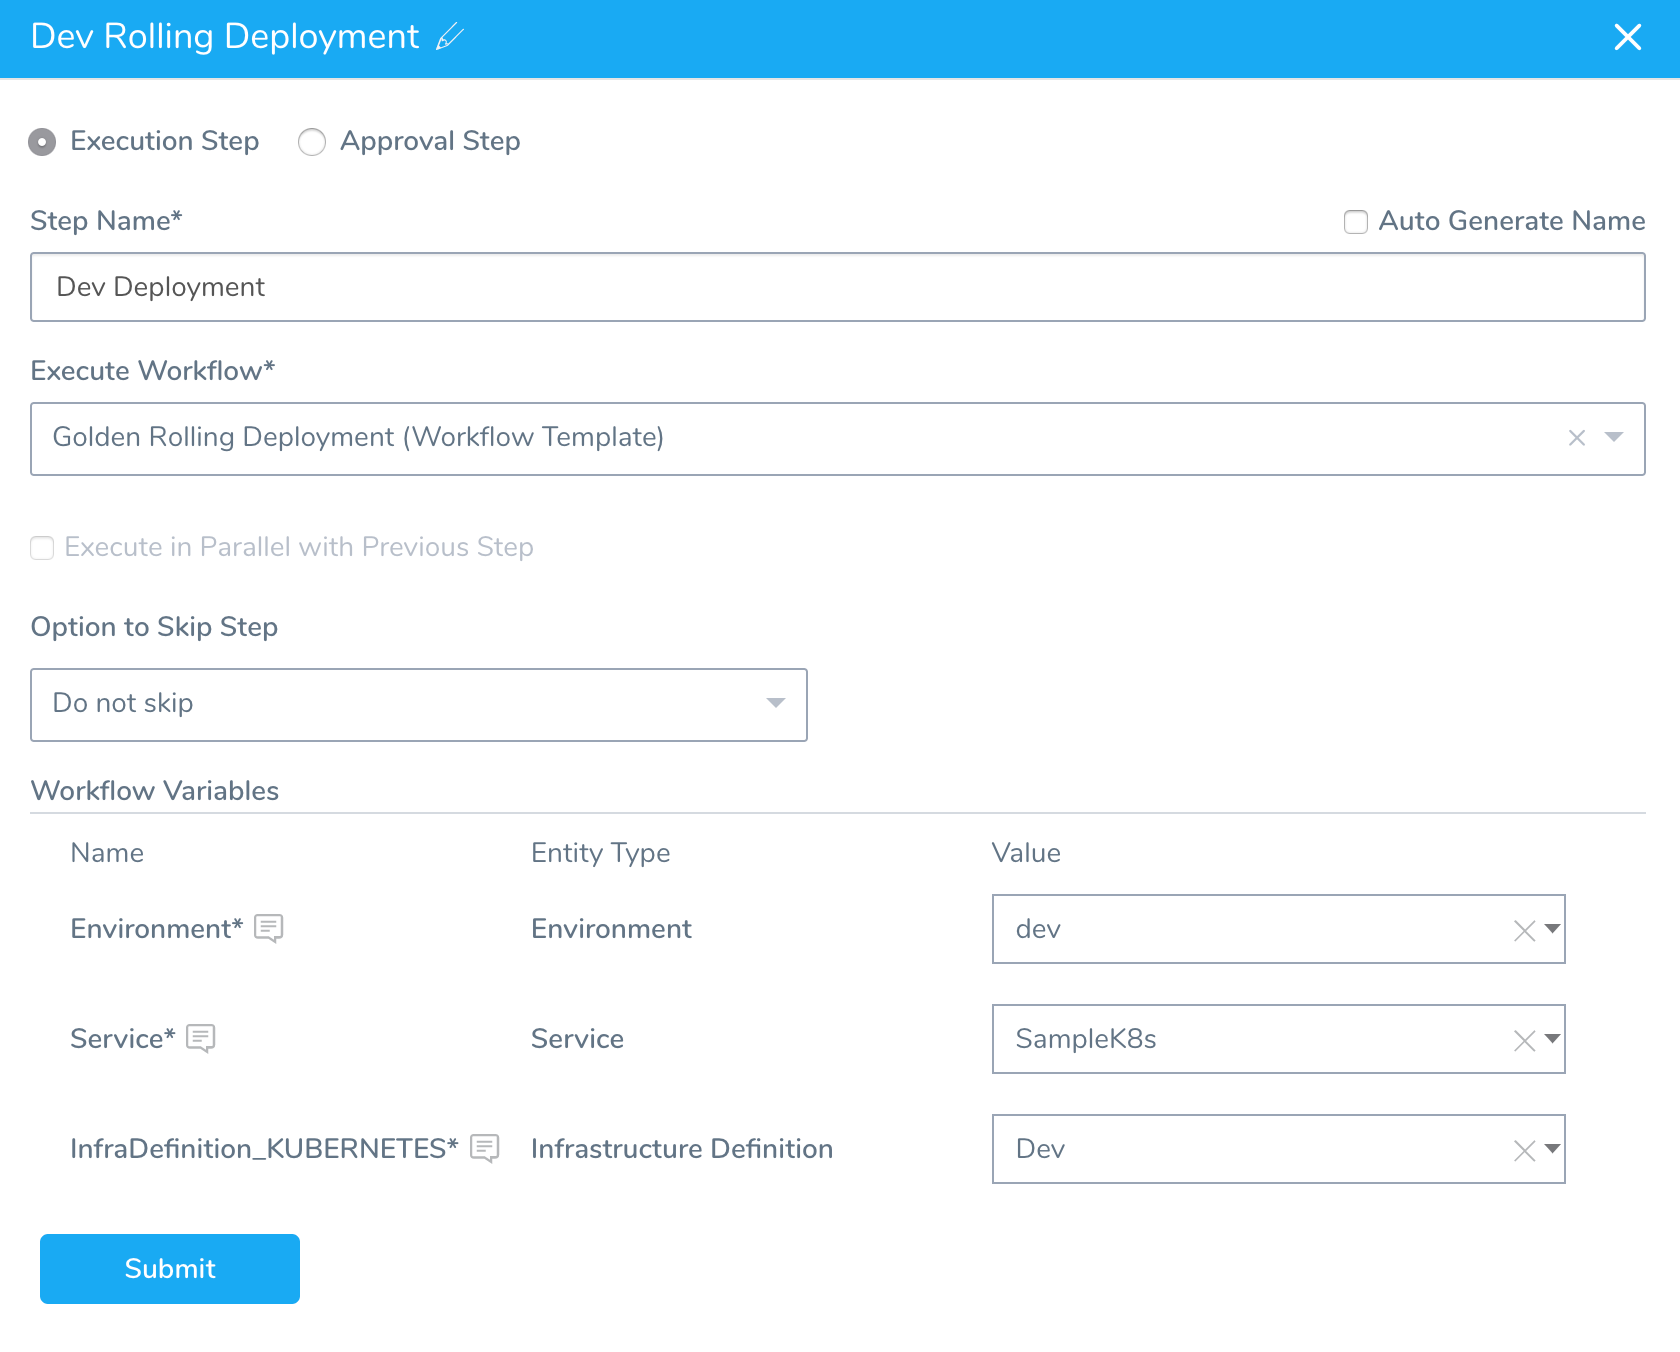
- Stage 1 — Rolling Workflow into the Dev environment.
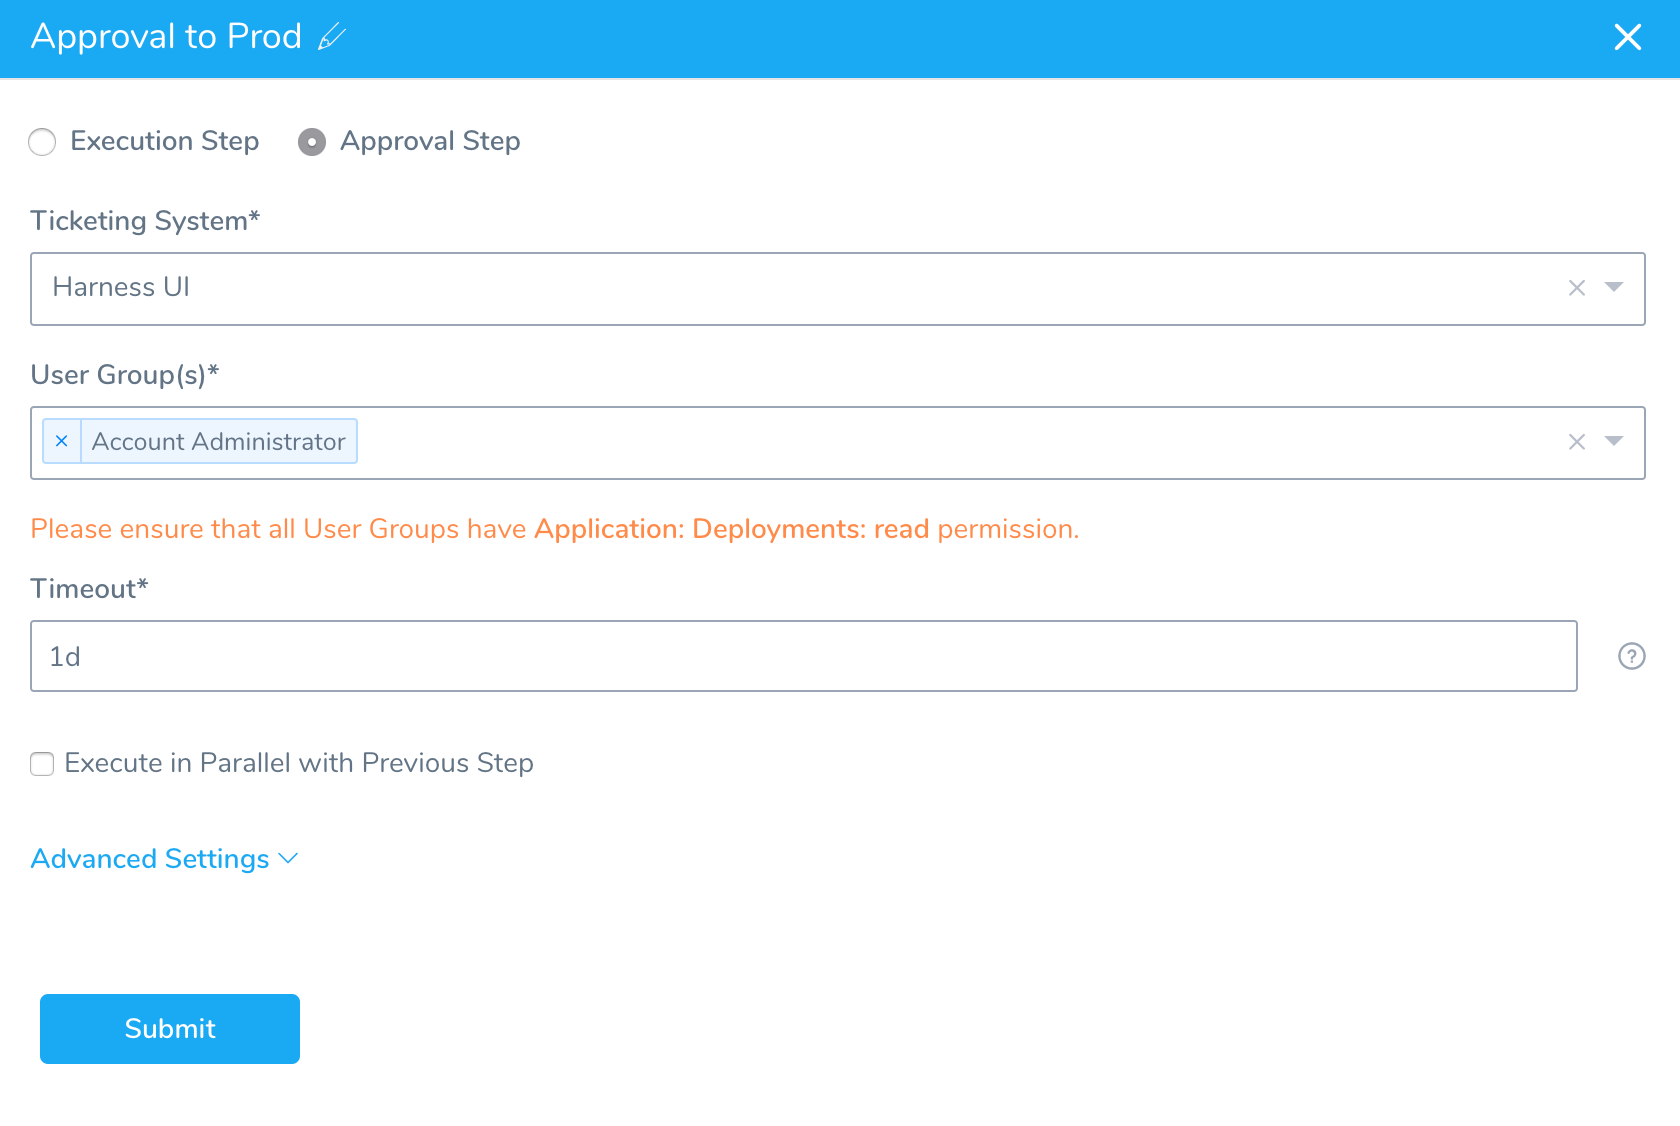
- Stage 2 — Approval Step.
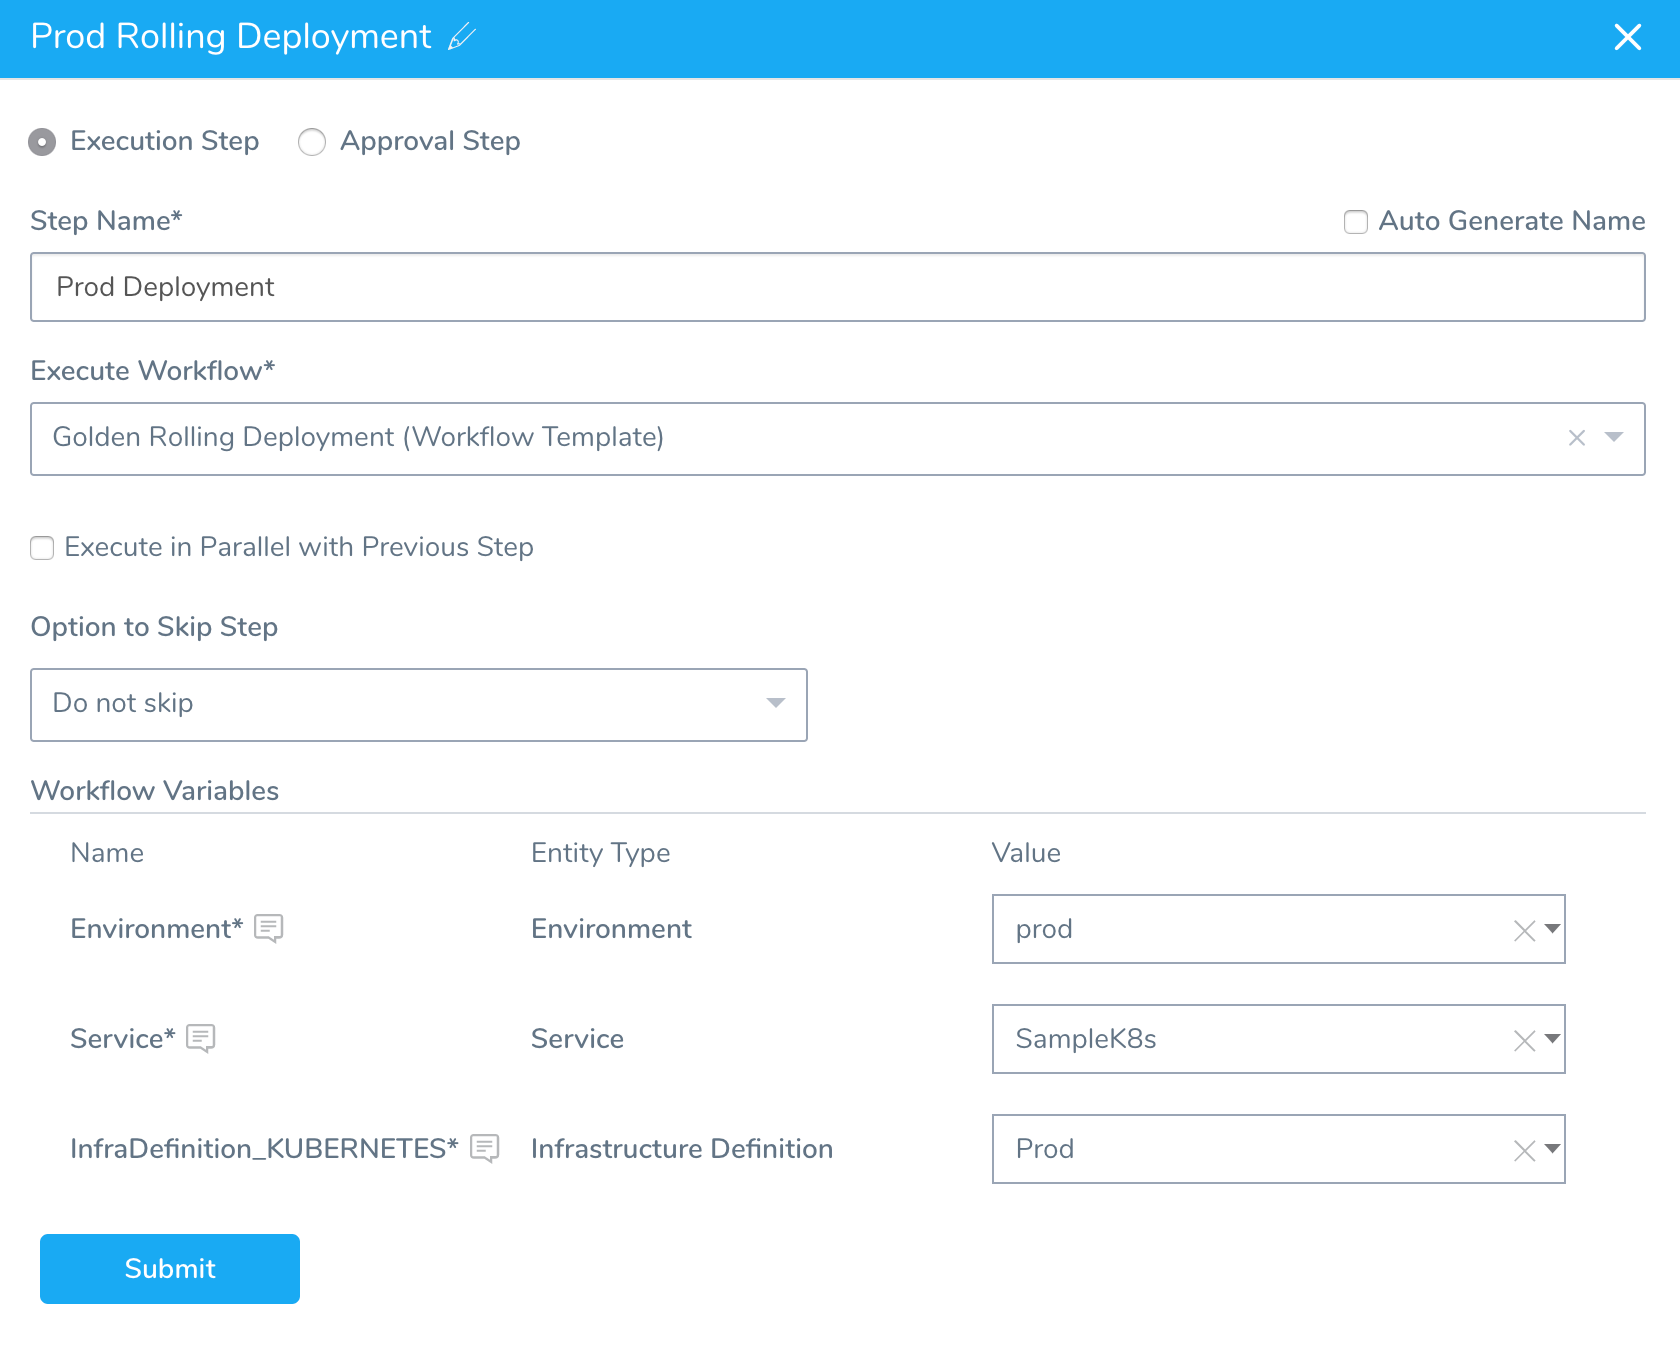
- Stage 3 — Rolling Workflow into the Production environment.
This Pipeline is a common use case and can be augmented as needed. For more details on Pipelines, see Pipelines.
First, create the Pipeline.
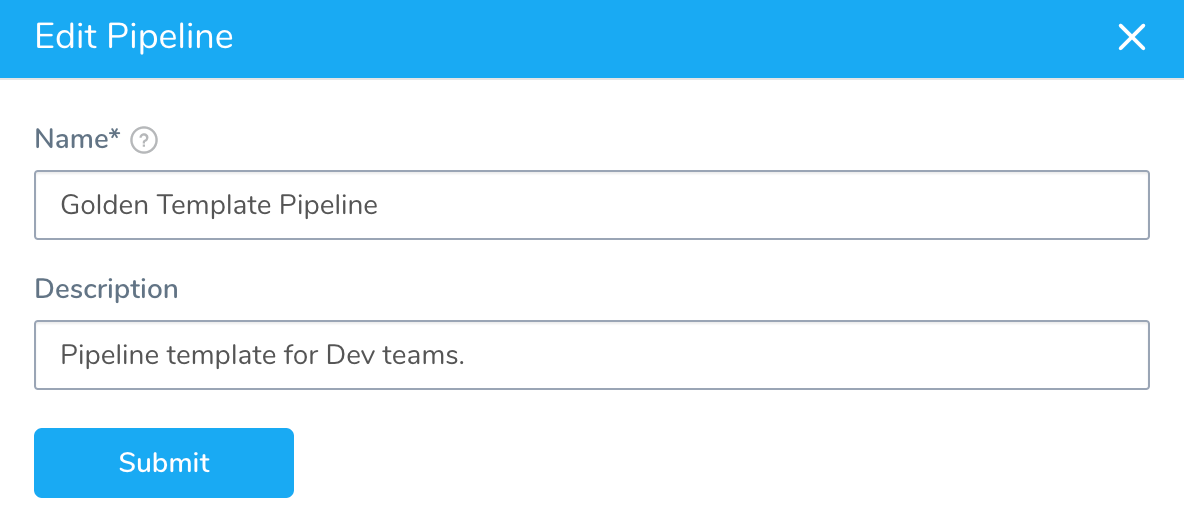
Next, create Stage 1 using the dev Environment and Dev Infrastructure Definition:
Next, create the Approval step for Stage 2:
Finally, create Stage 3 using the prod Environment and Prod Infrastructure Definition:
When you are done, the Pipeline will look like this:
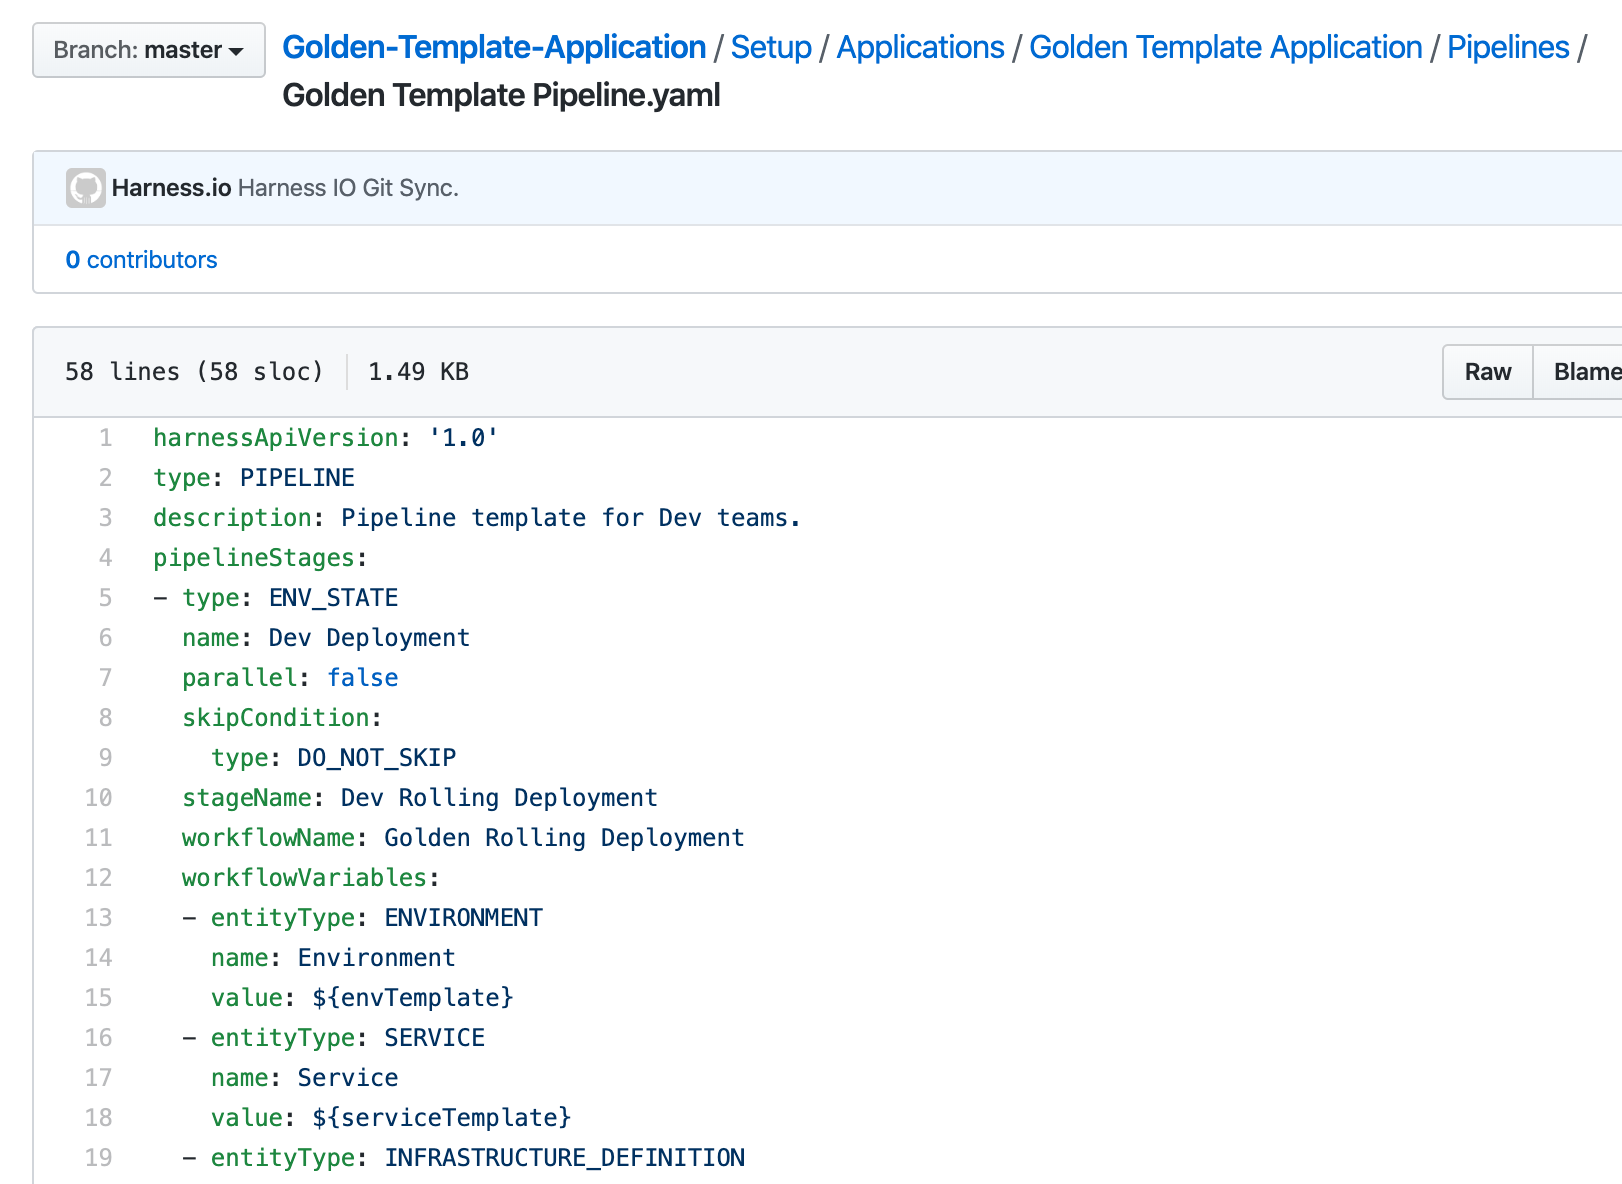
The Pipeline is synched with Git:
The Golden Template Application is complete. Now your teams can clone and modify it as needed.
Step 3: Clone and Change the Application
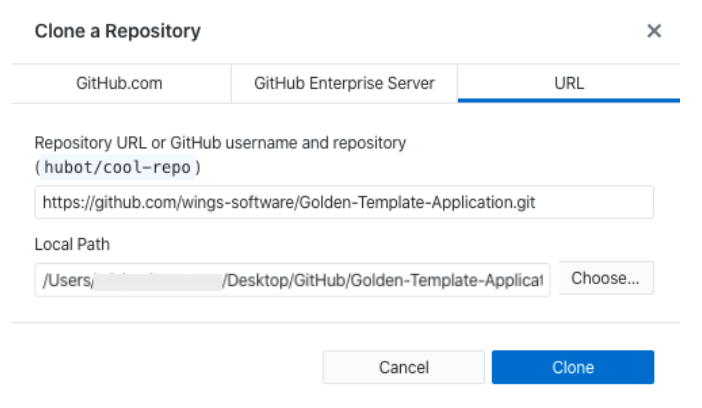
Clone the Golden Template Application using whatever Git tool you want. Here's an example using GitHub Desktop:
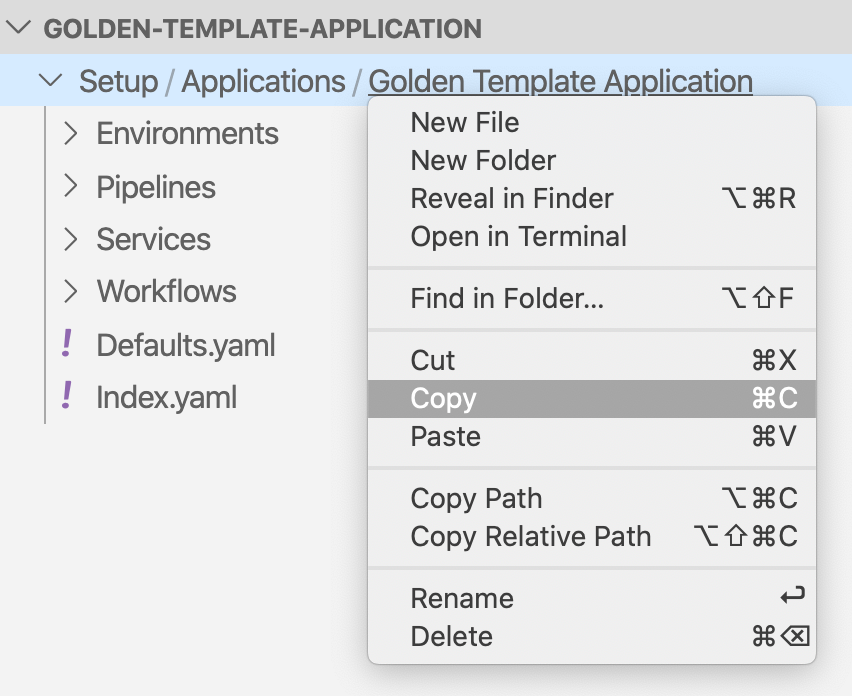
Next, copy the Application and paste the copy as a peer of Golden Template Application in the Applications folder:
Name the new Application folder Development:
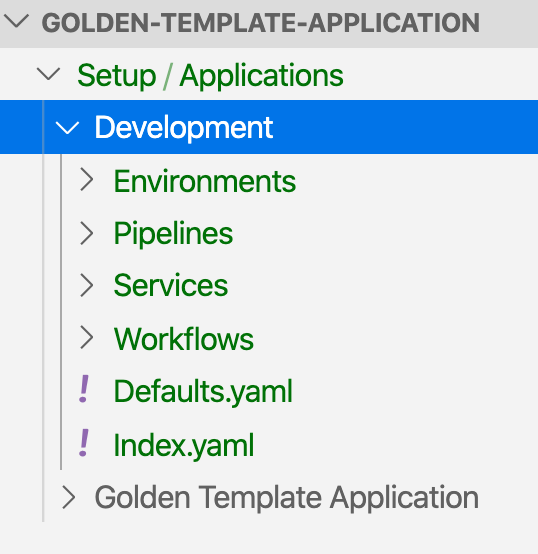
Change the new Application description in its index.yaml file:

Rename the Service:
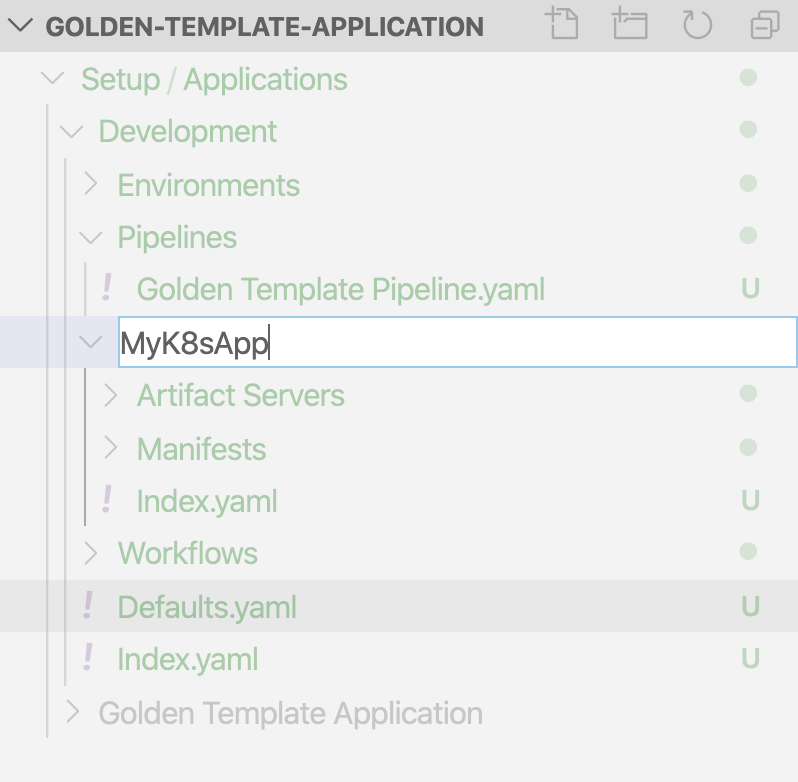
You do not need to update the Workflow with the new Service name because the Workflow is templated.
Update the Pipeline with the new Service name.

Update the following Service settings to customize this Application for a new team:
- Artifact Source placeholder — Replace the Nginx Docker image from Docker Hub.
- Remote manifests — Update the link to point to their own manifests.
- Service Config Variable for the namespace — Update the Service variable with a new namespace.
Step 4: Commit and Sync New Application
When you are done making changes to the new Application, you can commit and push the changes.
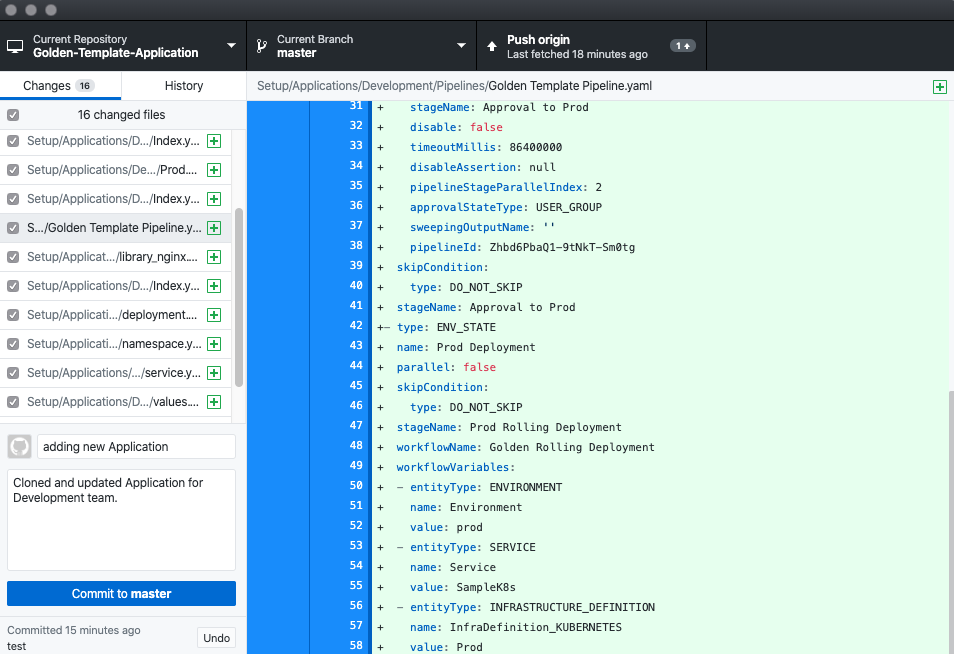
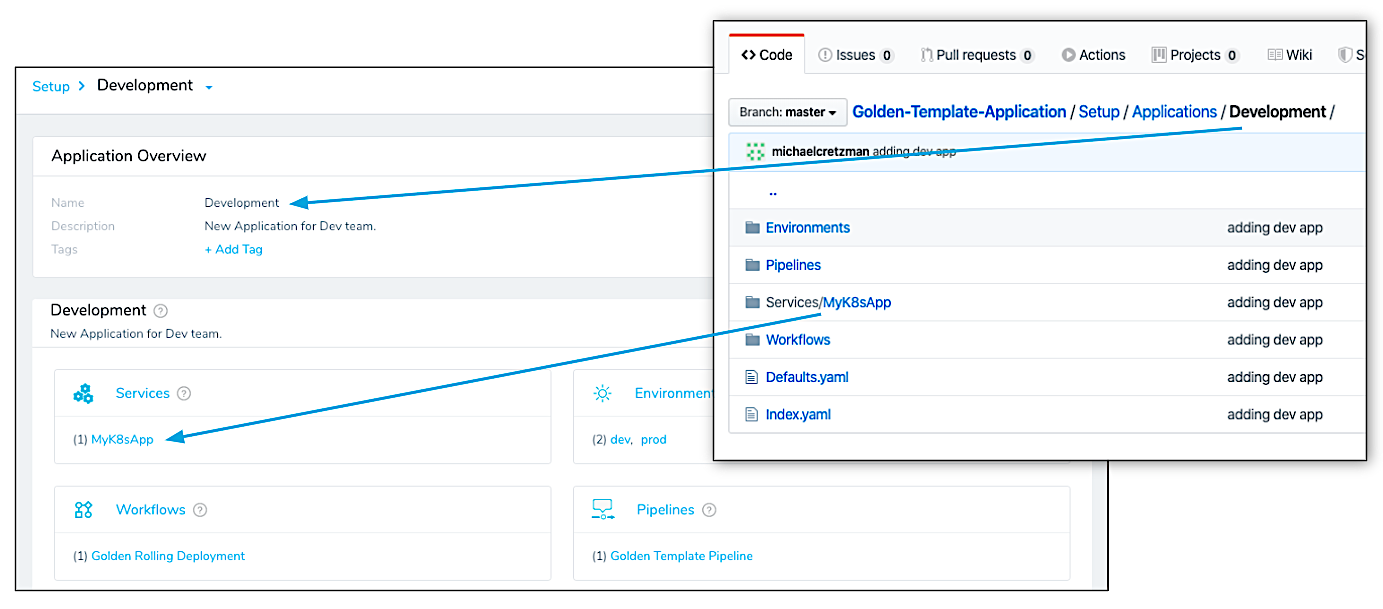
The new Application is in Git:
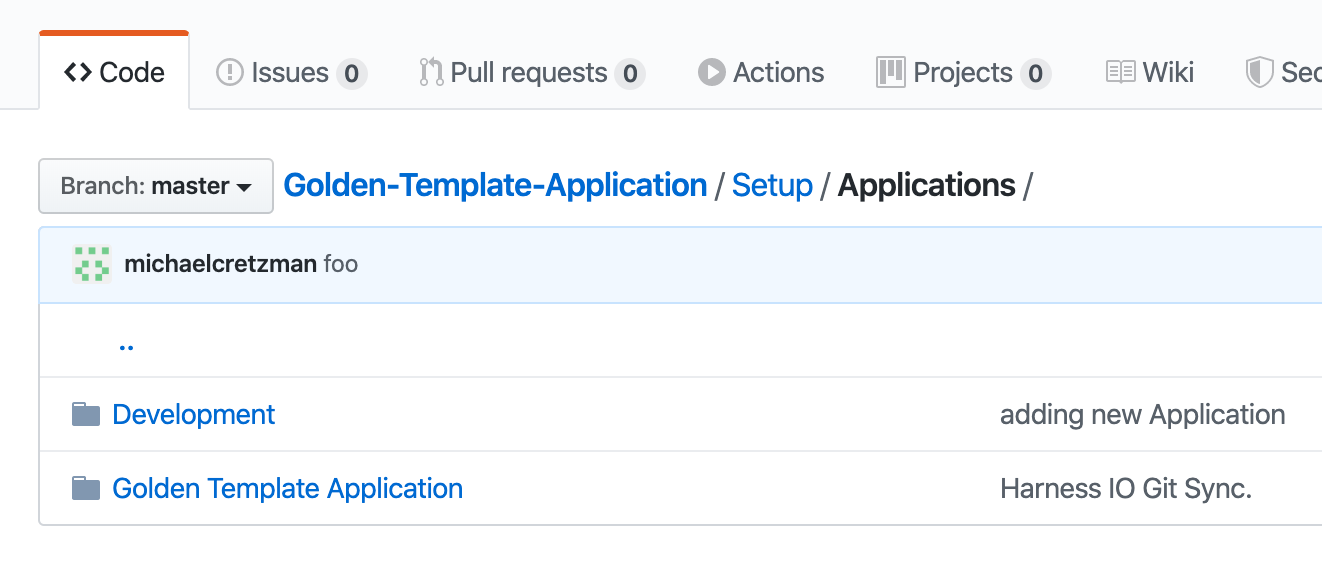
And the new Application is automatically synced and added to Harness:
Troubleshooting
Something not working? If some Application component does not appear in Harness it is likely because of a conflict between the YAML file and some settings in Harness.
For example, if you didn't update the Service name in the Pipeline YAML to match the new name of the Service, Harness cannot locate the Service listed in the Pipeline YAML. Consequently, Harness refuses to add the Pipeline from Git.
Another possible issue is a change to an Account setting in Harness or the Git YAML, such as the name of a Cloud Provider.
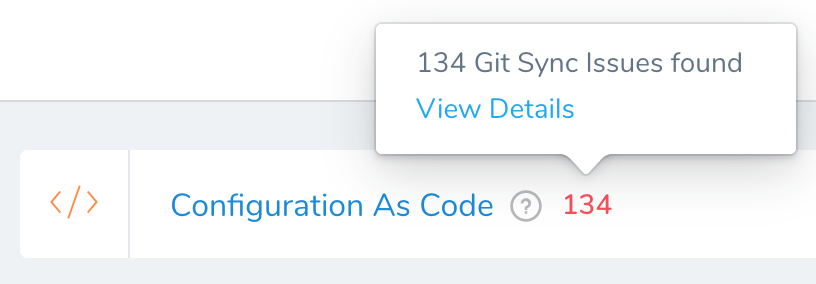
Harness displays Git errors in the Configuration as Code:
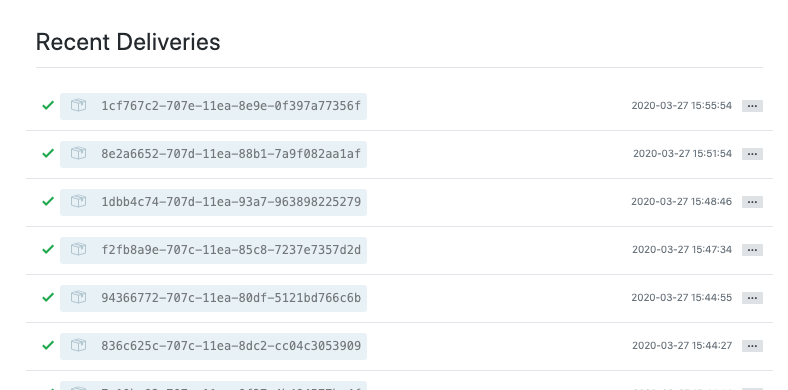
 You can also see them in the repo Webhook. For example, GitHub has a Recent Deliveries section at the bottom of the Webhook setting:
Step 5: Automating New Application Creation
Once you are comfortable creating new Applications using Git, you can write automation scripts to clone Applications and change values in the new Application YAML.
For example, some customers' sample scripts are based on an input in a UI or Shell Script that generates YAML stored in Git. The YAML is then synced to Harness through the Git Sync process on the push event.
You can use tools like yq to manipulate specific YAML fields inline. Tools like yamllint are excellent for validating YAML.
Here is a sample YAML automation flow:
- Create a Golden Application that is fully templated and sync it with Git.
- Create a script to create a new Harness Application, copy the content of the Golden Application into it, and edit the necessary fields. For example, a script might update the namespace and Cloud Provider YAML.
- Commit changes to Git and review the results in Harness.
If there are issues, Harness displays Git Sync errors in Configure As Code.
Conclusion
This topic showed you how Git can be used for safe, version-controlled, easy Harness component management.
Managing new Harness Application setup in Git brings deployment closer to developers. It enables them to live in their code.
With Harness Git support, developers don't need to check deployment status in the Harness Manager UI. For example, they can use Harness GraphQL. Here's a simple Pipeline executions query and result:
{
  executions(
    filters: [
      { pipeline: { operator: EQUALS, values: ["Kn3X_70dQy-VY-Wt2b2qVw"] } }
    ]
    limit: 30
  ) {
    pageInfo {
      total
    }
    nodes {
      id
    }
  }
}
...
{
  "data": {
    "executions": {
      "pageInfo": {
        "total": 1303
      },
      "nodes": [
        {
          "id": "tbdwrYw5RS2bEERFEQ6oiA"
        },
        {
          "id": "JhzVnLFMT5Wxlws-2hu18A"
        },
        {
          "id": "j-Oe2VUASsSmWo4ALzQGzg"
        },
...
      ]
    }
  }
}
In addition, Harness Application that live in code are reusable and versioned. If anything breaks, there is a working version to revert back to.