Provision using the Terragrunt Provision Step
You can use Terragrunt in Harness to provision the target infrastructure for a deployment or any other resources. Typically, Harness users provision the target infrastructure for a deployment and then deploy to it in the same Workflow.
This topic describes how to provision the target infrastructure for a deployment using the Workflow Terragrunt Provisioner step. The same information applies to provision non-target resources.
You use the Terragrunt Provisioner step in a Workflow to run the Terragrunt configuration file (and related Terraform scripts) you added in a Harness Terragrunt Infrastructure Provisioner.
During deployment, the Terragrunt Provisioner step provisions the target infrastructure and then the Workflow deploys to it.
The Harness Terragrunt Infrastructure Provisioner is supported in Canary and Multi-Service Workflows only. For AMI/ASG and ECS deployments, the Terragrunt Infrastructure Provisioner is also supported in Blue/Green Workflows.
Before You Begin
- Get an overview how how Harness supports Terragrunt: Terragrunt Provisioning with Harness.
- Ensure you have your Harness account settings prepared for Terragrunt: Set Up Your Harness Account for Terragrunt.
- Create a Harness Terragrunt Infrastructure Provisioner: Add Terragrunt Configuration Files.
- If you are provisioning the target infrastructure for a deployment you need to map Terraform outputs to the Infrastructure Definition used by the Workflow. See Map Dynamically Provisioned Infrastructure using Terragrunt.
In addition, the following related features are documented in other topics:
- Terragrunt Dry Run: the Terragrunt Provisioner step in the Workflow can be executed as a dry run, just like running the
terragrunt plancommand. The dry run will refresh the state file and generate a plan. See Perform a Terragrunt Dry Run. - Terragrunt Destroy: see Remove Provisioned Infra with Terragrunt Destroy.
Visual Summary
Here is a visual summary of how you use your and Terragrunt and Terraform files with Harness to provision target infra and then deploy to it:
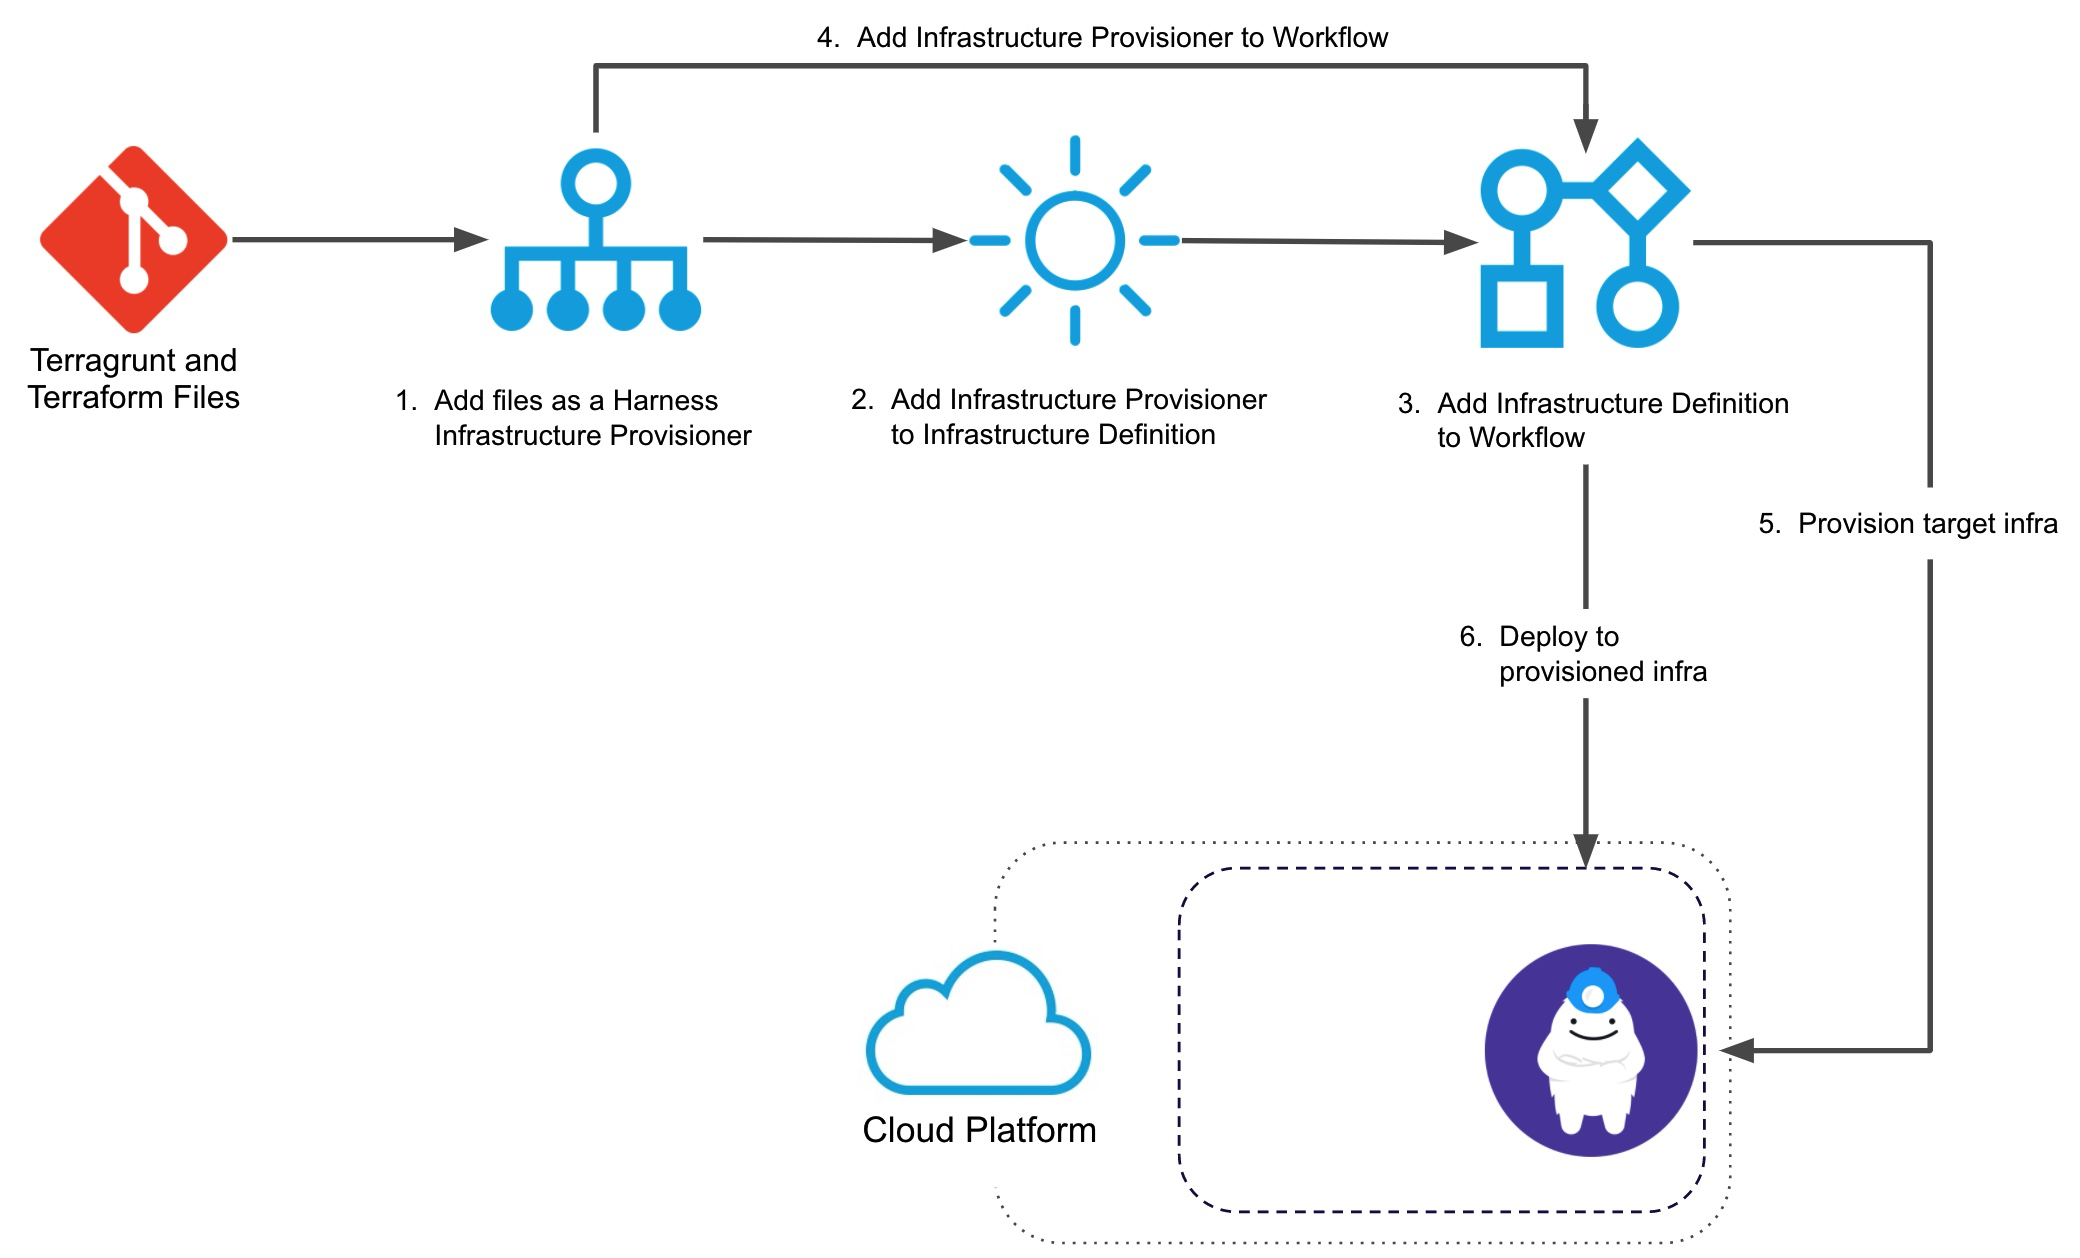
For step 1, see Add Terragrunt Configuration Files. For step 2, see Map Dynamically Provisioned Infrastructure using Terragrunt.
Here's a 6 minute video walkthrough of Harness-Terragrunt integration:
Step 1: Add Environment to Workflow
Before creating or changing the Workflow settings to use a Terragrunt Infrastructure Provisioner, you need an Infrastructure Definition that uses the Terragrunt Infrastructure Provisioner. Setting up this Infrastructure Definition is covered in Map Dynamically Provisioned Infrastructure using Terragrunt.
Next, when you create your Workflow, you add the Environment containing the mapped Infrastructure Definition to your Workflow settings.
Harness Infrastructure Provisioners are only supported in Canary and Multi-Service deployment types. For AMI deployments, Infrastructure Provisioners are also supported in Blue/Green deployments. If you are creating a Blue/Green Workflow for AMI, you can select the Environment and Infrastructure Definition in the Workflow setup settings.In your Harness Application, click Workflows.
Click Add Workflow. The Workflow settings appear.
Enter a name and description for the Workflow.
In Workflow Type, select Canary.
In Environment, select the Environment that has the Terragrunt Provisioner set up in one of its Infrastructure Definitions.
Click SUBMIT. The new Workflow is created.
By default, the Workflow includes a Pre-deployment Steps section. This is where you will add a step that uses your Terragrunt Provisioner.
Infrastructure Definitions are added in Canary Workflow Phases, in the Deployment Phases section. You will add the Infrastructure Definition that uses your Terragrunt Infrastructure Provisioner when you add the Canary Phases, later in this topic.
Step 2: Add Terragrunt Step to Pre-deployment Steps
To provision the infrastructure in your Terragrunt Infrastructure Provisioner, you add the Terraform Provisioner Step in Pre-deployment Steps.
In your Workflow, in Pre-deployment Steps, click Add Step.
Select Terragrunt Provision. The Terragrunt Provision settings appear.
In Name, enter a name for the step. Use a name that describes the infrastructure the step will provision.
In Provisioner, select the Harness Terragrunt Infrastructure Provisioner you set up for provisioning your target infrastructure. This is covered in Add Terragrunt Configuration Files.
In Timeout, enter how long Harness should wait to complete the Terragrunt Provisioner step before failing the Workflow. Provisioning can be time-consuming so use at least 5m.
Click Next. The Module Configuration settings appear.
Terragrunt Module Settings
Specify the Terraform modules you want Terragrunt to use.
You are telling Harness where to locate your terragrunt.hcl file. The terragrunt.hcl itself will point to a Terraform module using the source parameter like this:
locals {
}

terraform {
//  source = "git::git@github.com:Tathagat-289/terraformResources.git//module3"
  source = "github.com/Tathagat-289/terraformResources//module3"
}

# Include all settings from the root terragrunt.hcl file
include {
  path = find_in_parent_folders()
}

inputs = {
  tfmodule3 = "tfmodule4"
  slmodule3 = "sleepmodule4"
  tfv = "tfversion1"
  sl = "sl1"
}
You have two options:
- Apply All Modules: Harness will use all of the terragrunt.hcl files starting from the folder you specify in Path to Module.
When you select Apply All Modules, the Export Terragrunt Plan to next Terragrunt Provision step option is disabled.
When you select Apply All Modules, you might want to use Backend Configuration (Remote state) to store your state file. Harness will not sync with the current state when Apply All Modules is selected. Instead, Harness simply applies the terragrunt.hcl files. - Specify Specific Module: Harness will use the terragrunt.hcl file in the folder you specify in Path to Module.
You can use Workflow variables in Path to Module.
Terragrunt Plan Configuration
Essentially, these settings allow you to use your Terraform Provision steps as a Terragrunt plan dry run.
Users typically do this and add a Harness Approval step between the Terraform Provision step that runs the plan and the Terraform Provision step that applies the plan.
Inherit configurations from previous Terragrunt Provision step
Select this option if there is a previous Terragrunt Provision step in the Workflow with Export Terragrunt Plan to next Terragrunt Provision selected.
The Inherit configurations from previous Terragrunt Provision step will only work if a preceding Terragrunt Provision step uses Export Terragrunt Plan to next Terragrunt Provision.
Set as Terragrunt Plan
Run the step as a Terragrunt plan.
When this option is selected, the Export Terragrunt Plan to next Terragrunt Provision step option becomes available.
Export Terragrunt Plan to next Terragrunt Provision step
This option supports Terraform version 12 only.Select this option to run this Terragrunt Provision as a Terragrunt plan and then export it to the next Terragrunt Provision step in the Workflow to be applied.
The next Terragrunt Provision step must have the Inherit configurations from previous Terragrunt Provision step selected to apply the plan.
By default, Harness uses the Harness Secret Manager you have selected as your default.
Step 3: Input Values
Input values are where you provide values for the Terraform input variables in the Terraform module (config.tf) that your Terragrunt config file uses.
For example, here's a Terraform config.tf file with variables for access and secret key:
variable "access_key" {}

variable "secret_key" {}

provider "aws" {
  access_key = var.access_key
  secret_key = var.secret_key
  region = "us-east-1"
}
...
You provide values for these input variables in the Use tfvar Files and or Inline Values section. You can use either or a mix of both.
Use tfvar Files
Use the Use tfvar files option for a variable definitions file. You can use inline or remote tfvar files.
Inline tfvar Files
In File Path, enter the path to the terraform.tfvars file from the root of the repo you specified in the Terragrunt Infrastructure Provisioner you selected. Enter the full path from the root of the repo to the tfvar file.
For example, if the file is located from the root at variables/local_variables/terraform.tfvars you would enter variables/local_variables/terraform.tfvars. You can enter multiple file paths separated by commas.
You can use Workflow variables in File Path.
Remote tfvar Files
In Source Repository, select the Harness Source Repo Provider that connects to the repo where your tfvar file is.
Select Commit ID or Branch.
- For Commit ID, enter the git commit ID containing the tfvar version you want to use.
- For Branch, enter the name of the branch where the tfvar file is located.
In File Folder Path, enter the full path from the root of the repo to the tfvar file. You can enter multiple file paths separated by commas.
Inline Values
You can enter inline values for the inputs in the Terraform config.tf file.
For example, here's a Terraform config.tf file with variables for access and secret key:
variable "access_key" {}

variable "secret_key" {}

provider "aws" {
  access_key = var.access_key
  secret_key = var.secret_key
  region = "us-east-1"
}
...
In Inline Values, you can enter values for those inputs or select Harness secrets for the values:
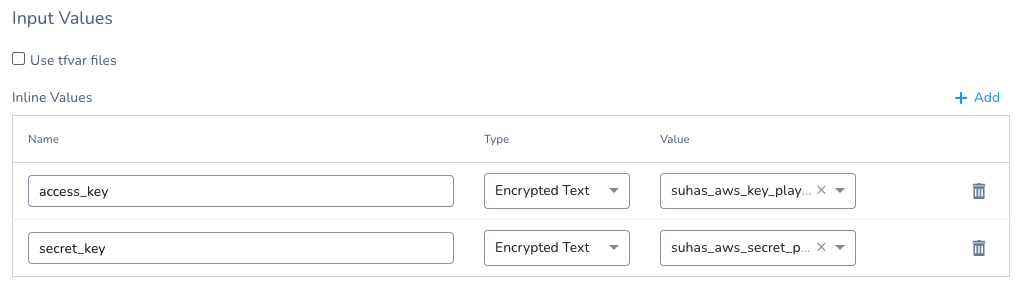
See Use Encrypted Text Secrets.
Option: Backend Configuration (Remote state)
In Backend Configuration (Remote state), enter values for each backend config (remote state variable) in the Terragrunt config (.hcl) or Terraform script (config.tf) file.
For example, here's a config.tf with a backend the values for it in Harness:
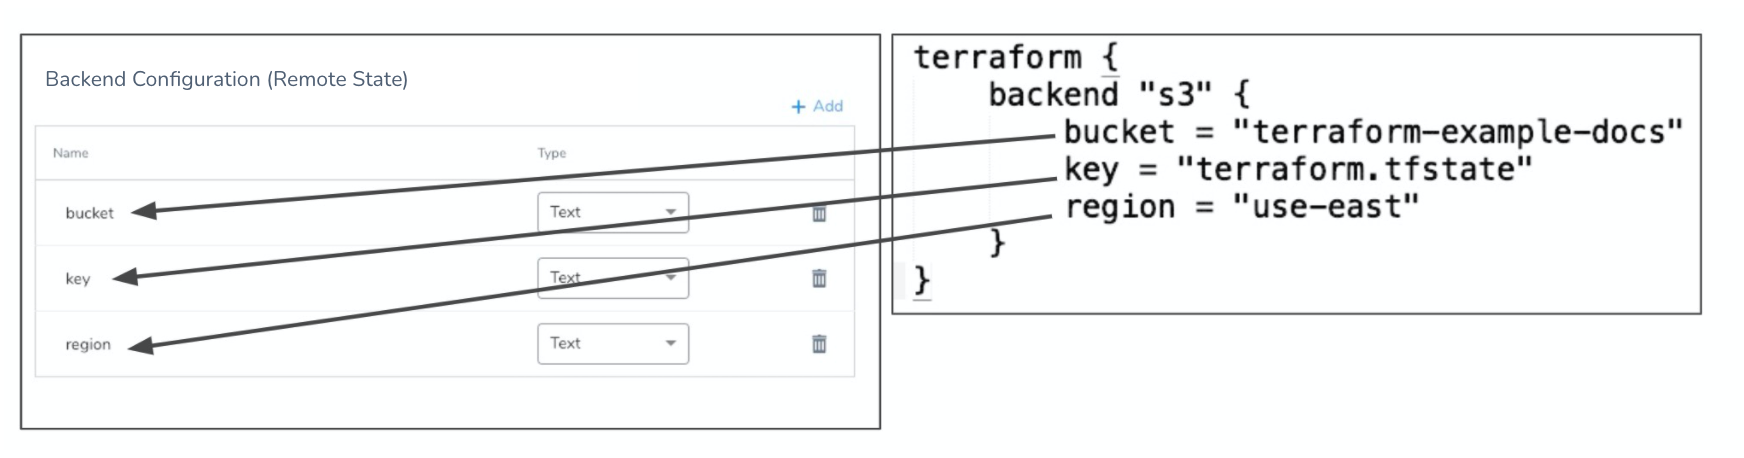
Depending on which platform you store your remote state data, Terragrunt and Terraform allow you to pass many different credentials and configuration settings, such as access and secret keys. For example, see the settings available for AWS S3 from Terraform and review Keep your remote state configuration DRY from Terragrunt.
Option: Resource Targeting
In Additional Settings, you can use the Target setting to target one or more specific modules in your Terraform script, just like using the terraform plan -target command. See Resource Targeting from Terraform.
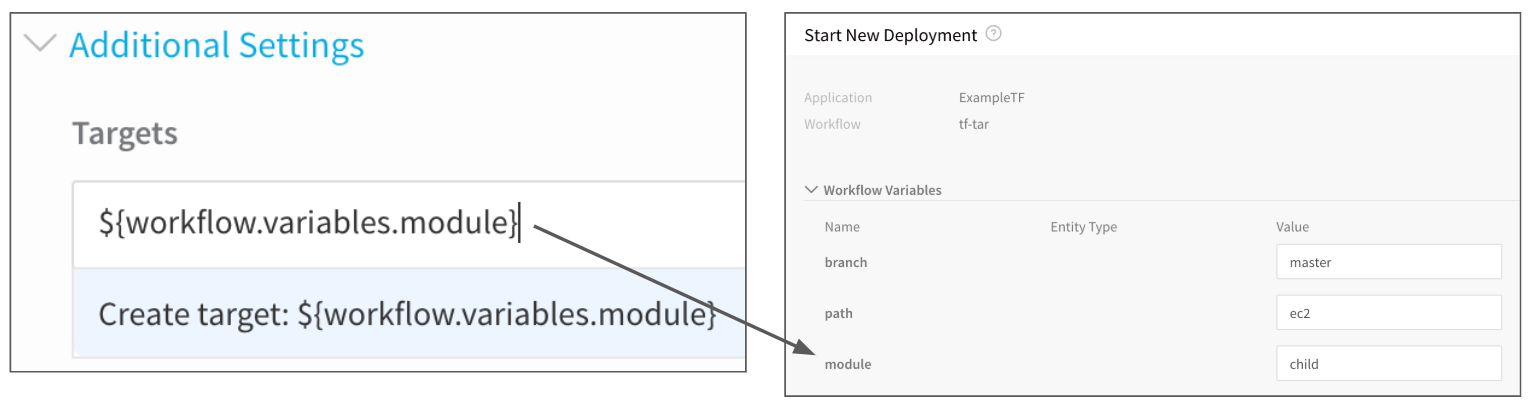
For example, in the following image you can see the Terraform script has one resource and two modules and the Targets setting displays them as potential targets.
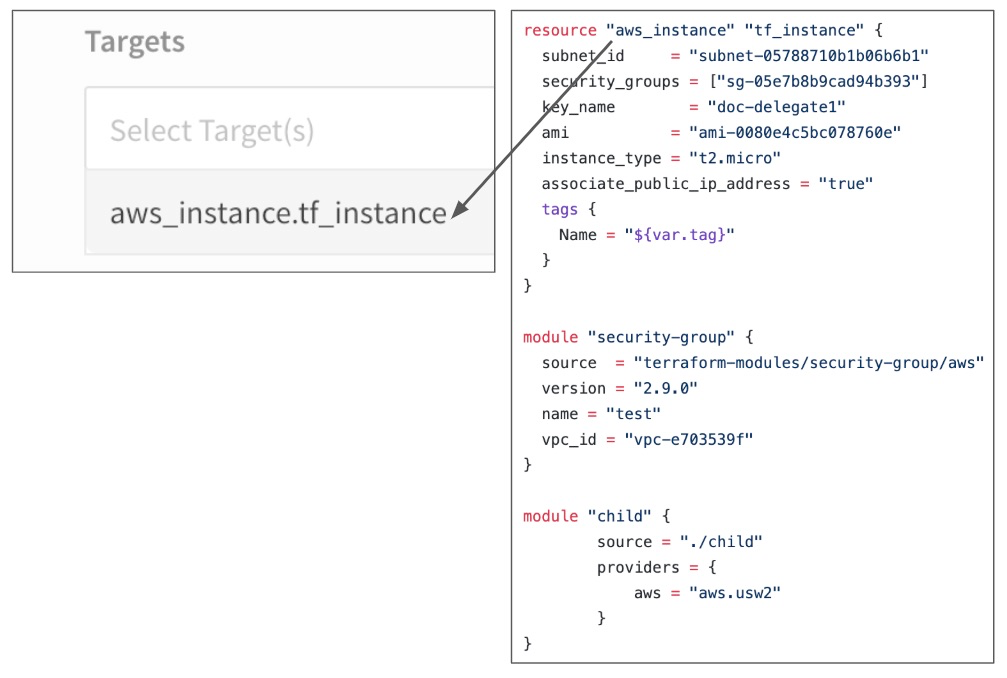
If you have multiple modules in your script and you do not select one in Targets, all modules are used.You can also use Workflow variables as your targets. For example, you can create a Workflow variable named module and then enter the variable ${workflow.variables.module} in the Targets field. When you deploy the Workflow, you are prompted to provide a value for the variable:
Option: Workspaces
Harness supports Terraform workspaces. A Terraform workspace is a logical representation of one your infrastructures, such as Dev, QA, Stage, Production.
Workspaces are useful when testing changes before moving to a production infrastructure. To test the changes, you create separate workspaces for Dev and Production.
A workspace is really a different state file. Each workspace isolates its state from other workspaces. For more information, see When to use Multiple Workspaces from Hashicorp.
Here is an example script where a local value names two workspaces, default and production, and associates different instance counts with each:
locals {
  counts = {
      "default"=1
      "production"=3
  }
}

resource "aws_instance" "my_service" {
  ami="ami-7b4d7900"
  instance_type="t2.micro"
  count="${lookup(local.counts, terraform.workspace, 2)}"
  tags {
         Name = "${terraform.workspace}"
    }
}
In the workspace interpolation sequence you can see the count is assigned by applying it to the workspace variable (terraform.workspace) and that the tag is applied using the variable also.
Harness will pass the workspace name you provide to the terraform.workspace variable, thus determining the count. If you provide the name production, the count will be 3.
In the Workspace setting, you can simply select the name of the workspace to use.
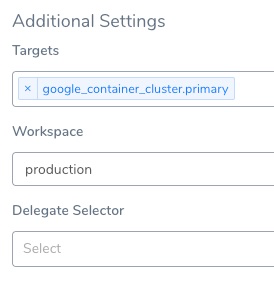
So can also use a Workflow variable to enter the name in Workspace.
Later, when the Workflow is deployed, you can specify the name for the Workflow variable:
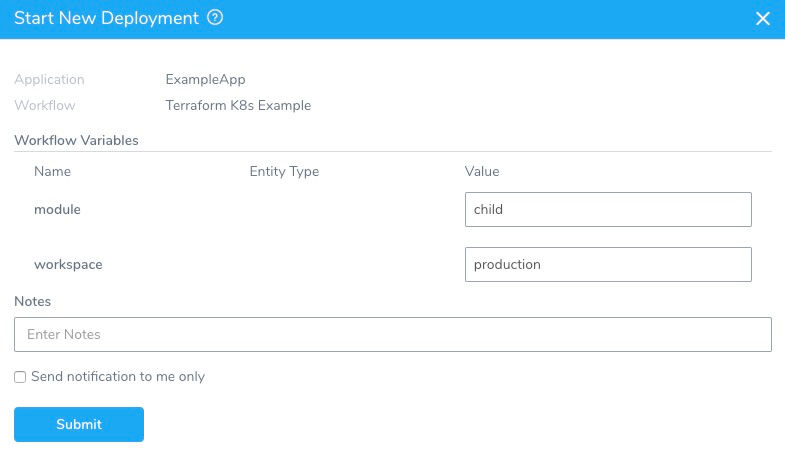
This allows you to specify a different workspace name each time the Workflow is run.
You can even set a Harness Trigger where you can set the workspace name used by the Workflow:
This Trigger can then be run in response to different events, such as a Git push. For more information, see Passing Variables into Workflows and Pipelines from Triggers.
When rollbacks occur, Harness will rollback the Terraform state to the previous version of same workspace.### Option: Select Delegate
In Delegate Selector, you can select the specific Harness Delegate(s) to execute the Terragrunt Provisioning step.
For more information on Delegate Selectors, see Select Delegates with Selectors.
You can even add a Workflow variable for the Delegate Selector and the use an expression in the Delegate Selectors field. When you deploy the Workflow, you will provide the name of the Delegate Selector.
For more information, see Add Workflow Variables and Passing Variables into Workflows and Pipelines from Triggers.
Option: Skip Terragrunt Rollback
When you add a Terragrunt Provision step to the Pre-deployment section of a Workflow, Harness automatically adds a Terragrunt Rollback step to the Rollback Steps of the Workflow Phase.
Enable Skip rollback of provisioned infrastructure on failure to prevent Harness from automatically adding a Terragrunt Rollback step to the Rollback Steps of the Workflow Phase.
Option: Add Environment Variables
In Terragrunt Environment Variables, you can reference additional environment variables in the Terraform script ultimately used by the Terragrunt Infrastructure Provisioner. These are in addition to any variables already in the script.
Click Add and enter a name, type, and value for the environment variable. For example: TF_LOG, Text, and TRACE.
If you select Encrypted Text, you must select an existing Harness Encrypted Text secret.
You can use Harness Workflow variables and expression variables for the name and value.
Environment variables can also be deleted using the Terragrunt Destroy step. See Remove Provisioned Infra with Terragrunt Destroy.
Step 4: Add Infrastructure Definition to Phases
Now that the Workflow Pre-deployment section has your Terragrunt Provisioner step added, you need to add the target Infrastructure Definition where the Workflow will deploy.
This is the same Infrastructure Definition where you mapped your Terragrunt Infrastructure Provisioner outputs, as described in Map Dynamically Provisioned Infrastructure using Terragrunt.
For Canary Workflows, Infrastructure Definitions are added in Phases, in the Deployment Phases section.
For AMI deployments, Terragrunt Infrastructure Provisioners are also supported in Blue/Green Workflows. If you are creating a Blue/Green Workflow for AMI, you can select the Environment and Infrastructure Definition in the Workflow setup settings.In the Deployment Phases section, click Add Phase. The Workflow Phase settings appear.
In Service, select the Harness Service to deploy.
In Infrastructure Definition, select the target Infrastructure Definition where the Workflow will deploy. This is the same Infrastructure Definition where you mapped your Terragrunt Infrastructure Provisioner outputs, as described in Map Dynamically Provisioned Infrastructure using Terragrunt.
Here is an example:
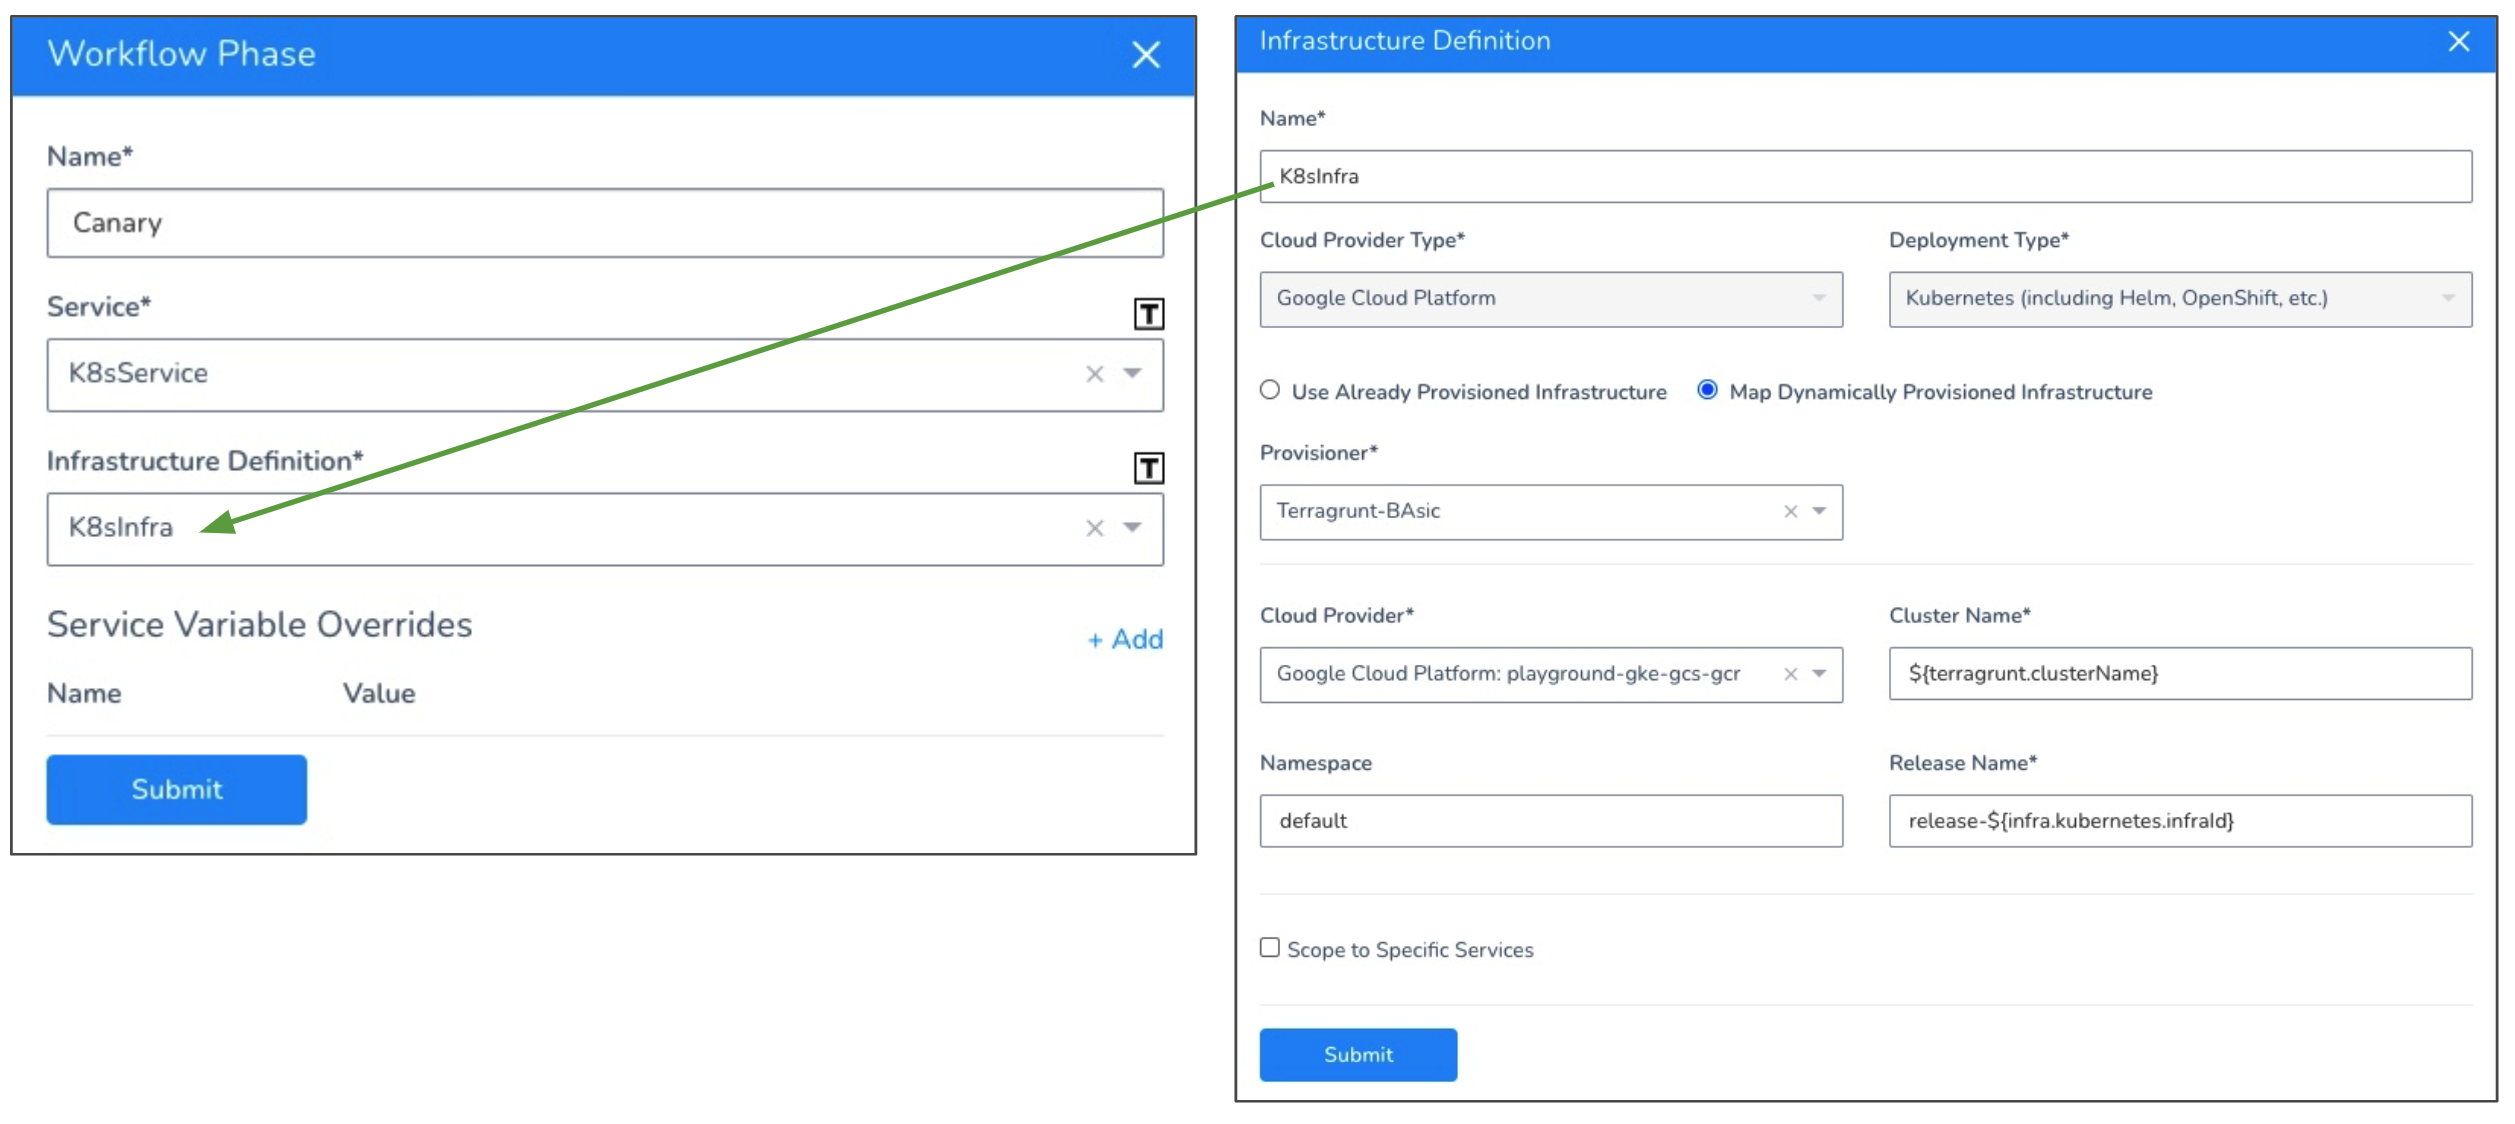
Click Submit. Use the same Infrastructure Definition for the remaining phases in your Canary Workflow.
Once you are done, your Workflow is ready to deploy. Let's look at an example below.
Example: Terragrunt Deployment
This section shows the deployment steps for a Workflow using the Terragrunt Provisioner step and deploying to a Kubernetes cluster.
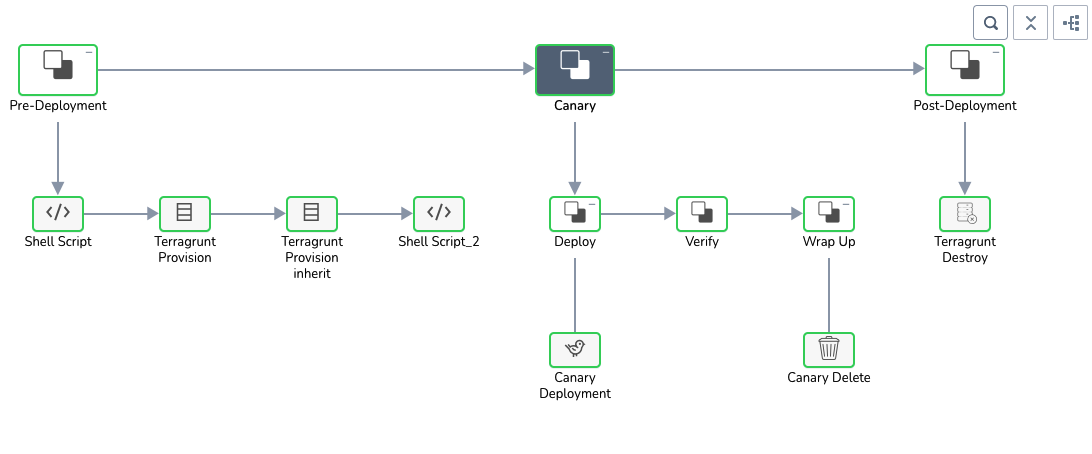
In the Pre-Deployment section, two Terragrunt Provision steps are executed. When you click each step you can see the Terragrunt commands executed in Details.
The first Terragrunt Provision step create a plan using the Terragrunt config files and the source Terraform module. The plan is encrypted and stored in a Secrets Manager.
Generating ************** plan

terragrunt plan -out=tfplan -input=false   -var-file="/opt/harness-delegate/./terragrunt-working-dir/kmpySmUISimoRrJL6NL73w/235638175/terragrunt-script-repository/variables/local_variables/**************.tfvars"
Refreshing Terraform state in-memory prior to plan...
The refreshed state will be used to calculate this plan, but will not be
persisted to local or remote state storage.
The second Terragrunt Provision step inherits the plan, decrypts it, and applies the plan:
Decrypting ************** plan before applying


Using approved ************** plan

Finished terragrunt plan task
...
terragrunt apply -input=false tfplan
null_resource.delaymodule3: Creating...
null_resource.delaymodule3: Provisioning with 'local-exec'...
null_resource.delaymodule3 (local-exec): Executing: ["/bin/sleep" "5"]
null_resource.delaymodule3: Creation complete after 5s [id=932665668643318315]

Apply complete! Resources: 1 added, 0 changed, 0 destroyed.

The state of your infrastructure has been saved to the path
below. This state is required to modify and destroy your
infrastructure, so keep it safe. To inspect the complete state
use the `************** show` command.

State path: **************.tfstate

Outputs:

clusterName = us-central1-a/harness-test
sleepoutputModule3 = 10
versionModule3 = 5
Finally, in the Canary Deployment step, the workload steady state is reached and the deployment is considered a success:
kubectl --kubeconfig=config get events --namespace=default --output=custom-columns=KIND:involvedObject.kind,NAME:.involvedObject.name,MESSAGE:.message,REASON:.reason --watch-only

kubectl --kubeconfig=config rollout status Deployment/harness-example-deployment-canary --namespace=default --watch=true


Status : Waiting for deployment "harness-example-deployment-canary" rollout to finish: 0 of 1 updated replicas are available...
Event  : Pod    harness-example-deployment-canary-5b4cb547b-dmv5k   Pulling image "registry.hub.docker.com/library/nginx:stable-perl"   Pulling
Event  : Pod   harness-example-deployment-canary-5b4cb547b-dmv5k   Successfully pulled image "registry.hub.docker.com/library/nginx:stable-perl"   Pulled
Event  : Pod   harness-example-deployment-canary-5b4cb547b-dmv5k   Created container harness-example   Created
Event  : Pod   harness-example-deployment-canary-5b4cb547b-dmv5k   Started container harness-example   Started

Status : deployment "harness-example-deployment-canary" successfully rolled out

Done.
Notes
The following notes discuss rollback of deployments that use Terragrunt Infrastructure Provisioners.
Deployment Rollback
If you have successfully deployed Terraform modules and on the next deployment there is an error that initiates a rollback, Harness will roll back the provisioned infrastructure to the previous, successful version of the Terraform state.
Harness will not increment the serial in the state, but perform a hard rollback to the exact version of the state provided.
Rollback Limitations
If you deployed two modules successfully already, module1 and module2, and then attempted to deploy module3, but failed, Harness will roll back to the successful state of module1 and module2.
However, let's look at the situation where module3 succeeds and now you have module1, module2, and module3 deployed. If the next deployment fails, the rollback will only roll back to the Terraform state with module3 deployed. Module1 and module2 were not in the previous Terraform state, so the rollback excludes them.
Next Steps
Now that you're familiar with provision using the Terragrunt Provisioner step, the following topics cover features to help you extend your Harness Terragrunt deployments: