Create a Basic Workflow for Traditional (SSH) Deployments
Traditional (SSH) deployments involve obtaining an application package from an artifact source, such as a WAR file in an AWS S3 bucket, and deploying it to a target host, such as a virtual machine.
Typically, the Harness Basic Workflow is used for Traditional deployments, but Harness provides Canary and Rolling Workflows for Traditional deployments also.
In this topic, we will use the Basic Workflow to demonstrate a simple Traditional deployment.
For a Build and Deploy Pipeline using a Traditional deployment, see Artifact Build and Deploy Pipelines Overview.
Before You Begin
- Add Artifacts and App Stacks for Traditional (SSH) Deployments
- Connect to Your Repos and Target SSH Platforms
- Traditional Deployments Overview
- Harness Key Concepts
Supported Platforms and Technologies
See SSH in Supported Platforms and Technologies.
Review: Basic Workflows
The Basic deployment Workflow is the most common Workflow type for traditional, package file-based deployments. Basic Workflows simply select nodes in the deployment infrastructure and install and start the application attached to the Harness Service.

Step 1: Create the Workflow
To create a Basic Workflow for a Traditional deployment, do the following:
- In your Harness Application, click Workflows.
- In Workflows, click Add Workflow. The Workflow dialog appears.
- In Name, enter a name for the Workflow.
- In Workflow Type, select Basic Deployment.
- In Environment, select the Environment where the Infrastructure Definition you defined for your deployment is located.
- In Service, select the SSH Service to be deployed.
- In Infrastructure Definition, select your target infrastructure.
- Click SUBMIT. The Workflow is created.
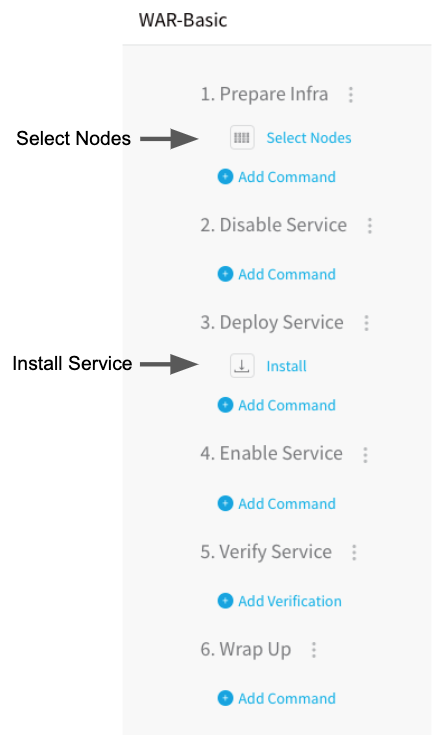
Let's look at the two default steps in the Workflow, Select Nodes and Install.
Step 2: Select Target Nodes
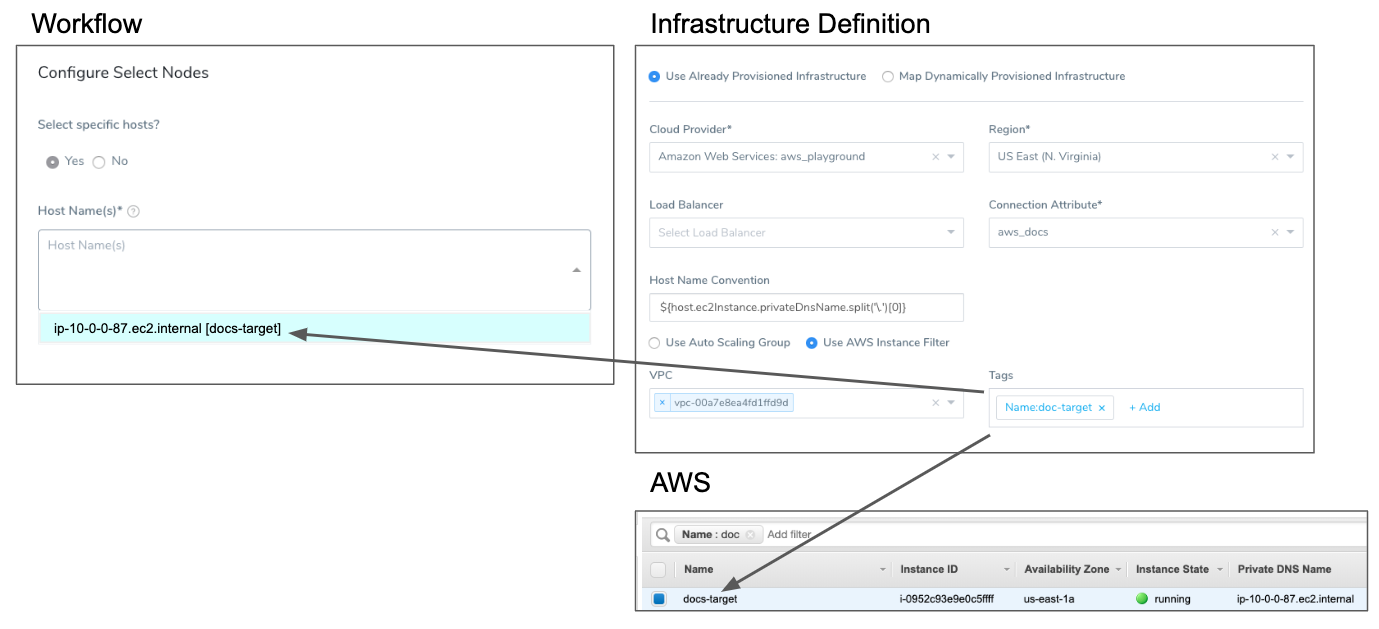
The Select Nodes step selects the target hosts from the Infrastructure Definition you defined. You can choose to select a specific host or simply specify the number of instances to select with the Infrastructure Definition criteria.
The following image shows an Infrastructure Definition specifying an AWS Region, VPC, and Tags (Name:doc-target), the EC2 instance that meets that criteria, and the host name in the Node Select dialog.

For details, see Select Nodes Workflow Step.
Step 3: Install and Run the Application and Stacks
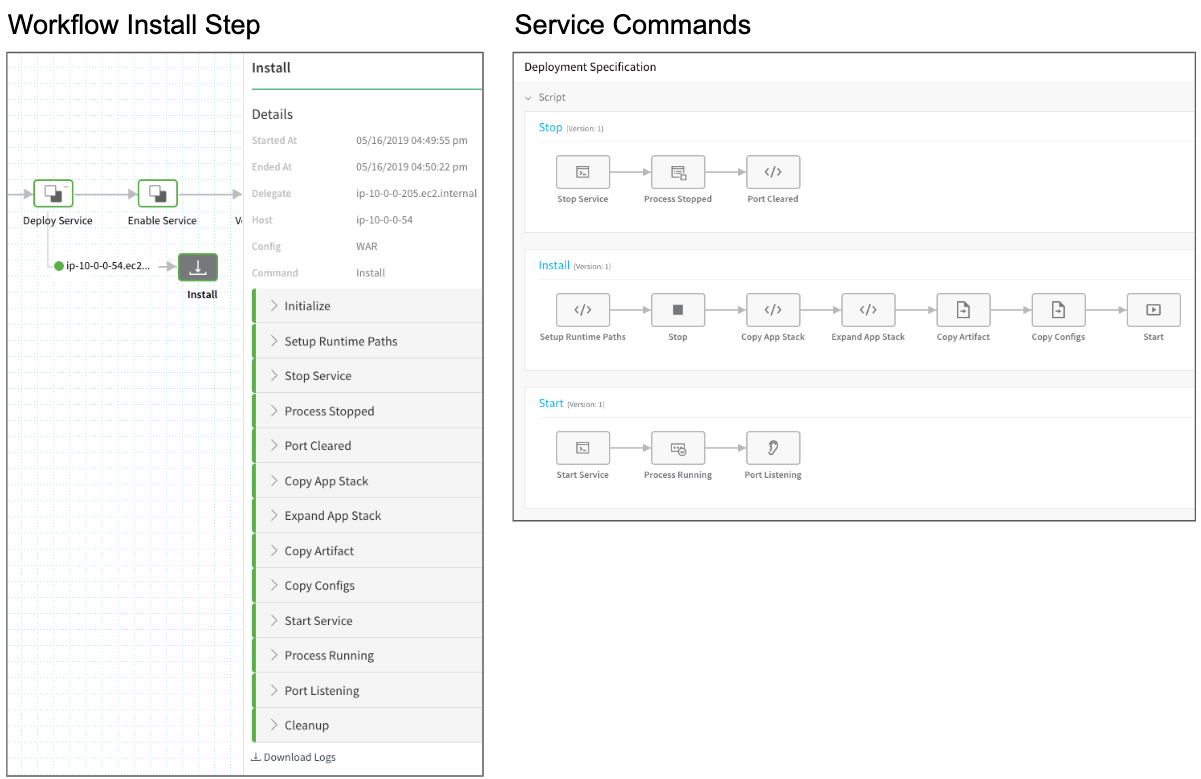
The Install step runs the command scripts in your Service on the target host.
For details, see Install Workflow Step.
Review: Rollbacks
There are not many causes for a rollback of a Basic Workflow using application packages. Artifact issues are uncommon because the artifact must be available to the Harness Delegate before you deploy. If the Delegate cannot reach the target host, the deployment will fail without changing the target host, and so no rollback is needed.
Example: Basic Workflow Deployment
The Basic Workflow is the most common deployment of Services deploying application packages. Once you've successfully deployed the Workflow, you can click the Install step to see the Service commands and scripts in the Deployments page.

You can expand logs for each script in the Install step to see the log of its execution by the Harness Delegate. For example, here is the Copy Artifact script copying the application package todolist.war to
the runtime location set up in Application Defaults ($HOME/${app.name}/${service.name}/${env.name}/runtime):
Begin execution of command: Copy Artifact

Connecting to ip-10-0-0-54.ec2.internal ....

Connection to ip-10-0-0-54.ec2.internal established

Begin file transfer todolist.war to ip-10-0-0-54.ec2.internal:/home/ec2-user/ExampleAppFileBased/WAR/Development/runtime/tomcat/webapps

File successfully transferred

Command execution finished with status SUCCESS
You can SSH into the target host and see the application package:

See Also
Configure As Code
To see how to configure the settings in this topic using YAML, configure the settings in the UI first, and then click the YAML editor button.