Single Sign-On (SSO) with SAML
Harness supports Single Sign-On (SSO) with SAML, integrating with your SAML SSO provider to enable you to log your users into Harness as part of your SSO infrastructure. This document explains how to set up SAML authentication.
If the Harness Self-Managed Enterprise Edition version is not accessed using the HTTPS load balancer, SAML authentication will fail. Make sure you access the Harness Self-Managed Enterprise Edition version using an HTTPS load balancer, and not an HTTP load balancer.
Support Formats
The XML SAML file used with Harness must use UTF-8.
UTF-8 BOM is not supported. Some text editors like Notepad++ save in UTF-8 BOM by default.
SAML SSO With Harness Overview
To set up SAML SSO with Harness, you add a SAML SSO provider to your Harness account and enable it as the default authentication method.
Harness SAML SSO involves the following:
- Harness User email addresses - Users are invited to Harness using their email addresses. Once they log into Harness, their email addresses are registered with Harness as Harness Users. To use SAML SSO, Harness Users must use the same email addresses to register in Harness and the SAML provider.
Ensure that you have at least two corresponding user accounts when setting up and testing SAML SSO in Harness. This allows you to set up the account with a Harness Administrator account and test it with a Harness user account.
- SAML provider user email addresses - To use the SAML provider to verify Harness Users, the email addresses used in the SAML provider must match the email addresses for the registered Harness Users you want to verify.
- Harness SAML Endpoint URL - This URL is where the SAML provider will post the SAML authentication response to your Harness account. This URL is provided by Harness in the Single Sign-On (SSO) Provider dialog. You enter this URL in your SAML SSO provider app to integrate it with Harness.
- SAML metadata file - This file is provided by your SAML provider app. You upload this file into the Harness Single Sign-On (SSO) Provider dialog to integrate the app with Harness.
SAML SSO With Okta
To set up Harness with Okta as a SAML SSO provider, you exchange the necessary information between your Okta app and Harness.
Users are not created as part of the SAML SSO integration. Users are invited to Harness using their email addresses. Once they log into Harness, their email addresses are registered as Harness Users. For more information, go to SAML SSO with Harness Overview.
This section describes the steps you must perform to use an Okta app for Harness SAML SSO:
Okta User Accounts
To set up a SAML support in your Okta Harness app, ensure that the app has corresponding Users in Harness:
- In Harness, add the users you want to set up for SAML SSO by inviting them to Harness using the same email addresses that they use in your SAML provider.
- In Okta, assign them to your SAML provider app.
The only user property that must match between a Harness User and its corresponding SAML provider user account is its email address.
Sometimes users might have mixed case email addresses in Okta. In these situations, Harness converts the email address to lowercase when adding them to Harness.
Create App Integration in Okta
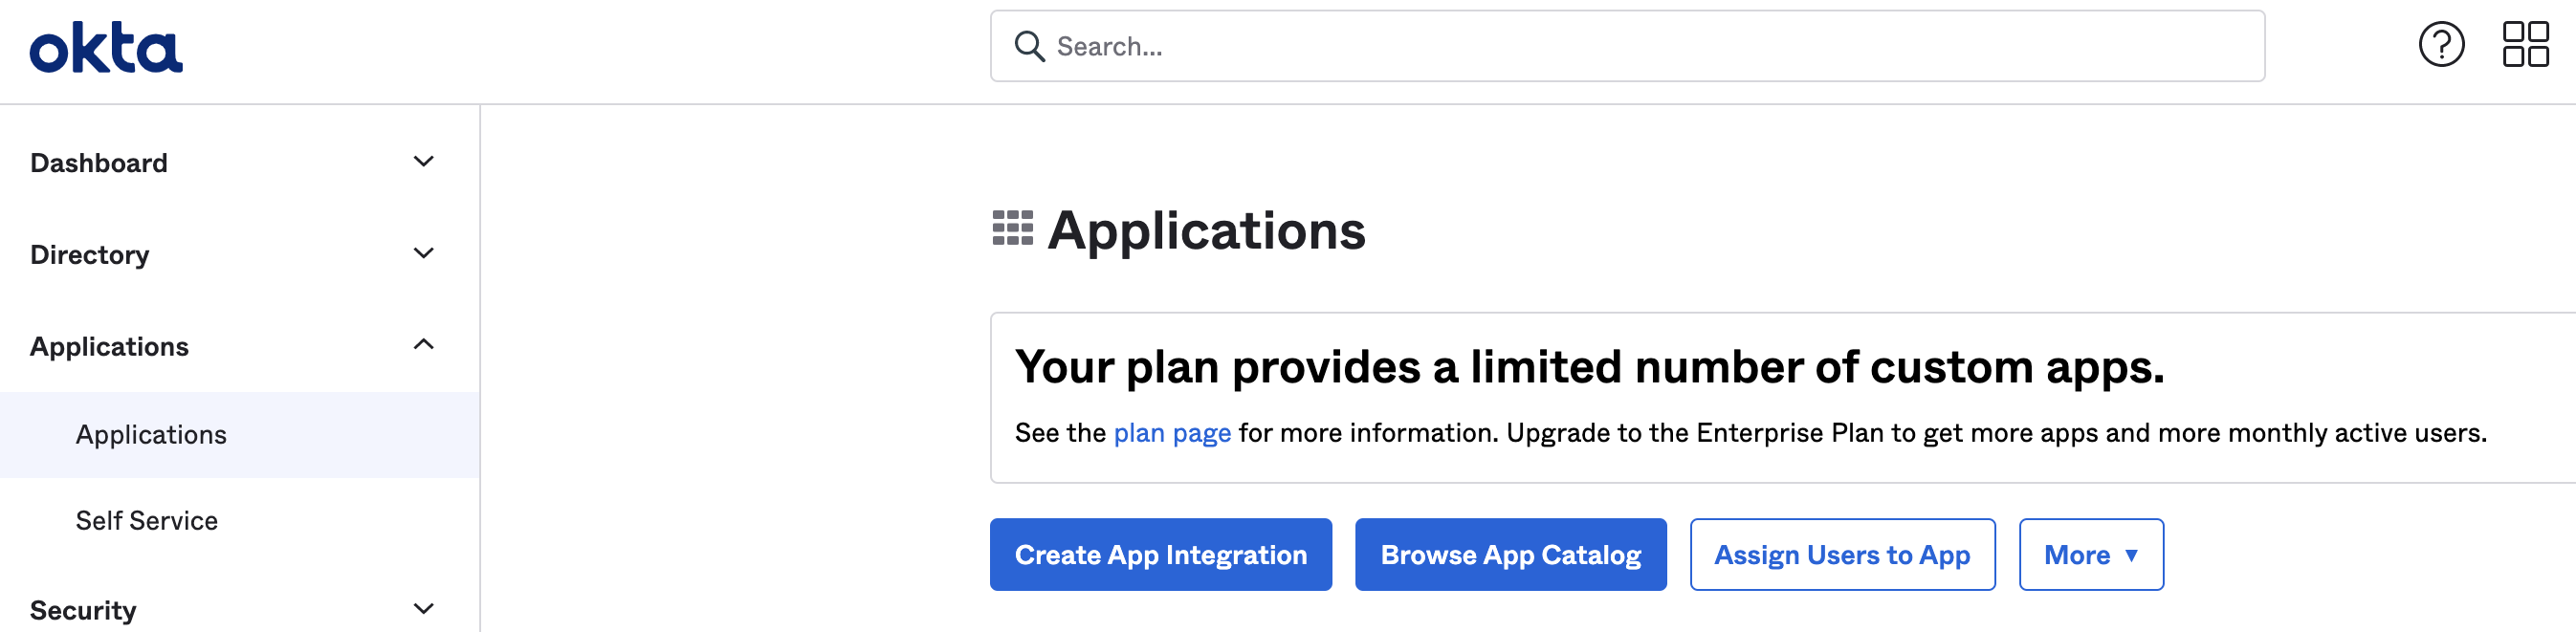
Log in to your Okta administrator account and click Applications.
Click Create App Integration.
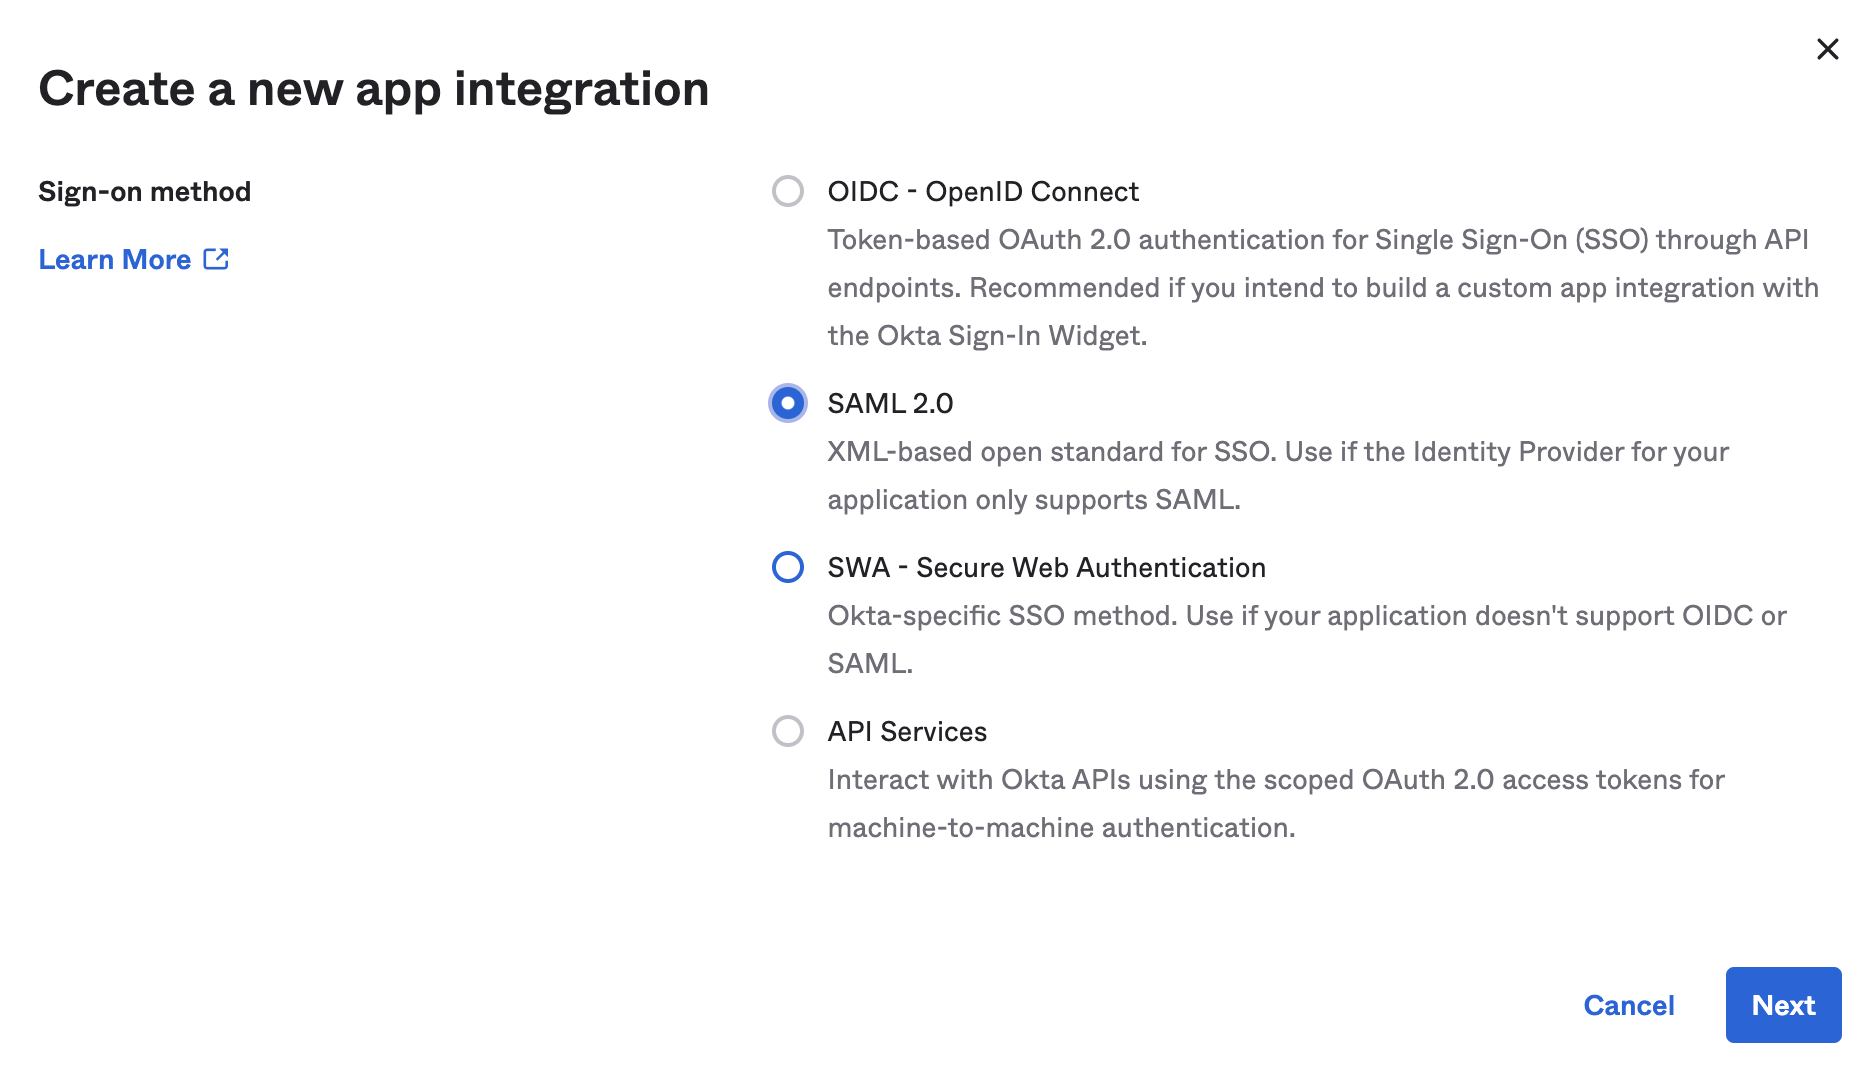
The Create a new app integration dialogue appears. Select SAML 2.0 and click Next.
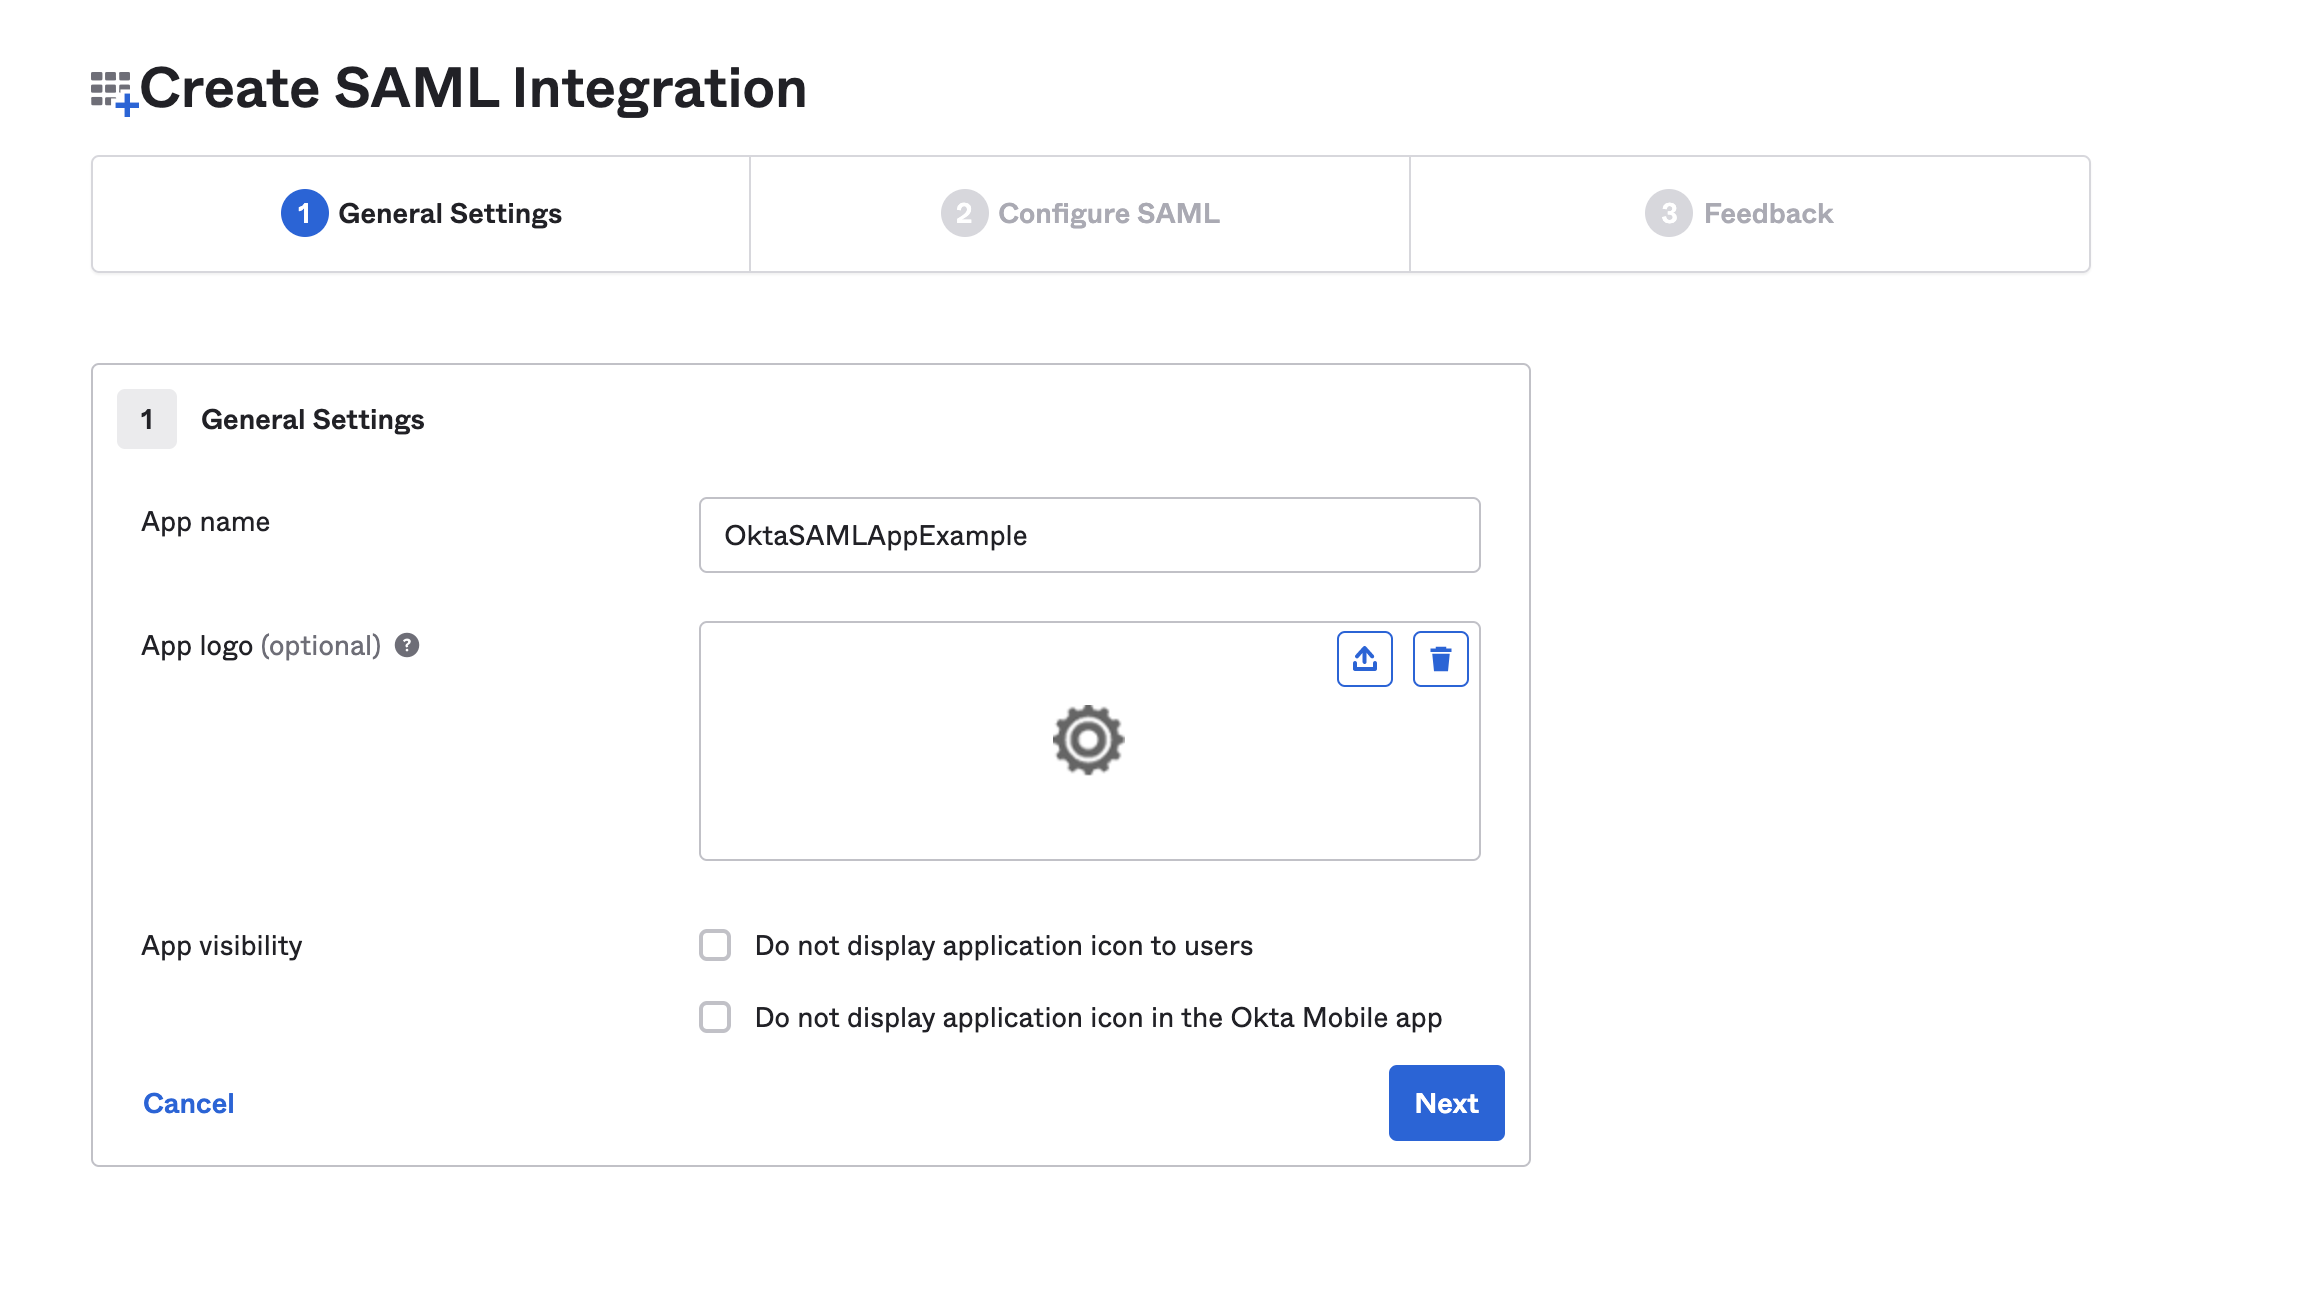
In General Settings, enter a name in the Application label field, and click Next.
You are redirected to the Configure SAML tab. Copy the SAML Endpoint URL from Harness and paste it into Single sign on URL. To get this URL from Harness, perform the following steps:
Login to Harness.
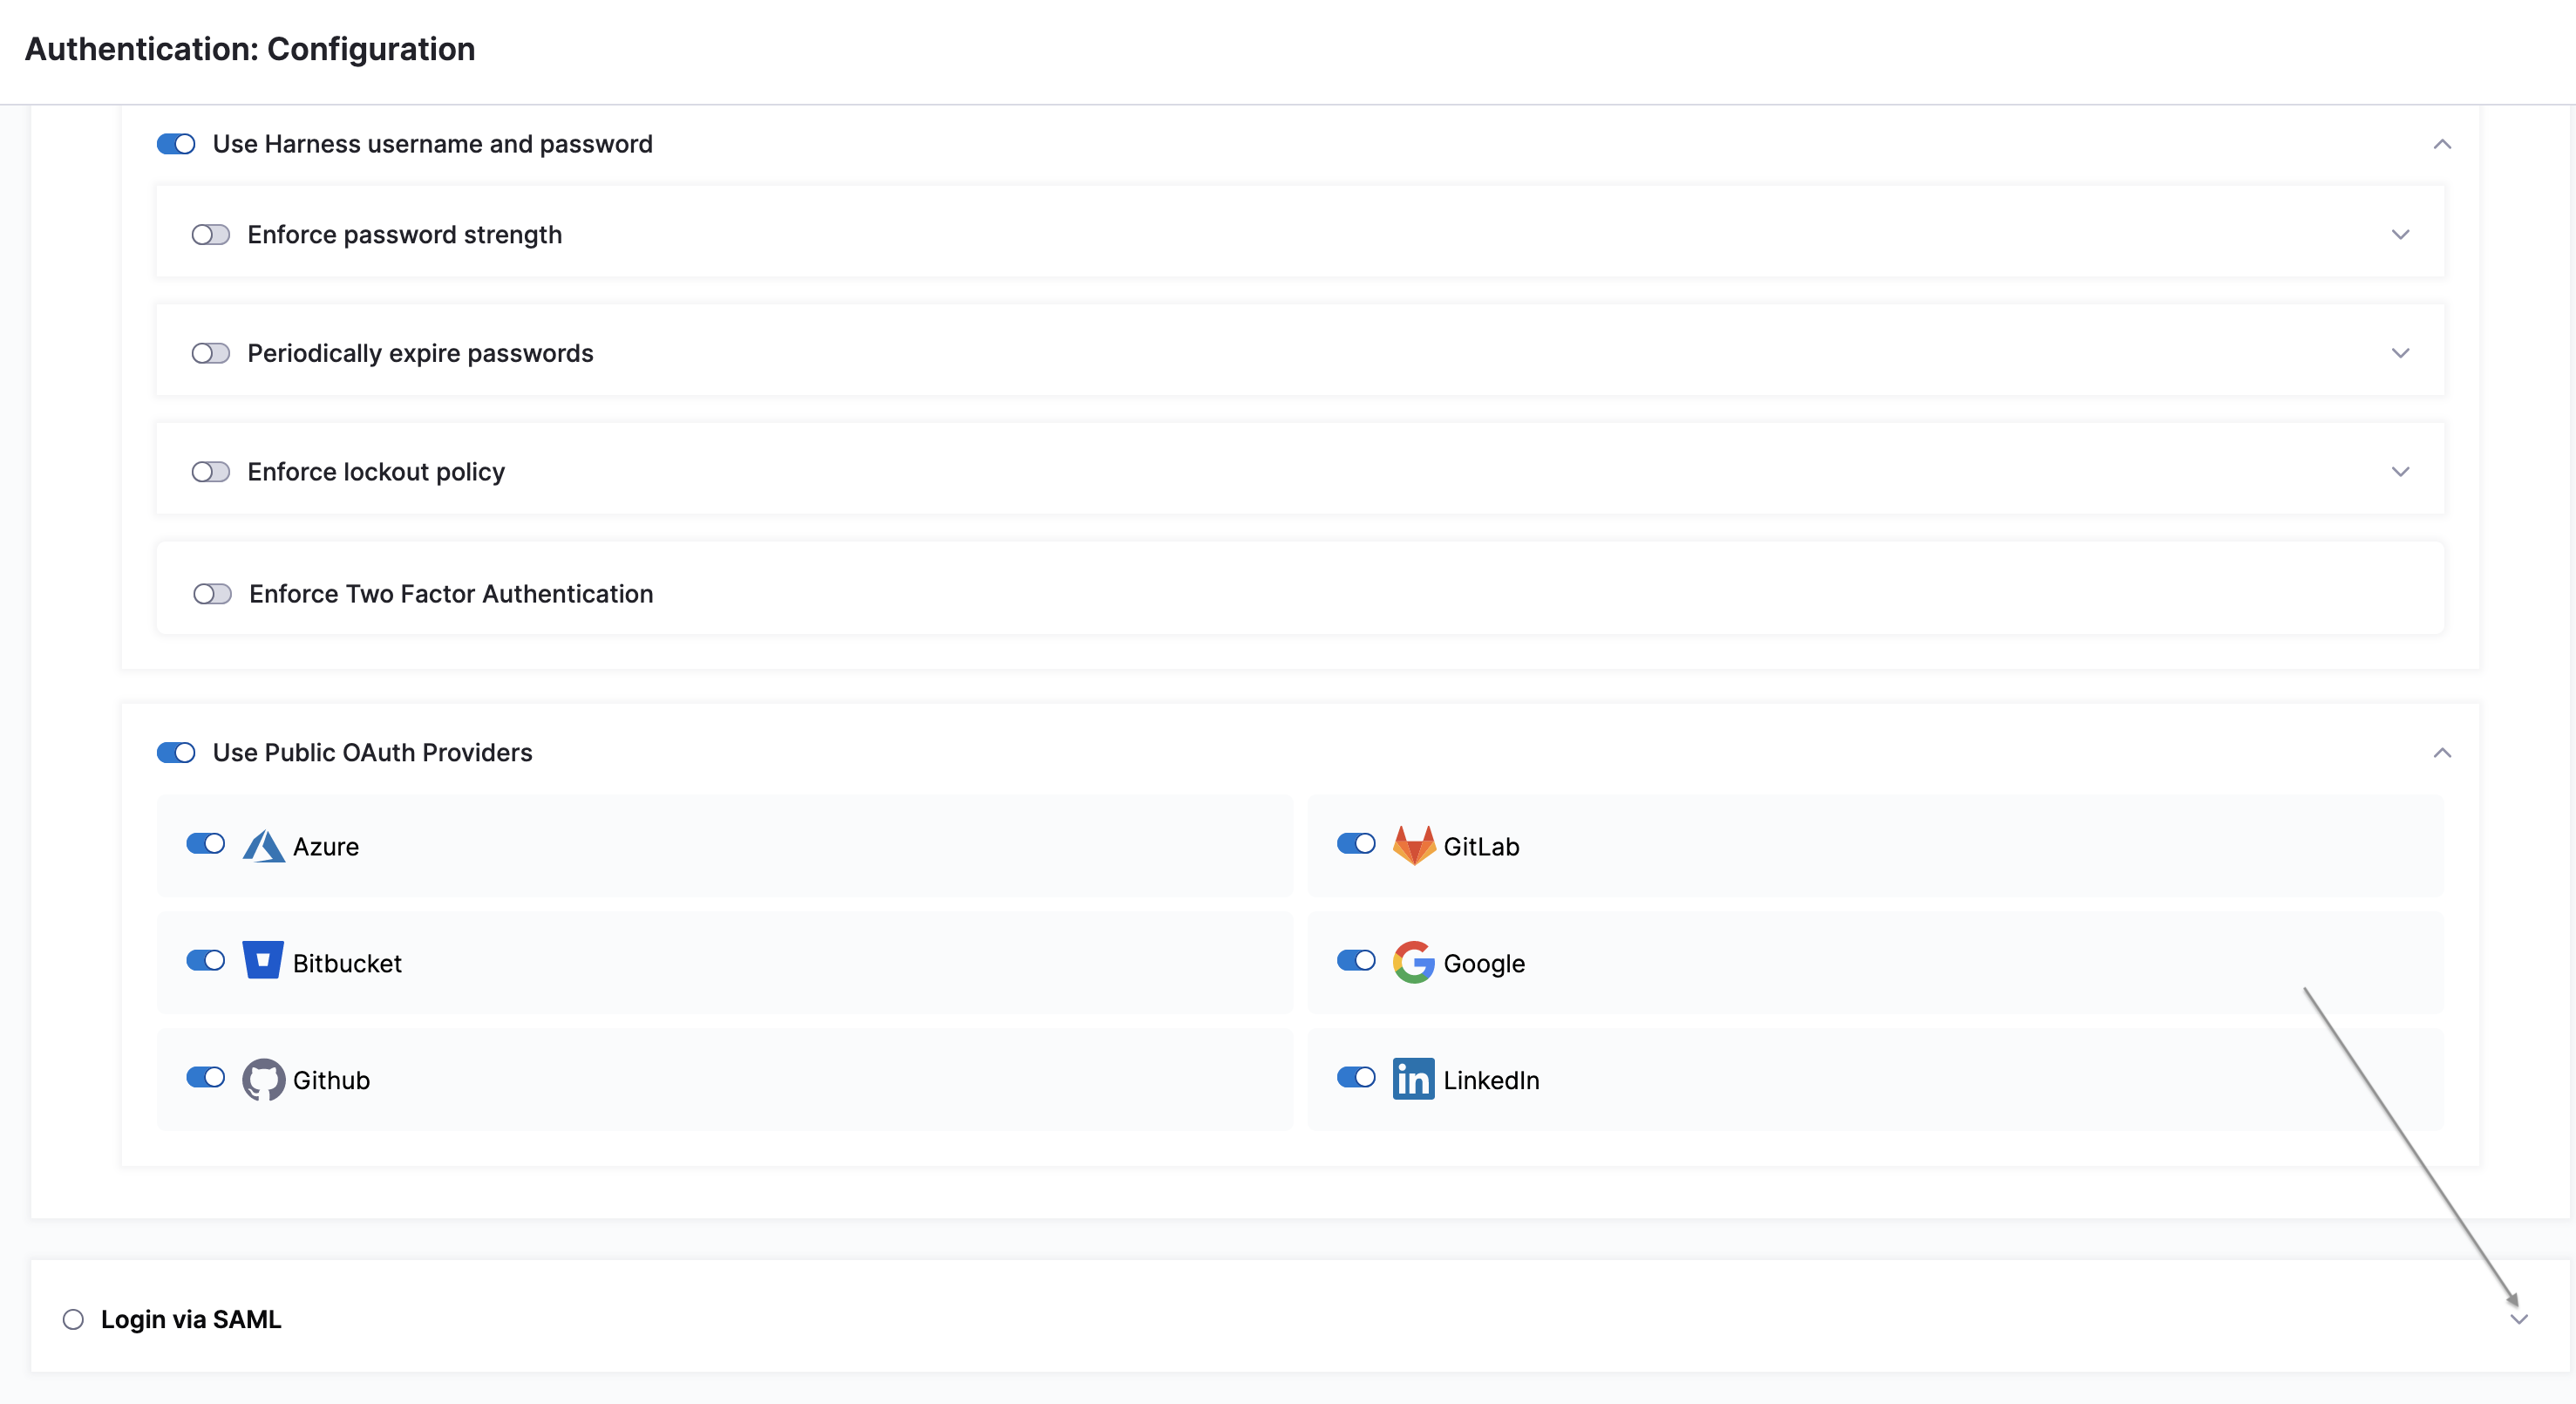
In Home, click Authentication under ACCOUNT SETUP. The Authentication: Configuration page appears.
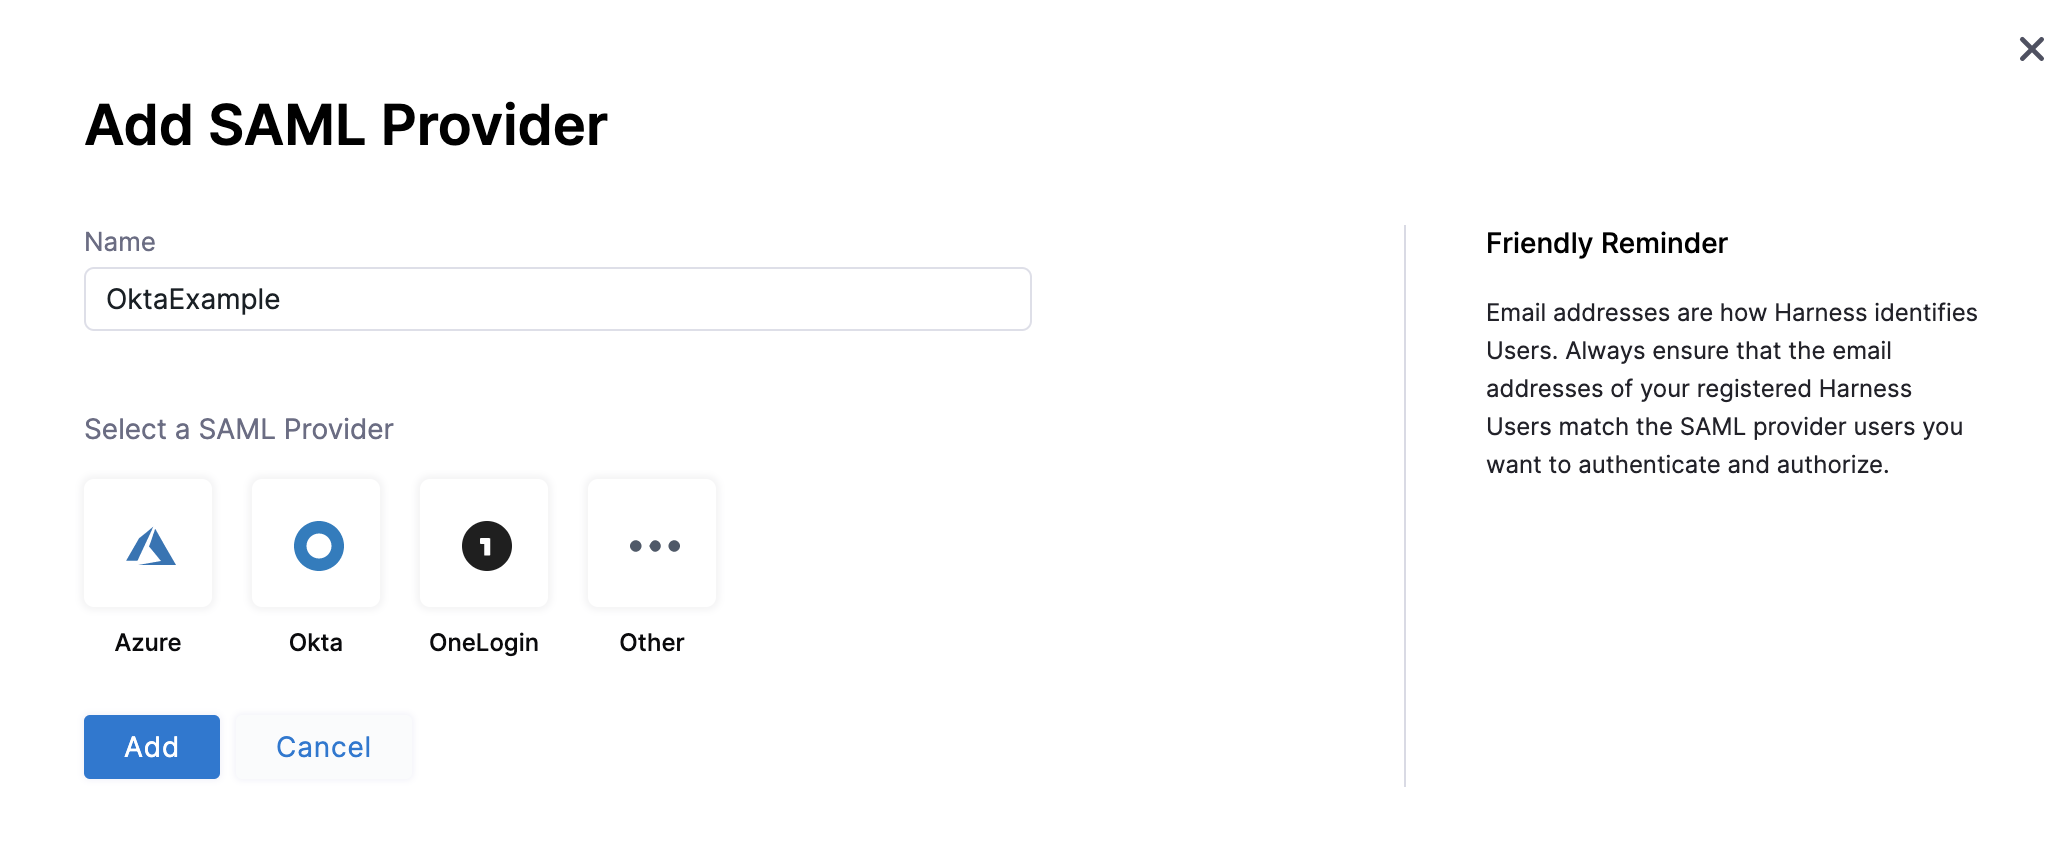
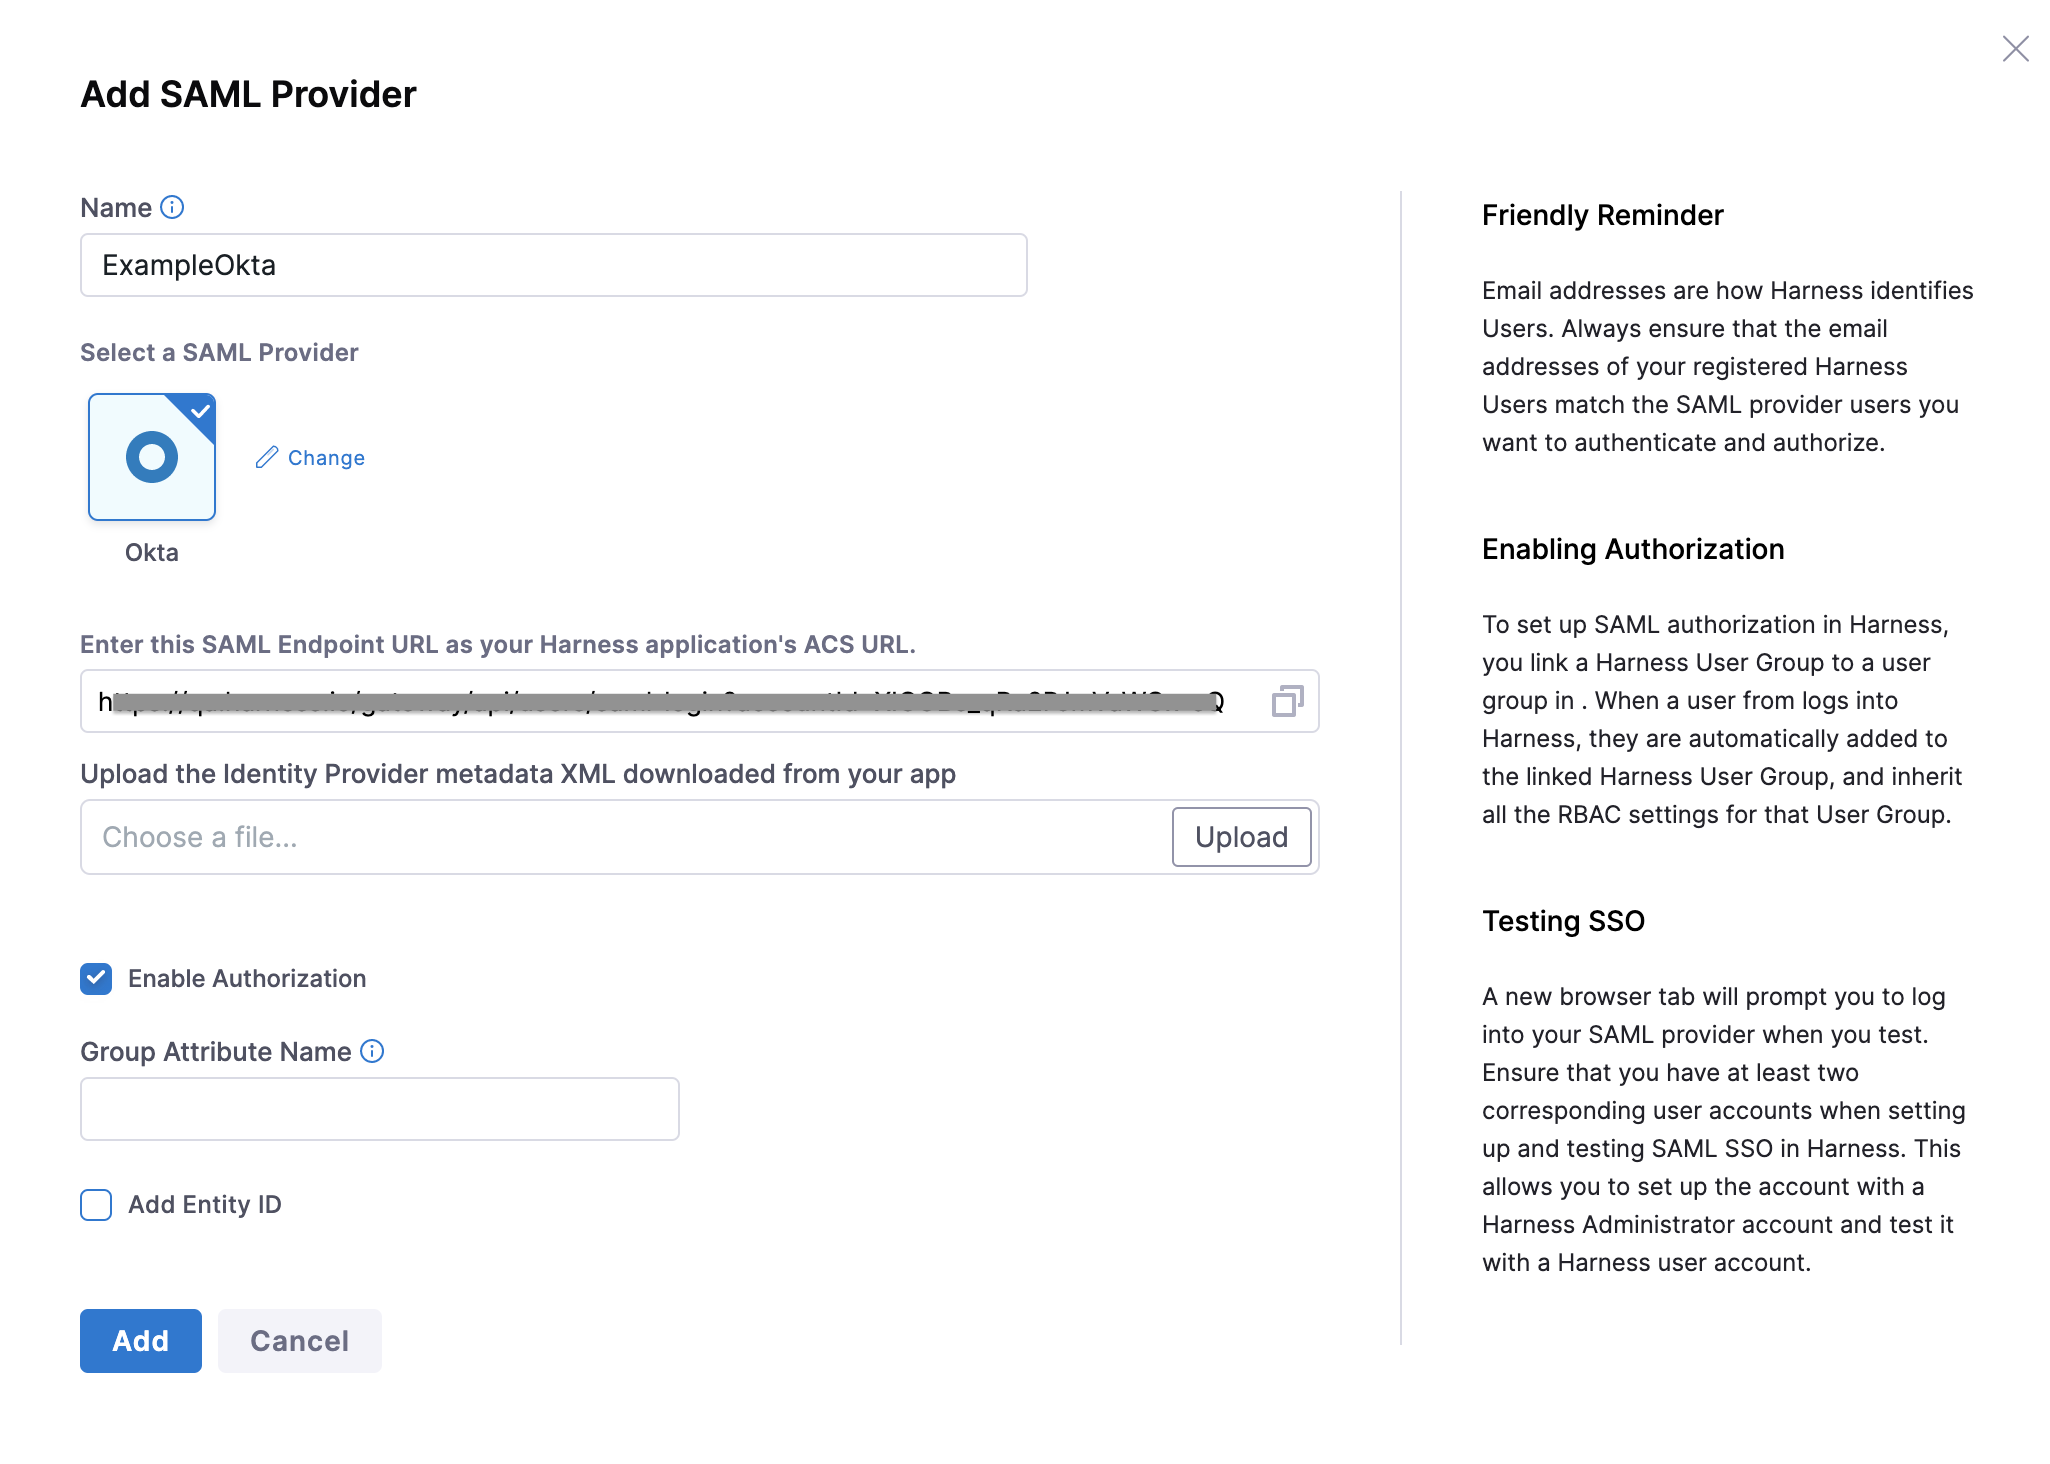
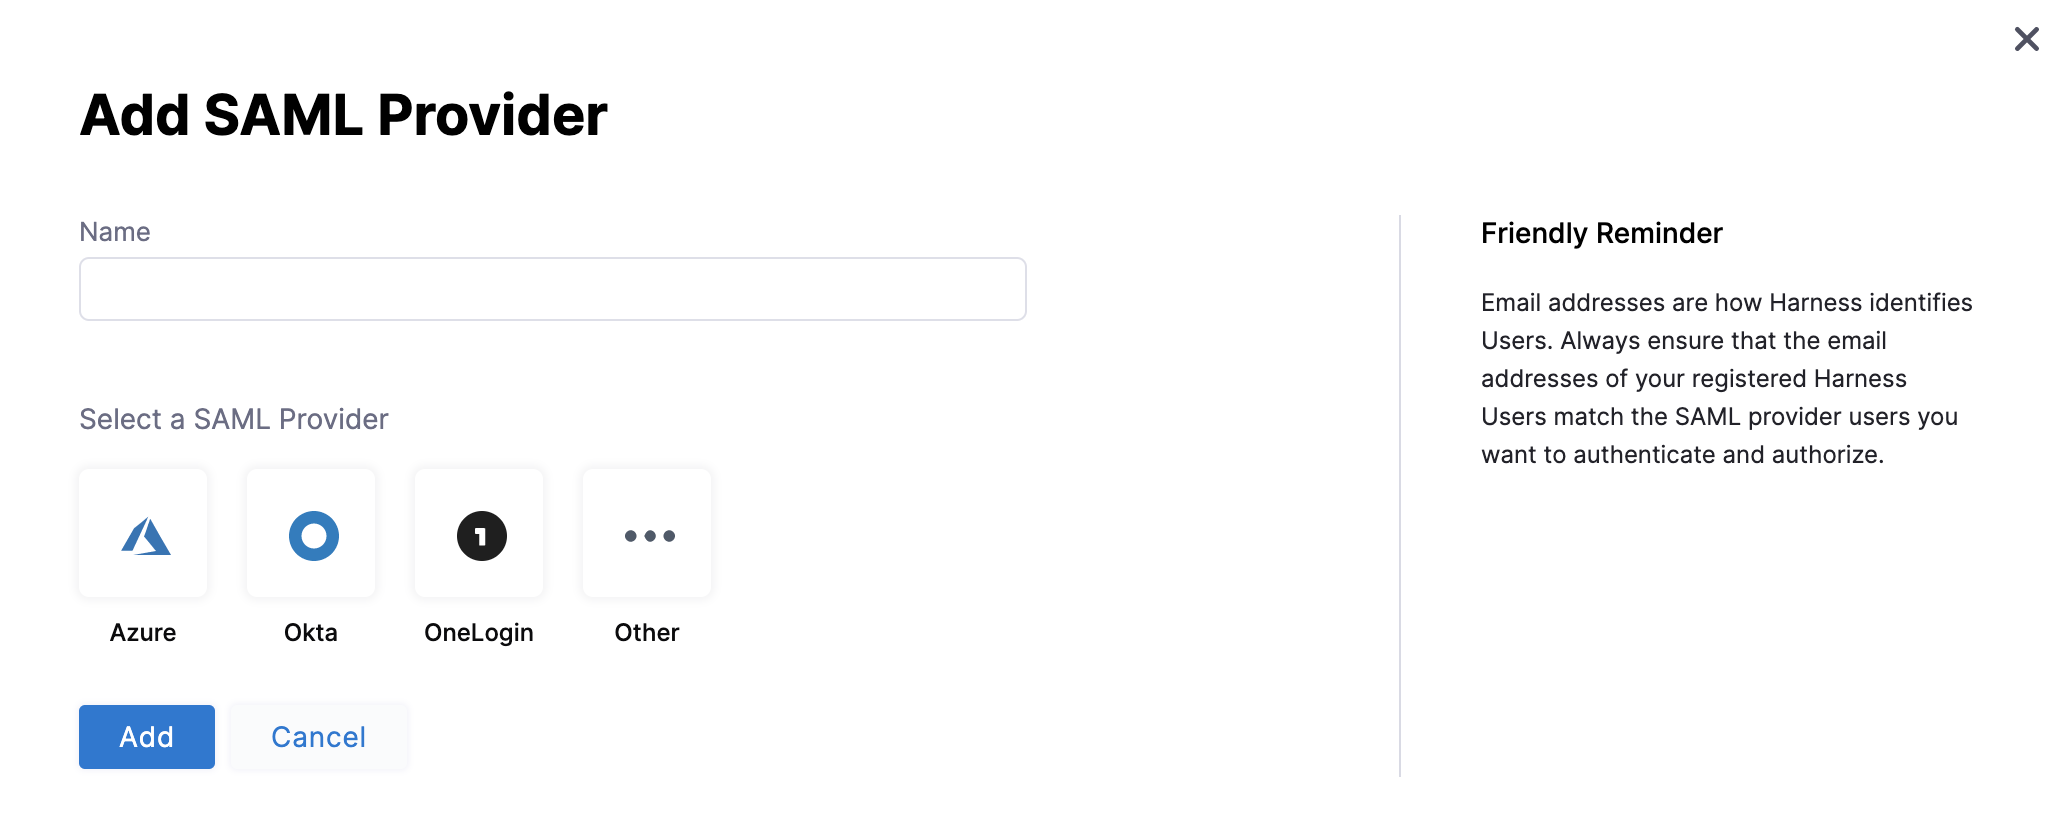
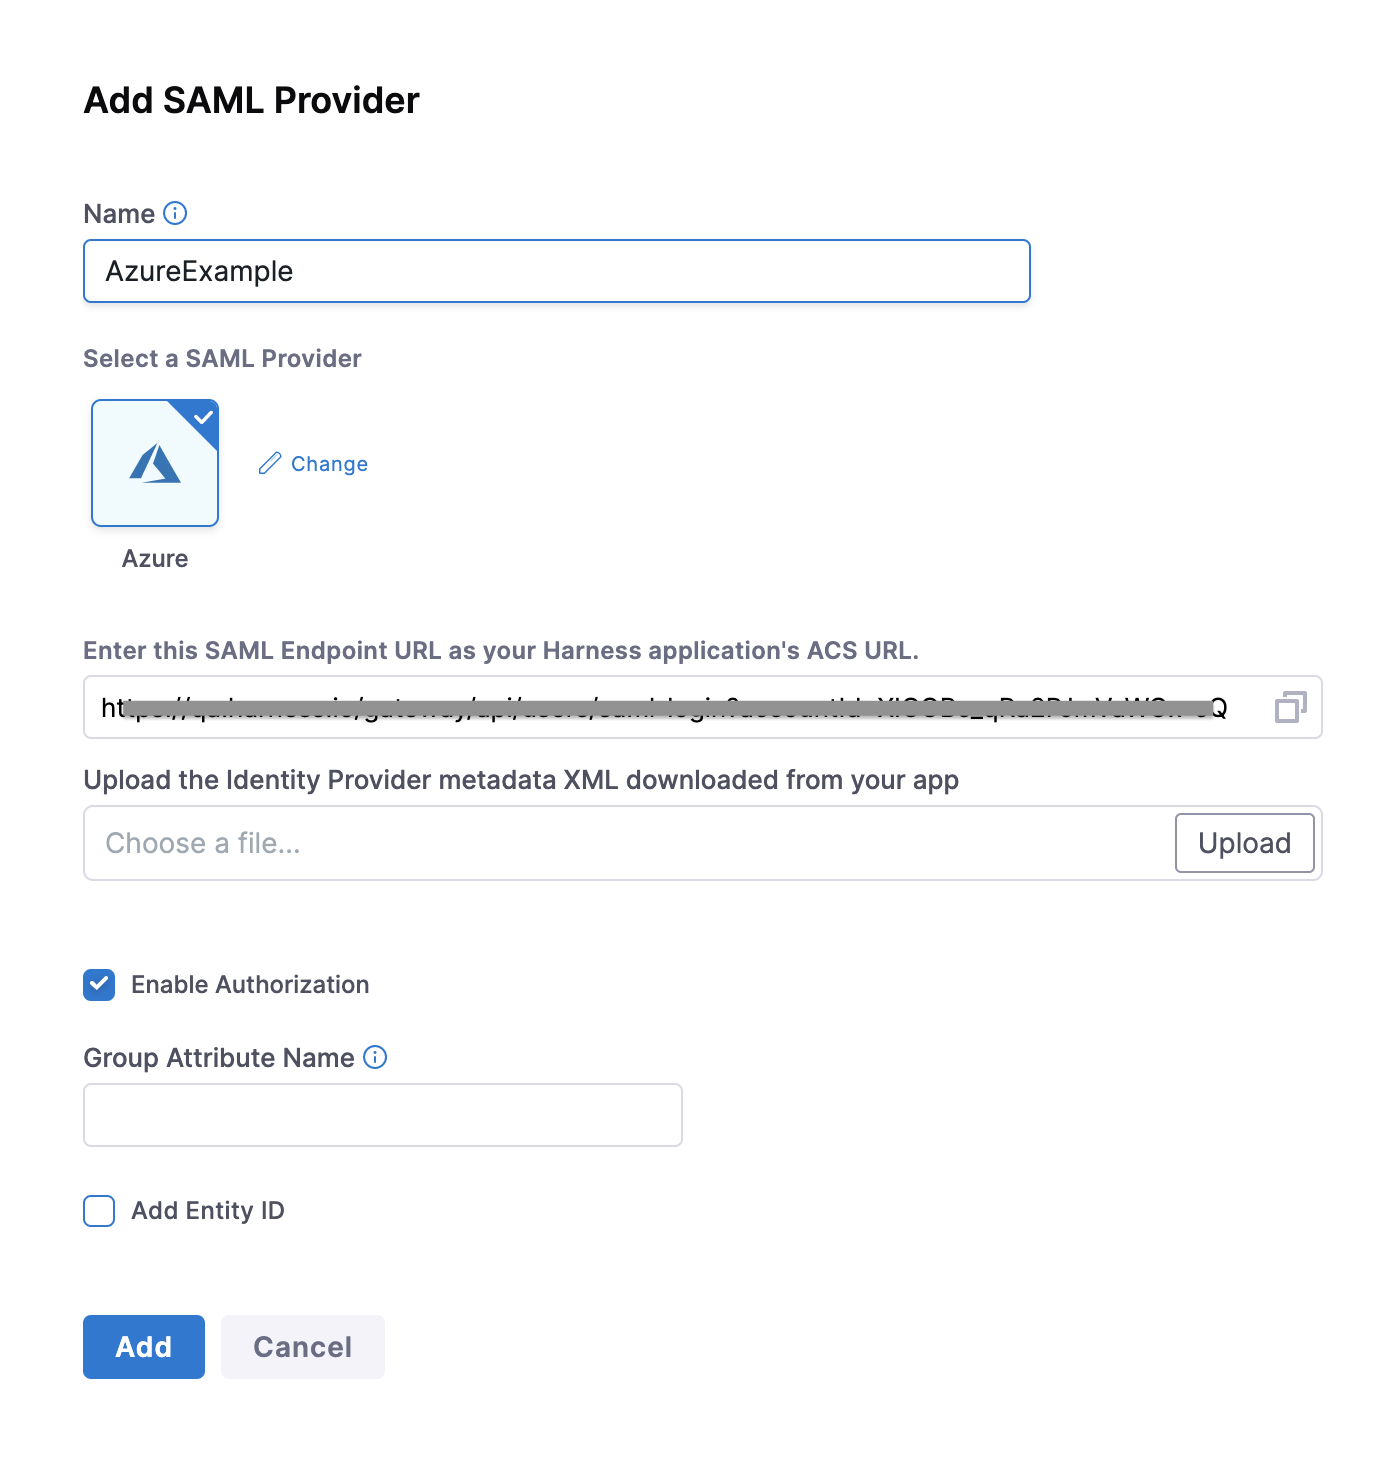
Select +SAML Provider. The Add SAML Provider dialog appears.
Enter a name for your SAML Provider in the Name field.
Under Select a SAML Provider, select the SAML Provider you want to set up (in this case Okta).
Once you do this, you can see additional controls to set up the SAML Provider.
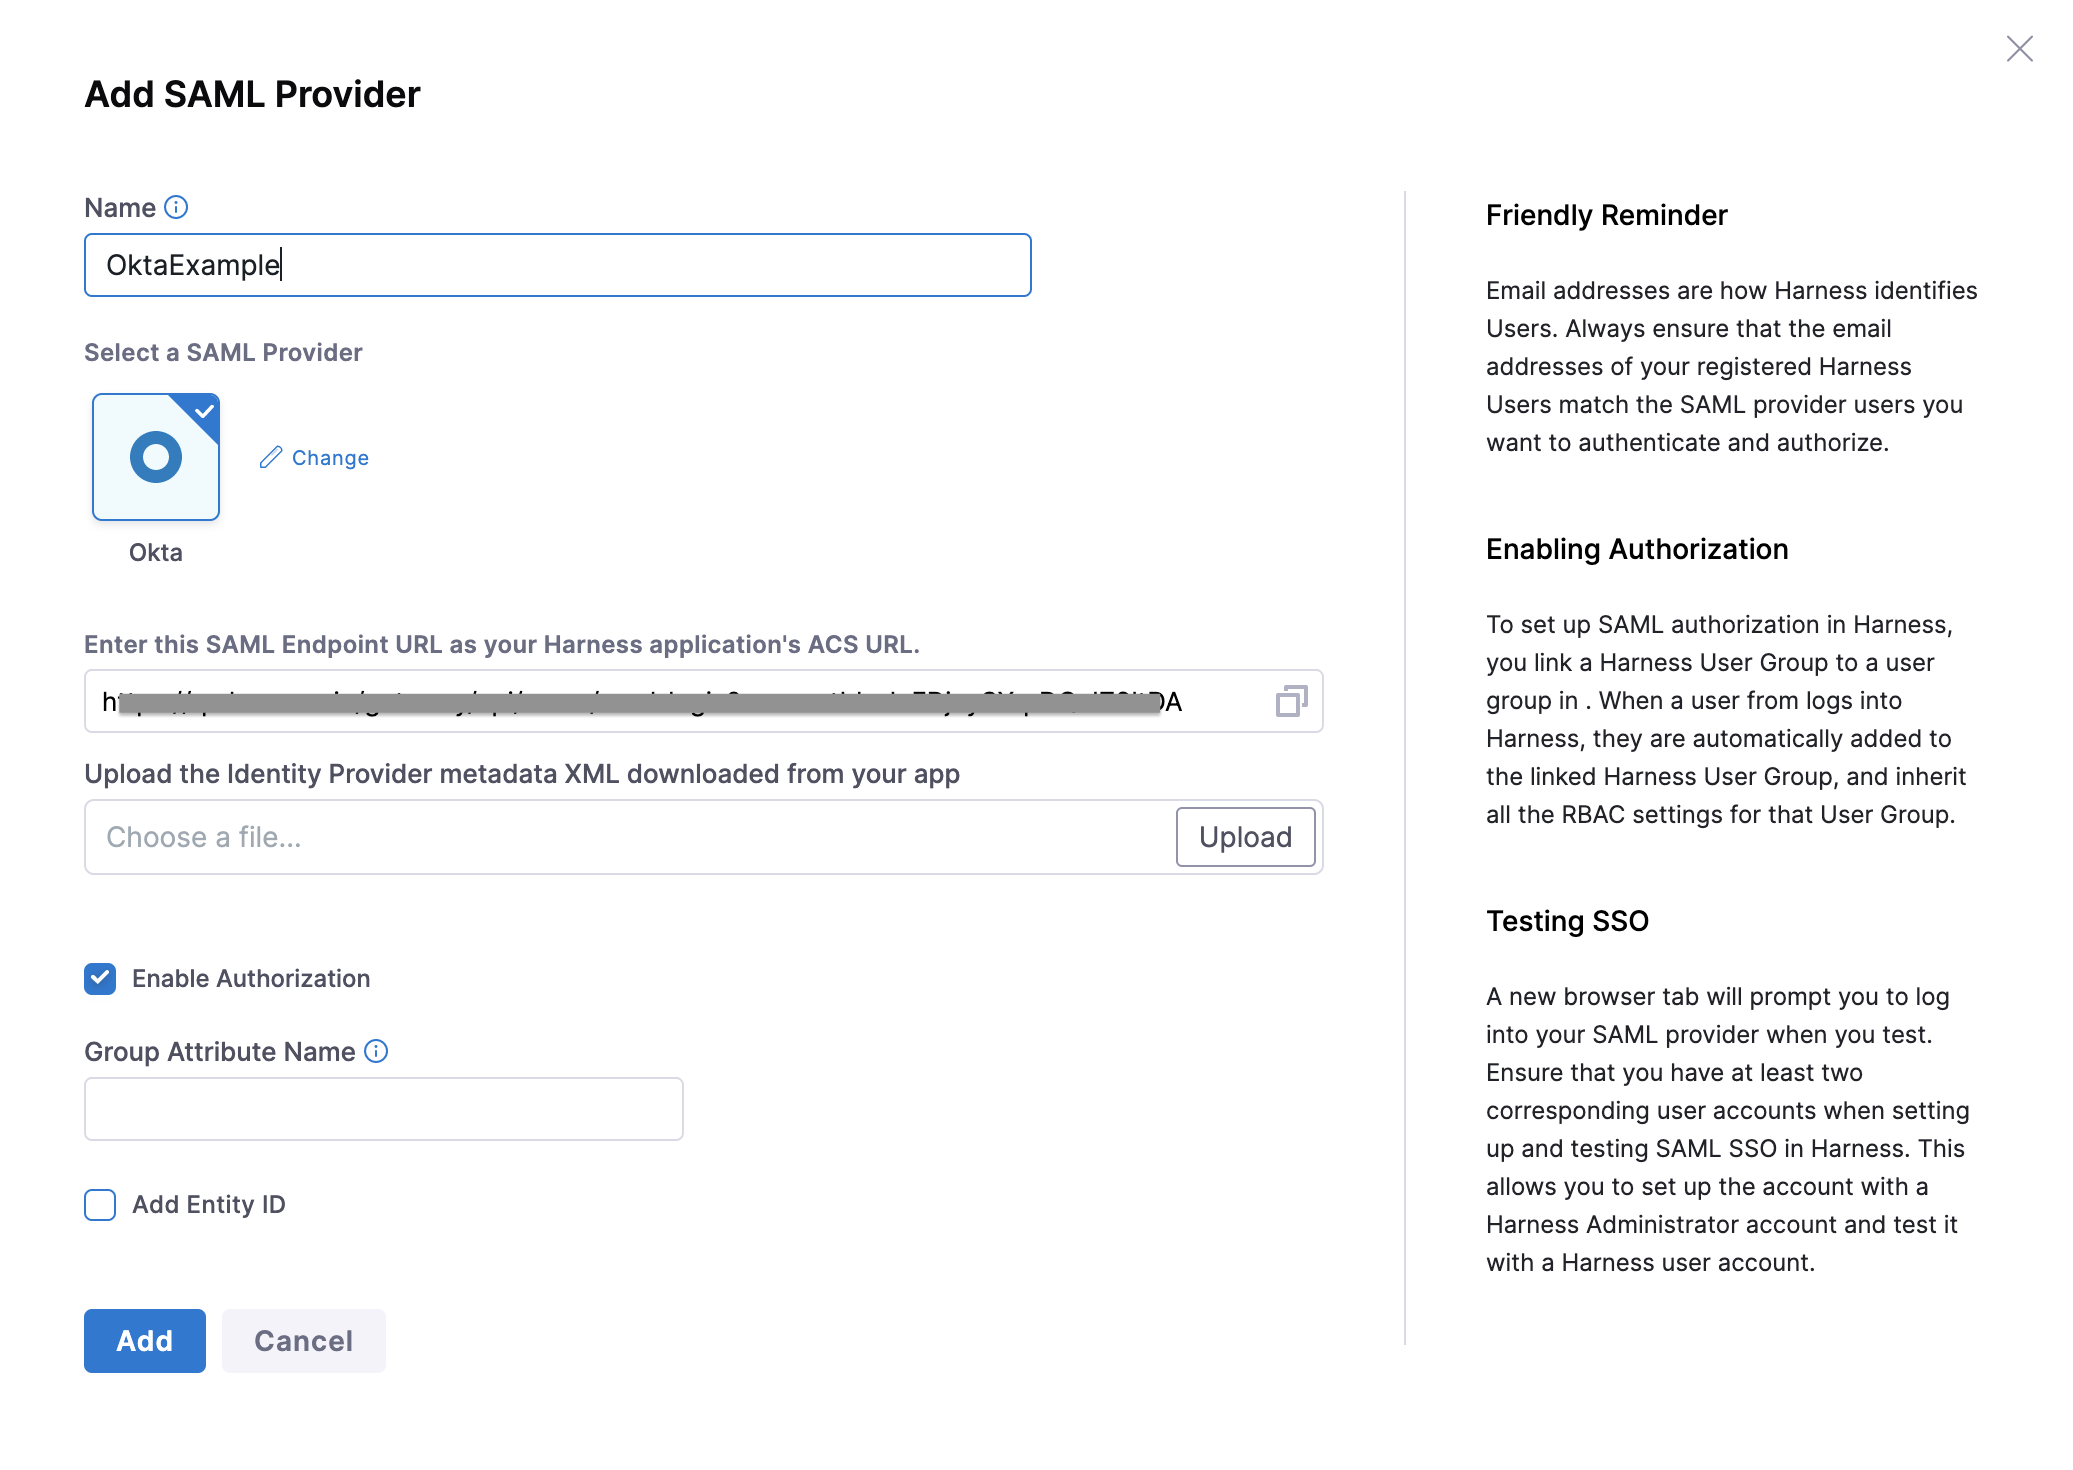
Copy the Endpoint URL under Enter the SAML Endpoint URL as your Harness application's ACS URL and paste it in Single sign on URL in your Okta SAML provider app's Configure SAML tab.
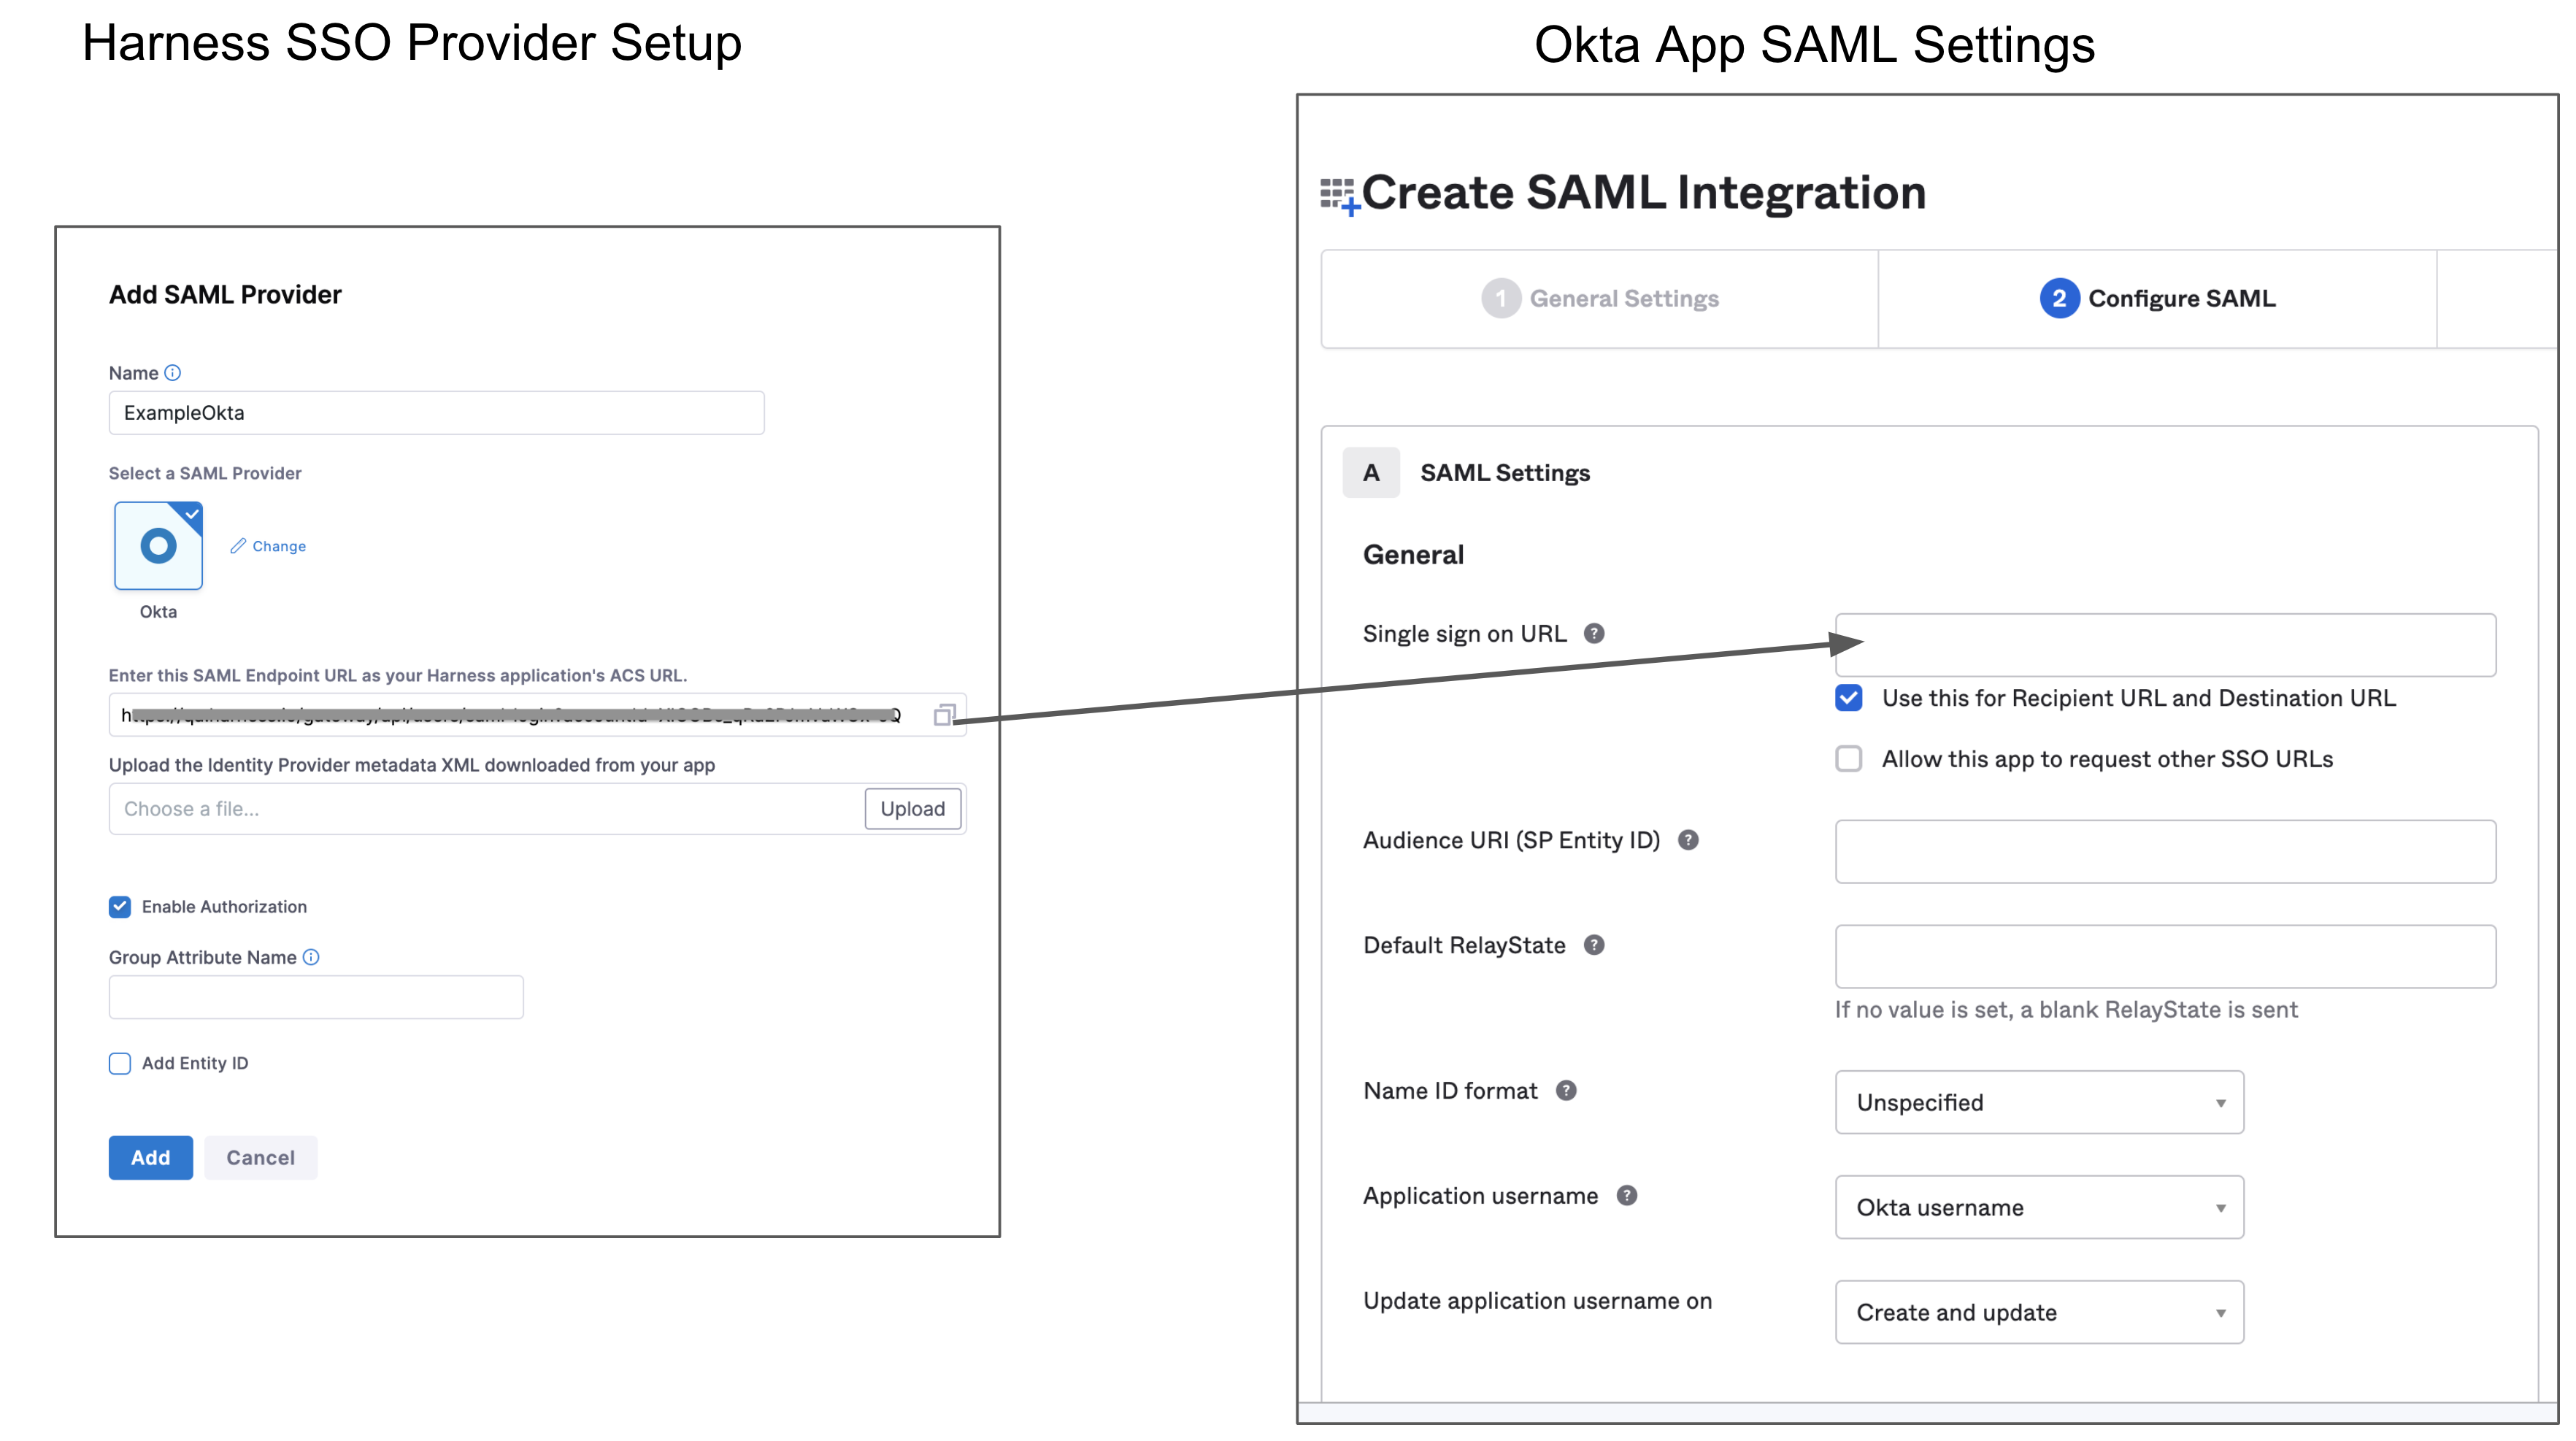
In Audience URI (SP Entity ID), enter app.harness.io. The SAML application identifier should be always
app.harness.io.In Default RelayState, enter a valid URL. This is the page where users land after a successful sign-in using SAML into the SP.
In Name ID format, enter the username format you are sending in the SAML Response. The default format is Unspecified.
In Application username, enter the default value to use for the username with the application.
In Attribute Statements (optional), enter name in the Name field, select Name Format as Basic, and select the Value as user.email.
When you create a new SAML integration or modify an existing one, you can define custom attribute statements. These statements are inserted into the SAML assertions shared with your app. For more information, go to Define Attribute Statements.In Group Attribute Statements (optional), enter a name in the Name field, select Name format (optional) as Basic, select an appropriate Filter and enter its value.
If your Okta org uses groups to categorize users, you can add group attribute statements to the SAML assertion shared with your app. For more information, go to Define Group Attribute Statements.
- Click Next and then click Finish.
Okta SAML Metadata File
You must download the Identity Provider metadata XML from your Okta app and upload the file into Harness. To do this perform the following steps:
In the Harness Okta app that you just created, click the Sign On tab, and then click Edit.
Click on Actions to download the SAML metadata file from your Okta provider app.

In Harness' Add SAML Provider dialog, under Upload the Identity Provider metadata XML, downloaded from your Okta app, click Choose File, and add the SAML metadata file you downloaded from your Okta application.
Uncheck Enable Authorization.
Select Add Entity ID and enter your custom Entity ID. The default Entity ID is app.harness.io. The value you enter here will override the default Entity ID.
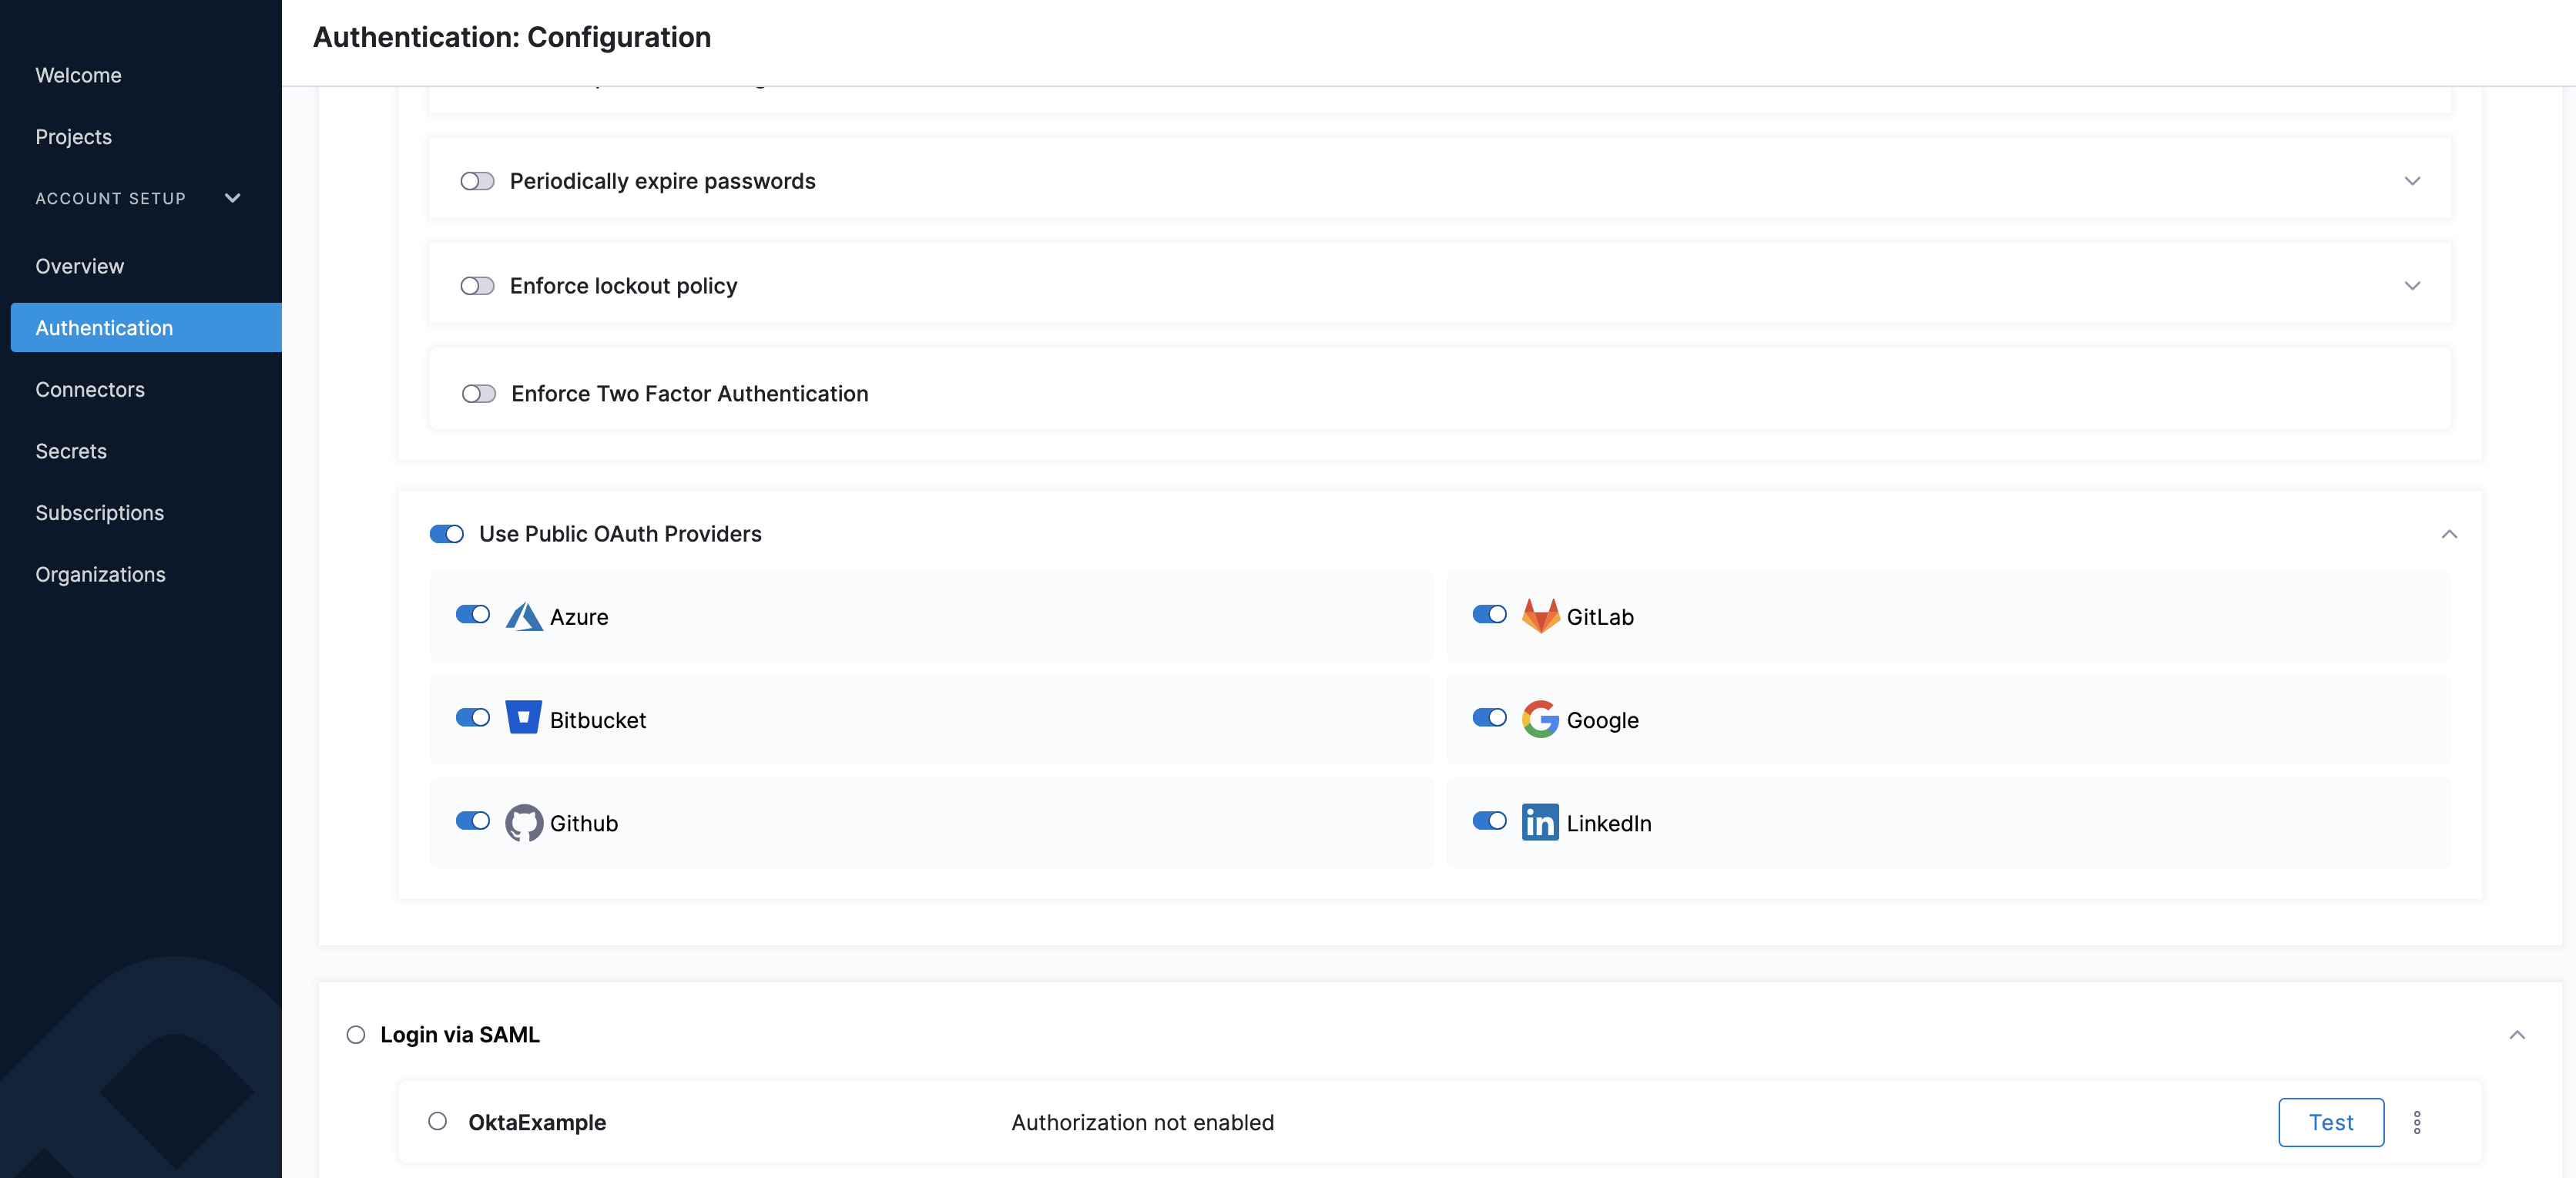
Click Add. The new SSO provider is displayed under Login via SAML.
Enable and Test SSO with Okta
Now that Okta is set up in Harness as a SAML SSO provider, you can enable and test it.
To enable the SSO provider, select Login via SAML.
In the resulting Enable SAML Provider dialog, click TEST to verify the SAML connection you've configured.

A new browser tab will prompt you to log into your SAML provider (in this case Okta).
Upon a successful test, Harness will display the SAML test successful banner on top.
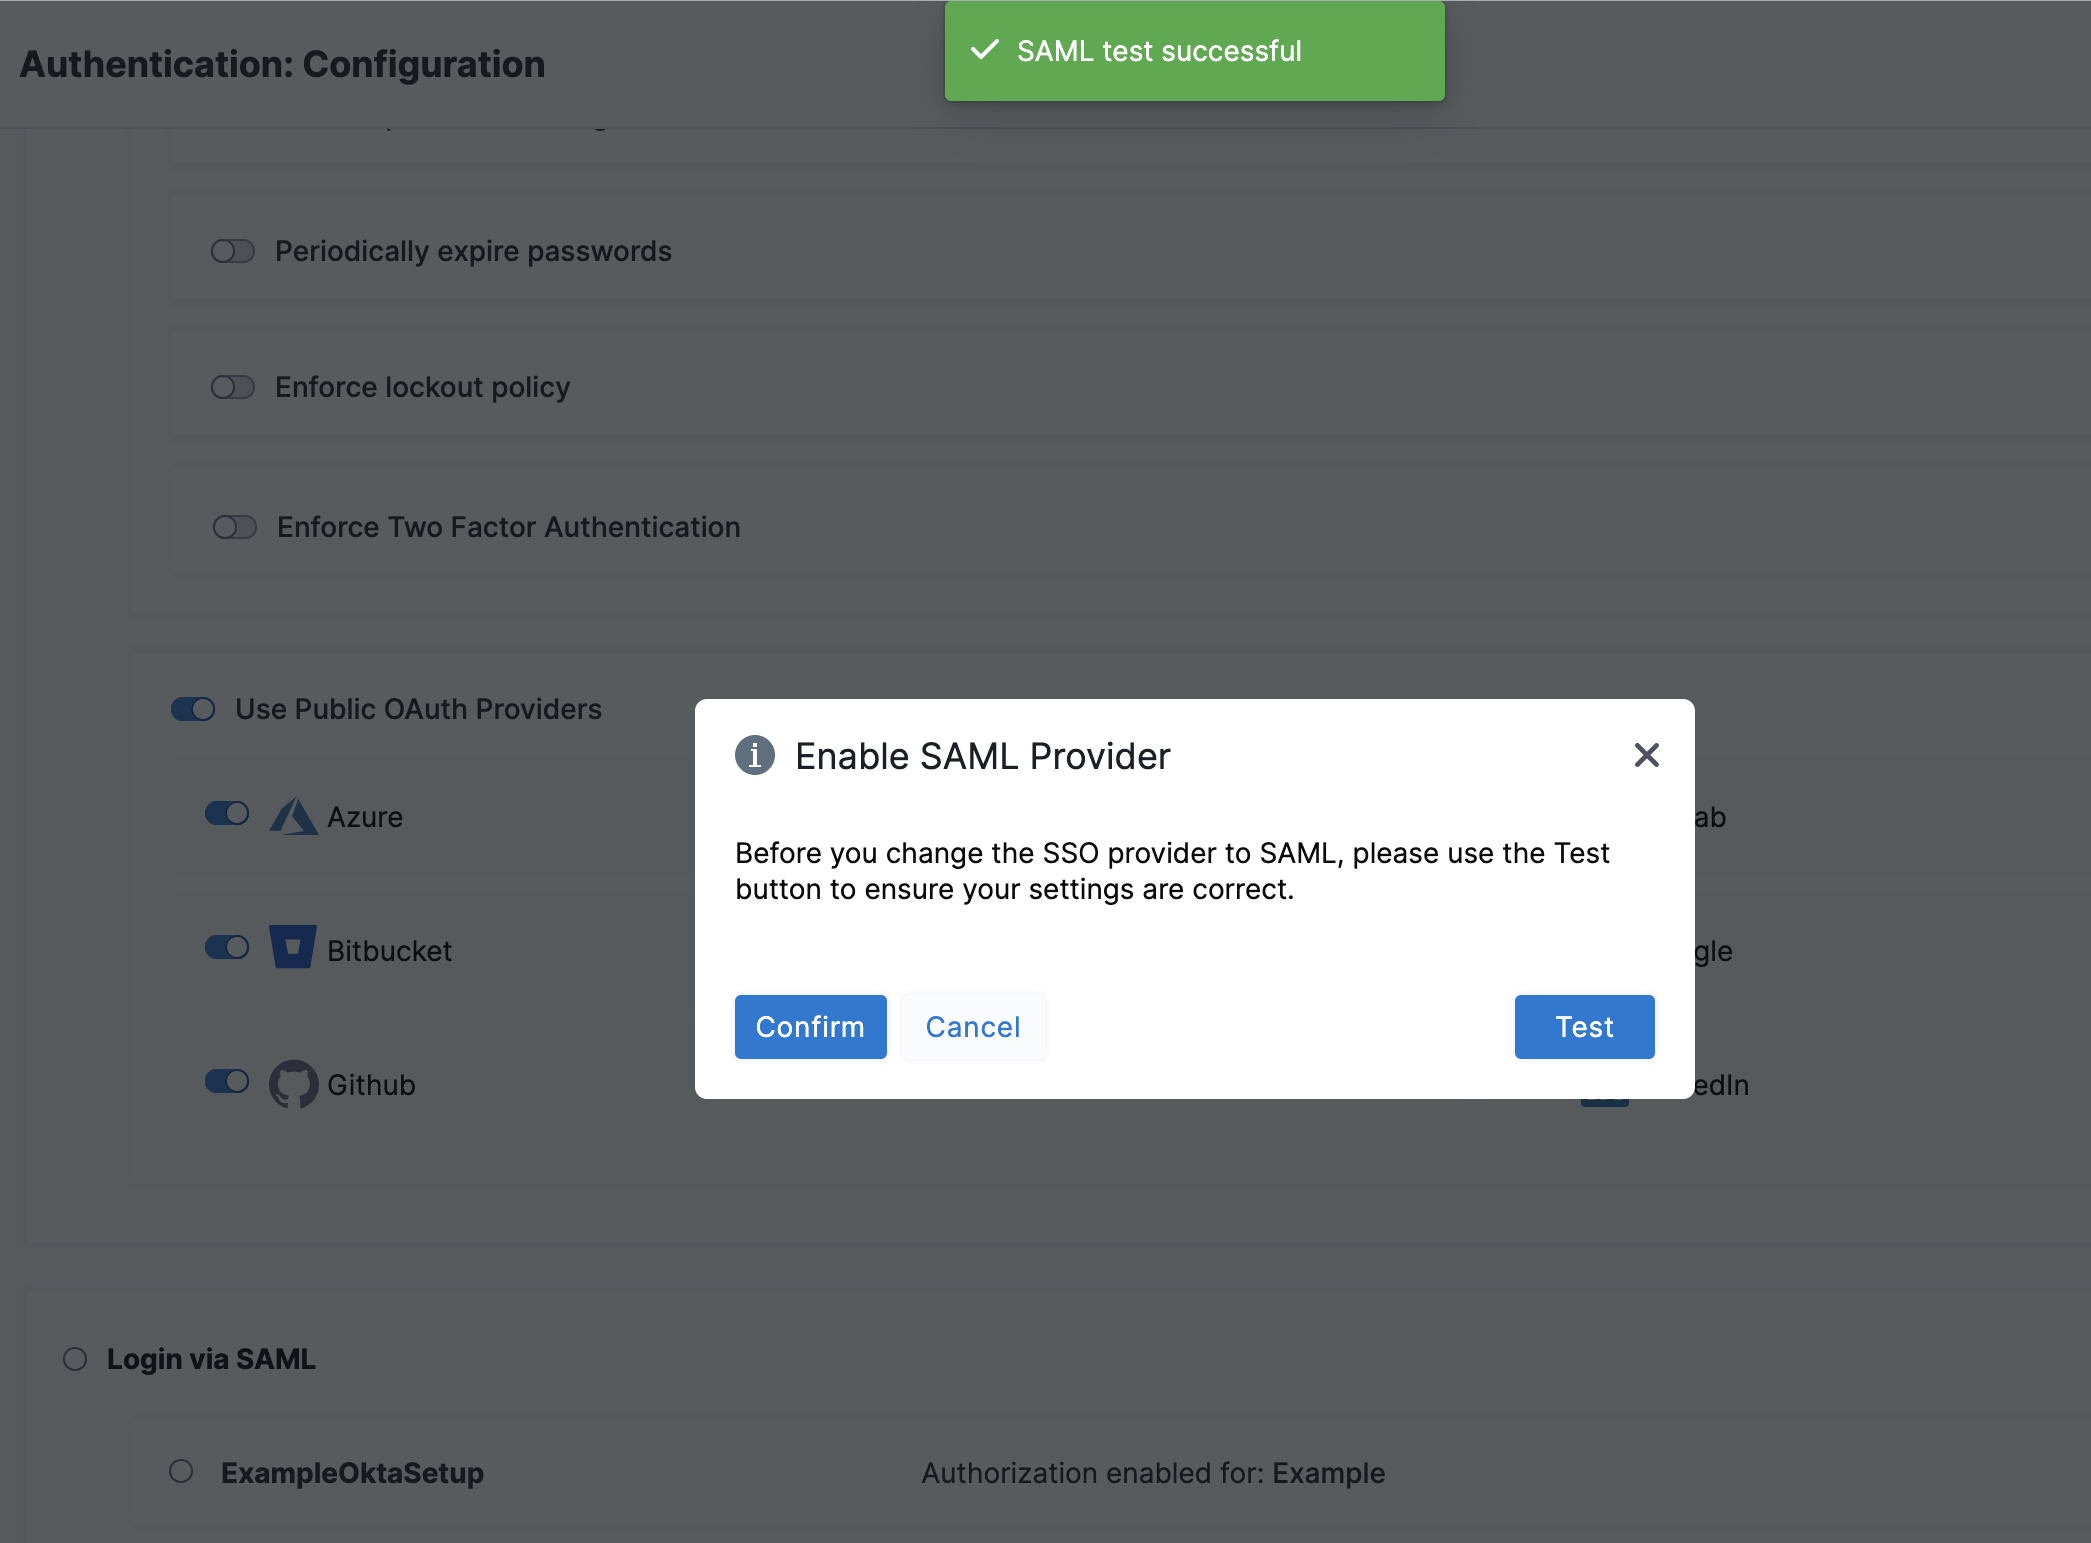
Click CONFIRM to enable SAML SSO in Harness.
If you are locked out of Harness because of an SSO issue, you can log into Harness using the Harness Local Login.
- To fully test SSO, log into Harness using another User account. Login using a Chrome Incognito window to test SSO so that you can disable SSO in your Harness Administrator account if there are any errors.
- Open an Incognito window in Chrome.
- Log into Harness using a Harness User account that has a corresponding user account email address in the SAML SSO provider. You will be redirected to your SAML SSO provider's login page.
- Log into your SSO Provider using an email address for a Harness User. The password does not have to be the same.
You are automatically returned to the Harness Manager, and logged into the dashboard using your SSO credentials.
SAML Authorization with Okta
Once you have enabled Harness SSO with your Okta app, you can set up and enable SAML authorization in Harness using Okta.
To set up SAML authorization in Harness, link a Harness User Group to a user group in Okta. When a user from Okta logs into Harness, they are automatically added to the linked Harness User Group and inherit all the RBAC settings for that User Group.
There are two Okta components you need to set up SAML authorization in Harness:
- Group Name - The name of the Okta group containing the users you want to authorize in Harness. The email addresses registered in this group must be the same as the email addresses these users have registered in Harness.
- Group Attribute Name - The Group Attribute Name associated with the Okta app you use for authentication. The Group Attribute Name is different from the Okta group name. Your company might have many groups set up in Okta. The Group Attribute Name is used to filter groups.
In Harness, you will enter the Group Attribute Name in the SAML SSO provider settings, and then you will enter the group name in the Harness User Group to link it to the Okta group.
Remember that email addresses are how Harness identifies Users. Always ensure that the email addresses of your registered Harness Users match the Okta users you want to authenticate and authorize.
To set up SAML Authorization with Okta, do the following:
Set up SAML SSO in Harness as described in SAML SSO with Okta.
You will be authorizing the same Harness Users that are authenticated using your SAML provider, so ensure that the email addresses registered in Harness are the same email addresses registered in your SAML provider.Add a user group to your SAML provider, and then add users to the group. The group name will be used to link the Harness User Group later. To do this perform the following steps:
Log in to Okta using Admin Account.
Click Groups, under Directory. Click Add Group. The Add Group dialog appears.
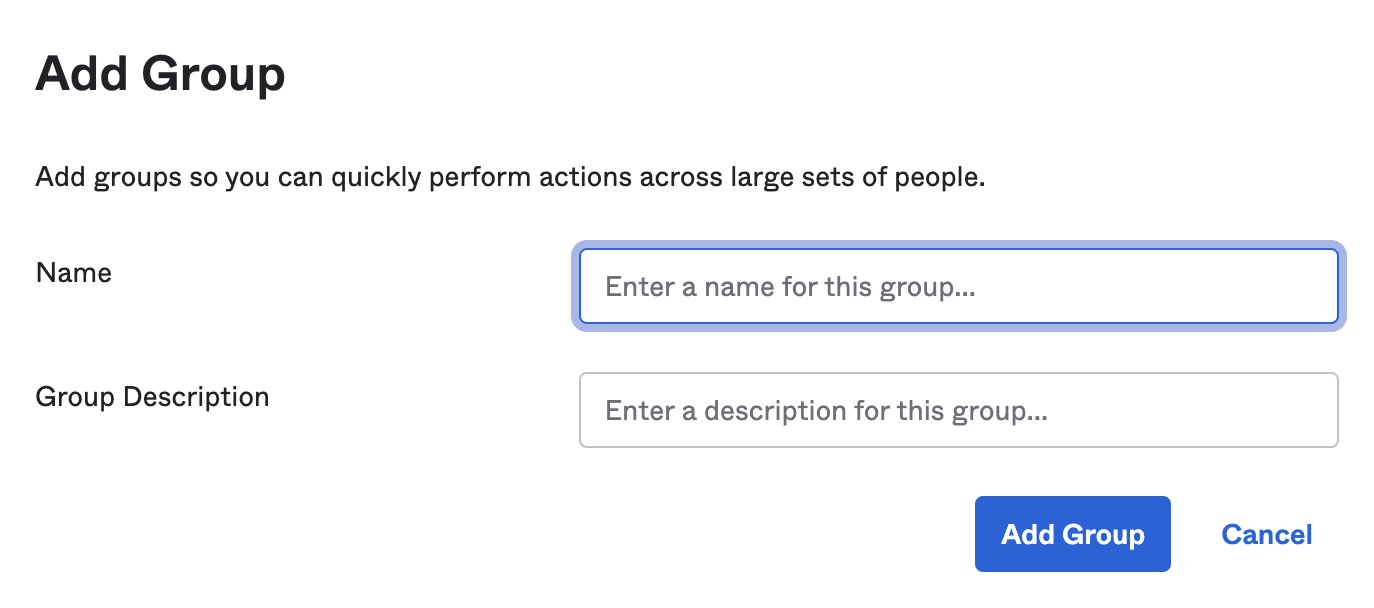
Enter a Name and Group Description for your group. Click Add Group.
You are redirected to the Groups page. Search for the group you created and click on it.
Click Manage People. Find and add members to your group.
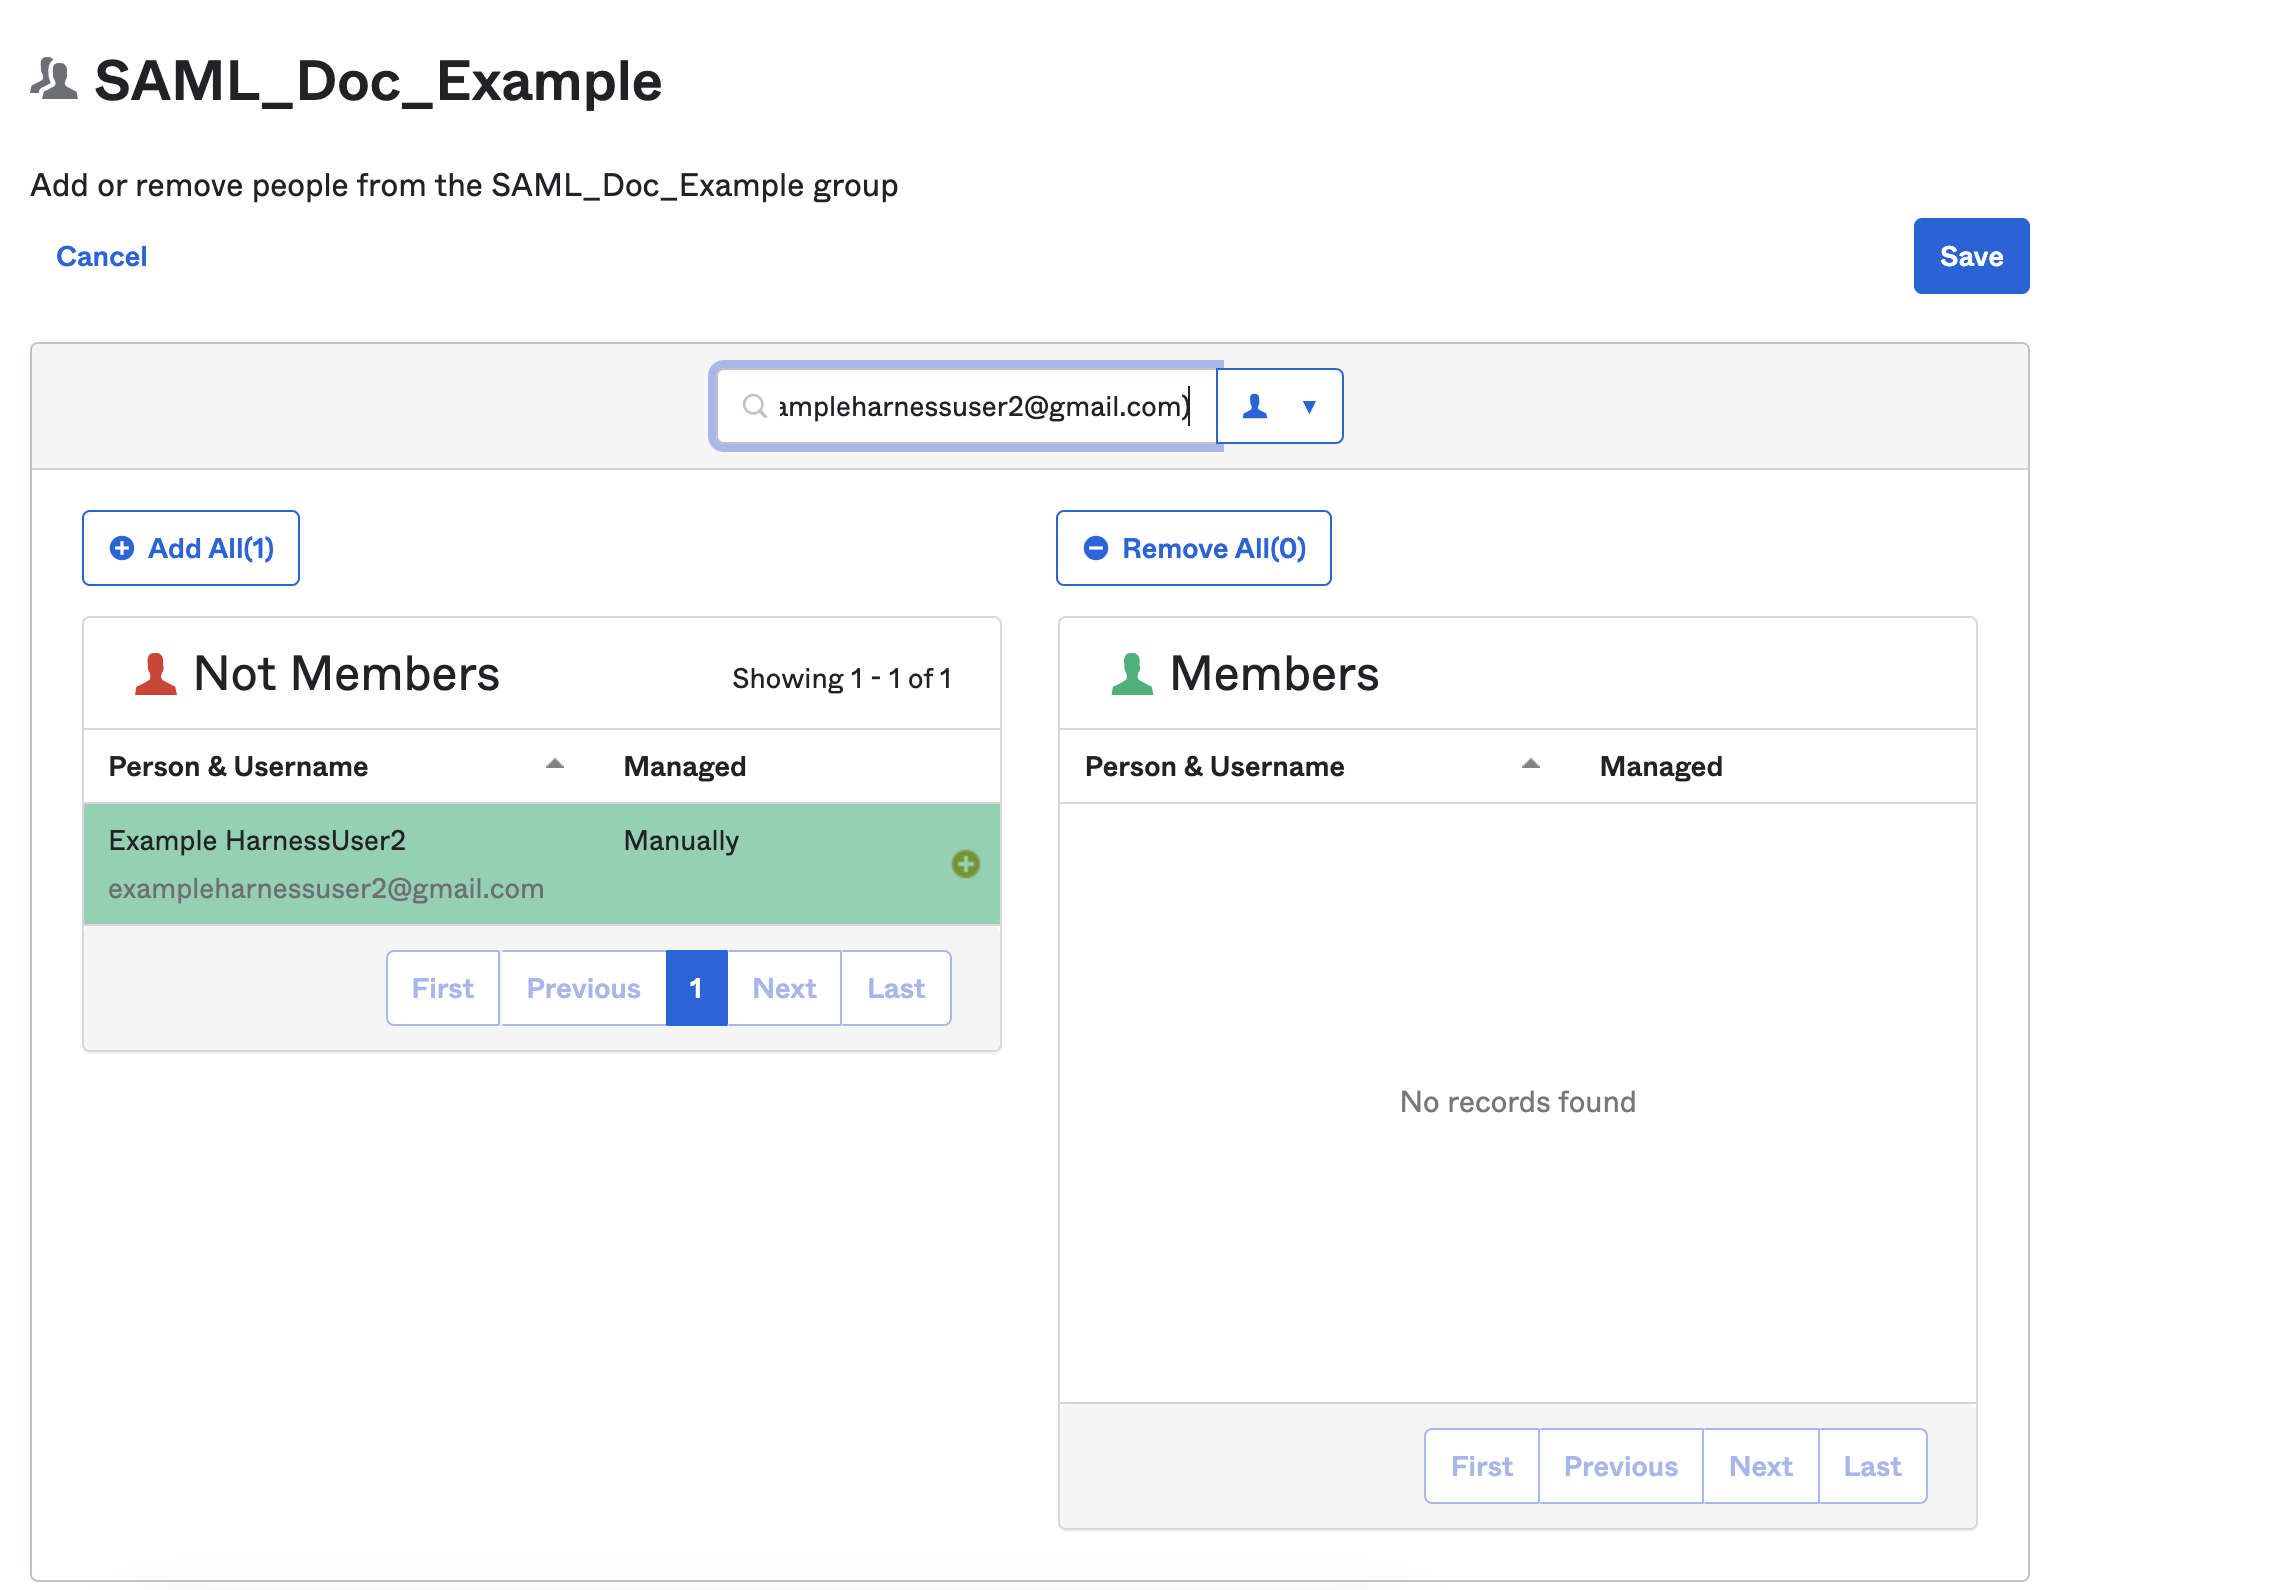
After adding the members to the group we just created, the screen would look like this:
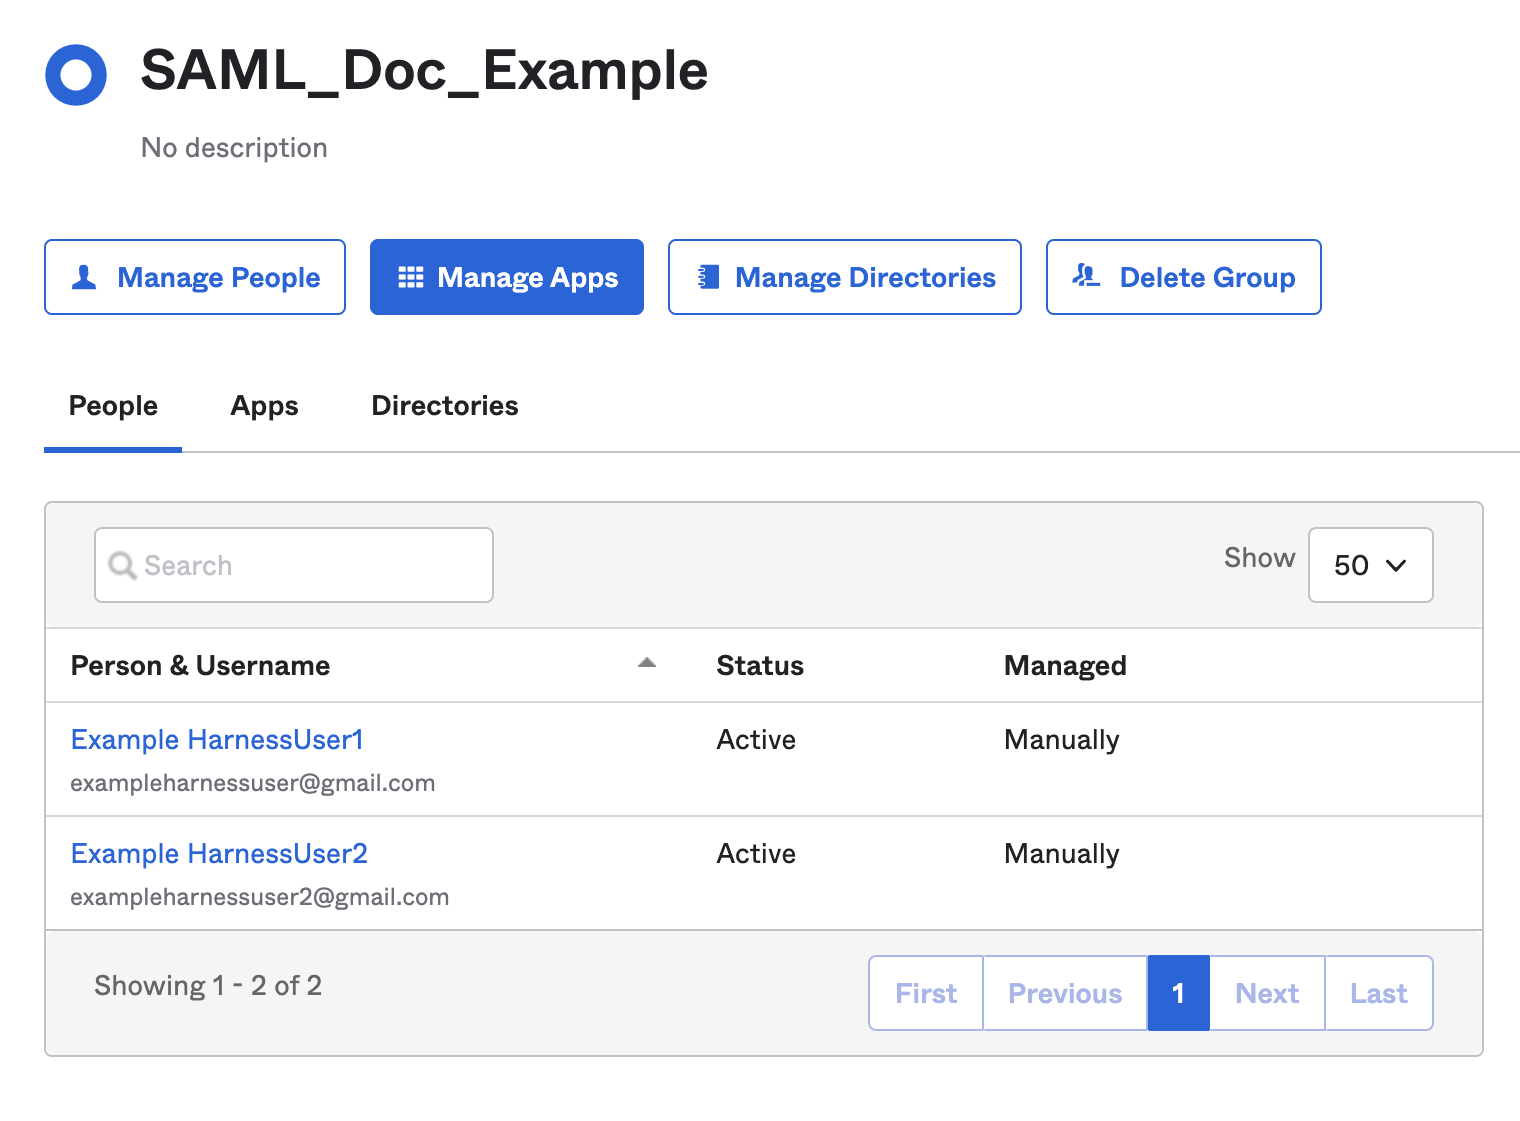
Both members are already registered in Harness using the same email addresses in both Harness and the SAML provider.
Ensure that the SAML provider group is assigned to the same SAML provider app you use for Harness SAML SSO. To do this:
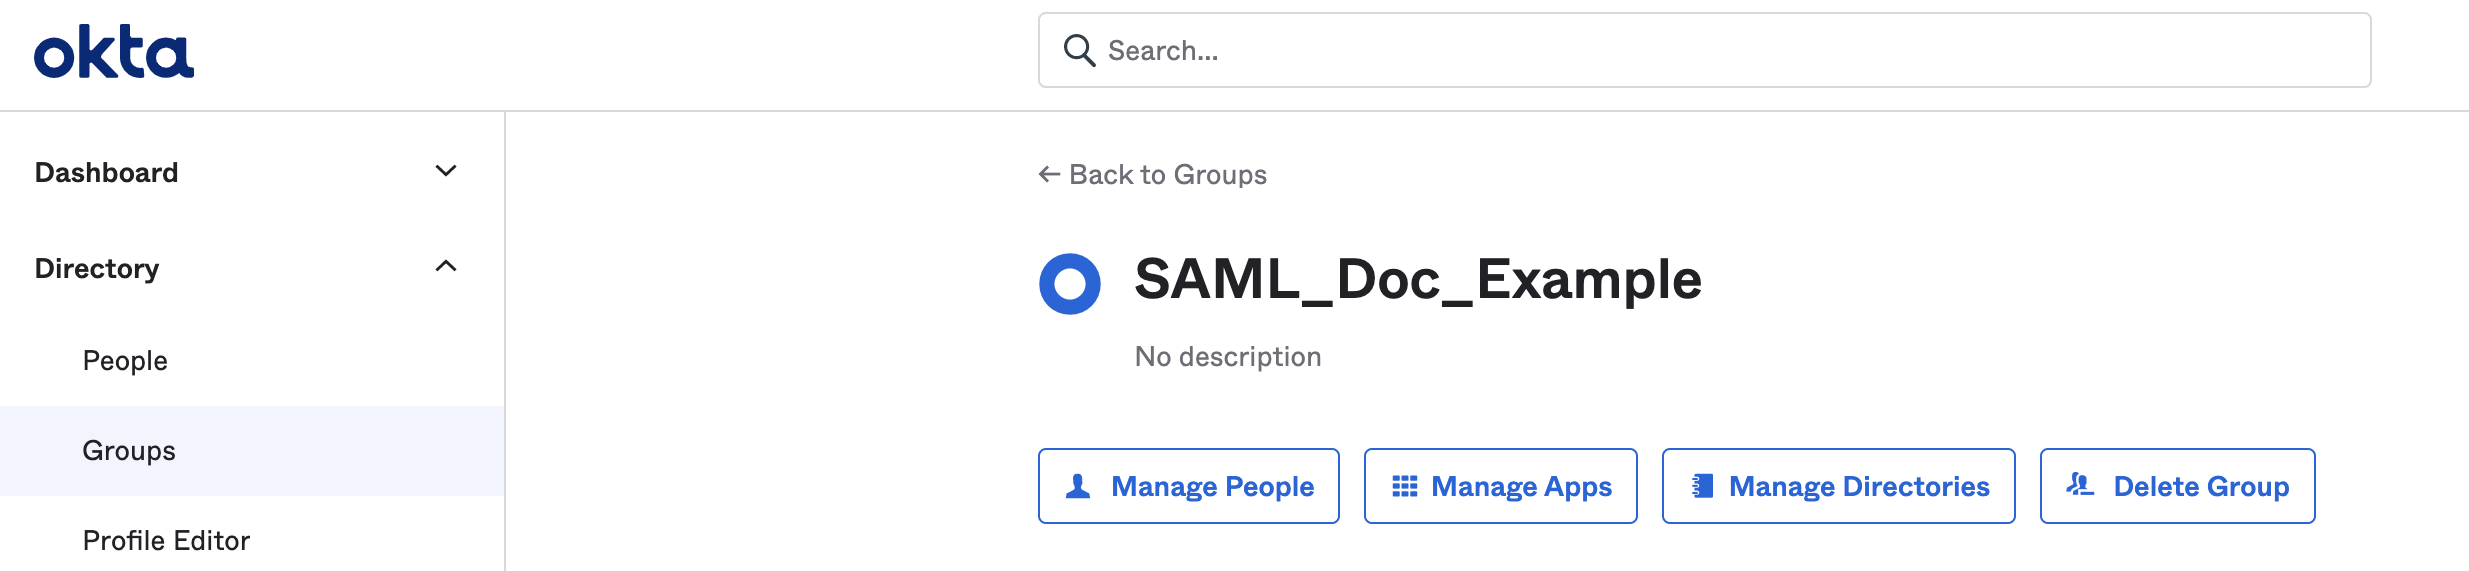
In the Okta app, Click on Groups, under Directory.
Find and select the group that you just created.
Click Manage Apps.
In the subsequent screen, find the okta app that you had created earlier and click Assign.
Click Done.
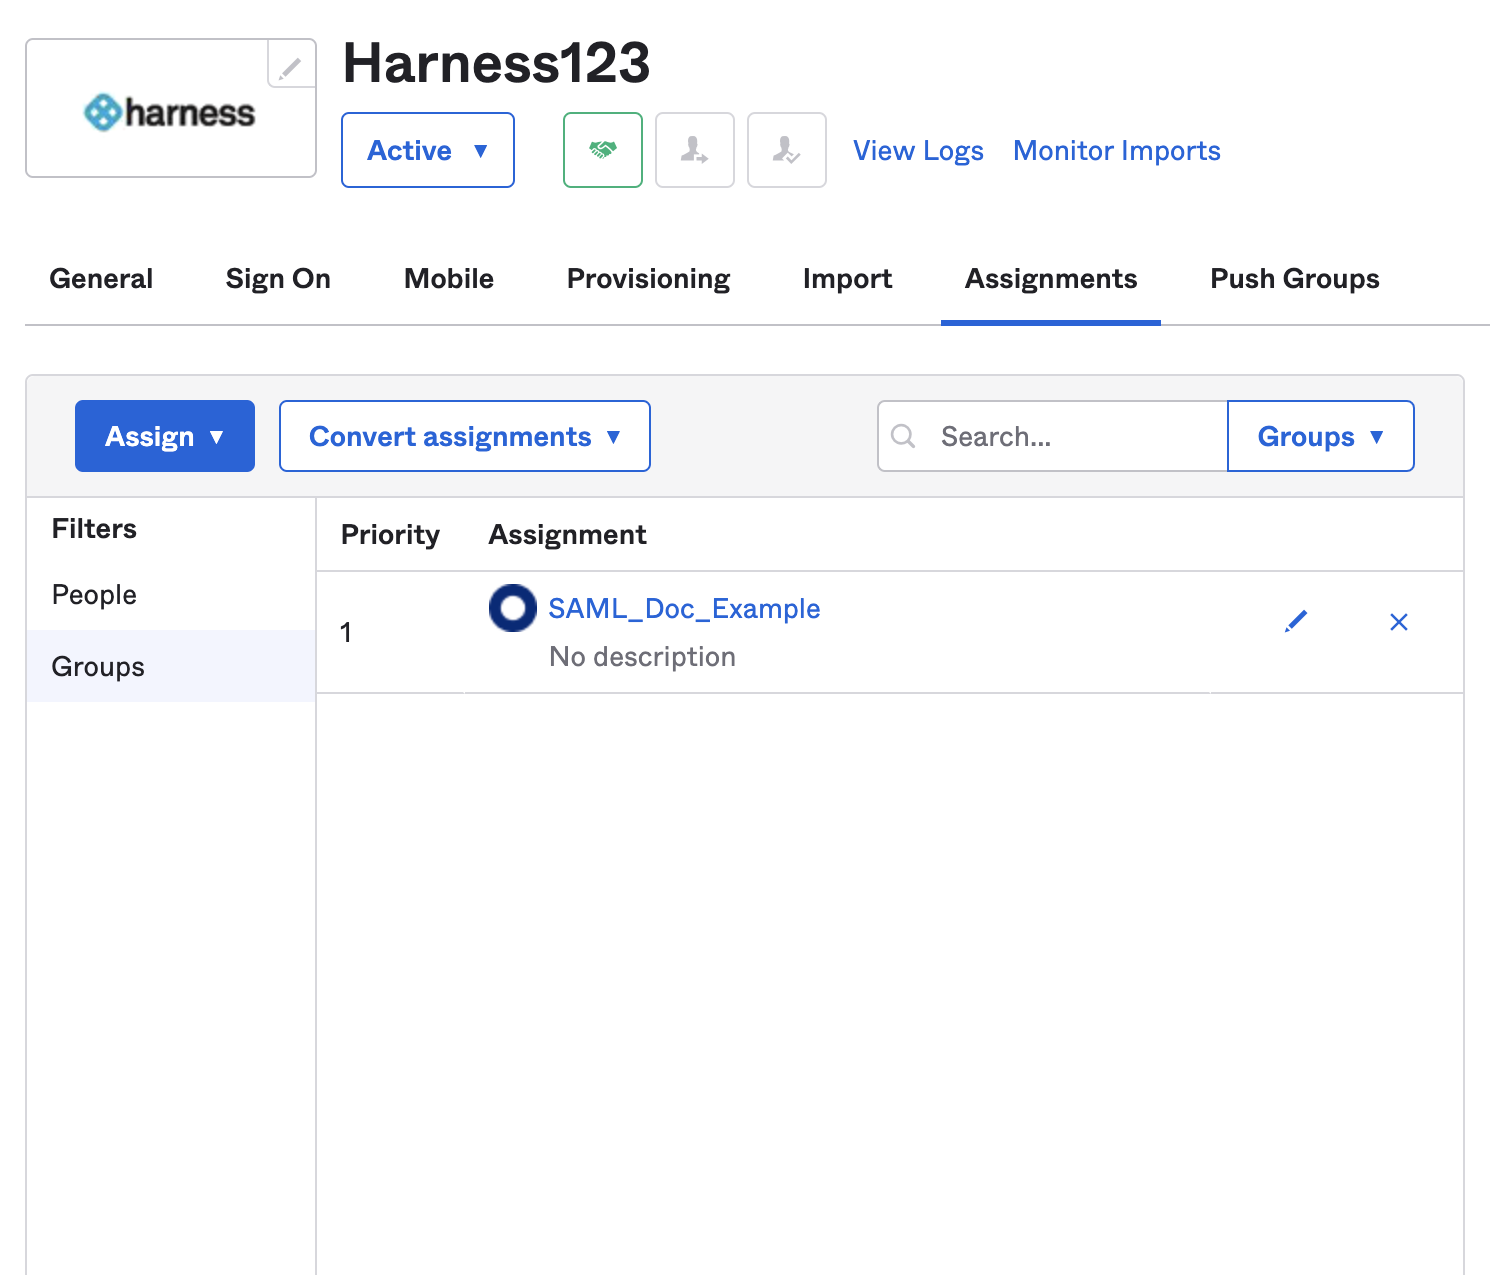
Click on Applications under Applications.
Find and select the okta application that you have created.
Under Assignments, click Groups. You can see your group listed here.
Configure the Group Attribute Name in your SAML app. You will use the Group Attribute Name later in Harness when you enable SAML authorization.
Here are the steps for adding a Group Attribute Name in Okta:
In Okta, click Applications, and then click the name of the app you use for Harness SAML SSO to open its settings.
In the app, click the General tab.
For SAML Settings, click Edit.

In General Settings, click Next.
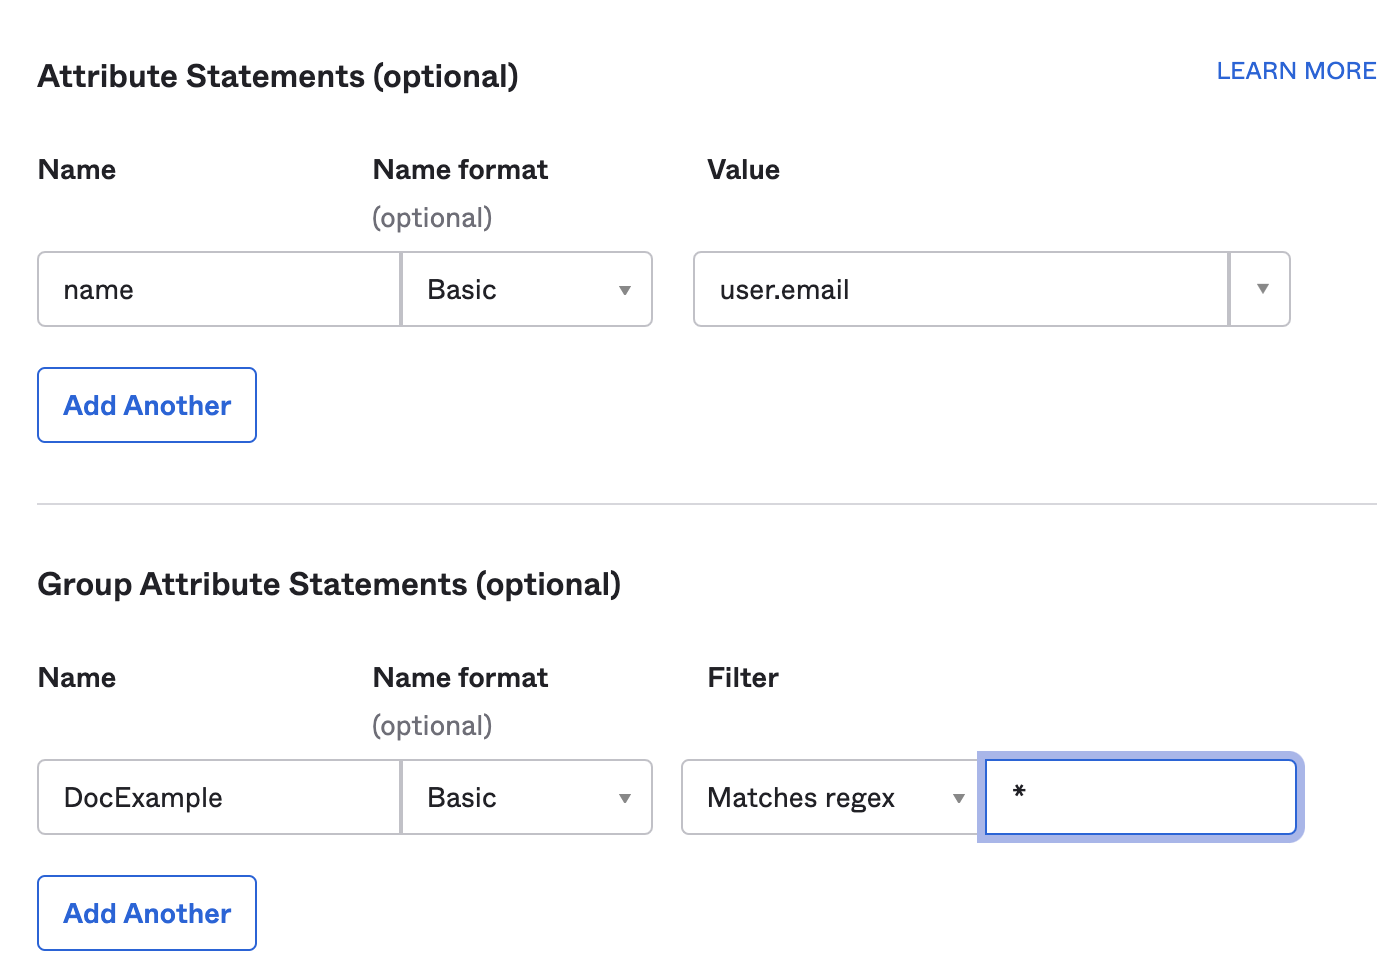
In GROUP ATTRIBUTE STATEMENTS (OPTIONAL), in Name, enter the Group Attribute Name you want to use, such as dept.
In Filter, select Matches regex and enter period asterisk (.*) in the field. When you are done, it will look something like this:

Click Next and then click Finish.
Enable Authorization in Harness. Now that you have assigned a group to your SAML app and added a Group Attribute Name, you can enable authorization in Harness.
In Home, click Authentication under ACCOUNT SETUP. The Authentication: Configuration page appears.
Click to expand the Login via SAML section.
You can see the SSO Provider you have set up listed in this section. Click the vertical ellipsis (︙) next to the SSO Provider you have set up for SSO authentication, and click Edit.

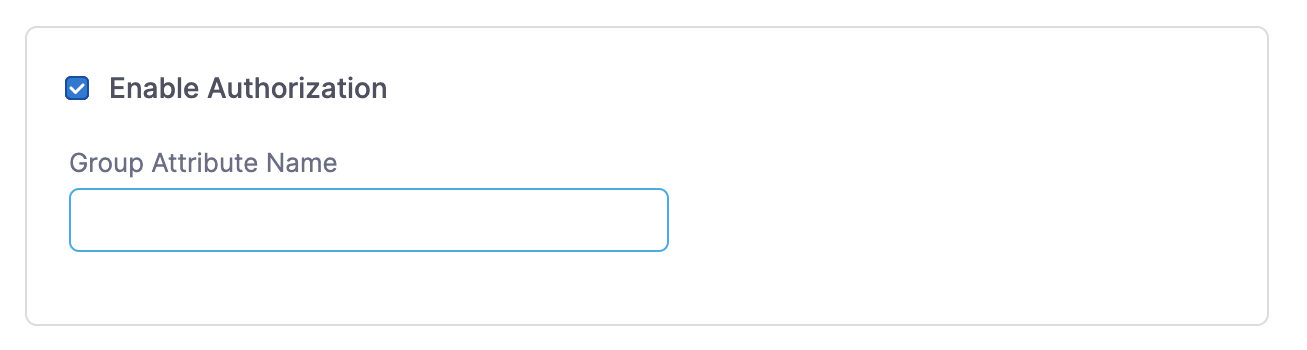
In the Edit SAML Provider dialog, click Enable Authorization.
In Group Attribute Name, enter the Group Attribute Name you earlier added to your SAML app in your SAML provider.
Click Add. The SAML SSO Provider is now set up to use the Group Attribute Name for authorization.
Link the SAML SSO Provider to the Harness User Group. You can create a new User Group or use an existing Group so long as your Harness User account is a member and that User account is registered using the same email address you used to register with your SAML provider. For detailed instructions on creating a User Group in Harness, go to Add and Manage User Groups. To link your group, perform the following steps:
In Home, click Access Control under ACCOUNT SETUP.
Click User Groups and then click on the User Group you want to link the SAML SSO Provider to.
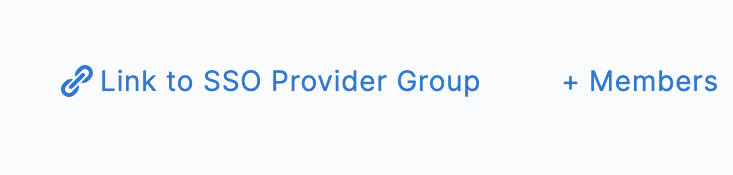
Click Link to SSO Provider Group.
In the Link to SSO Provider Group Dialog, in Search SSO Settings, select the SAML SSO Provider you have set up.
In the Group Name, enter the name of the group you assigned to your app in your SAML provider.
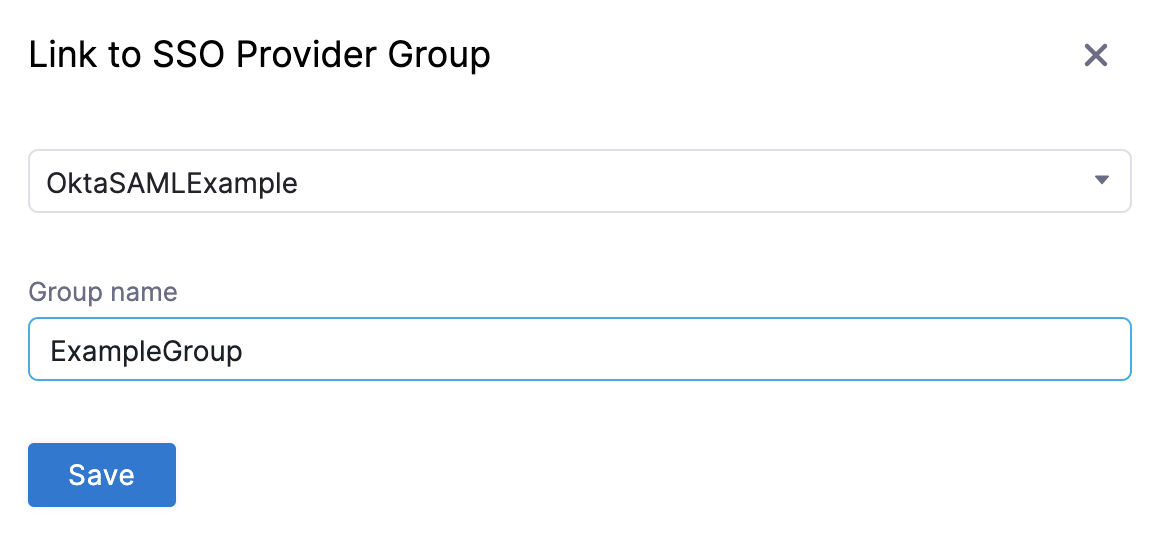
Click Save.
Test the SAML Authorization by repeating steps 5-8 from Enable and Test SSO with Okta.
In your Harness account in the other browser window, check the User Group you linked with your SAML provider. The user that logged in is now added to the User Group, receiving the authorization associated with that User Group.
You can link multiple Harness User Groups with the SAML SSO Provider you set up in Harness.
You can also remove a link between a Harness User Group and a Harness SAML SSO Provider without losing the User Group members. In the Harness User Group, simply click Delink Group:

The Delink Group dialog appears.
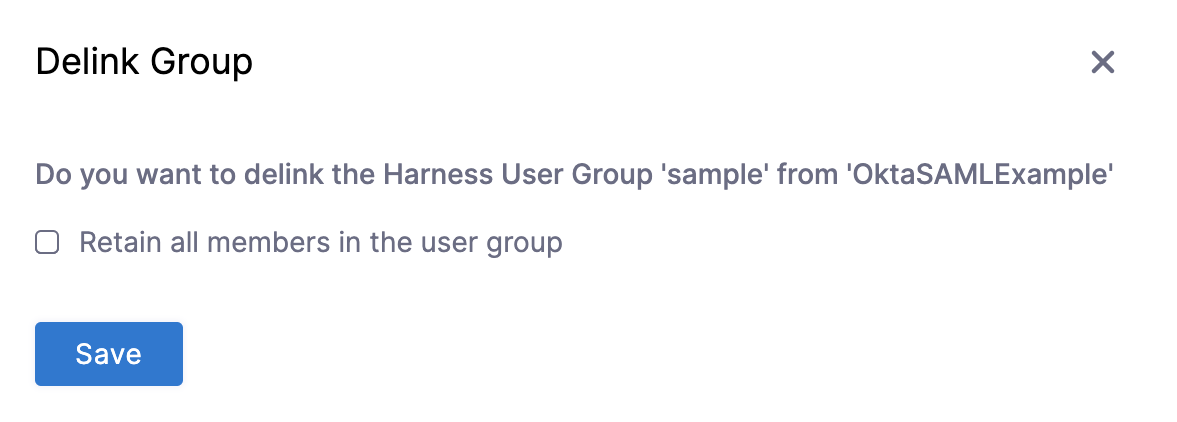
Click Retain all members in the user group and click Save. The link to the SAML SSO Provider is removed and the Users are still members of the User Group.
You cannot delete a SAML SSO Provider from Harness that is linked to a Harness Group. You must first remove the link to the SSO Provider from the Group.
SAML SSO with Azure
The section describes the Azure-specific steps you must perform to use an Azure app for Harness SAML SSO:
Make sure the email address used in Harness matches the email address in the Azure app for every user.
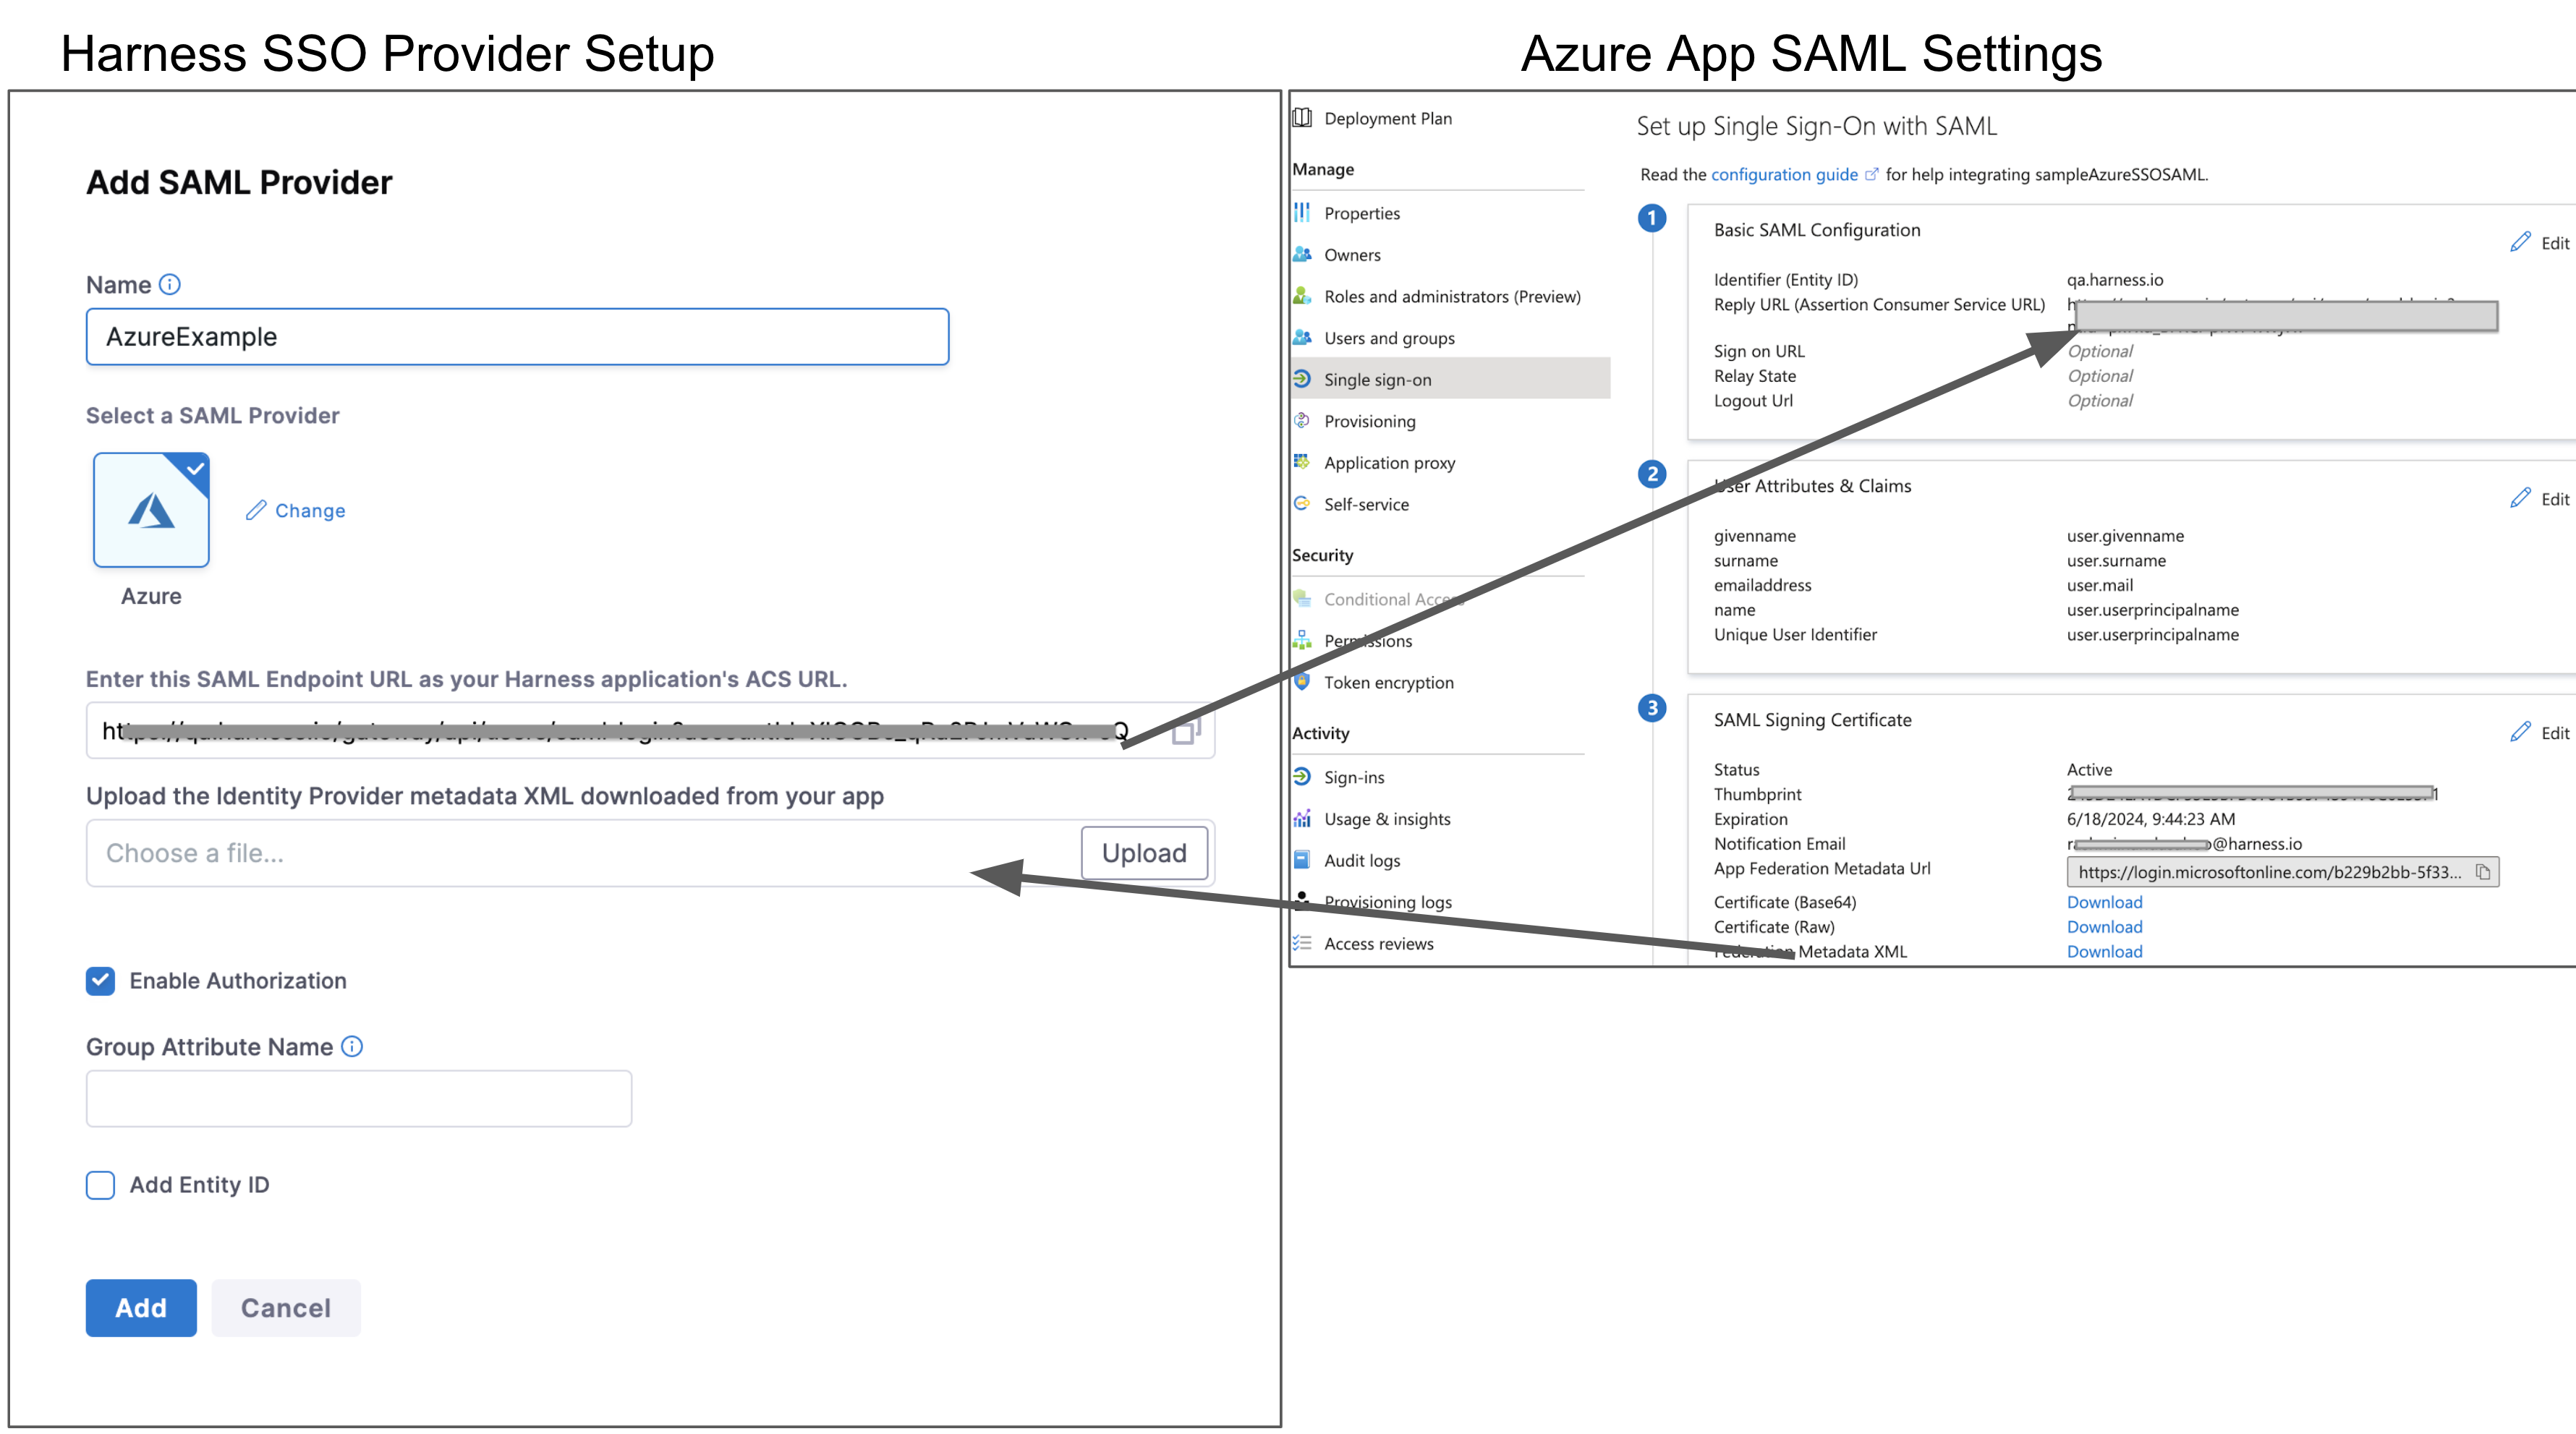
The following image shows the basic exchange of information between Harness and your Azure app's Single sign-on settings:
Azure User Accounts
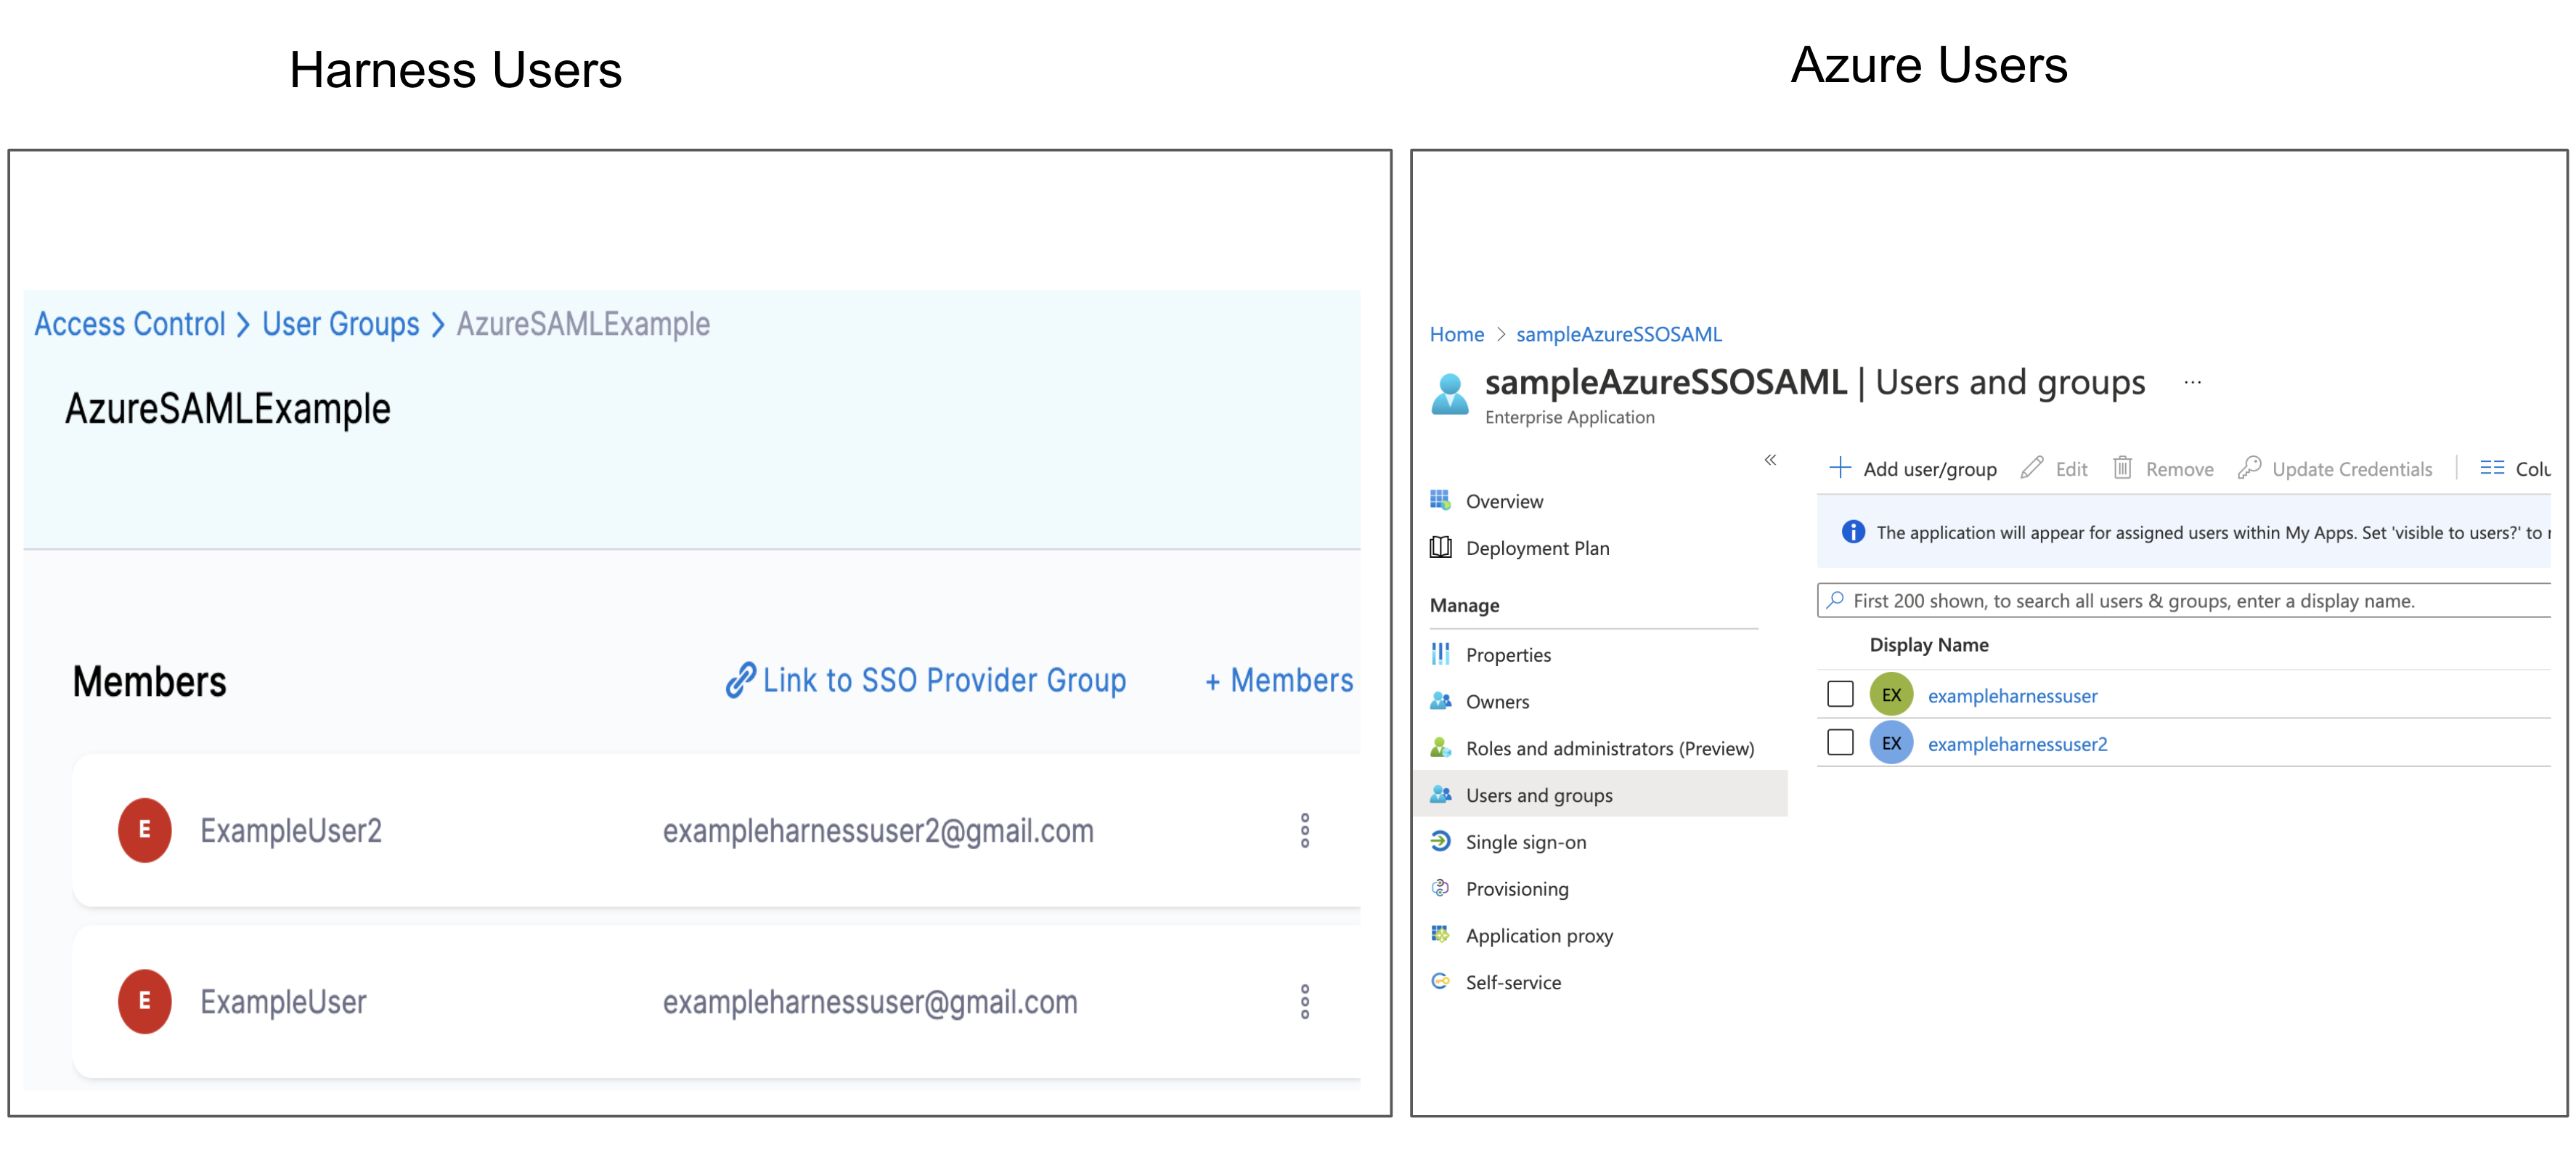
The Harness User accounts and their corresponding Azure user accounts must have the same email addresses.
- Ensure that you have at least two corresponding user accounts in both Harness and your Azure app when setting up and testing SAML SSO. This allows you to set up the account with a Harness Administrator account and test it with a Harness user account.
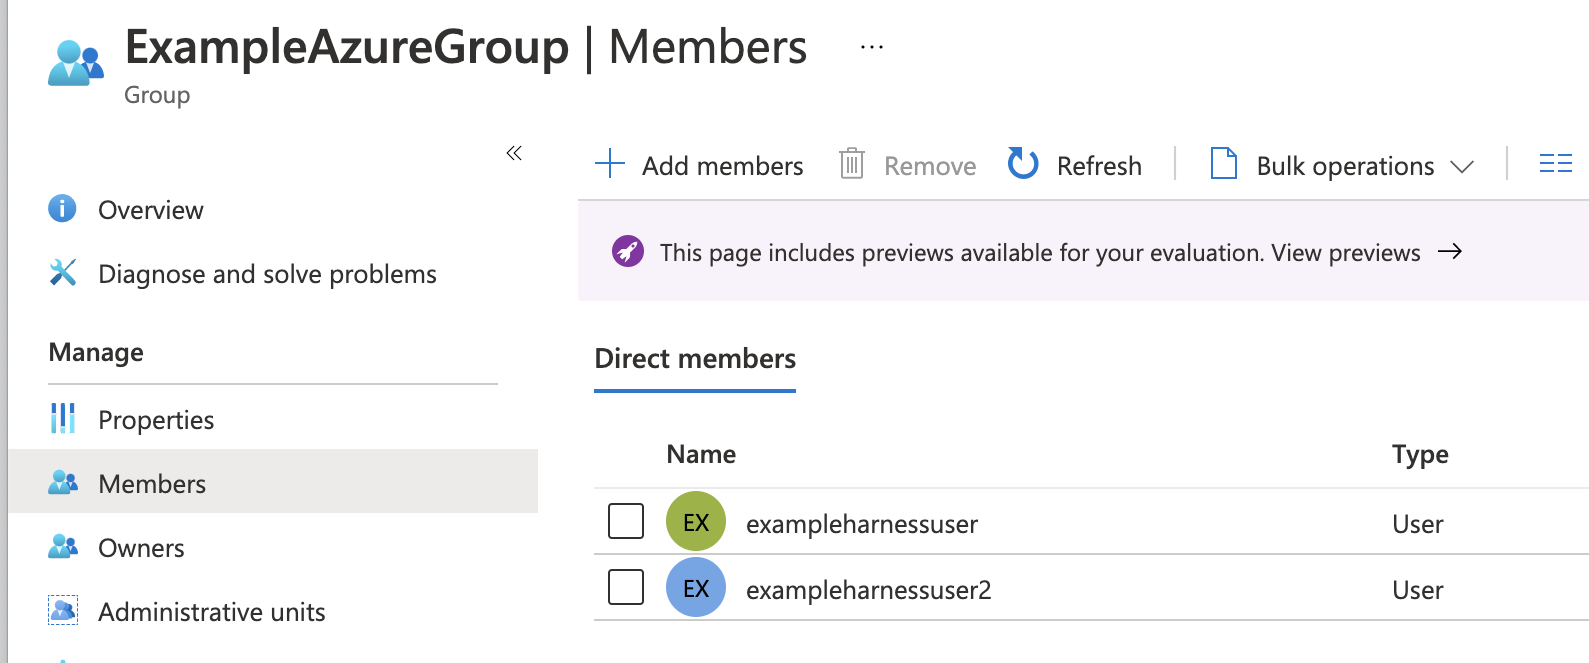
The following image shows a Harness User Group containing two users and their corresponding accounts in the Azure app that will be used for SAML SSO.
Endpoint URL for Azure
You must enter the Harness SAML Endpoint URL from Harness in your Azure app Reply URL:
In your Azure app, click Single sign-on. The SSO settings for the Azure app are displayed.
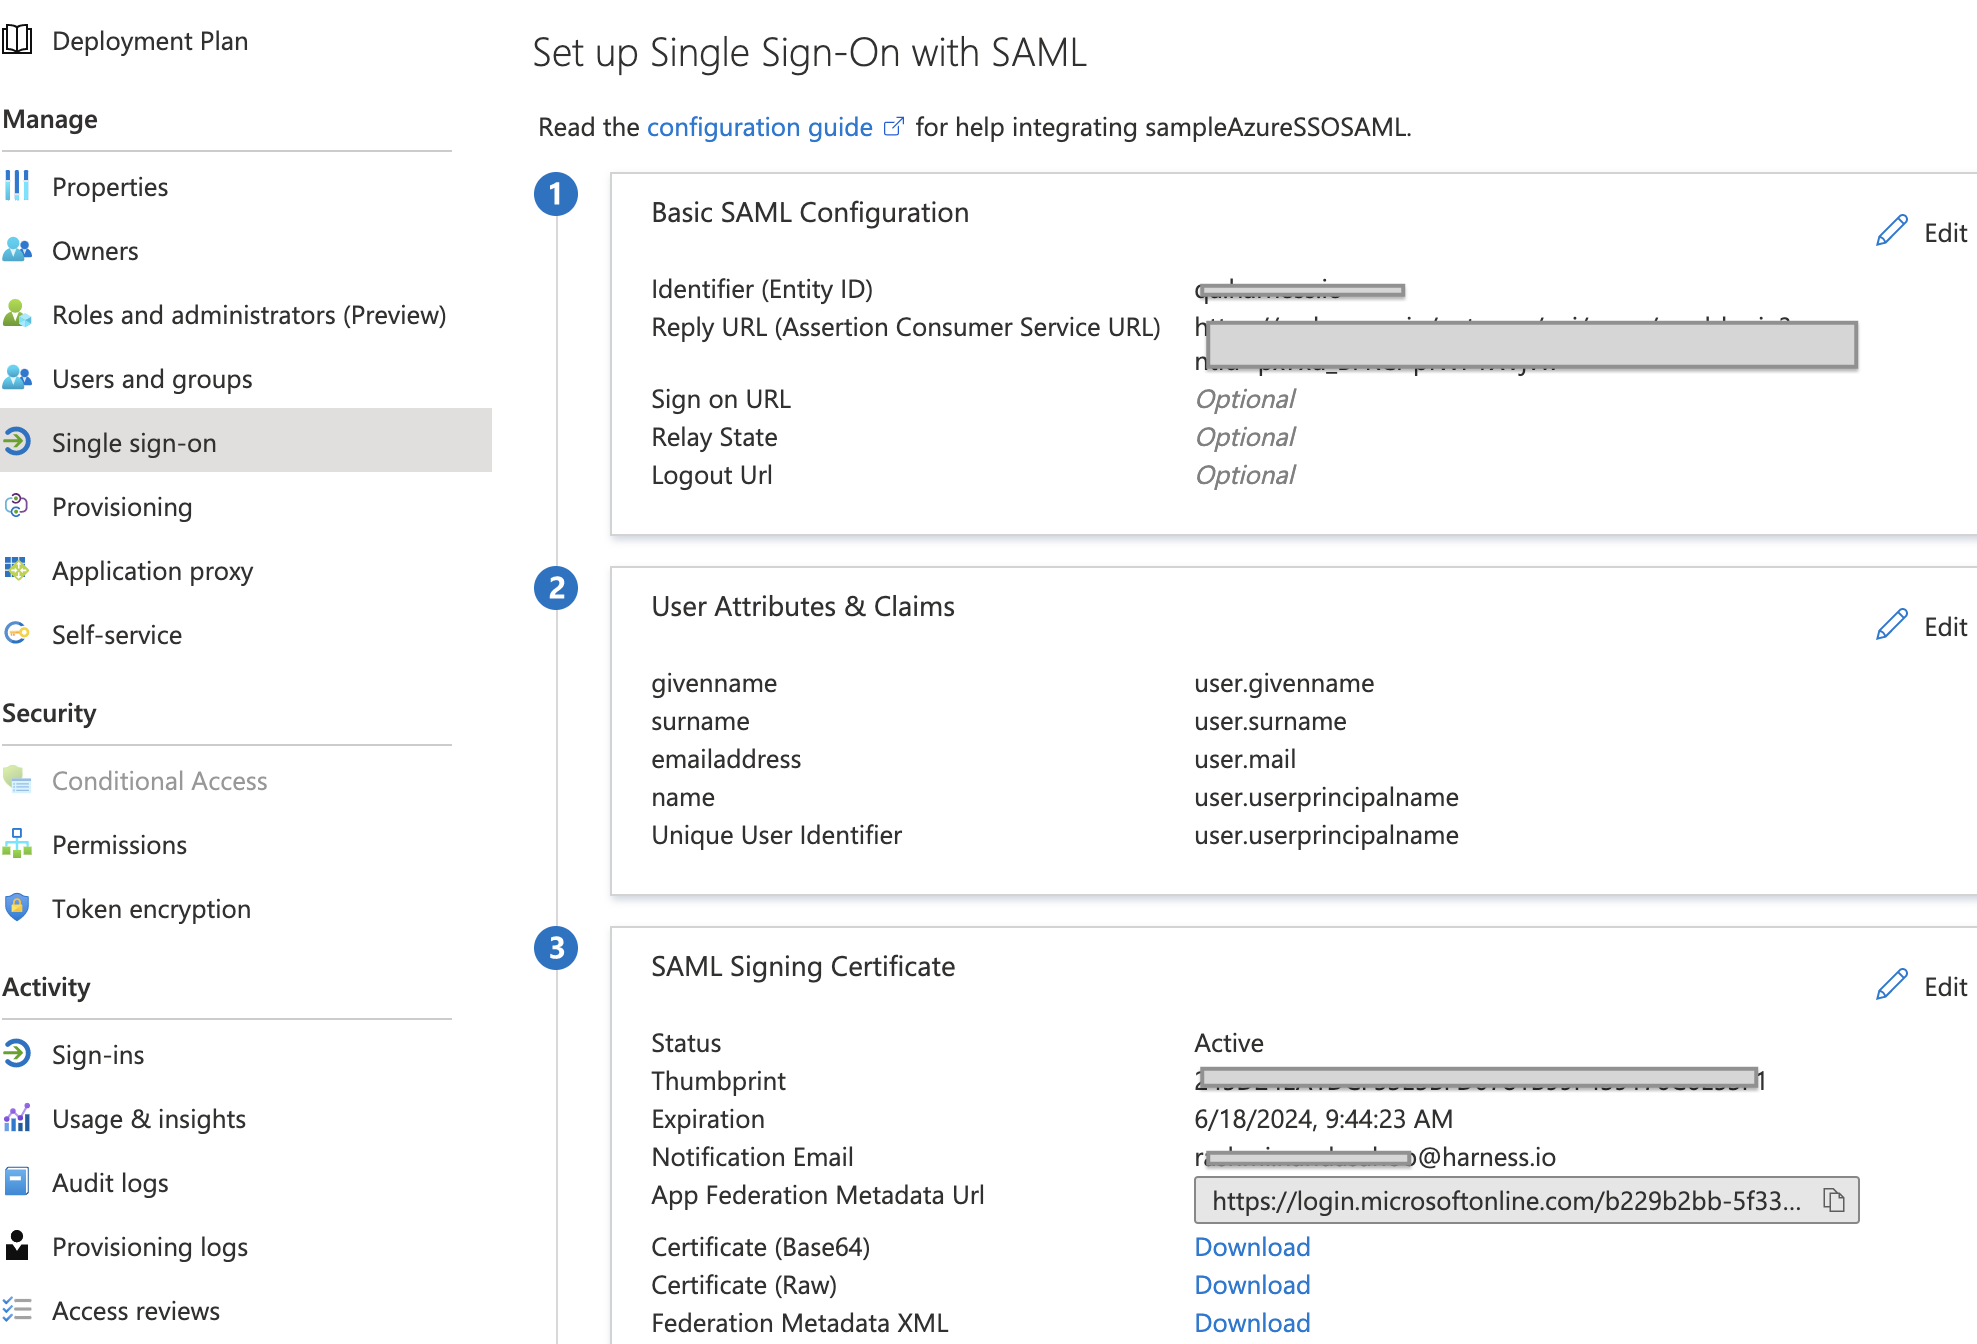
In Basic SAML Configuration, click the edit icon (pencil).
Enter a unique identifier in the Identifier (Entity ID) field. When your tenant only has one SAML application, this can be
app.harness.io. If there are several SAML applications in the same tenant, this should be a unique identifier. While setting up SAML in Harness, the same identifier should be configured in the Entity ID field.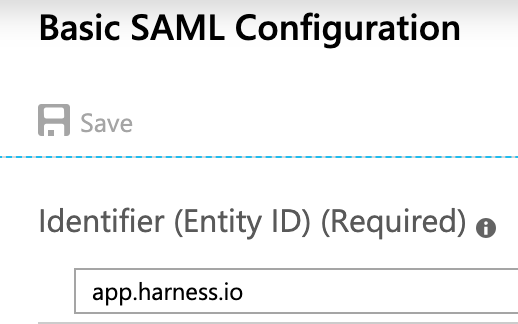
Next, you will use the SAML SSO Provider settings in Harness to set up your Azure app Single sign-on.
For Harness Self-Managed Enterprise Edition, replace app.harness.io with your custom URL.
If you use a custom Harness subdomain in any Harness version, like example.harness.io, use that URL.
In Home, click Authentication under ACCOUNT SETUP. The Authentication: Configuration page appears.
Click +SAML Provider. The Add SAML Provider page appears.
In Name, enter a name for the SAML SSO Provider.
Select Azure under Select a SAML Provider. The settings for Azure setup are displayed:
Copy the Harness SAML Endpoint URL from the Add SAML Provider dialog, and paste it in the Reply URL in your Azure app.

Click Save on the Azure App SAML Settings page.
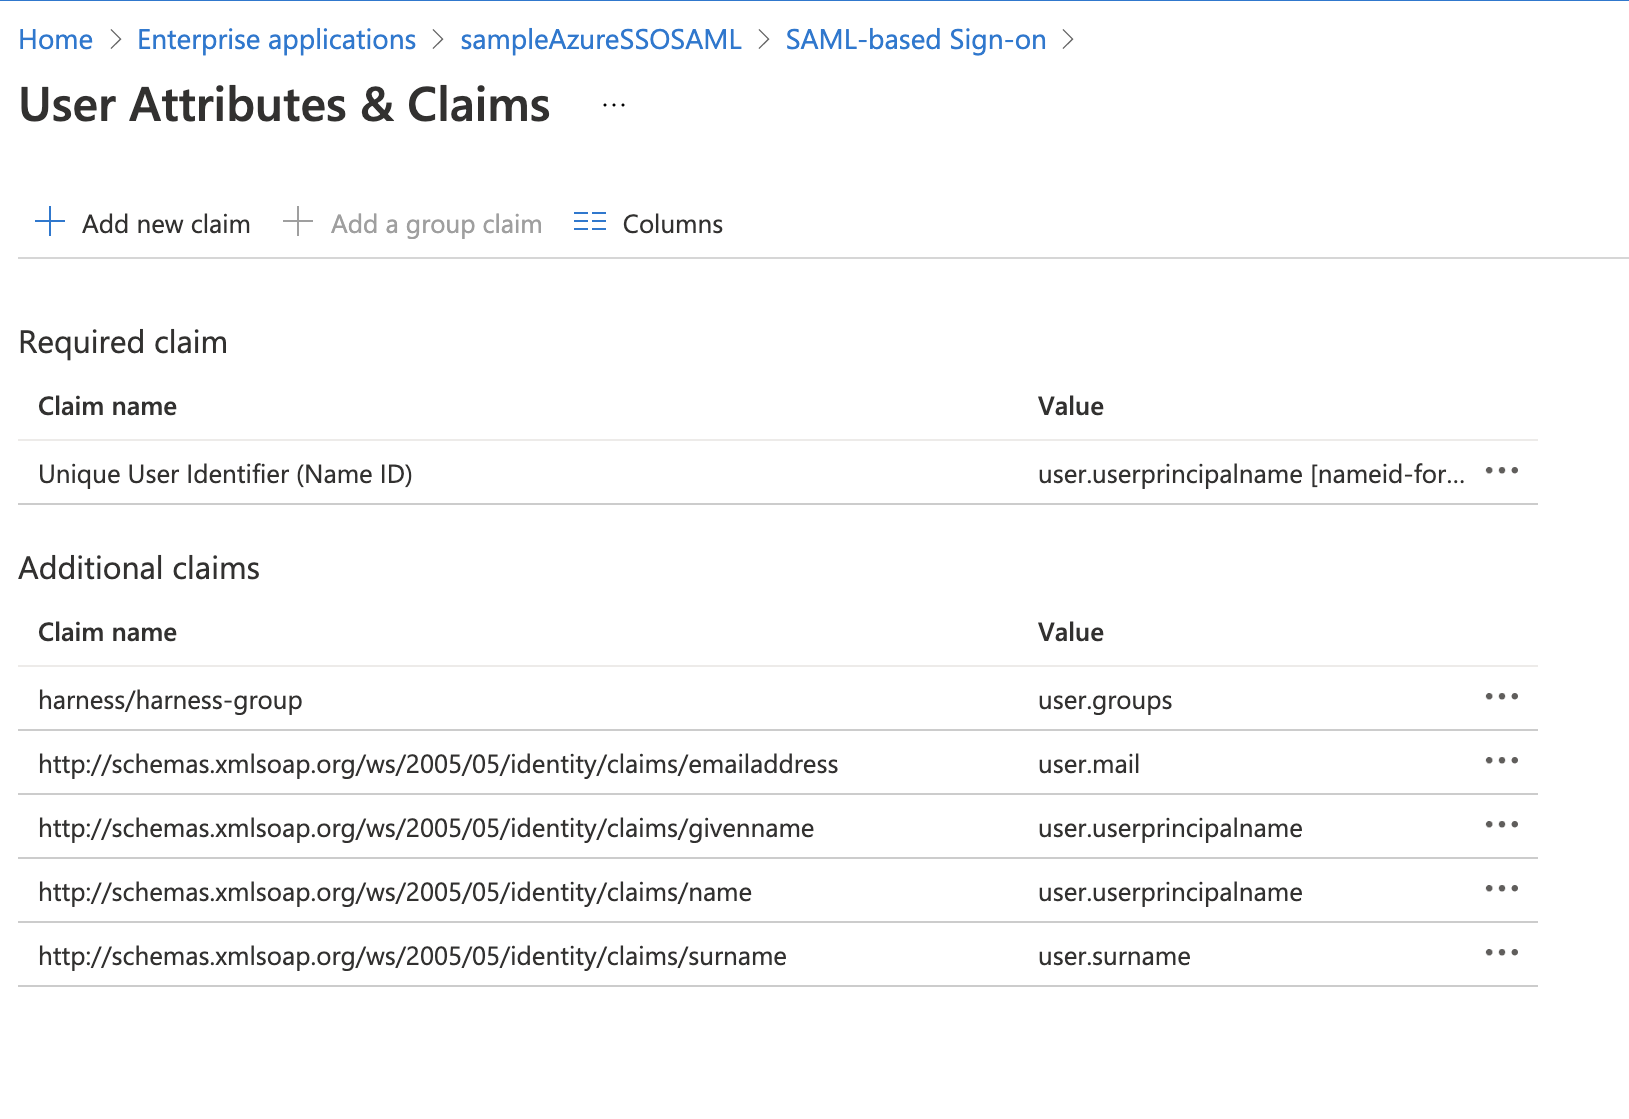
User Attributes and Claims
Next, you need to ensure that Harness Users' email addresses will identify them when they log in via Azure. To do this, you set up the Single sign-on section of your Azure app to use the User name email address as the method to identify users.
The Azure users that are added to your Azure app must have their email addresses listed as their User name.
To set this User name email address as the method for identifying users, in the Azure app Single sign-on section, the Azure app must use the user.userprincipalname as the Unique User Identifier, and user.userprincipalname must use Email address as the name identifier format.
To set this up in your Azure app, do the following:
In your Azure app, in the Single sign-on blade, in User Attributes & Claims, click the edit icon (pencil). The User Attributes & Claims settings appear.
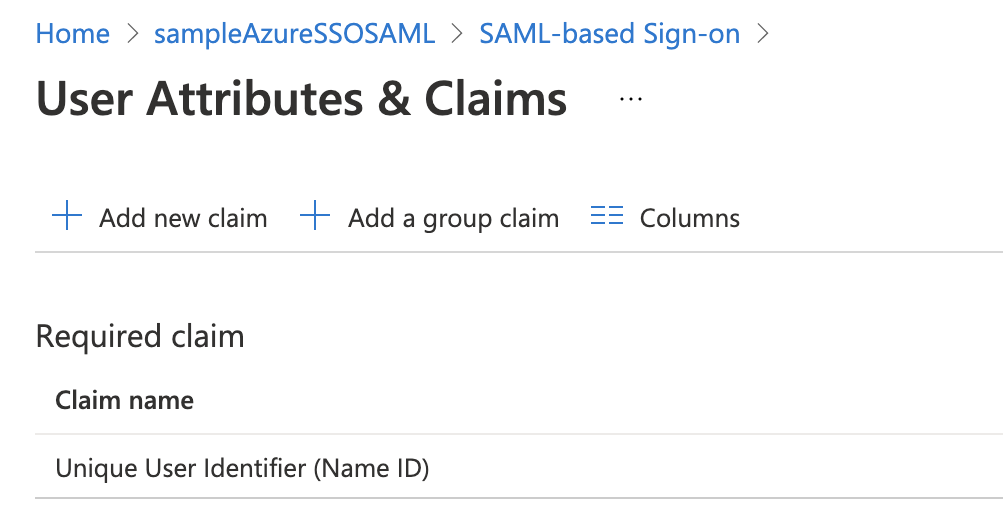
For Unique User identifier value, click the edit icon. The Manage claims settings appear.
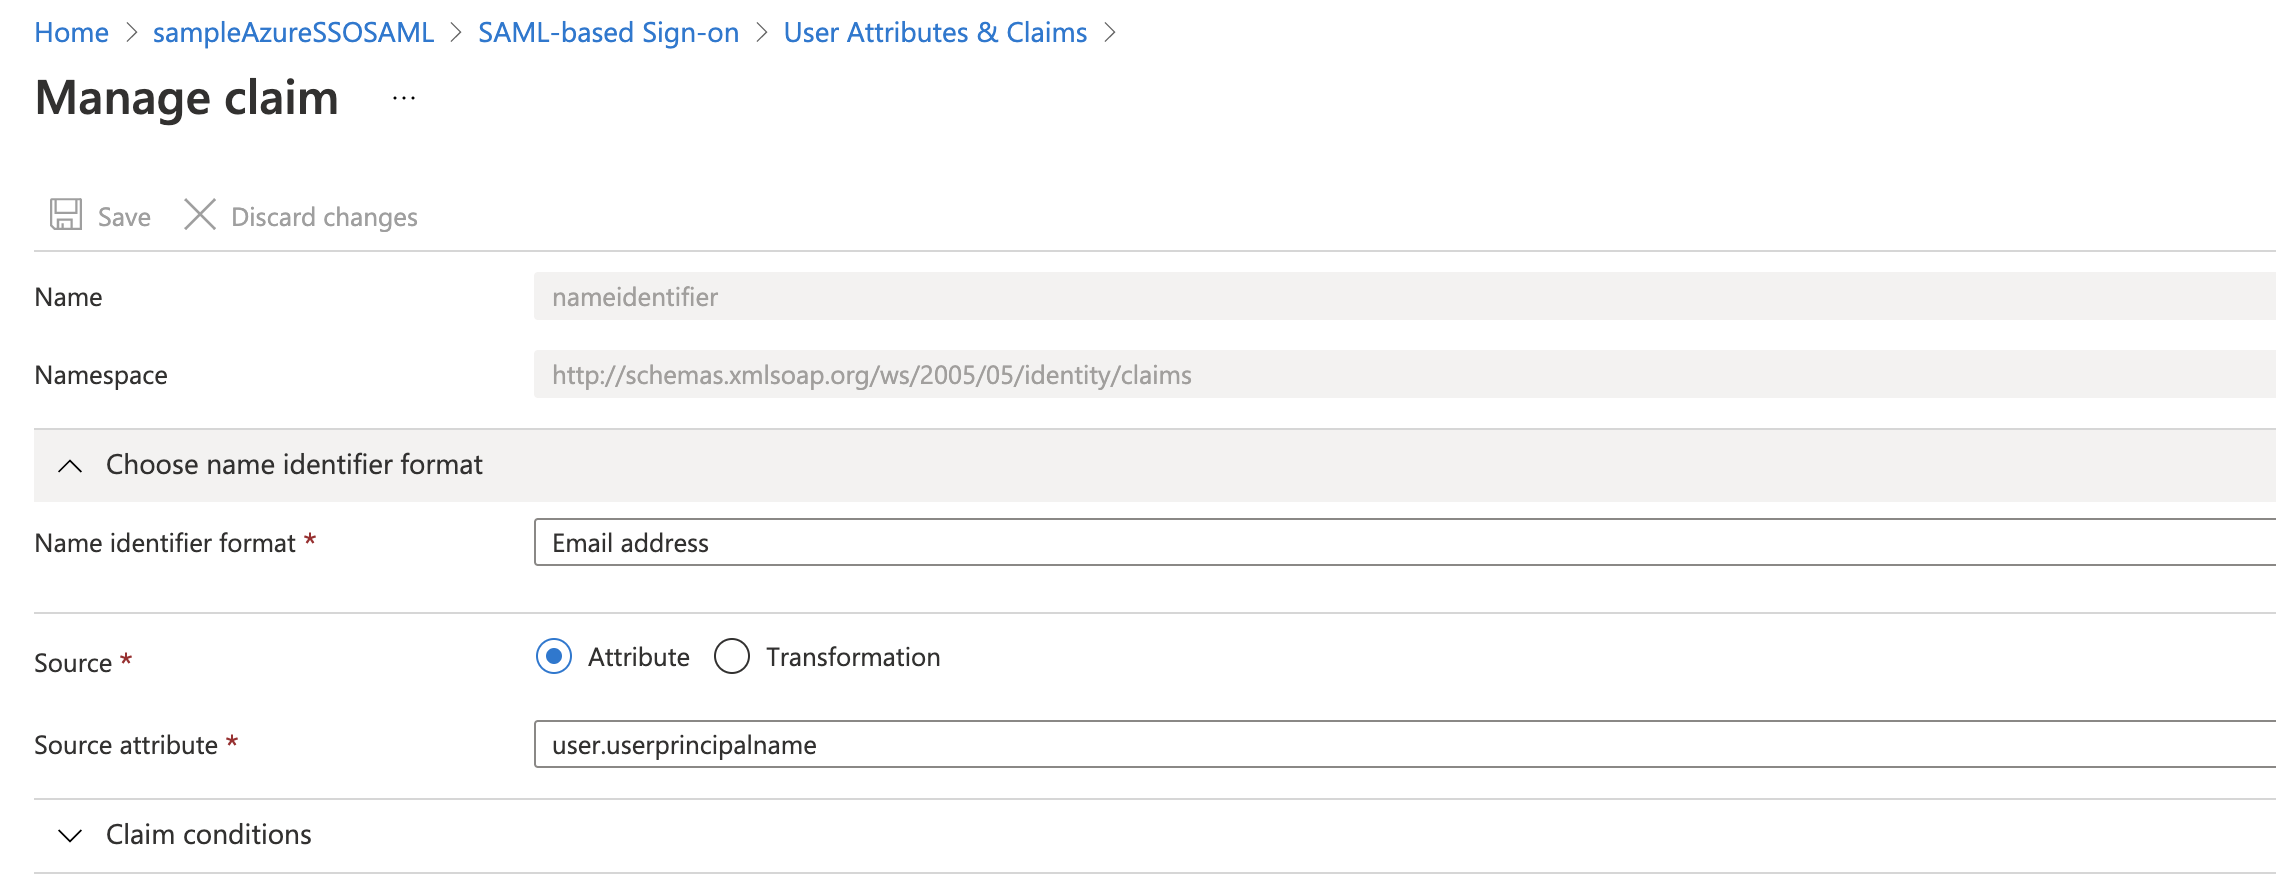
Click Choose name identifier format, and select Email address.
In Source attribute, select user.userprincipalname.
Click Save, and then close User Attributes & Claims.
If your Azure users are set up with their email addresses in some field other than User name, just ensure that the field is mapped to the Unique User Identifier in the Azure app and the name identifier format is Email address.
Azure SAML Metadata File
You must download the Federation Metadata XML from your Azure app and upload the file into Harness.
Download the Federation Metadata XML from your Azure app and upload it using Upload the identity Provider metadata xml downloaded from your Azure App in the Add SAML Provider settings in Harness.

Select Add Entity ID and enter your custom Entity ID. The default Entity ID is app.harness.io. The value you enter here will override the default Entity ID.
Click Add. The new Azure SAML Provider is added.

Enable and Test SSO with Azure
Now that Azure is set up in Harness as a SAML SSO provider, you can enable and test it.
You can test the Azure app SSO from within Azure if you are logged into Azure using an Azure user account that has the following:
- A corresponding Harness User account with the same email address.
- The Azure user account is in the Azure app Users and groups settings.
- The Azure user account has the Global Administrator Directory role in Azure.
To test Azure SSO using Azure, do the following:
In the Azure app, click Single sign-on, and then at the bottom of the Single sign-on settings, click Test.

In the Test panel, click Sign in as current user. If the settings are correct, you are logged into Harness. If you cannot log into Harness, the Test panel will provide debugging information. See also Debug SAML-based single sign-on to applications in Azure Active Directory from Azure.
To test Azure SSO using Harness, do the following:
- In Harness, in ACCOUNT SETUP->Authentication, select Login via SAML, to enable SAML SSO using the Azure provider.
- Open a new Chrome Incognito window to test the SSO login using a Harness User account other than the one you are currently logged in with.
- Using one of the user account email addresses that are shared by Harness and Azure, log into Harness. When you log into Harness, you are prompted with the Microsoft Sign in dialog.
- Enter the Azure user name for the user (most often, the email address), enter the Azure password, and click Sign in.
SAML Authorization with Azure
Once you have enabled Harness SSO with your Azure app, you can set up and enable SAML authorization in Harness using Azure.
To set up SAML authorization in Harness, you link a Harness User Group to a user group assigned to your Azure app. When a user from your Azure app logs into Harness, they are automatically added to the linked Harness User Group and inherit all the RBAC settings for that Harness User Group.
Below is the Harness SAML settings you need from Azure to set up SAML authorization in Harness:
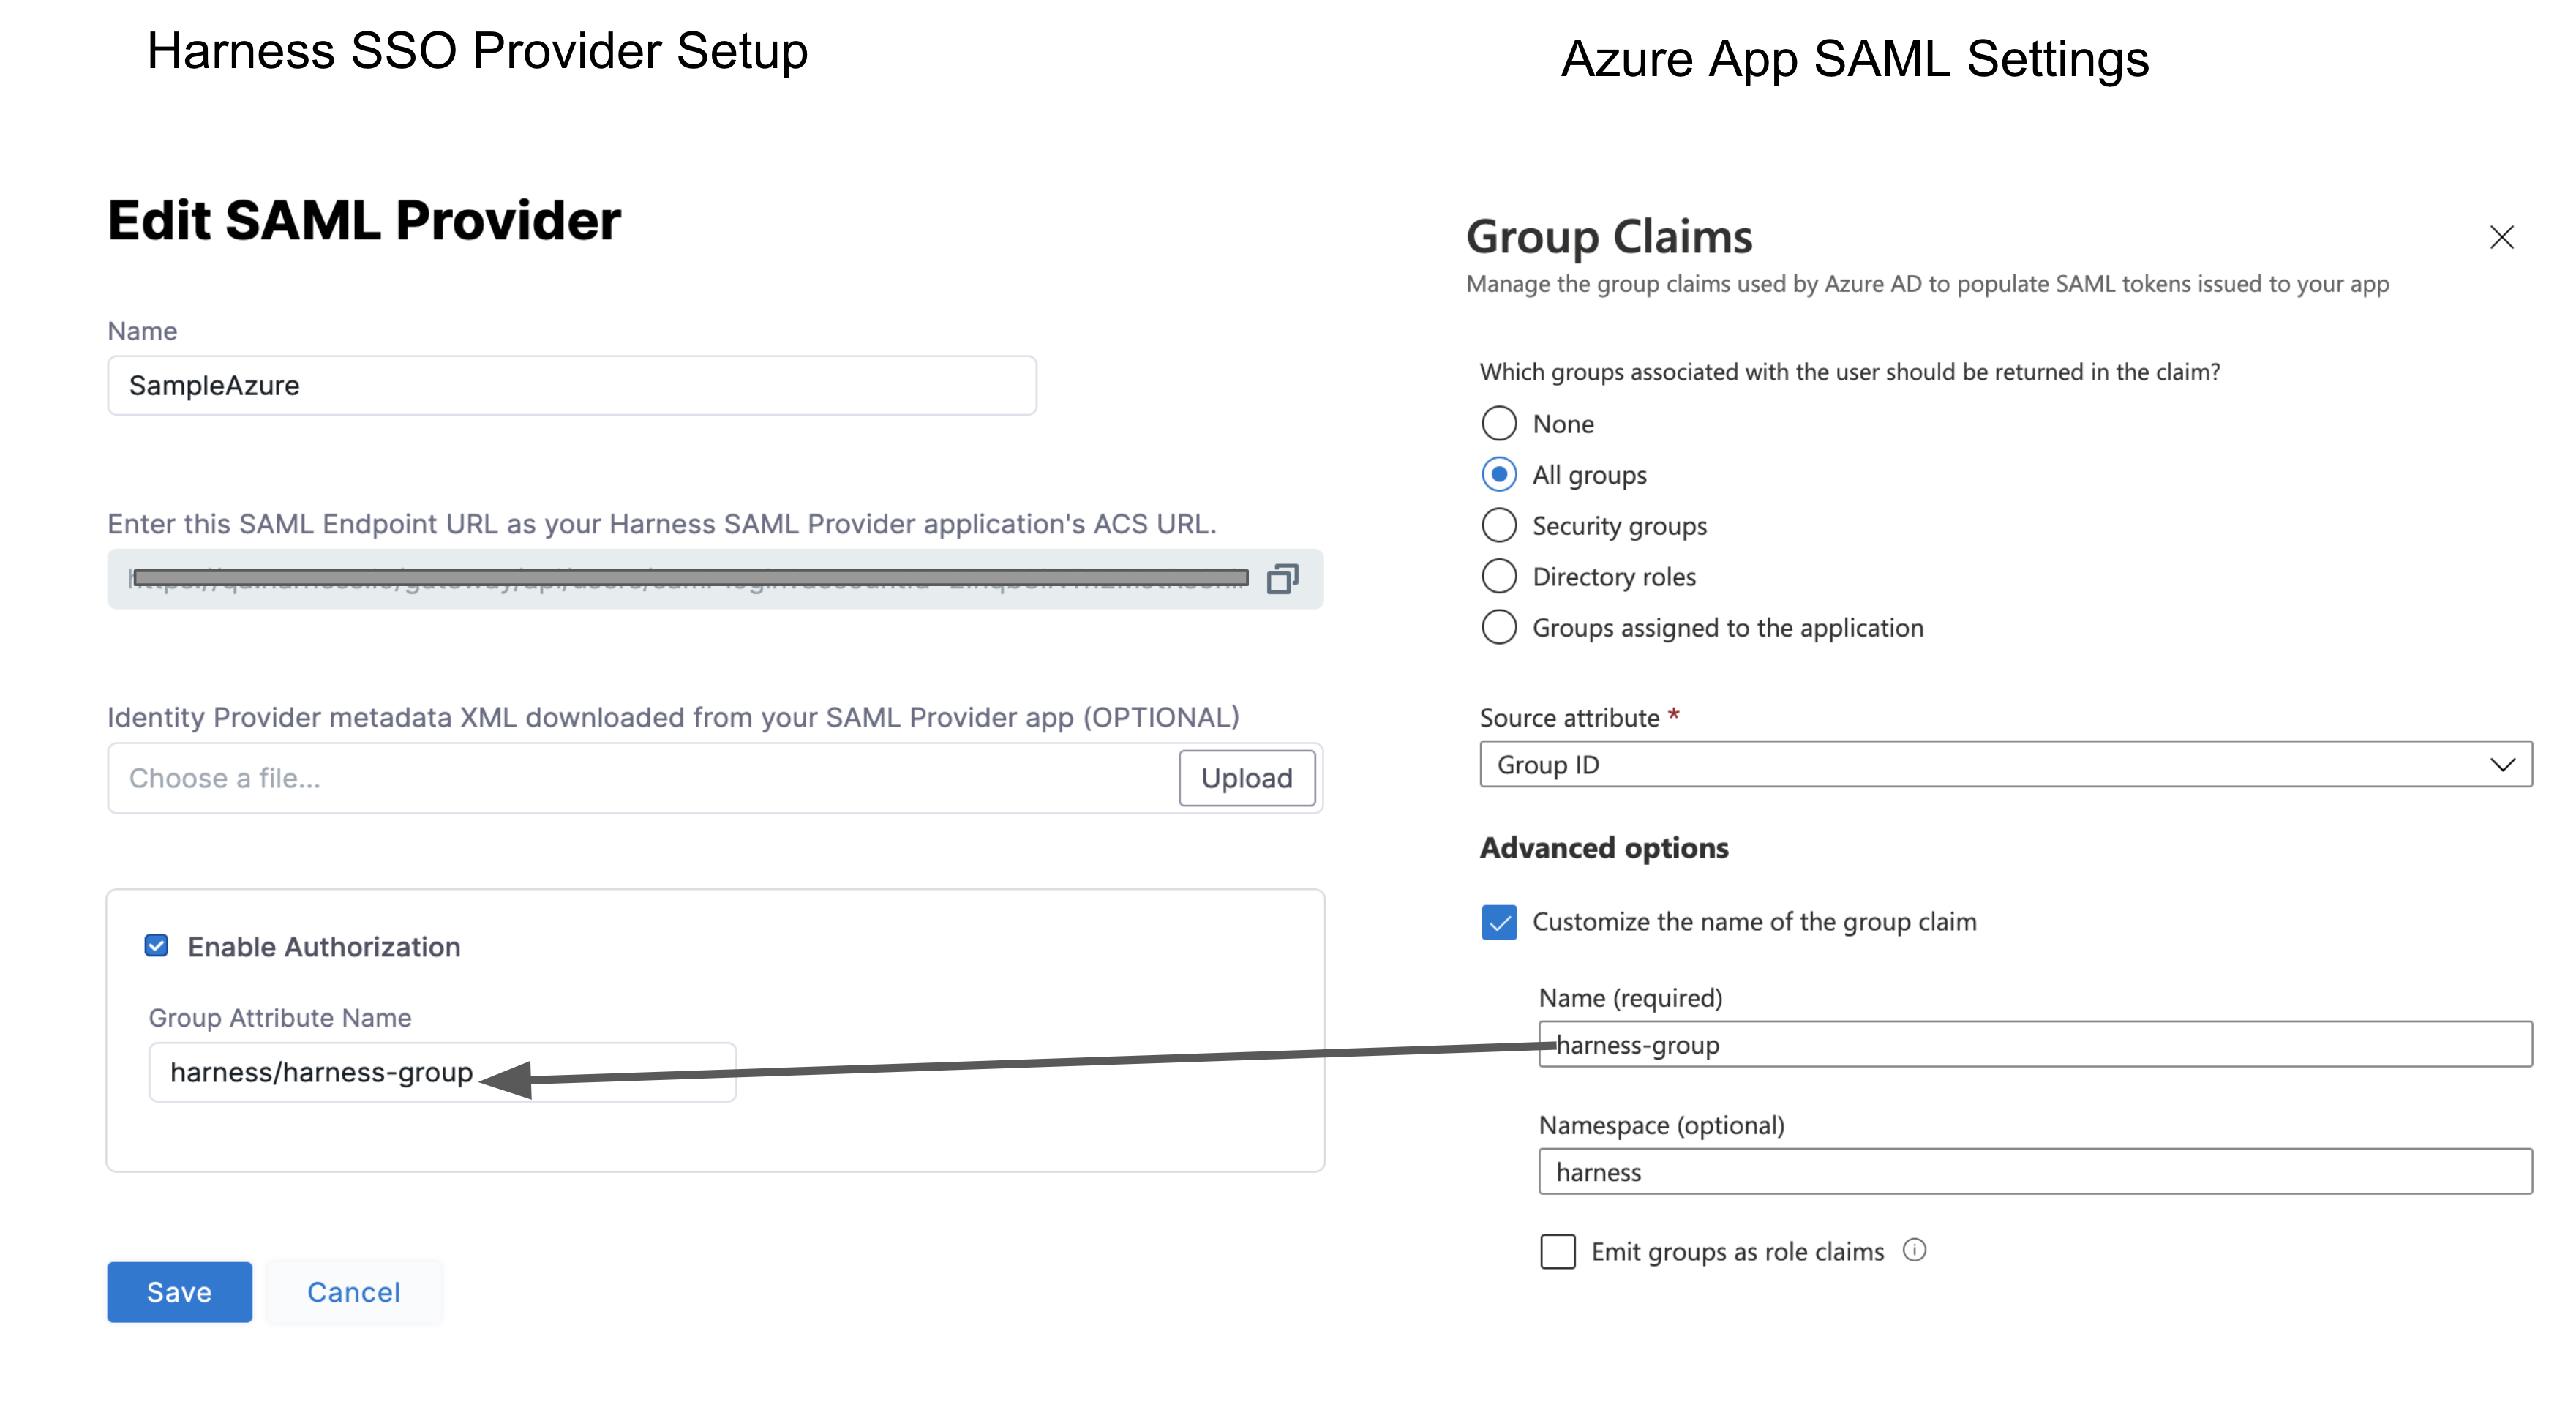
- Group Attribute Name - In Azure, this value is obtained from the Group Claims in the Azure app User Attributes & Claims settings.
For Harness Group Attribute Name, here is the Harness SAML Provider setting on the left and their corresponding Azure Group Claims settings on the right:
To set up Azure Authorization in Harness, do the following:
In Azure, add the Group Claim (Name and Namespace) to the Azure app.
In your Azure app, click Single sign-on, and then in User Attributes & Claims, click edit (pencil icon).
In User Attributes & Claims, edit the groups claim. The Group Claims settings appear.

Click the All groups option and then enable Customize the name of the group claim.
In Name, enter a name to use to identify the Harness Group Attribute Name.
In Namespace, enter a namespace name.
Click Save. User Attributes & Groups now display the group claim you created.
Close User Attributes & Groups.
In Harness, enter the Group Claim name and namespace in the SAML SSO Provider Group Attribute Name field.
Open the SAML SSO Provider dialog, and enable the Enable Authorization setting. You need to enable Enable Authorization in order to select this SSO Provider when you link a Harness User Group for authorization.
Enter the Group Claim name and namespace in the Group Attribute Name field in the same format as a Claim Name (
namespace/name). The SAML SSO Provider dialog will look something like this: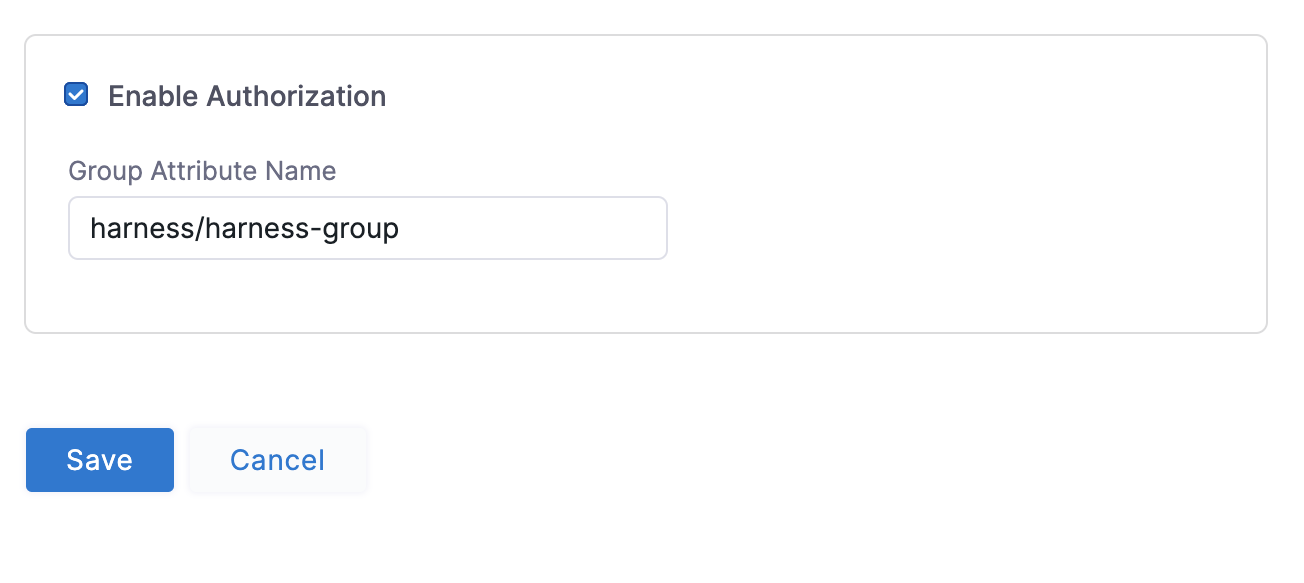
Click Save. Authorization and the Group Attribute Name are set up. Next, you need to set up your Azure and Harness groups.
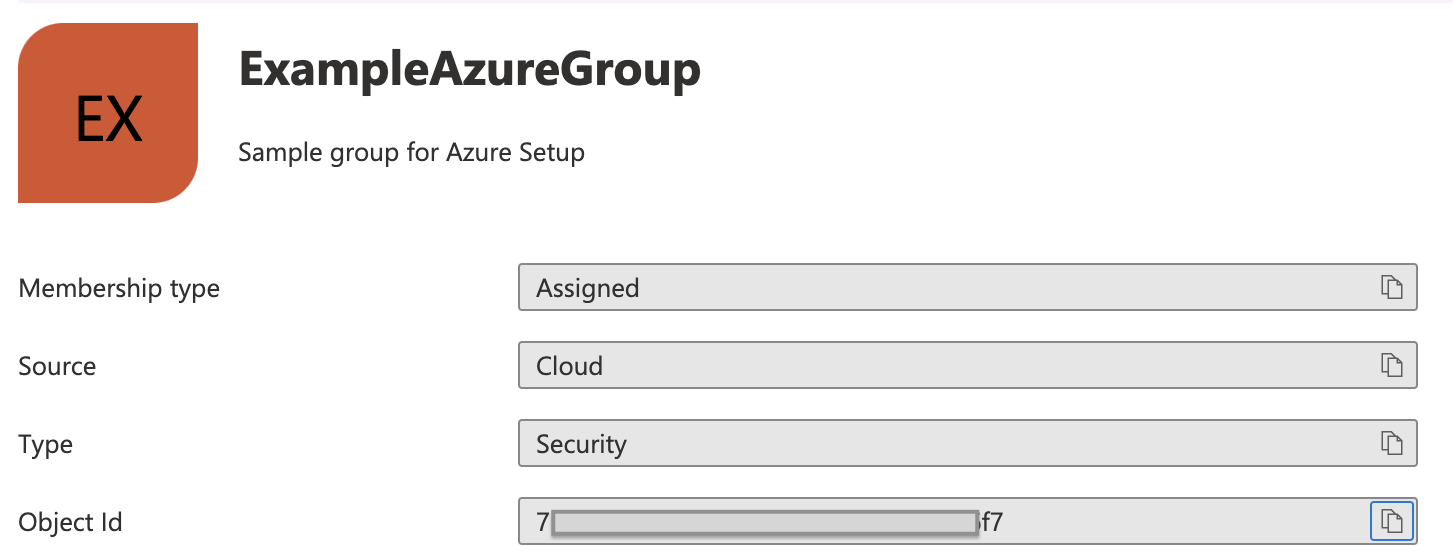
In Azure, ensure the Azure users with corresponding Harness accounts belong to an Azure group. Here is an Azure group named ExampleAzureGroup with two members:
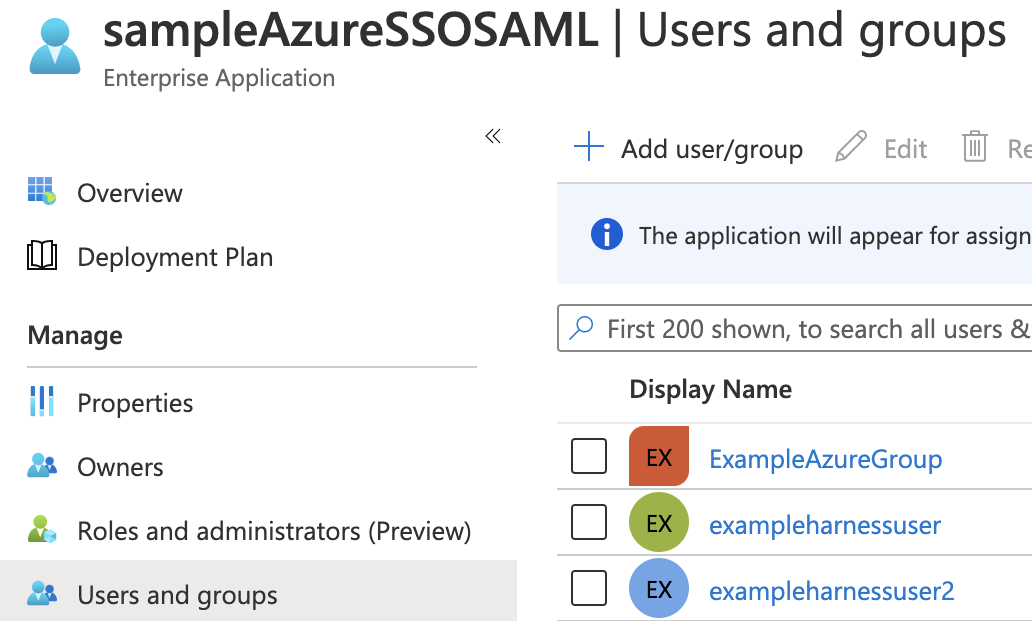
Ensure that the Azure group is assigned to the Azure app. Here you can see the ExampleAzureGroup group in the Azure app's Users and groups:
Link the Harness User Group to the Azure group using the Azure group Object ID.
In Azure, copy the Azure group Object ID.
In Harness, create a new User Group or open an existing User Group.
In Home, click Access Control under ACCOUNT SETUP.
Click User Groups and then click on the User Group you want to link the SAML SSO Provider to.
Click Link to SSO Provider Group.
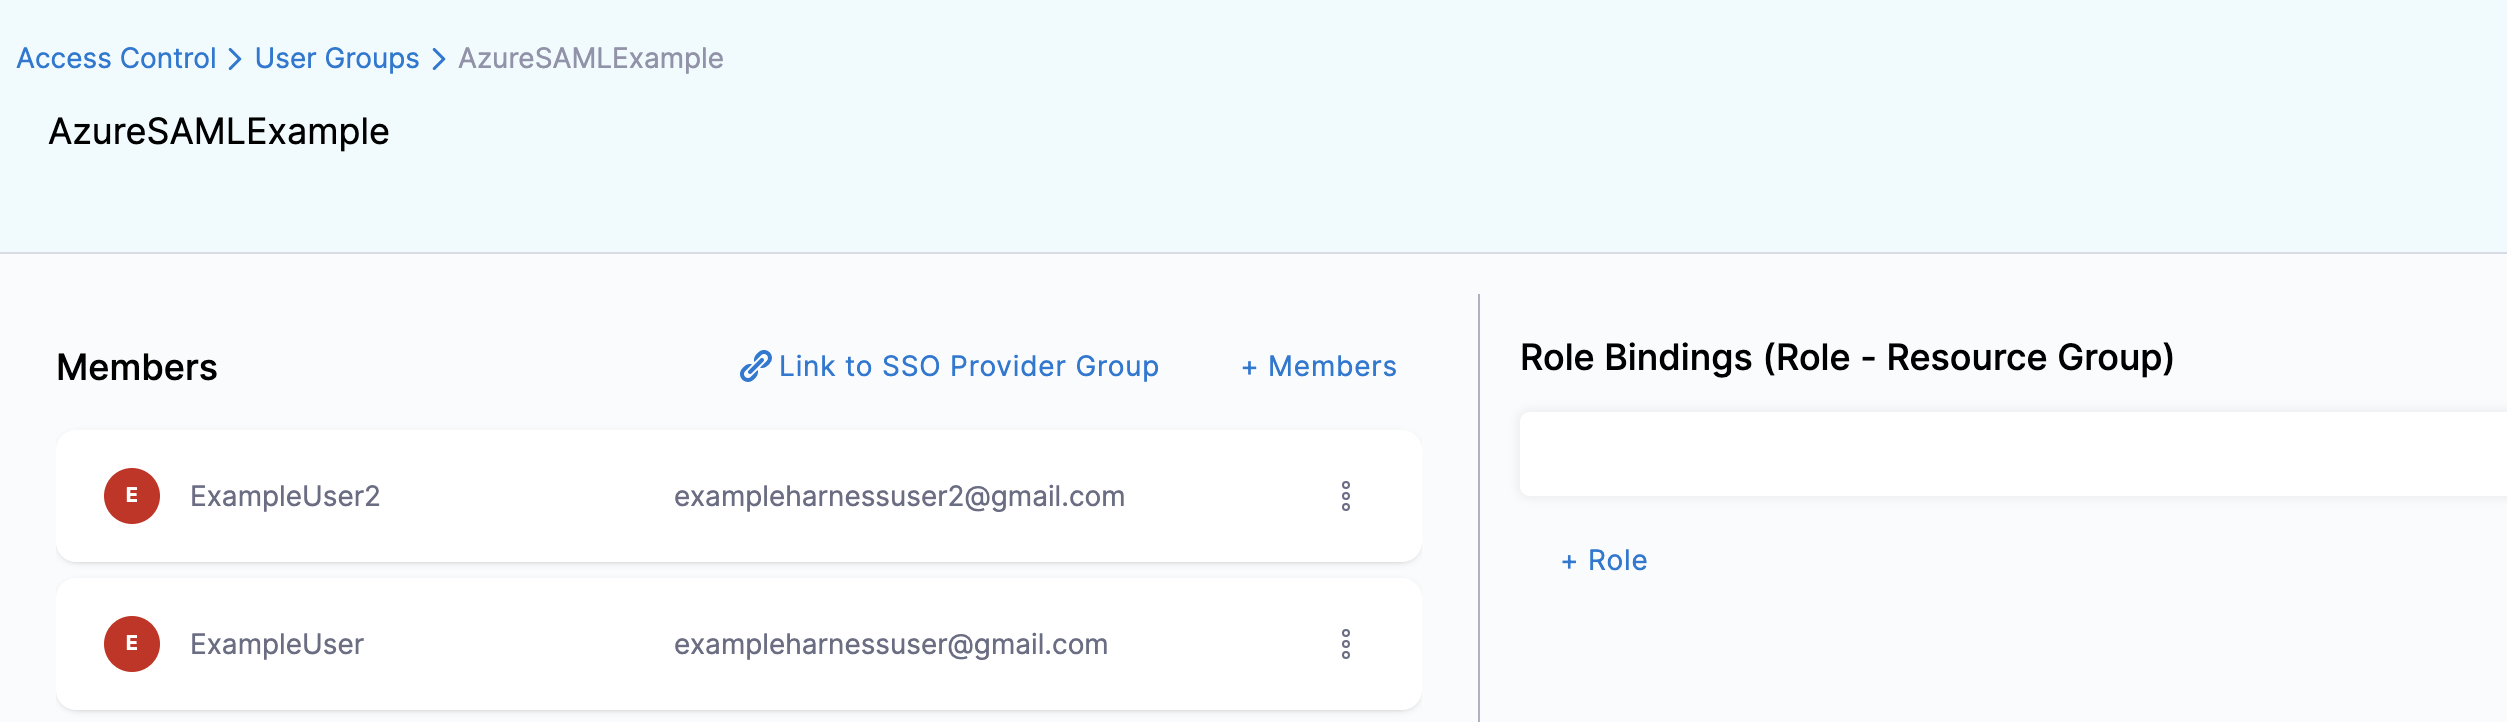
In the Link to SSO Provider Group dialog, in SSO Provider, select the Azure SSO Provider you set up, and in Group Name, paste the Object ID you copied from Azure. When you are done, the dialog will look something like this:
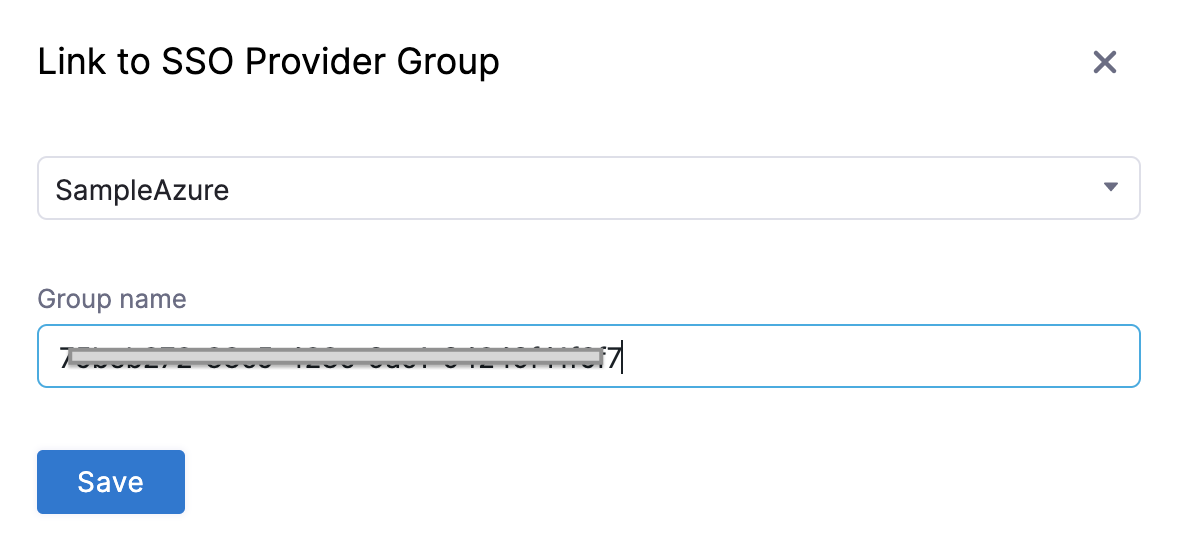
Click Save. The User Group is now linked to the SAML SSO Provider and Azure group Object ID.
Test Authorization. 18. Open a new Chrome Incognito window to test the authorization using a Harness User account other than the one you are currently logged in with. 19. Log into Harness using the user email address, and sign in using the Azure username and password. If you are already logged into Azure in Chrome, you might be logged into Harness automatically. 20. In the linked Harness User Group, ensure that the Harness User account you logged in with was added.
The Harness User is now added and the RBAC settings for the Harness User Group are applied to its account. For more information, go to Add and manage User Groups.
SAML SSO with Azure Active Directory
You can use Azure Active Directory (AD) for SAML SSO with Harness, enabling AD users to log into Harness using their AD credentials.
For detailed steps on adding SAML SSO with Active Directory, follow the steps in the tutorial Azure Active Directory single sign-on (SSO) integration with Harness from Microsoft.
Users are not created as part of the SAML SSO integration. Users are invited to Harness using their email addresses. Once they log into Harness, their email addresses are registered as Harness Users. For more information, go to SAML SSO with Harness Overview.
Users in over 150 Groups
When users have large numbers of group memberships, the number of groups listed in the token can grow the token size. Azure Active Directory limits the number of groups it will emit in a token to 150 for SAML assertions.
If a user is a member of a larger number of groups, the groups are omitted and a link to the Graph endpoint to obtain group information is included instead.
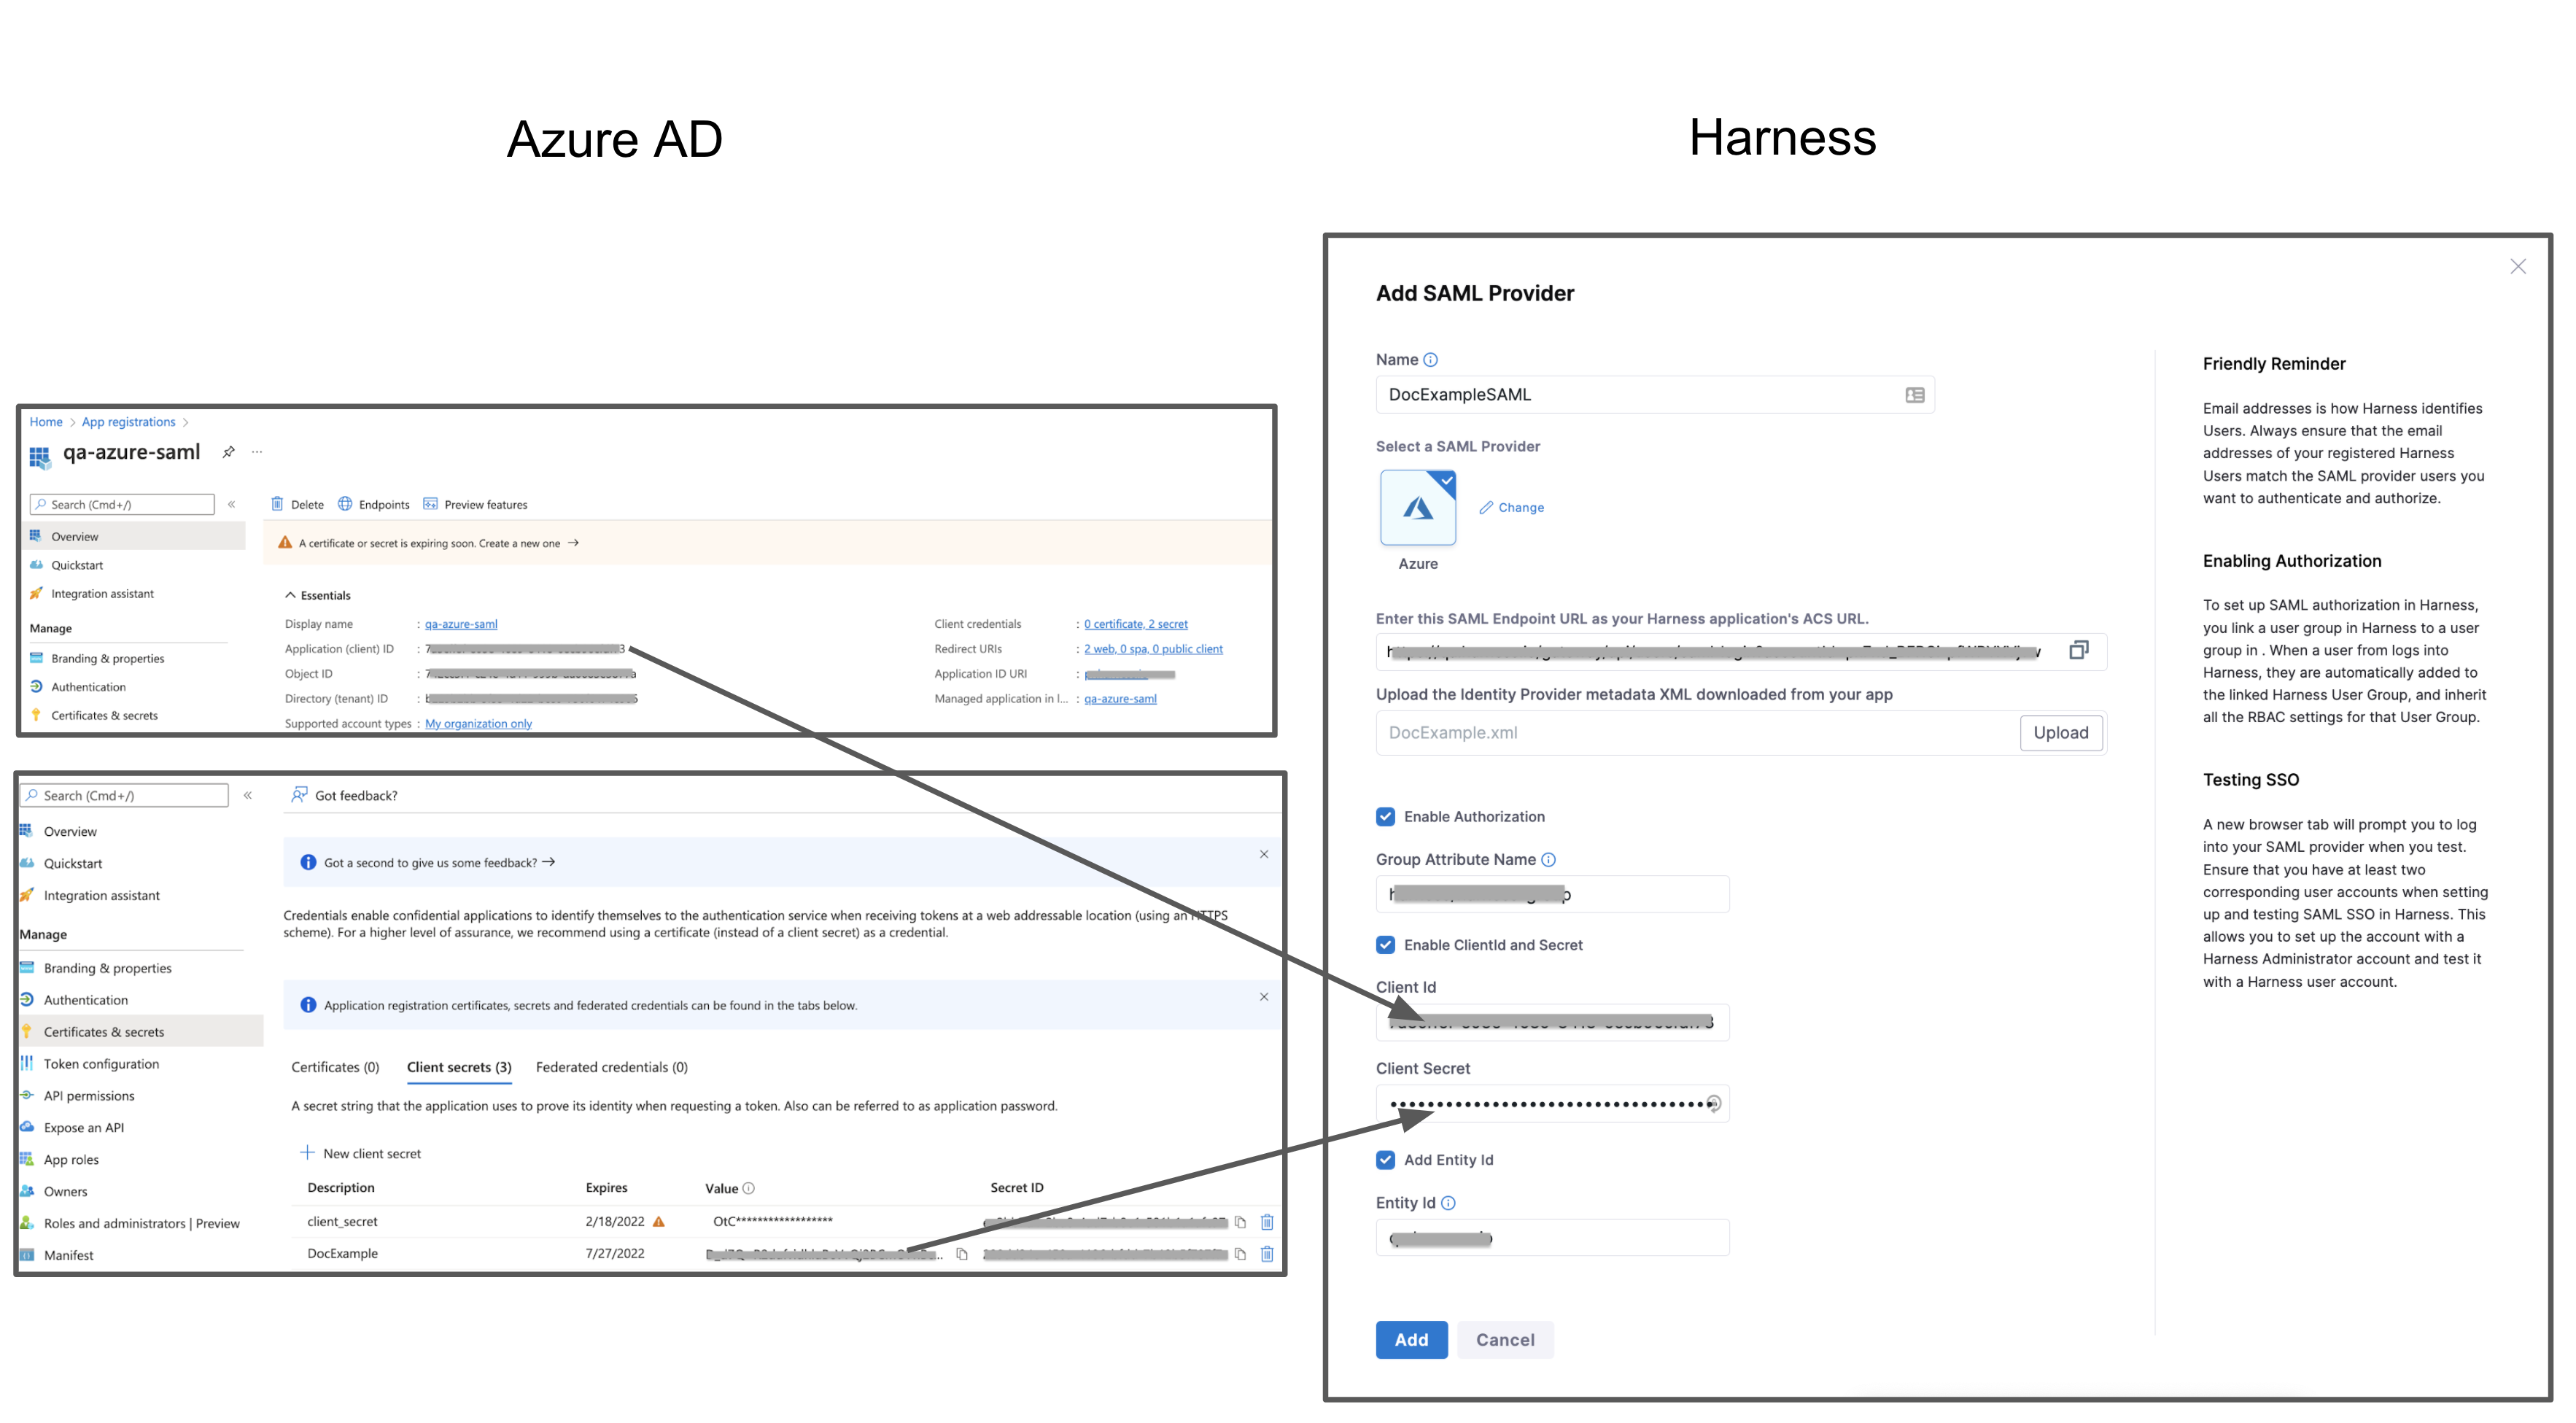
To invoke the API Harness will need Client ID and Client Secret for your registered app.
To get this information, perform the following steps:
In your Azure account, go to App registrations.
Click on your app. Copy the Application (client) ID and paste it in Client ID in your Harness account.
In your Azure account, go to App registrations. Click Certificates and Secrets.
Click New Client Secret.
Add a description and click Add.
Make sure to copy this secret and save it as an encrypted text secret. For detailed steps to create an encrypted text in Harness, go to Use Encrypted text Secrets.
Select the above secret reference in the Client Secret field in your Harness account.
SAML SSO with OneLogin
To set up OneLogin as a SAML SSO provider on Harness, you exchange the necessary information between the OneLogin Harness application and Harness. The following sections cover Authentication steps, followed by Authorization steps.
OneLogin Authentication on Harness
Enabling OneLogin authentication on Harness requires configuration on both platforms, as described in these sections:
Exchange Harness Consumer URL and OneLogin Metadata
In Home, click Authentication under ACCOUNT SETUP. The Authentication: Configuration page appears.
Click +SAML Provider. The Add SAML Provider page appears.
InName, enter a name for the SAML SSO Provider.
Select OneLogin under Select a SAML Provider. The settings for OneLogin setup are displayed.
Copy the provided URL under Ener the SAML Endpoint URL, as your Harness OneLogin application's ACS URL, to clipboard.
In OneLogin, add the Harness app (for SaaS setup) or Harness (On Prem) app for Harness Self-Managed Enterprise Edition setup. To do so, perform the following steps:
Log in to OneLogin.
Click Administration.
Under the Applications tab, click Applications.
Click Add App.
Find Harness or Harness (On Prem) based on your setup, and then click the app.

In Configuration, paste this URL into the SCIM Base URL field.
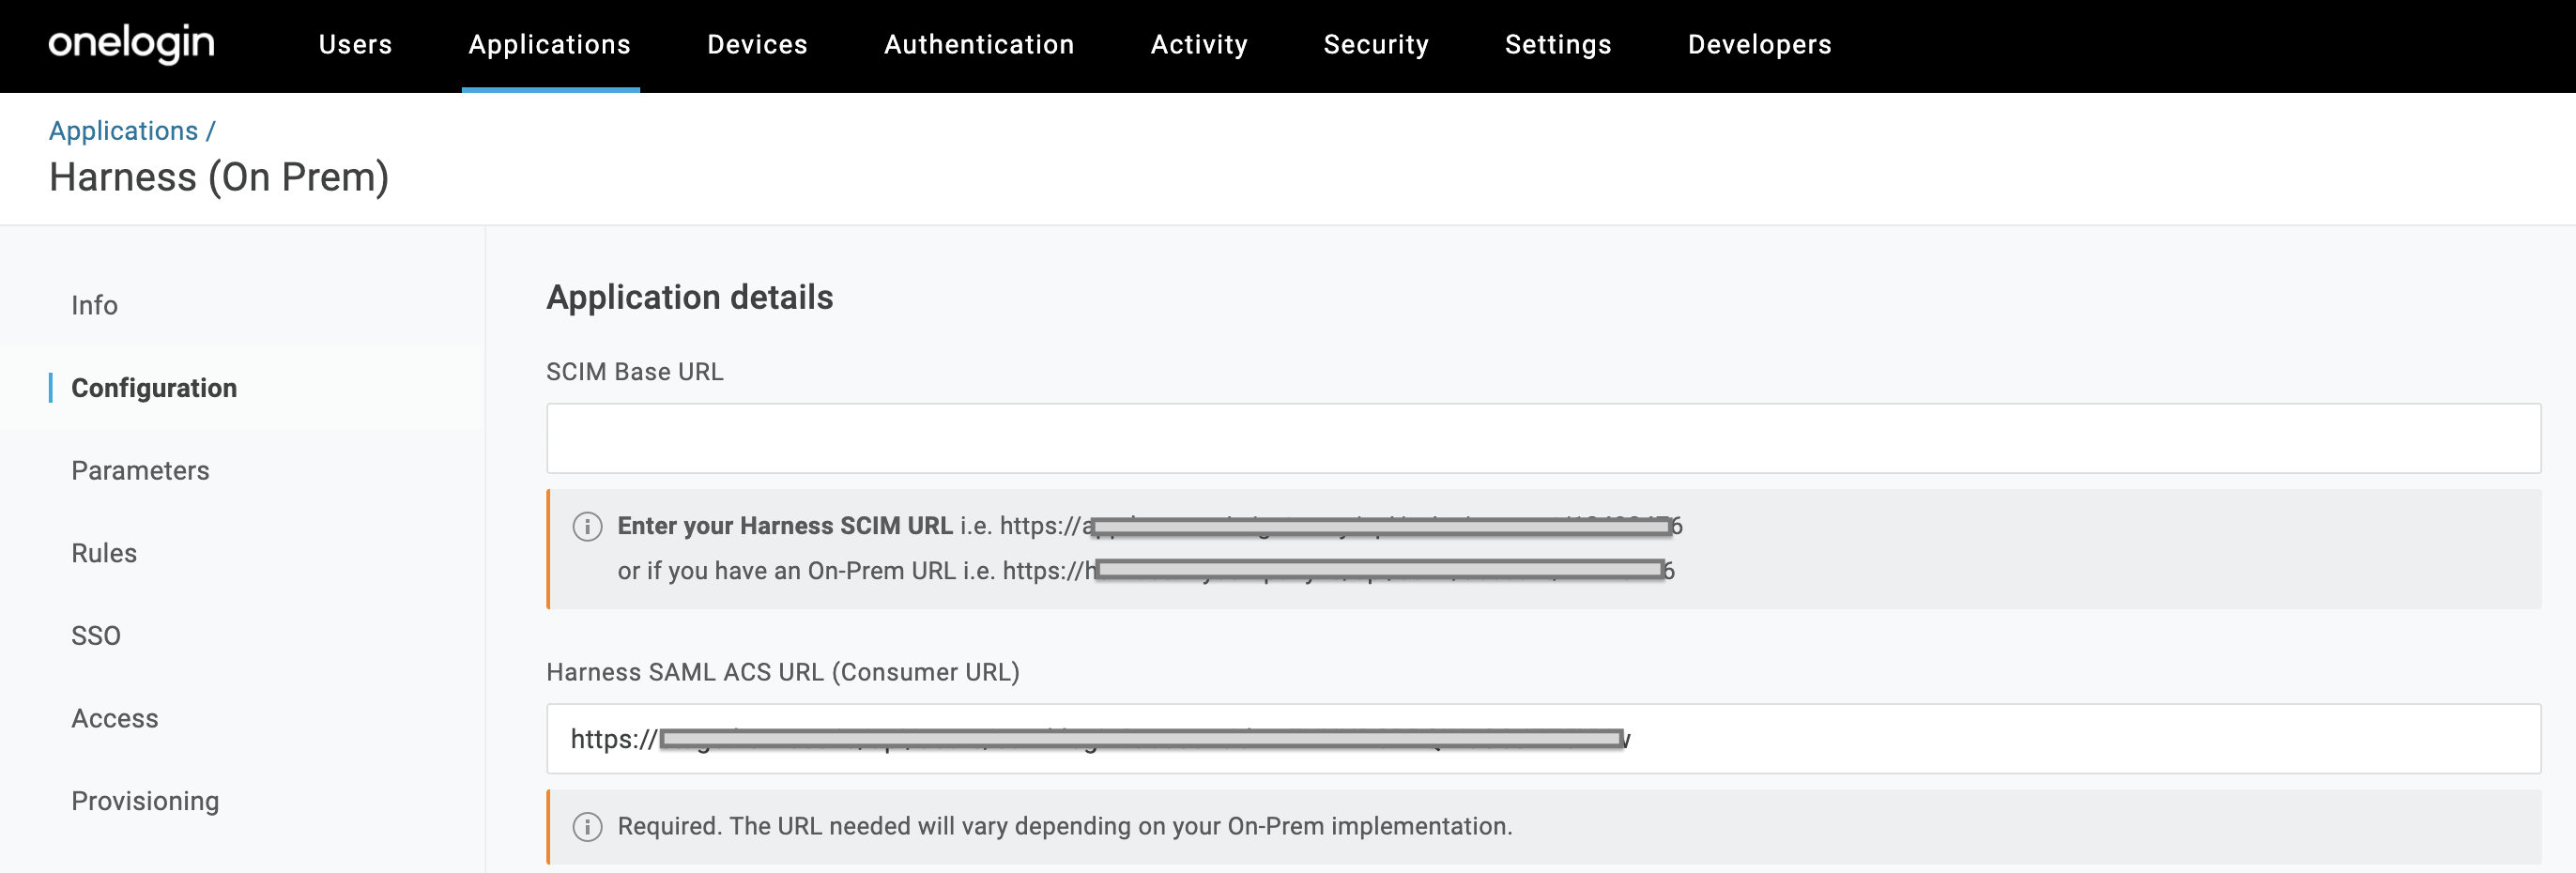
Skip all other Application Details fields, and click Save.
Navigate to OneLogin's Applications > SSO tab. At the upper right, select More Actions > SAML Metadata.

From the resulting dialog, download the .xml authentication file that you'll need to upload to Harness.
Assign Users to Roles
- In OneLogin, select Users > Users.
If you prefer to assign groups to roles, instead start at Users > Groups, and modify the following instructions accordingly.
Search for a user that you want to add to Harness.

Click to select the user.
The Users page appears. Click the Applications tab.
Click the + button at the upper right to assign an Application.
Select the Application, then click Continue.
Repeat this section for other users (or groups) that you want to add to Harness.
Enable OneLogin as a Harness SSO Provider
In Home, click Authentication under ACCOUNT SETUP. The Authentication: Configuration page appears.
Click to expand the Login via SAML section.

You can see the SSO Provider you have setup listed in this section. Click the vertical ellipsis (︙) next to the SSO Provider you have set up for SSO authentication, and click Edit.
Use Choose File to upload the .xml file that you obtained from OneLogin.
Deselect Enable Authorization.
Select Add Entity ID and enter your custom Entity ID. The default Entity ID is app.harness.io. The value you enter here will override the default Entity ID.
Click Add.
Click Login via SAML toggle, to enable your new provider.
In the resulting Enable SAML Provider dialog, click TEST to verify the SAML connection you've configured.
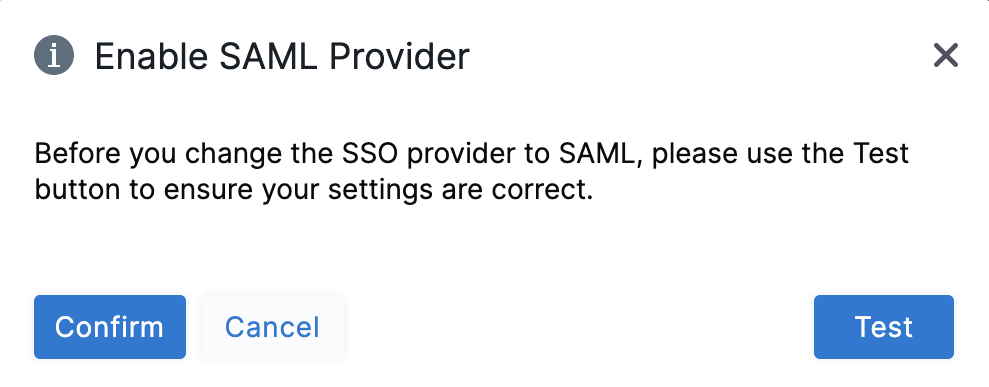
Once the test is successful, click Confirm to finish setting up OneLogin authentication.
OneLogin Authorization on Harness
Once you've enabled OneLogin authentication on Harness, refer to the below sections to enable authorization between the two platforms:
Assign Roles to Users
Harness’ SAML authorization replicates OneLogin Roles as Harness User Groups. Here is how to begin mapping between these entities.
- From OneLogin's, menu, select Users > Users.
- Find and select a user, assigned to Harness, to assign appropriate OneLogin Roles.
- Click the Applications tab.
- Select the specific Roles you want to assign to this user.
- Click Save User at the upper right.
- Repeat this section for other users to whom you want to assign Roles.
Define Parameters
Select Applications > Parameters, then select the
+button to add a new Parameter.In the resulting New Field dialog, assign a Field name (for example Groups).
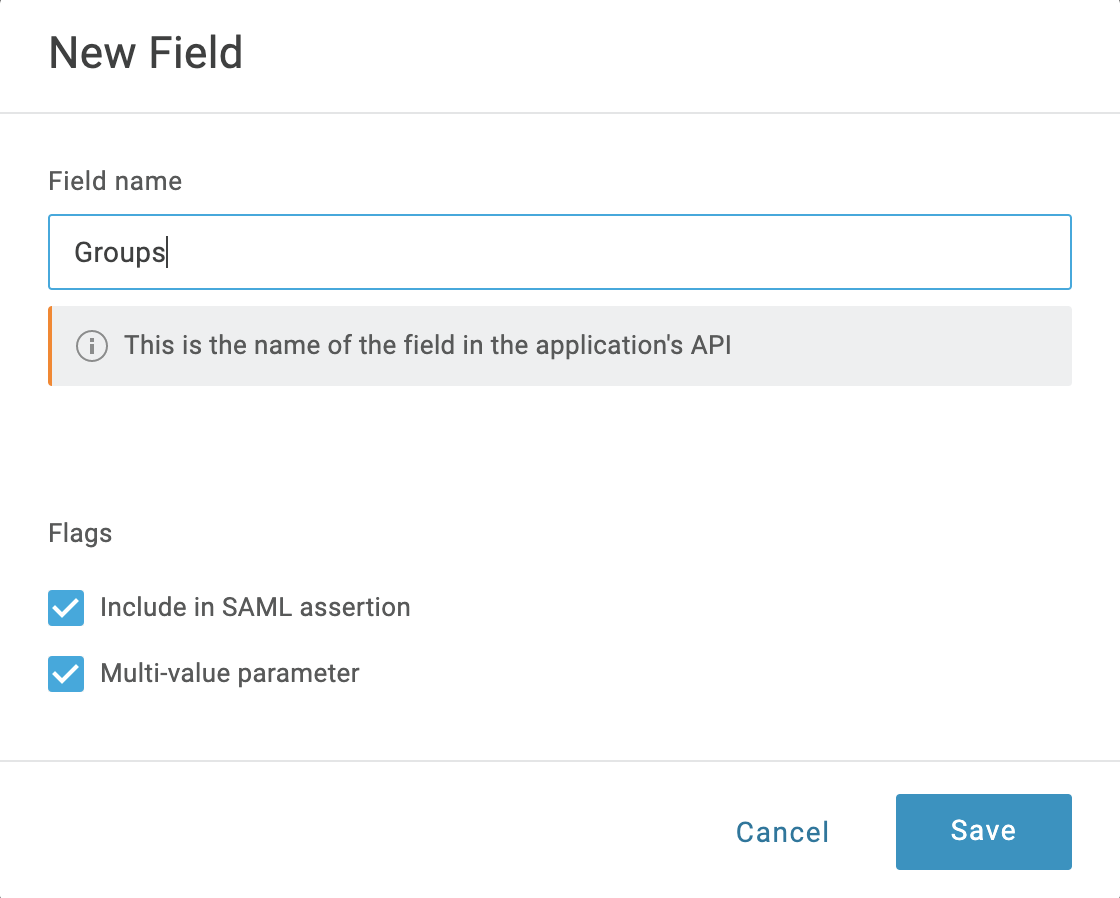
Select Include in SAML assertion and Multi-value parameter. Then click Save.
Back on the Parameters tab, select your new Groups field.
In the resulting Edit Field Groups dialog, set Default if no value selected to User Roles. Below that, select Semicolon Delimited input (Multi-value output). Then select Save.

Select Save again at the Parameters page's upper right.
Sync Users in Harness
In Home, click Authentication under ACCOUNT SETUP. The Authentication: Configuration page appears.
Click to expand the Login via SAML section.

You can see the SSO Provider you have set up listed in this section. Click the vertical ellipsis (︙) next to the SSO Provider you have set up for SSO authentication, and click Edit.
In the Edit SAML Provider dialog, click Enable Authorization.
In Group Attribute Name, enter the name of the Field Group you configured in OneLogin.
Click Save.
Under ACCOUNT SETUP click User Groups.
Click on the User Group you want to link the SAML SSO Provider to.
Click Link to SSO Provider Group.
In the Link to SSO Provider Group Dialog, in Search SSO Settings, select the SAML SSO Provider you have set up.
In the Group Name, enter the name of the Field Group you configured in OneLogin.
Click Save.
Test the Integration
After you've synced Users between OneLogin and Harness, users will be assigned to the designated Harness User Group upon your next login to Harness. To test whether OneLogin authentication and authorization on Harness are fully functional do the following:
- In Chrome, open an Incognito window, and navigate to Harness.
- Log into Harness using the email address of a Harness User that is also used in the SAML provider group linked to the Harness User Group.
When the user submits their email address in Harness Manager, the user is redirected to the SAML provider to log in. - Log into the SAML provider using the same email that the user is registered with, within Harness.
Once the user logs in, the user is redirected to Harness and logged into Harness using the SAML credentials. - In your Harness account in the other browser window, check the User Group you linked with your SAML provider. The user that logged in is now added to the User Group, receiving the authorization associated with that User Group.
You cannot delete a SAML SSO Provider from Harness that is linked to a Harness Group. You must first remove the link to the SSO Provider from the Group.
SAML SSO with Keycloak
To set up SAML support in your Keycloack Harness app, make sure that the app has corresponding Users in Harness:
Users are not created as part of the SAML SSO integration. Users are invited to Harness using their email addresses. Once they log into Harness, their email addresses are registered as Harness Users. For more information, go to SAML SSO with Harness Overview.
This section describes the steps you must perform to use a Keycloak app for Harness SAML SSO:
Keycloak User Accounts
- In Harness, add the users you want to set up for SAML SSO by inviting them to Harness using the same email addresses that they use in your SAML provider.
- In Keycloak, assign them to your SAML provider app.
Set Up a Client in Keycloak
Log in to your Keycloak account.
In your Master Realm, click Clients. For steps to create a new Realm, go to Create a New Realm.

Click Create Client. The Create Client settings appear.
In Client type, select SAML.
In Client ID, enter
app.harness.io.In Name, enter a name for your client.
Turn off Always display in console. Turning this option off will make sure that this client is not displayed in the Account Console, when you do not have an active session.
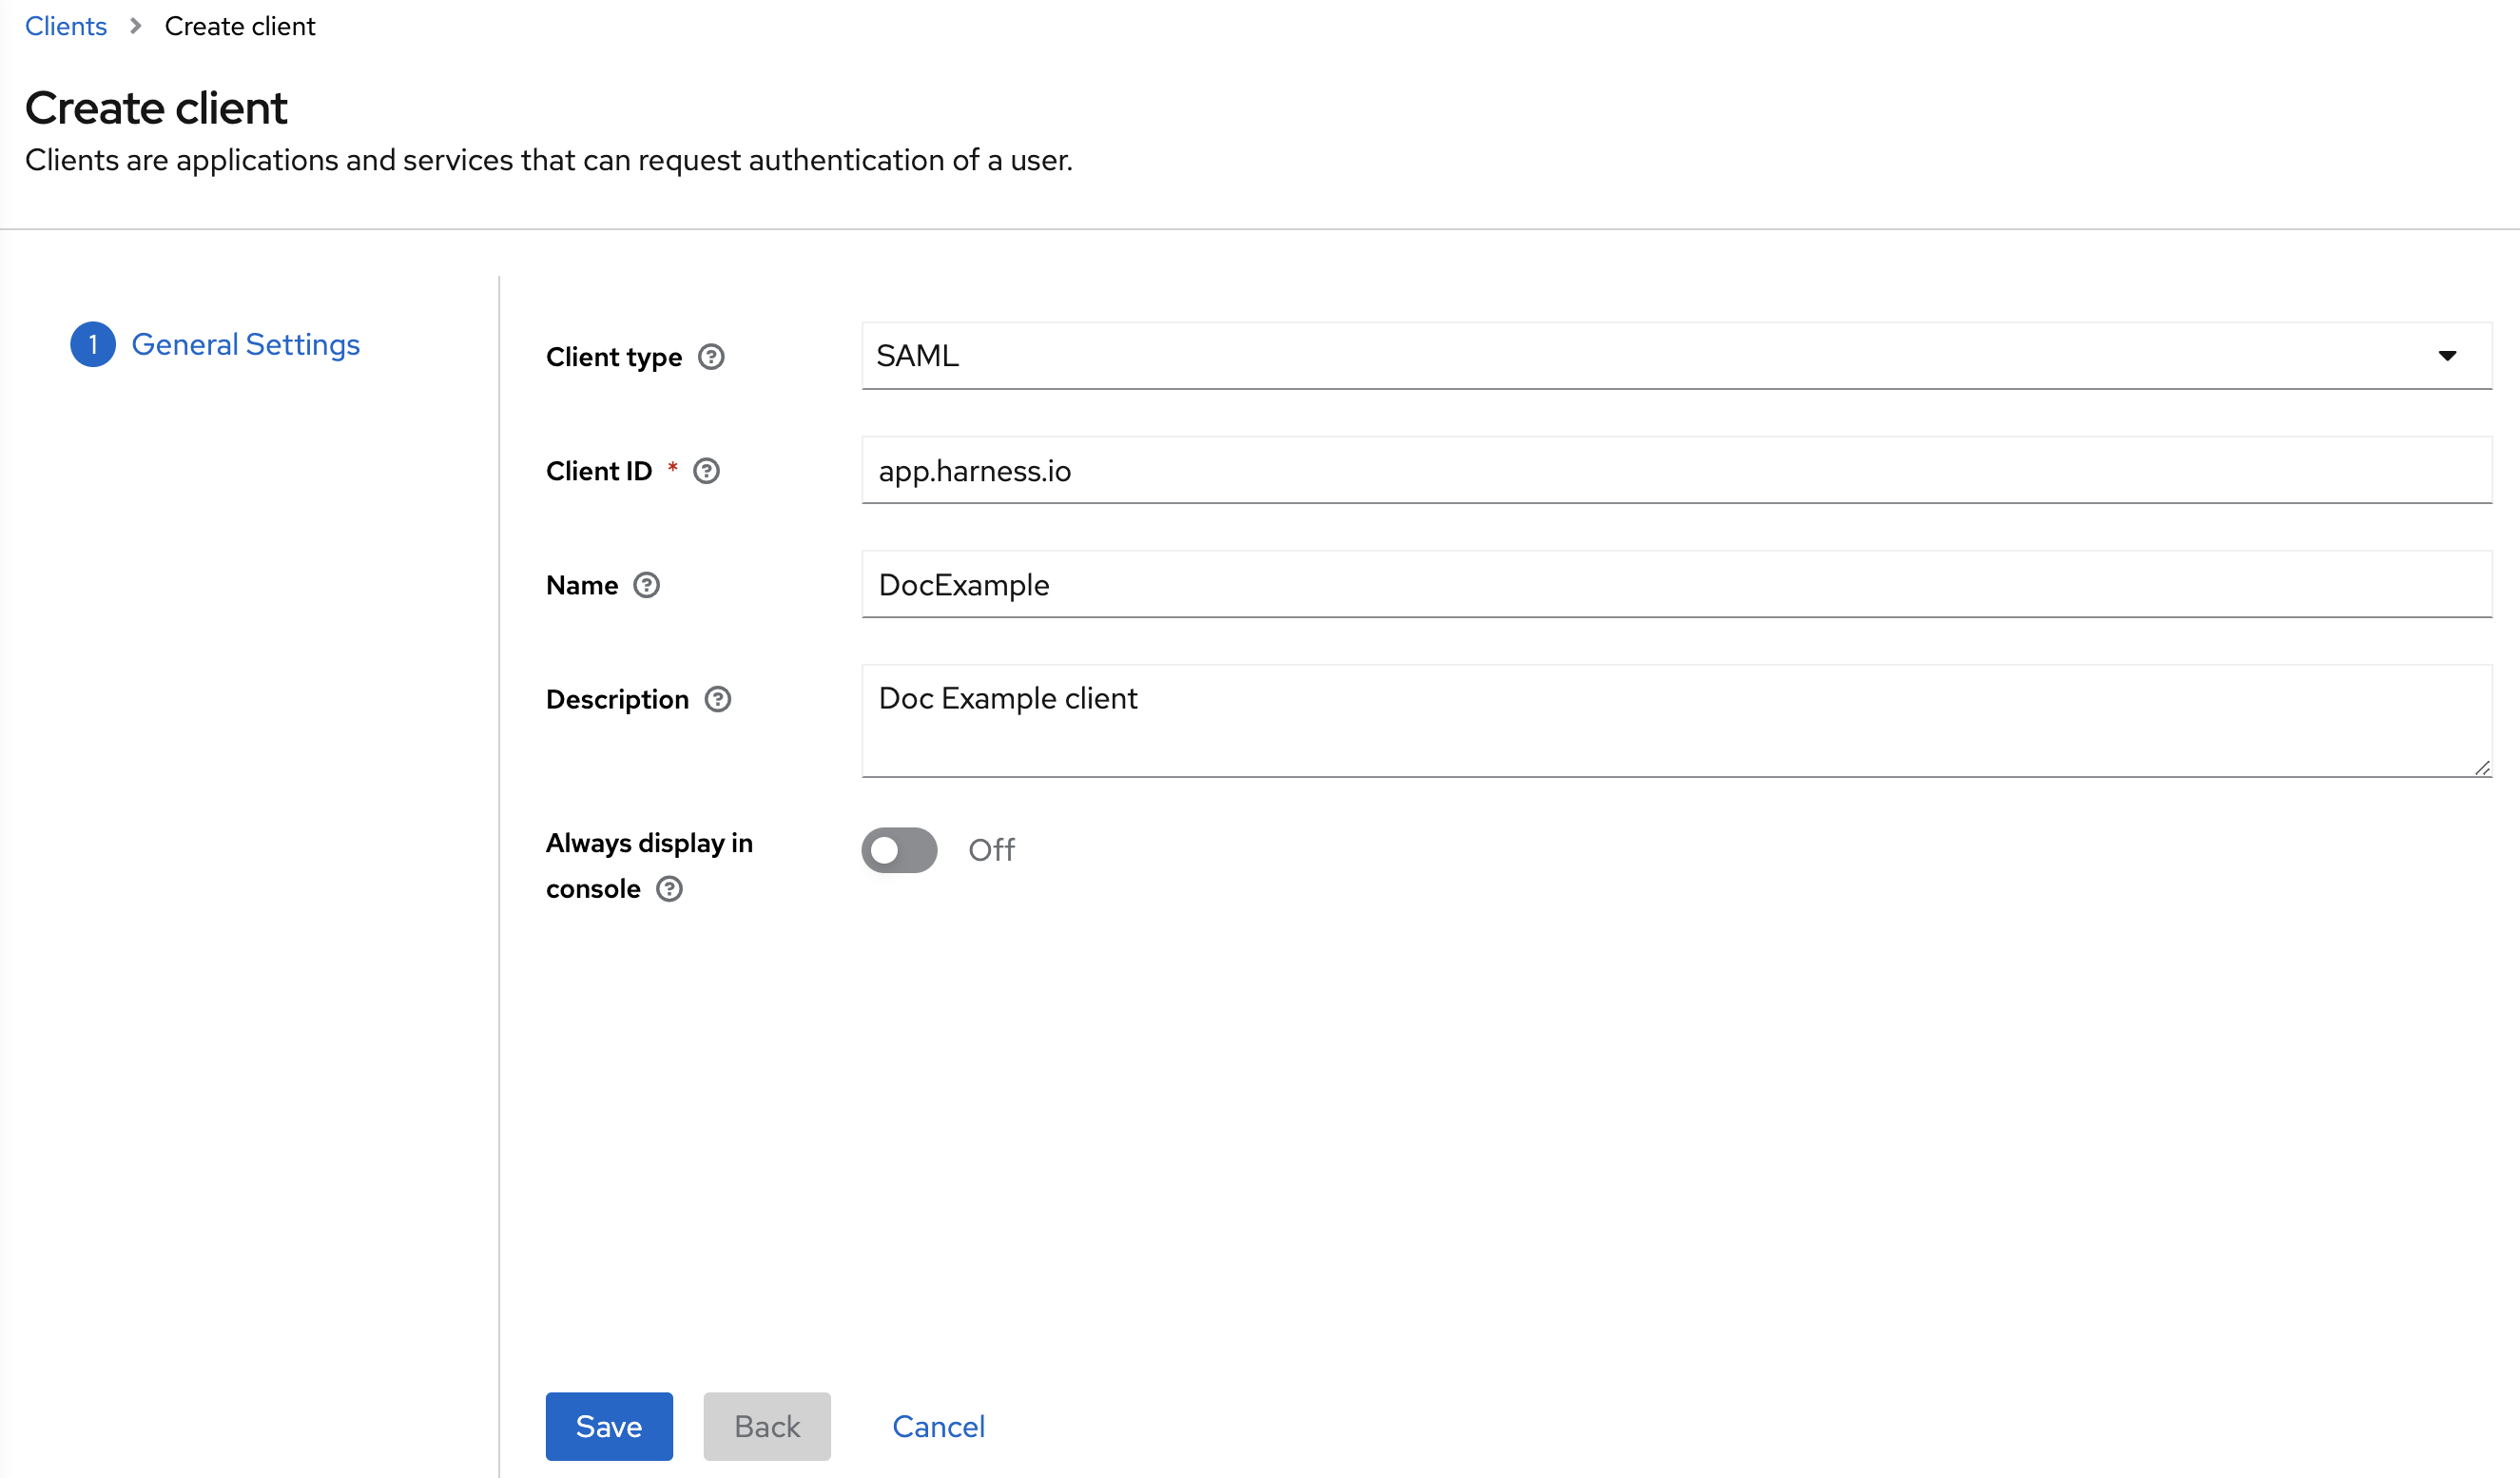
In Root URL, Home URL, and Valid post logout redirect URIs enter
https://devtest.harnesscse.com.In Master SAML Processing URL, enter your app's redirect YAML login URL.
For example,https://app.harness.io/gateway/api/users/saml-login?accountId=<your account Id>.Click Save. Your client is now listed in Clients.
Click on the client you just created. The client details appear.
Make sure the Name ID format is set to email.
Make sure the following settings are turned on:
Force POST binding
Include AuthnStatement
Sign assertions
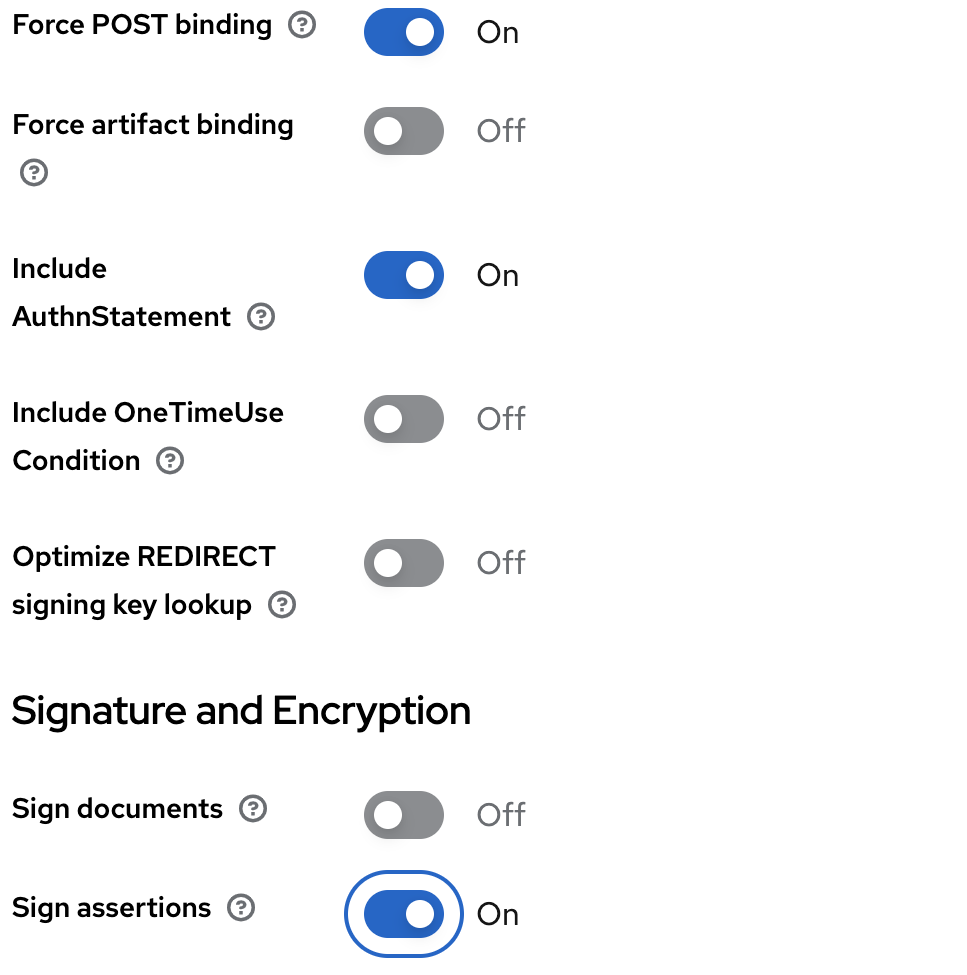
In Signature Algorithm, select
RSA_SHA256.In SAML signature key name, select NONE.
In Canonicalization method, select Exclusive.
Click Save
Create a Role
- In your Client, click Roles.
- Click Create Role.
- In Role Name, enter a name for the role. Click Save.
Create a User
- In your Keycloak account, click Users.
- Click Add user. The Create User settings appear.
- In Email, enter the email address of the user.
- Turn on Email verified.
- In First name, enter the first name of the user.
- In Last name, enter the last name of the user.
- Turn on Enabled. This is to make sure that a disabled user cannot log in.
- Click Join Groups. Search for your user groups and join.
- Click Create.
- Click on the user you just created and click Credentials.
- Add password for this user.
- Click Role mapping. Assign admin role to this user.
Set up Keycloak SAML SSO in Harness
In your Harness Account, got to Account SETUP and click Authentication.
Click SAML Provider. The Add SAML Provider settings appear.
In Name, enter a name for your SAML provider.
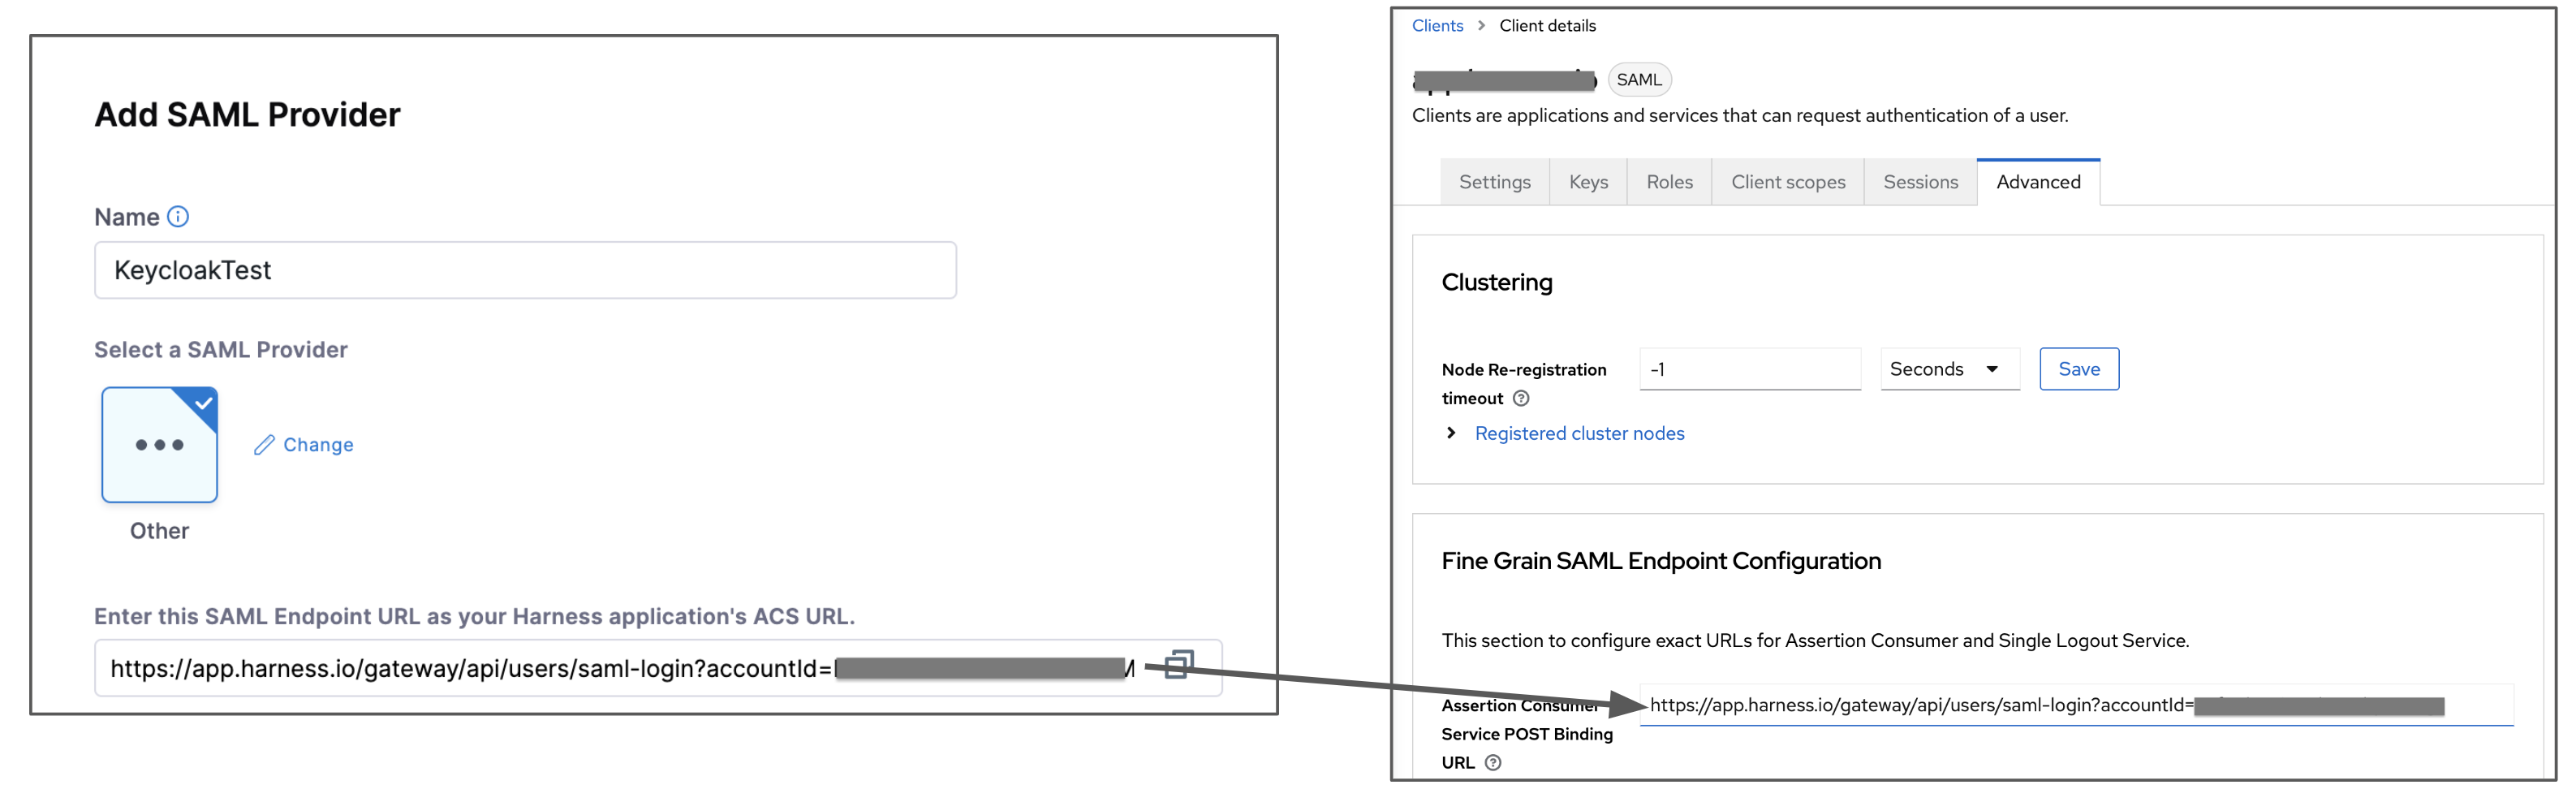
In Select a SAML Provider, click Other.
Once you do this, you can see additional controls to set up the SAML Provider.Copy the Endpoint URL under Enter the SAML Endpoint URL as your Harness application's ACS URL and paste it in Assertion Consumer Service POSTBinding URL in your Keycloak client's Advanced tab.
You must download the Identity Provider metadata XML from your Keycloak realm and upload the file into Harness.
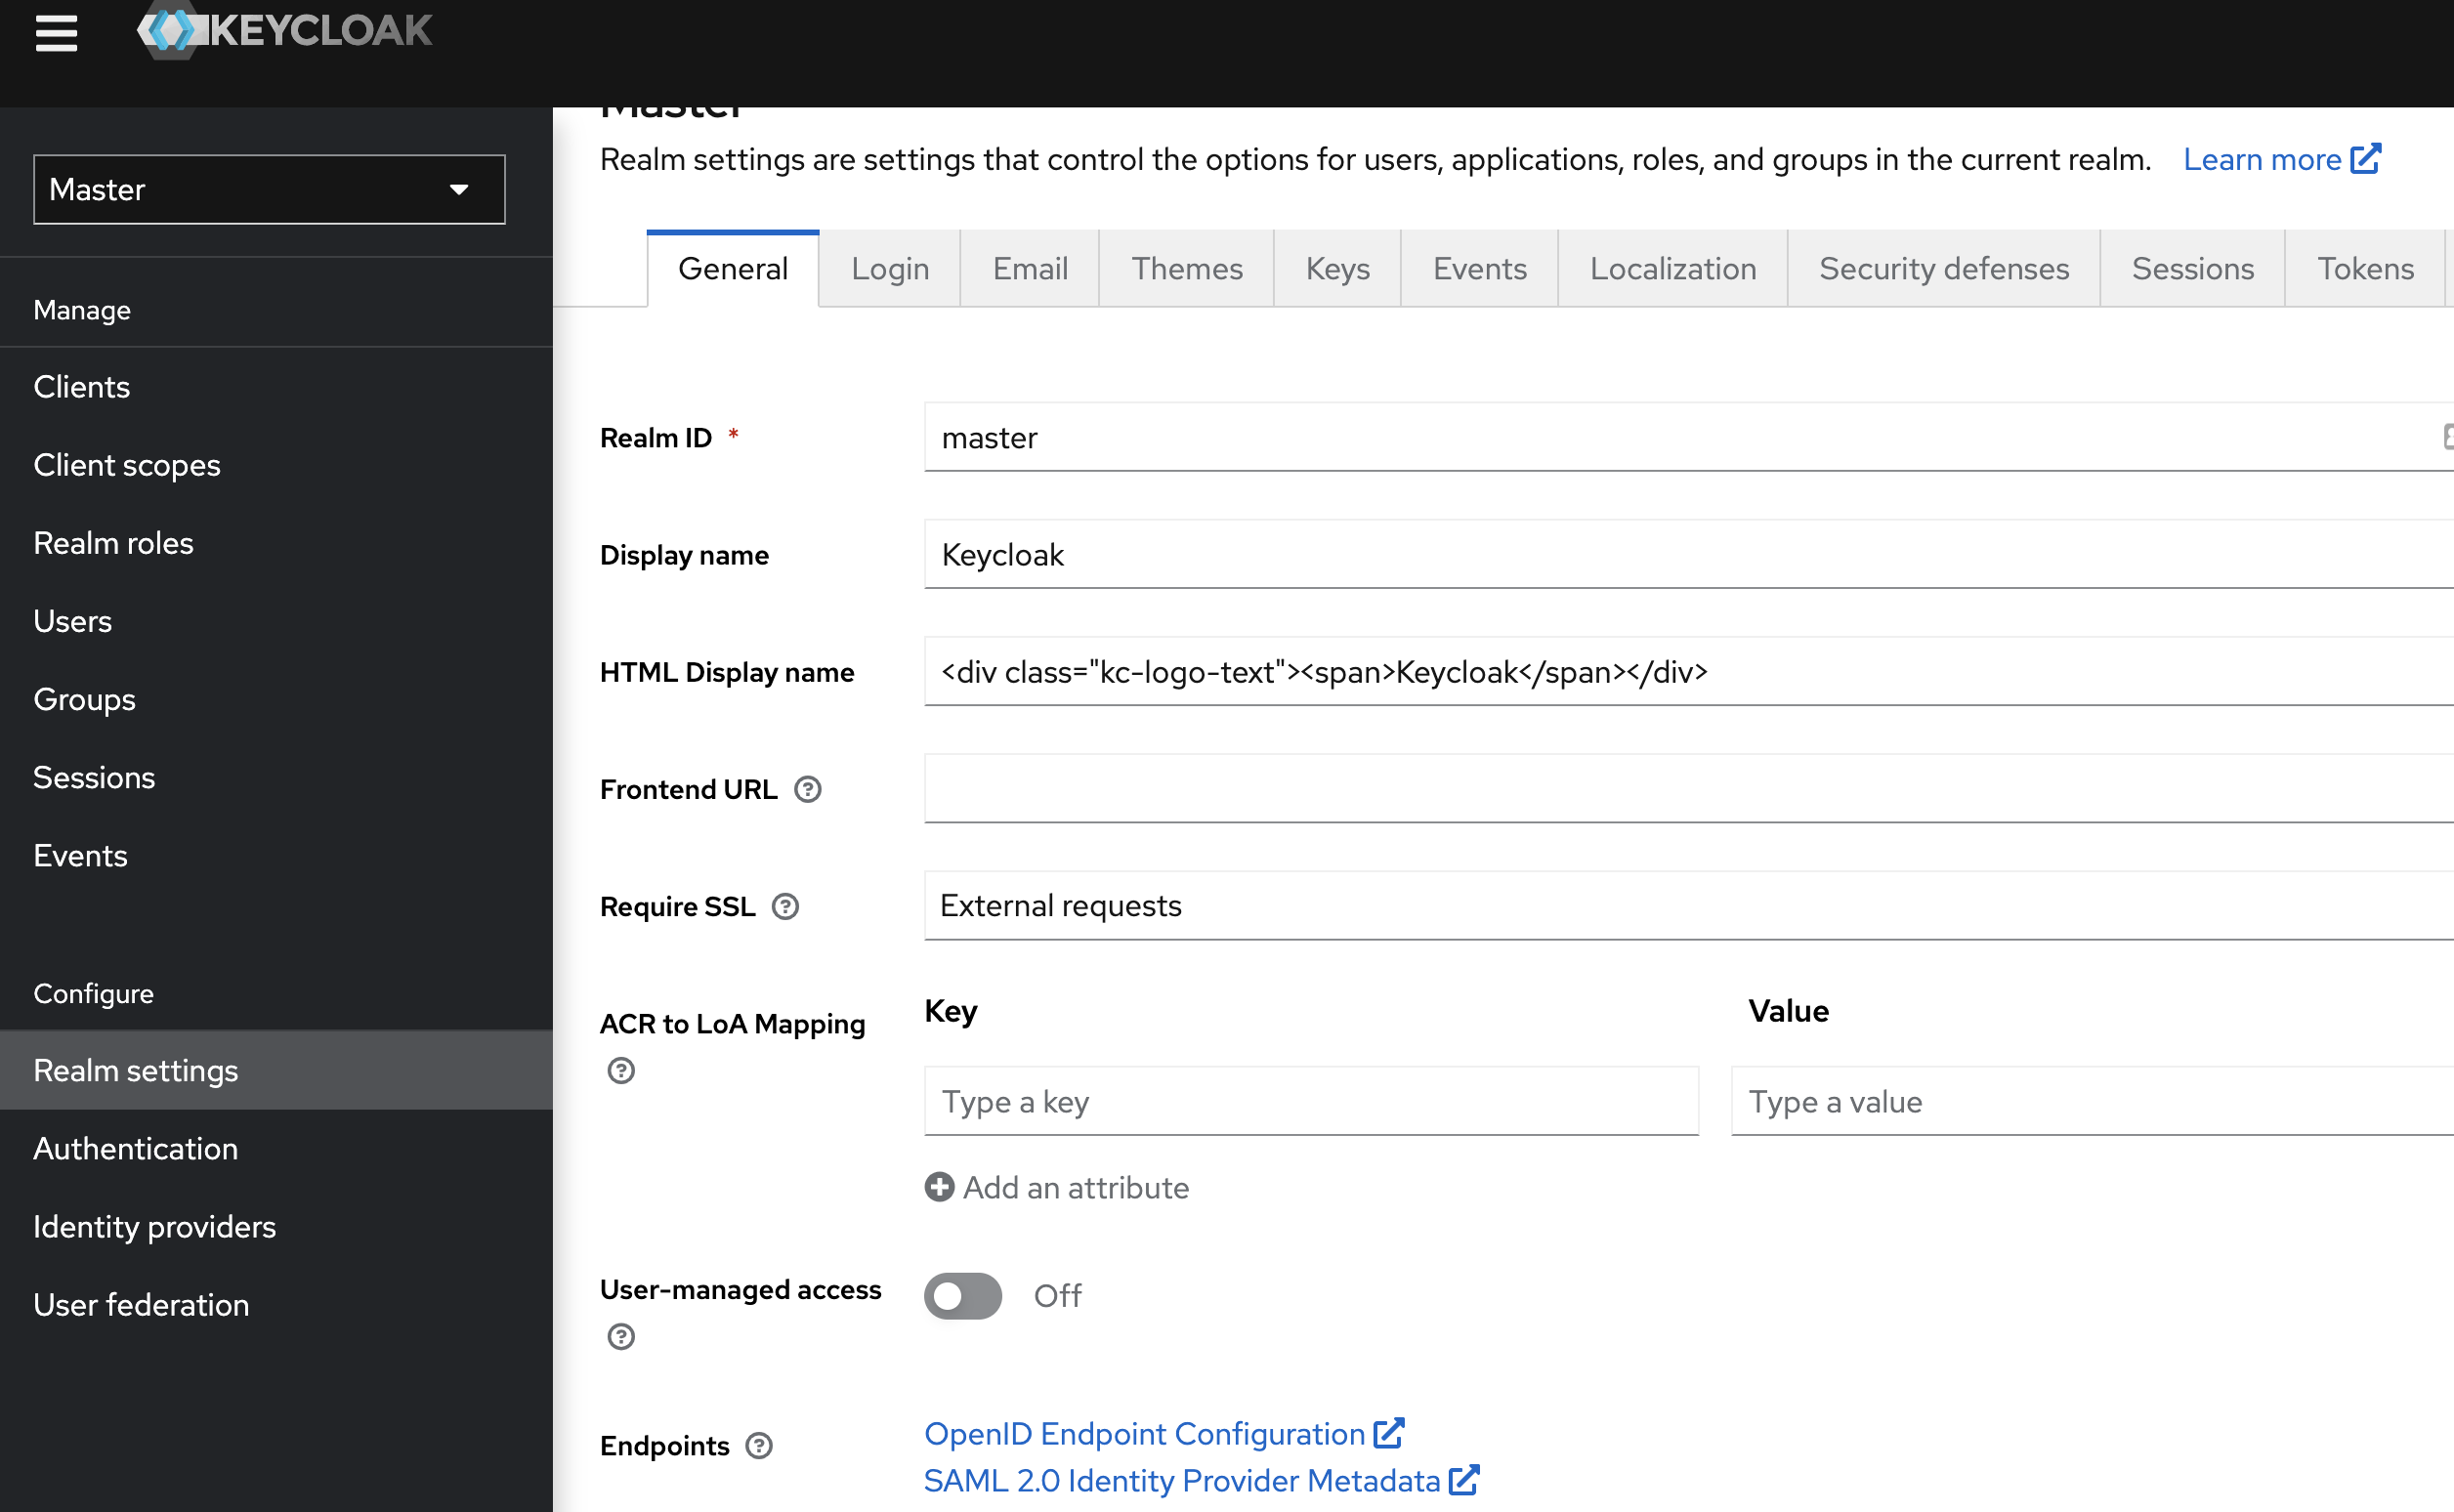
To do this, in your Keycloak account, click Realm Settings.Click SAML 2.0 Identity Provider Metadata. Save the metadata file.
In Harness' Add SAML Provider dialog, under Upload the Identity Provider metadata XML, click Upload.
Add the SAML metadata file you downloaded from your Keycloak realm settings.
Select Add Entity ID and enter your custom Entity ID. The default Entity ID is
app.harness.io. The value you enter here will override the default Entity ID.Click Add.
The new SSO provider is displayed under Login via SAML.
Harness does not support authorization with Keycloak.
Enable and Test SSO with Keycloak
Now that Keycloak is set up in Harness as a SAML SSO provider, you can enable and test it.
- To enable the SSO provider, select Login via SAML.
- In the resulting Enable SAML Provider dialog, click TEST to verify the SAML connection you've configured.
- Upon a successful test, Harness will display the SAML test successful banner on top.
- Click CONFIRM to enable SAML SSO in Harness.
Harness Local Login
To prevent lockouts or in the event of OAuth downtime, a user that has Account Admin assigned on All Account Level Resources or All Resources Including Child Scopes can use the Local Login URL to log in and update the OAuth settings. The user must have this access assigned directly on their Harness user, not via a group assignment.
For the Harness production cluster prod-3, the local login URL is https://app3.harness.io/auth/#/local-login.
Log in using Harness Local Login.
Change the settings to enable users to log in.
You can disable Local Login using the feature flag DISABLE_LOCAL_LOGIN. Contact Harness Support to enable the feature flag.