Deploy a Docker Image to Amazon ECS
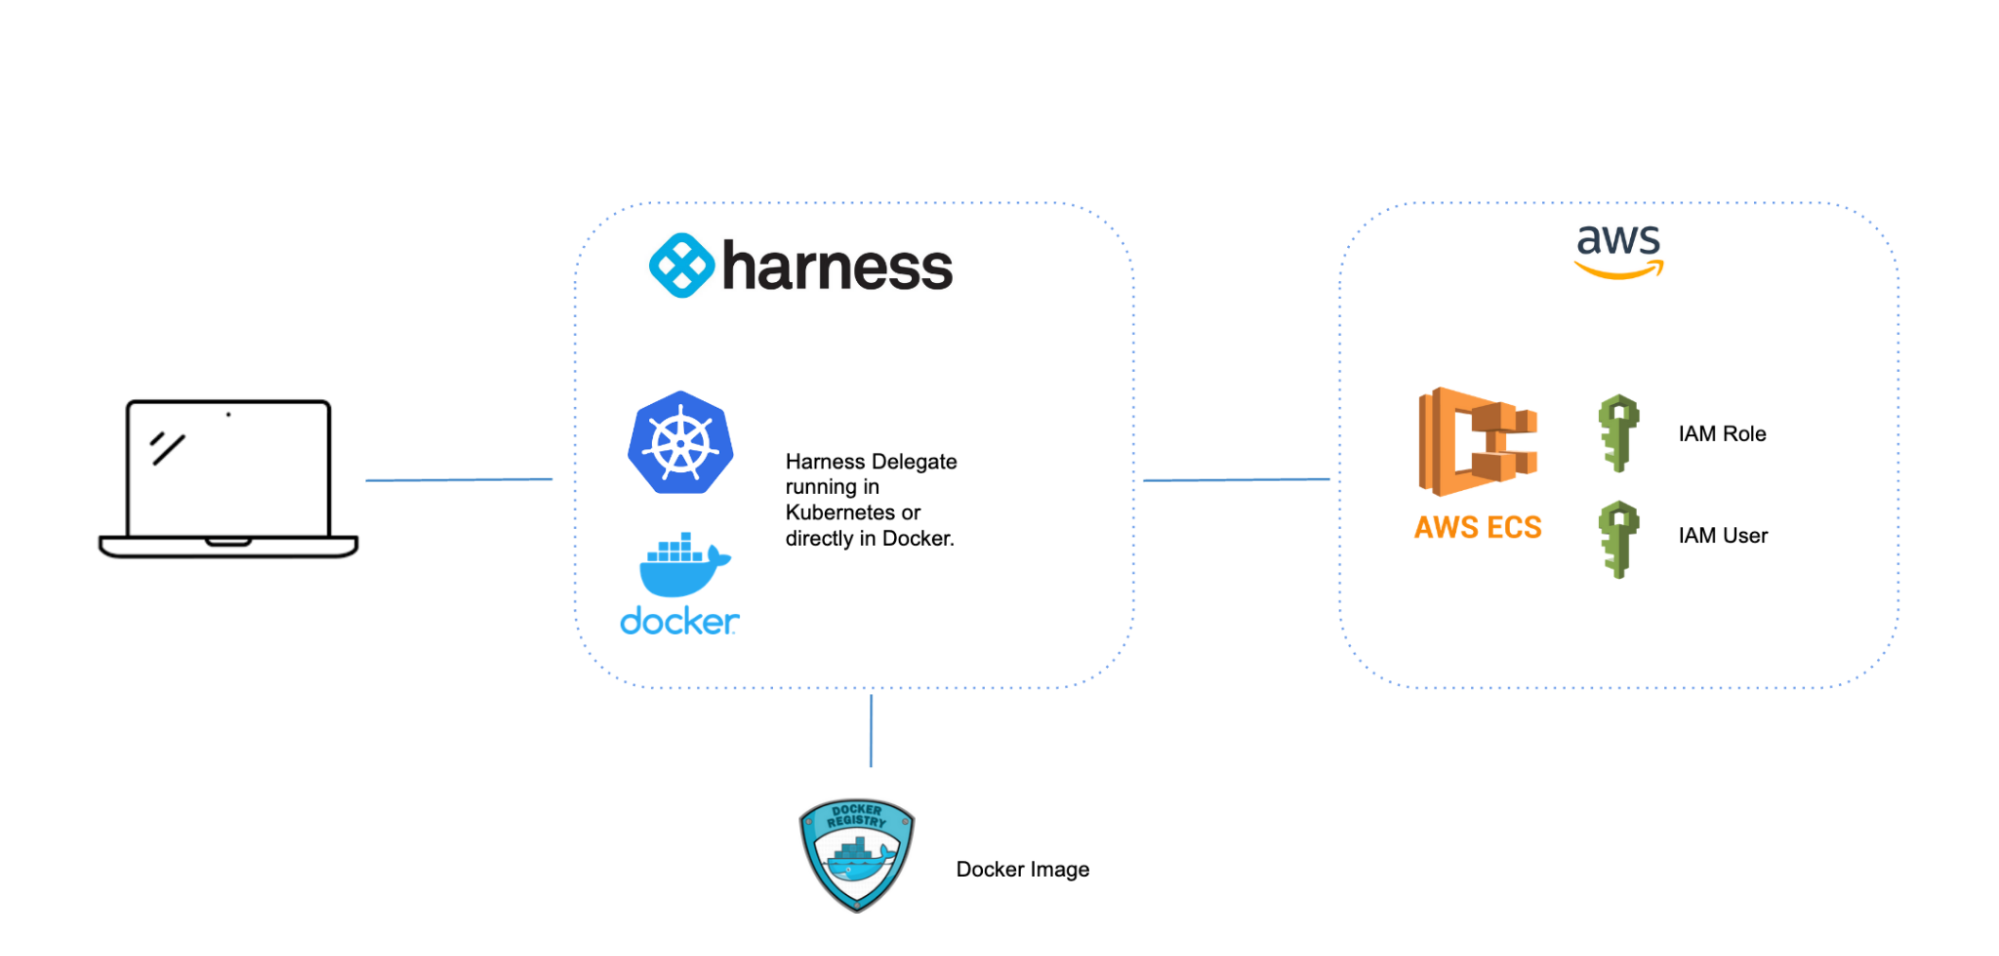
Amazon Elastic Container Service is an AWS offering for those looking to run containerized workloads. Define an ECS Task Definition describing your workload and a Service Definition where you want to run your workload and you are all set. A Continuous Delivery Pipeline is an excellent spot to orchestrate a deployment to Amazon ECS. In this example, we will go through deploying an image with Amazon ECS inside a Harness Continuous Delivery Pipeline.
There are a few AWS Items to setup, such as the ECS Cluster itself, which we will go through configuring. If you have not signed up for Harness CD, sign up now before diving in.
Create Your First Amazon ECS Cluster
You need access to an AWS Account to create an ECS cluster. After that there are a few items to create ahead of ECS Cluster Creation or can leverage the AWS ECS Cluster Creation Wizard to create. Amazon ECS creates EC2 instances on your behalf to run your workloads. So if you have used EC2 in the past, some of these items will not be too foreign.
Create/Validate Ahead of Time
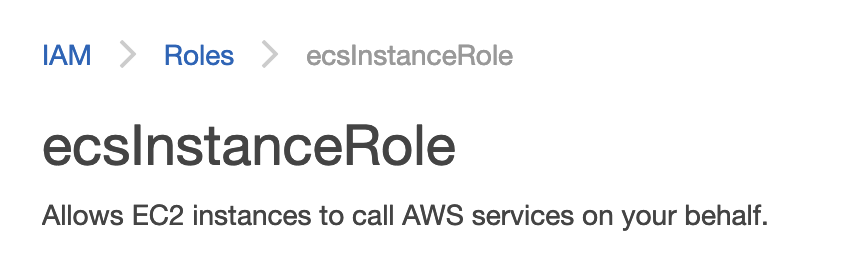
ECS Instance Role - IAM
The ECS Instance Role will allow the running containers to call underlying ECS API commands. If you do not have an “ecsInstanceRole”, AWS Provides documentation to create one. Make sure to set up the “Trust relationships” per the AWS documentation so your user can eventually assume the Role.
ECS Managed Policy - IAM
The next is to choose or set up a Managed Policy which will allow Harness to call ECS. Just as an example to not set up a more specific Harness Centric Managed Policy, you can use the generic AmazonECS_FullAccess [not recommended in production].

Attach the Managed Policy to your IAM User
Lastly, the ECS Managed Policy will need to be attached [Add permission] to your user that you will have Harness connect to AWS with.

VPC/Subnet(s)/Security Group
If this is your first time using ECS or have an account that is a sandbox environment, leveraging the AWS Default VPC and subsequent subnets [e.g one each for each availability zone in a Region] is fine. Depending on your traffic, you would want to create a Security Group to allow that traffic in. In this example, we will be handling traffic over TCP port 80 with an example image. For the future steps of wiring in the ECS Service Definition, make sure to have the subnet and Security Group IDs handy.
Creating an ECS Cluster
With the above items created/validated, you are now ready to create an ECS Cluster. You can pick your flavor of ECS. In this example we will deploy to EC2 Linux + Networking.
AWS Console -> ECS -> Clusters -> Create Cluster
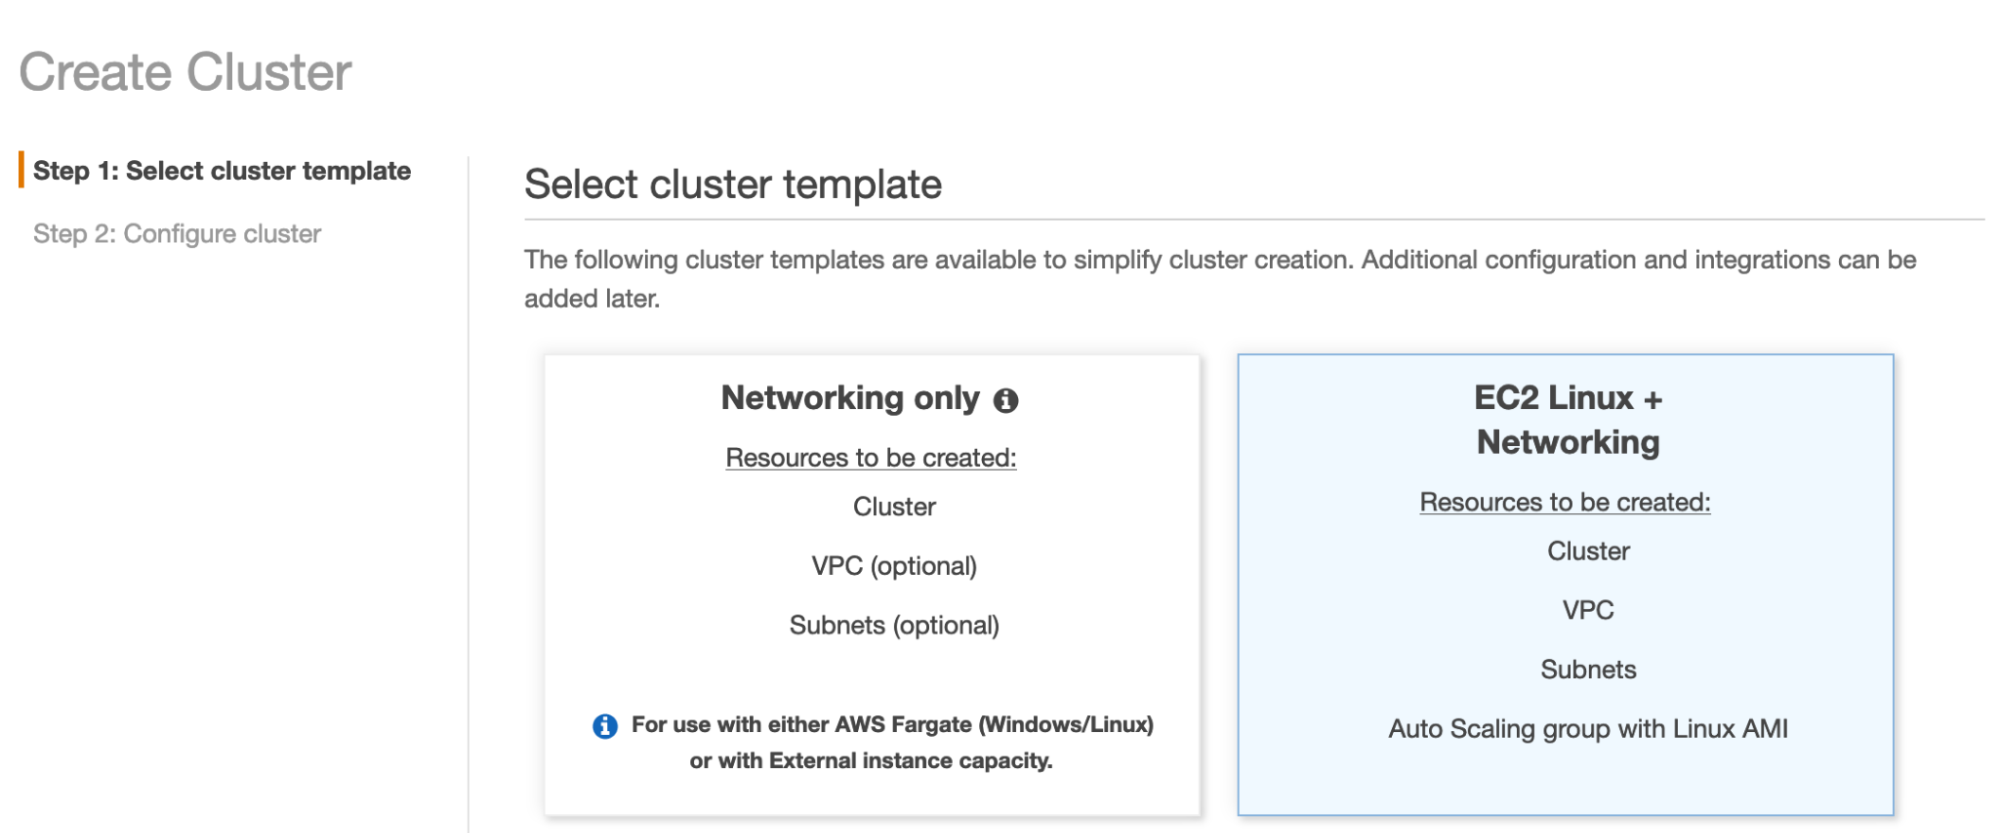
When filling out the wizard, here are a few prudent details:
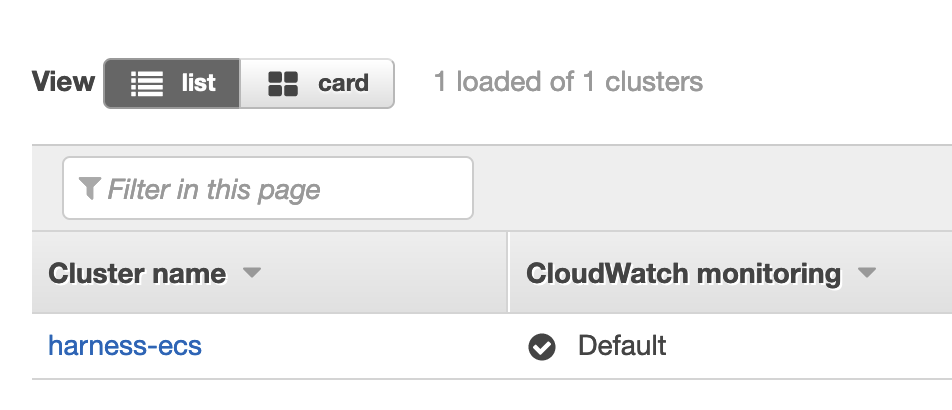
- Cluster Name: harness-ecs
- Instance Type: A medium instance type e.g m5-medium
- VPC: existing VPC, e.g your default.
- Subnets: select the subnets in your VPC. Note: Regions can sometimes have networking exhaustion, for the example better to select multiple subnets that represent each availability zone.
- Security Group: Security Group that was created before / one that can handle inbound TCP 80. Will need to reference the Security Group ID later, so creating one ahead of time allows the ID to be visible via the UI to reference.
Once set up, you will have an ECS Cluster that is ready to accept workload.
Now you are ready to wire Harness to deploy on your behalf.
Initial Harness Setup
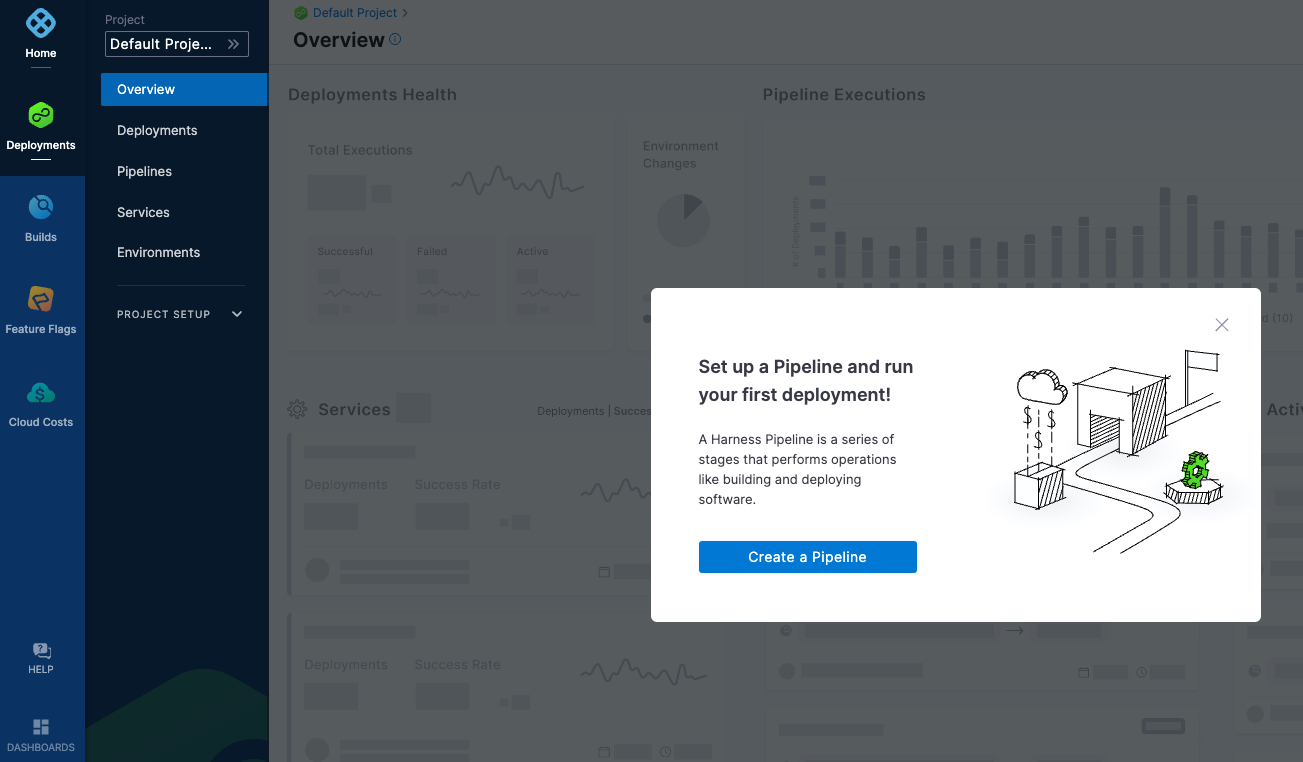
If you do not have a Harness Account, sign up for a Harness Account for access to the Continuous Delivery Module. a default Harness Project will be created for you automatically. Projects are logical groupings of resources. The generated default project is perfect for the first time deployment.
When navigating back to Deployments, can set the project context to the Default Project by clicking on the blue chevrons >> and selecting Default Project.

With the Default Project selected, clicking on Overview will bring up a wizard to create your first Pipeline/Deployment.
There are a few Harness entities that will need to be created in Harness. The needed objects are a Harness Delegate and an AWS Connector for your user credentials.
Install a Delegate
If you do not have a Delegate installed, follow these steps to get one installed either in Docker or Kubernetes.
Install Delegate
Install Harness Delegate on Kubernetes or Docker
What is Harness Delegate?
Harness Delegate is a lightweight worker process that is installed on your infrastructure and communicates only via outbound HTTP/HTTPS to the Harness Platform. This enables the Harness Platform to leverage the delegate to execute the CI/CD and other tasks on your behalf, without any of your secrets leaving your network.
You can install the Harness Delegate on either Docker or Kubernetes.
Install Harness Delegate
Create a new delegate token
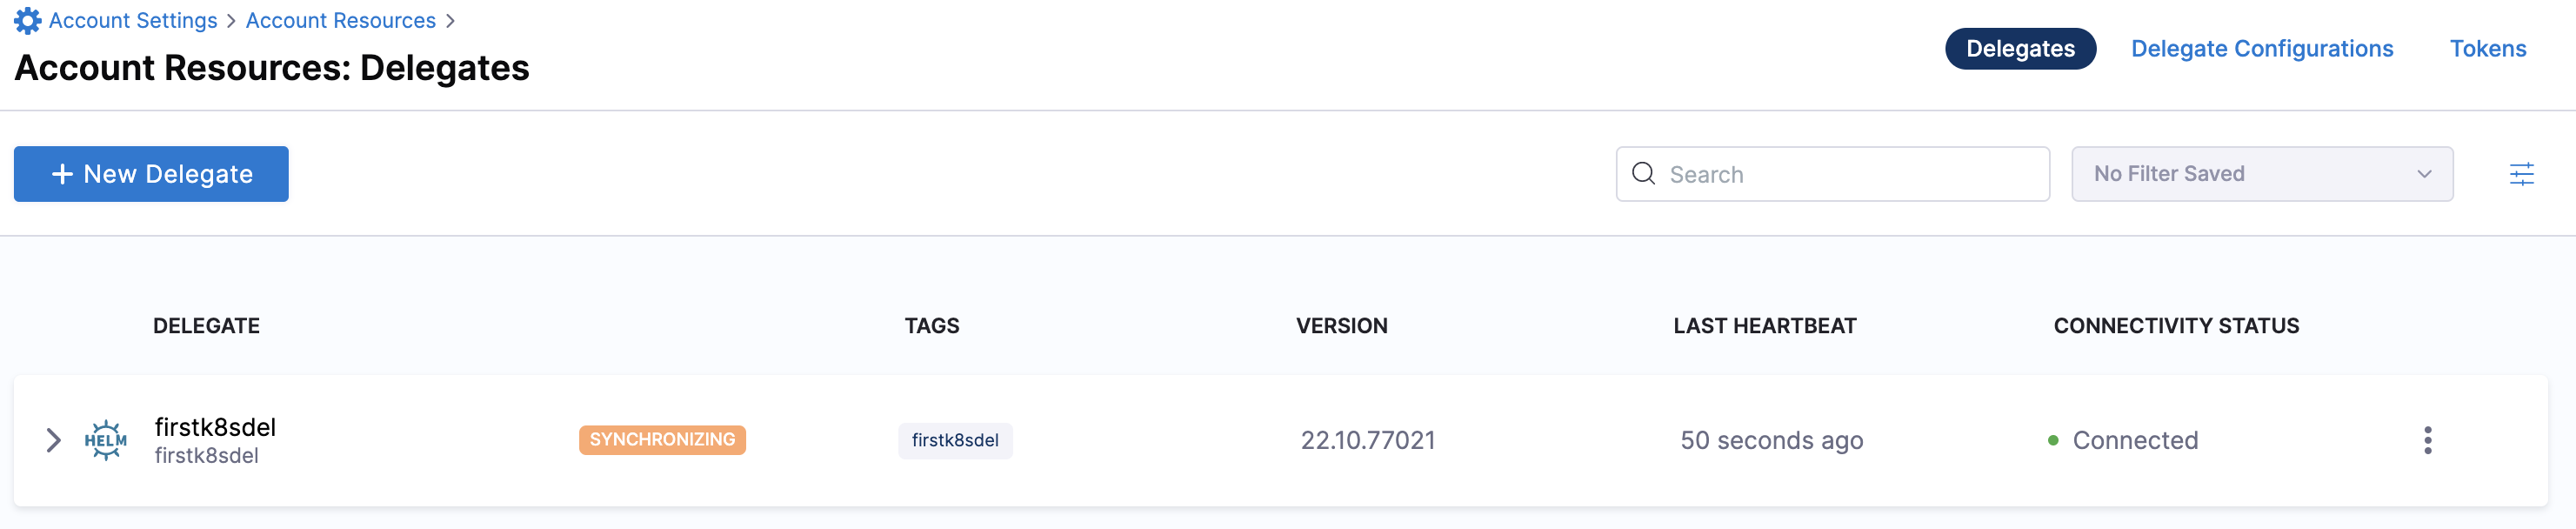
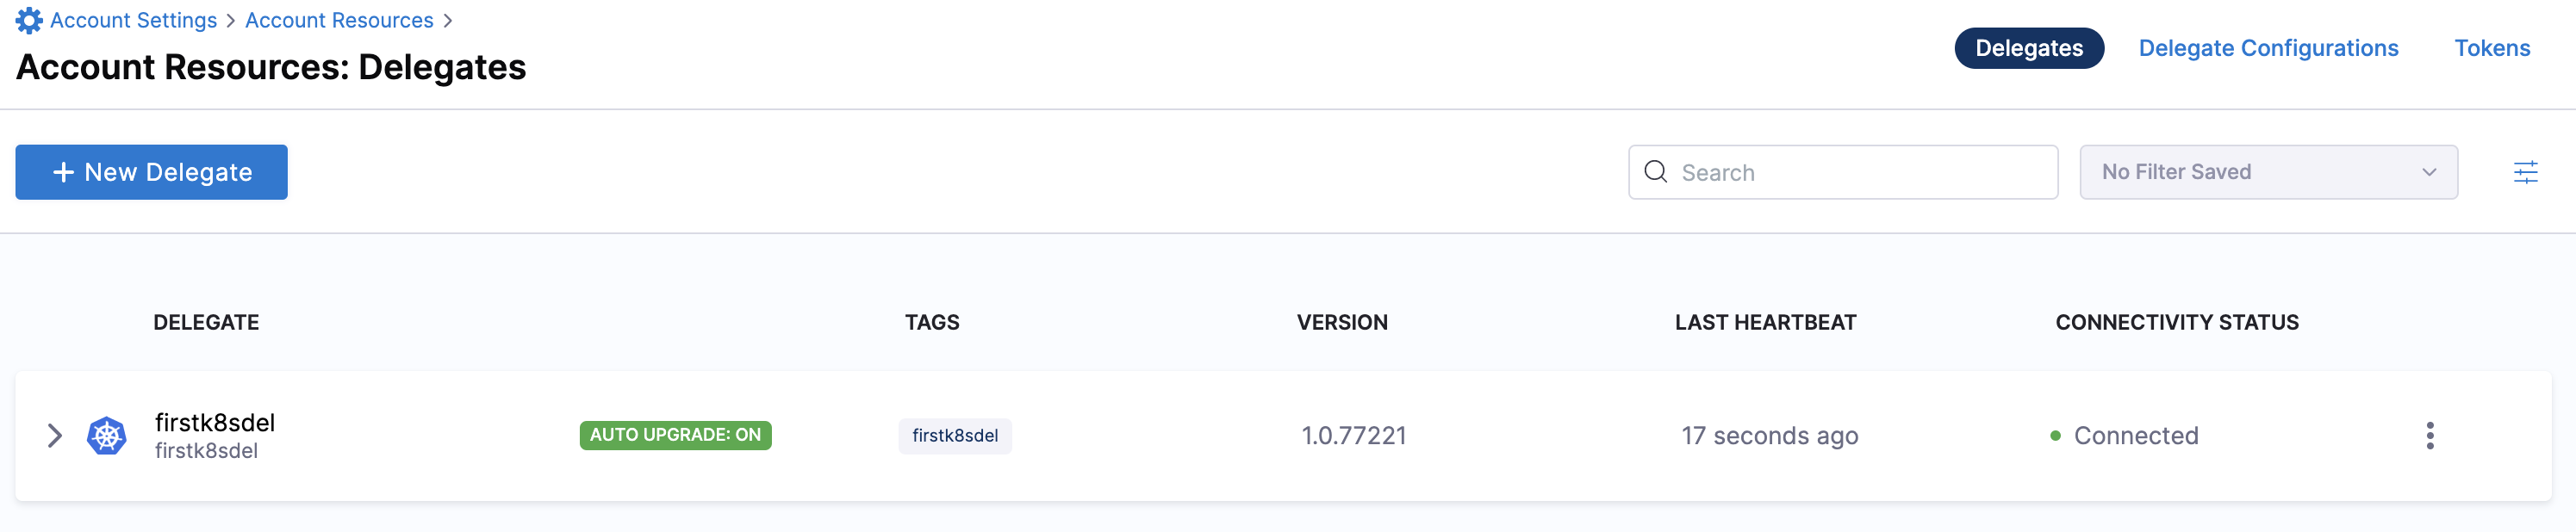
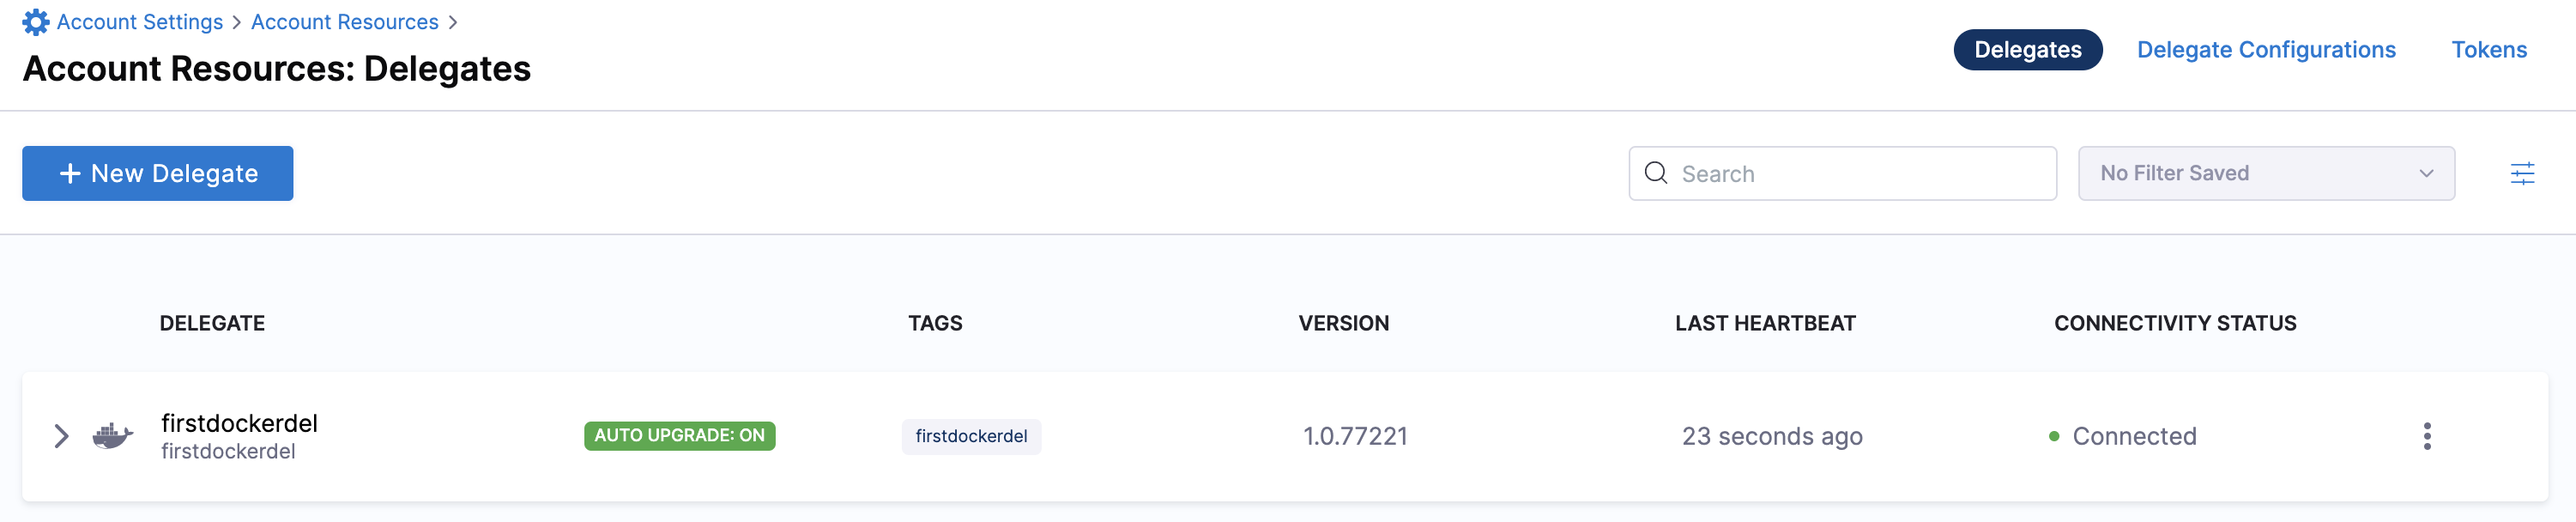
Log in to the Harness Platform and go to Account Settings -> Account Resources -> Delegates. Select the Tokens tab. Select +New Token, and enter a token name, for example firstdeltoken. Select Apply. Harness Platform generates a new token for you. Select Copy to copy and store the token in a temporary file. You will provide this token as an input parameter in the next installation step. The delegate will use this token to authenticate with the Harness Platform.
Get your Harness account ID
Along with the delegate token, you will also need to provide your Harness accountId as an input parameter during delegate installation. This accountId is present in every Harness URL. For example, in the following URL:
https://app.harness.io/ng/#/account/6_vVHzo9Qeu9fXvj-AcQCb/settings/overview
6_vVHzo9Qeu9fXvj-AcQCb is the accountId.
Now you are ready to install the delegate on either Docker or Kubernetes.
- Kubernetes
- Docker
Prerequisite
Ensure that you have access to a Kubernetes cluster. For the purposes of this tutorial, we will use minikube.
Install minikube
- On Windows:
choco install minikube
- On macOS:
brew install minikube
Now start minikube with the following config.
minikube start --memory 4g --cpus 4
Validate that you have kubectl access to your cluster.
kubectl get pods -A
Now that you have access to a Kubernetes cluster, you can install the delegate using any of the options below.
- Helm Chart
- Terraform Helm Provider
- Kubernetes Manifest
Install the Helm chart
As a prerequisite, you must have Helm v3 installed on the machine from which you connect to your Kubernetes cluster.
You can now install the delegate using the delegate Helm chart. First, add the harness-delegate Helm chart repo to your local Helm registry.
helm repo add harness-delegate https://app.harness.io/storage/harness-download/delegate-helm-chart/
helm repo update
helm search repo harness-delegate
We will use the harness-delegate/harness-delegate-ng chart in this tutorial.
NAME                                    CHART VERSION   APP VERSION DESCRIPTION
harness-delegate/harness-delegate-ng    1.0.8           1.16.0      A Helm chart for deploying harness-delegate
Now we are ready to install the delegate. The following example installs/upgrades firstk8sdel delegate (which is a Kubernetes workload) in the harness-delegate-ng namespace using the harness-delegate/harness-delegate-ng Helm chart.
To install the delegate, do the following:
In Harness, select Deployments, then select your project.
Select Delegates under Project Setup.
Select Install a Delegate to open the New Delegate dialog.
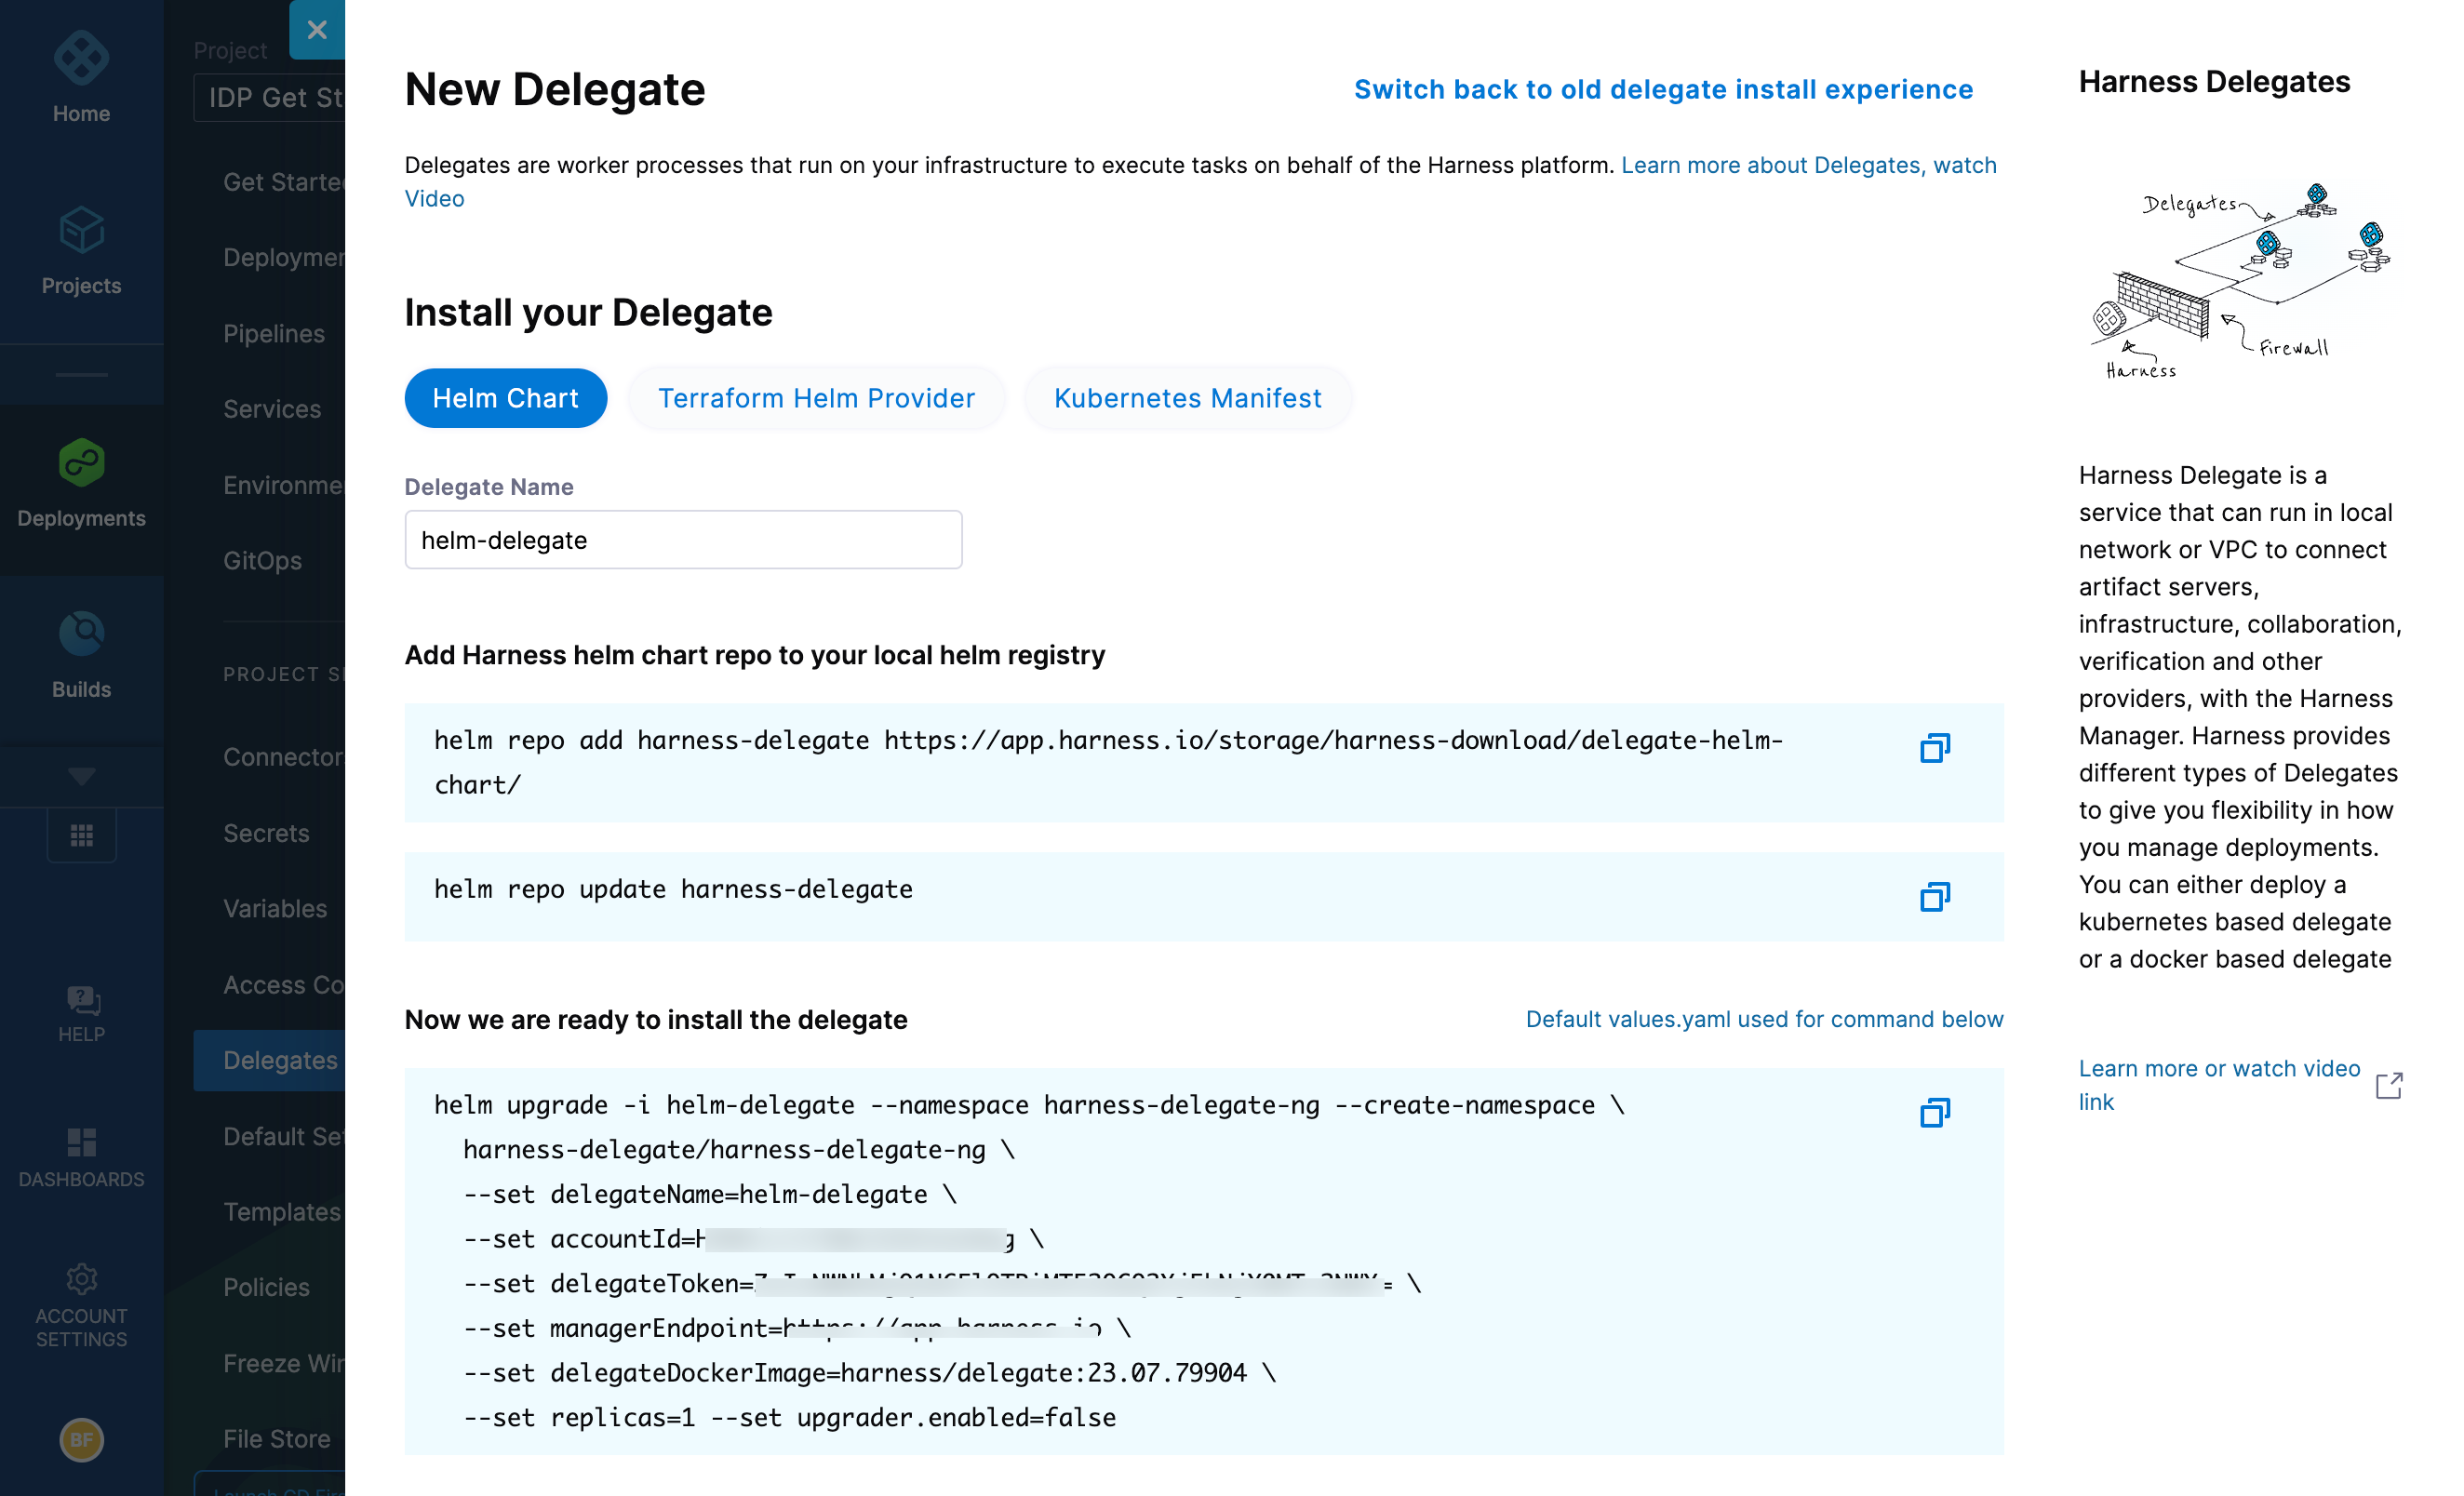
Select Helm Chart under Install your Delegate.
Copy the
helm upgradecommand.Run the command.
The command uses the default values.yaml located in the delegate-helm-chart GitHub repo. If you want change one or more values in a persistent manner instead of the command line, you can download and update the values.yaml file as per your need. You can use the updated values.yaml file as shown below.
helm upgrade -i firstk8sdel --namespace harness-delegate-ng --create-namespace \
  harness-delegate/harness-delegate-ng \
  -f values.yaml \
  --set delegateName=firstk8sdel \
  --set accountId=PUT_YOUR_HARNESS_ACCOUNTID_HERE \
  --set delegateToken=PUT_YOUR_DELEGATE_TOKEN_HERE \
  --set managerEndpoint=PUT_YOUR_MANAGER_HOST_AND_PORT_HERE \
  --set delegateDockerImage=harness/delegate:23.02.78306 \
  --set replicas=1 --set upgrader.enabled=false
Create main.tf file
Harness uses a Terraform module for the Kubernetes delegate. This module uses the standard Terraform Helm provider to install the Helm chart onto a Kubernetes cluster whose config by default is stored in the same machine at the ~/.kube/config path. Copy the following into a main.tf file stored on a machine from which you want to install your delegate.
module "delegate" {
  source = "harness/harness-delegate/kubernetes"
  version = "0.1.5"

  account_id = "PUT_YOUR_HARNESS_ACCOUNTID_HERE"
  delegate_token = "PUT_YOUR_DELEGATE_TOKEN_HERE"
  delegate_name = "firstk8sdel"
  namespace = "harness-delegate-ng"
  manager_endpoint = "PUT_YOUR_MANAGER_HOST_AND_PORT_HERE"
  delegate_image = "harness/delegate:23.02.78306"
  replicas = 1
  upgrader_enabled = false

  # Additional optional values to pass to the helm chart
  values = yamlencode({
    javaOpts: "-Xms64M"
  })
}

provider "helm" {
  kubernetes {
    config_path = "~/.kube/config"
  }
}
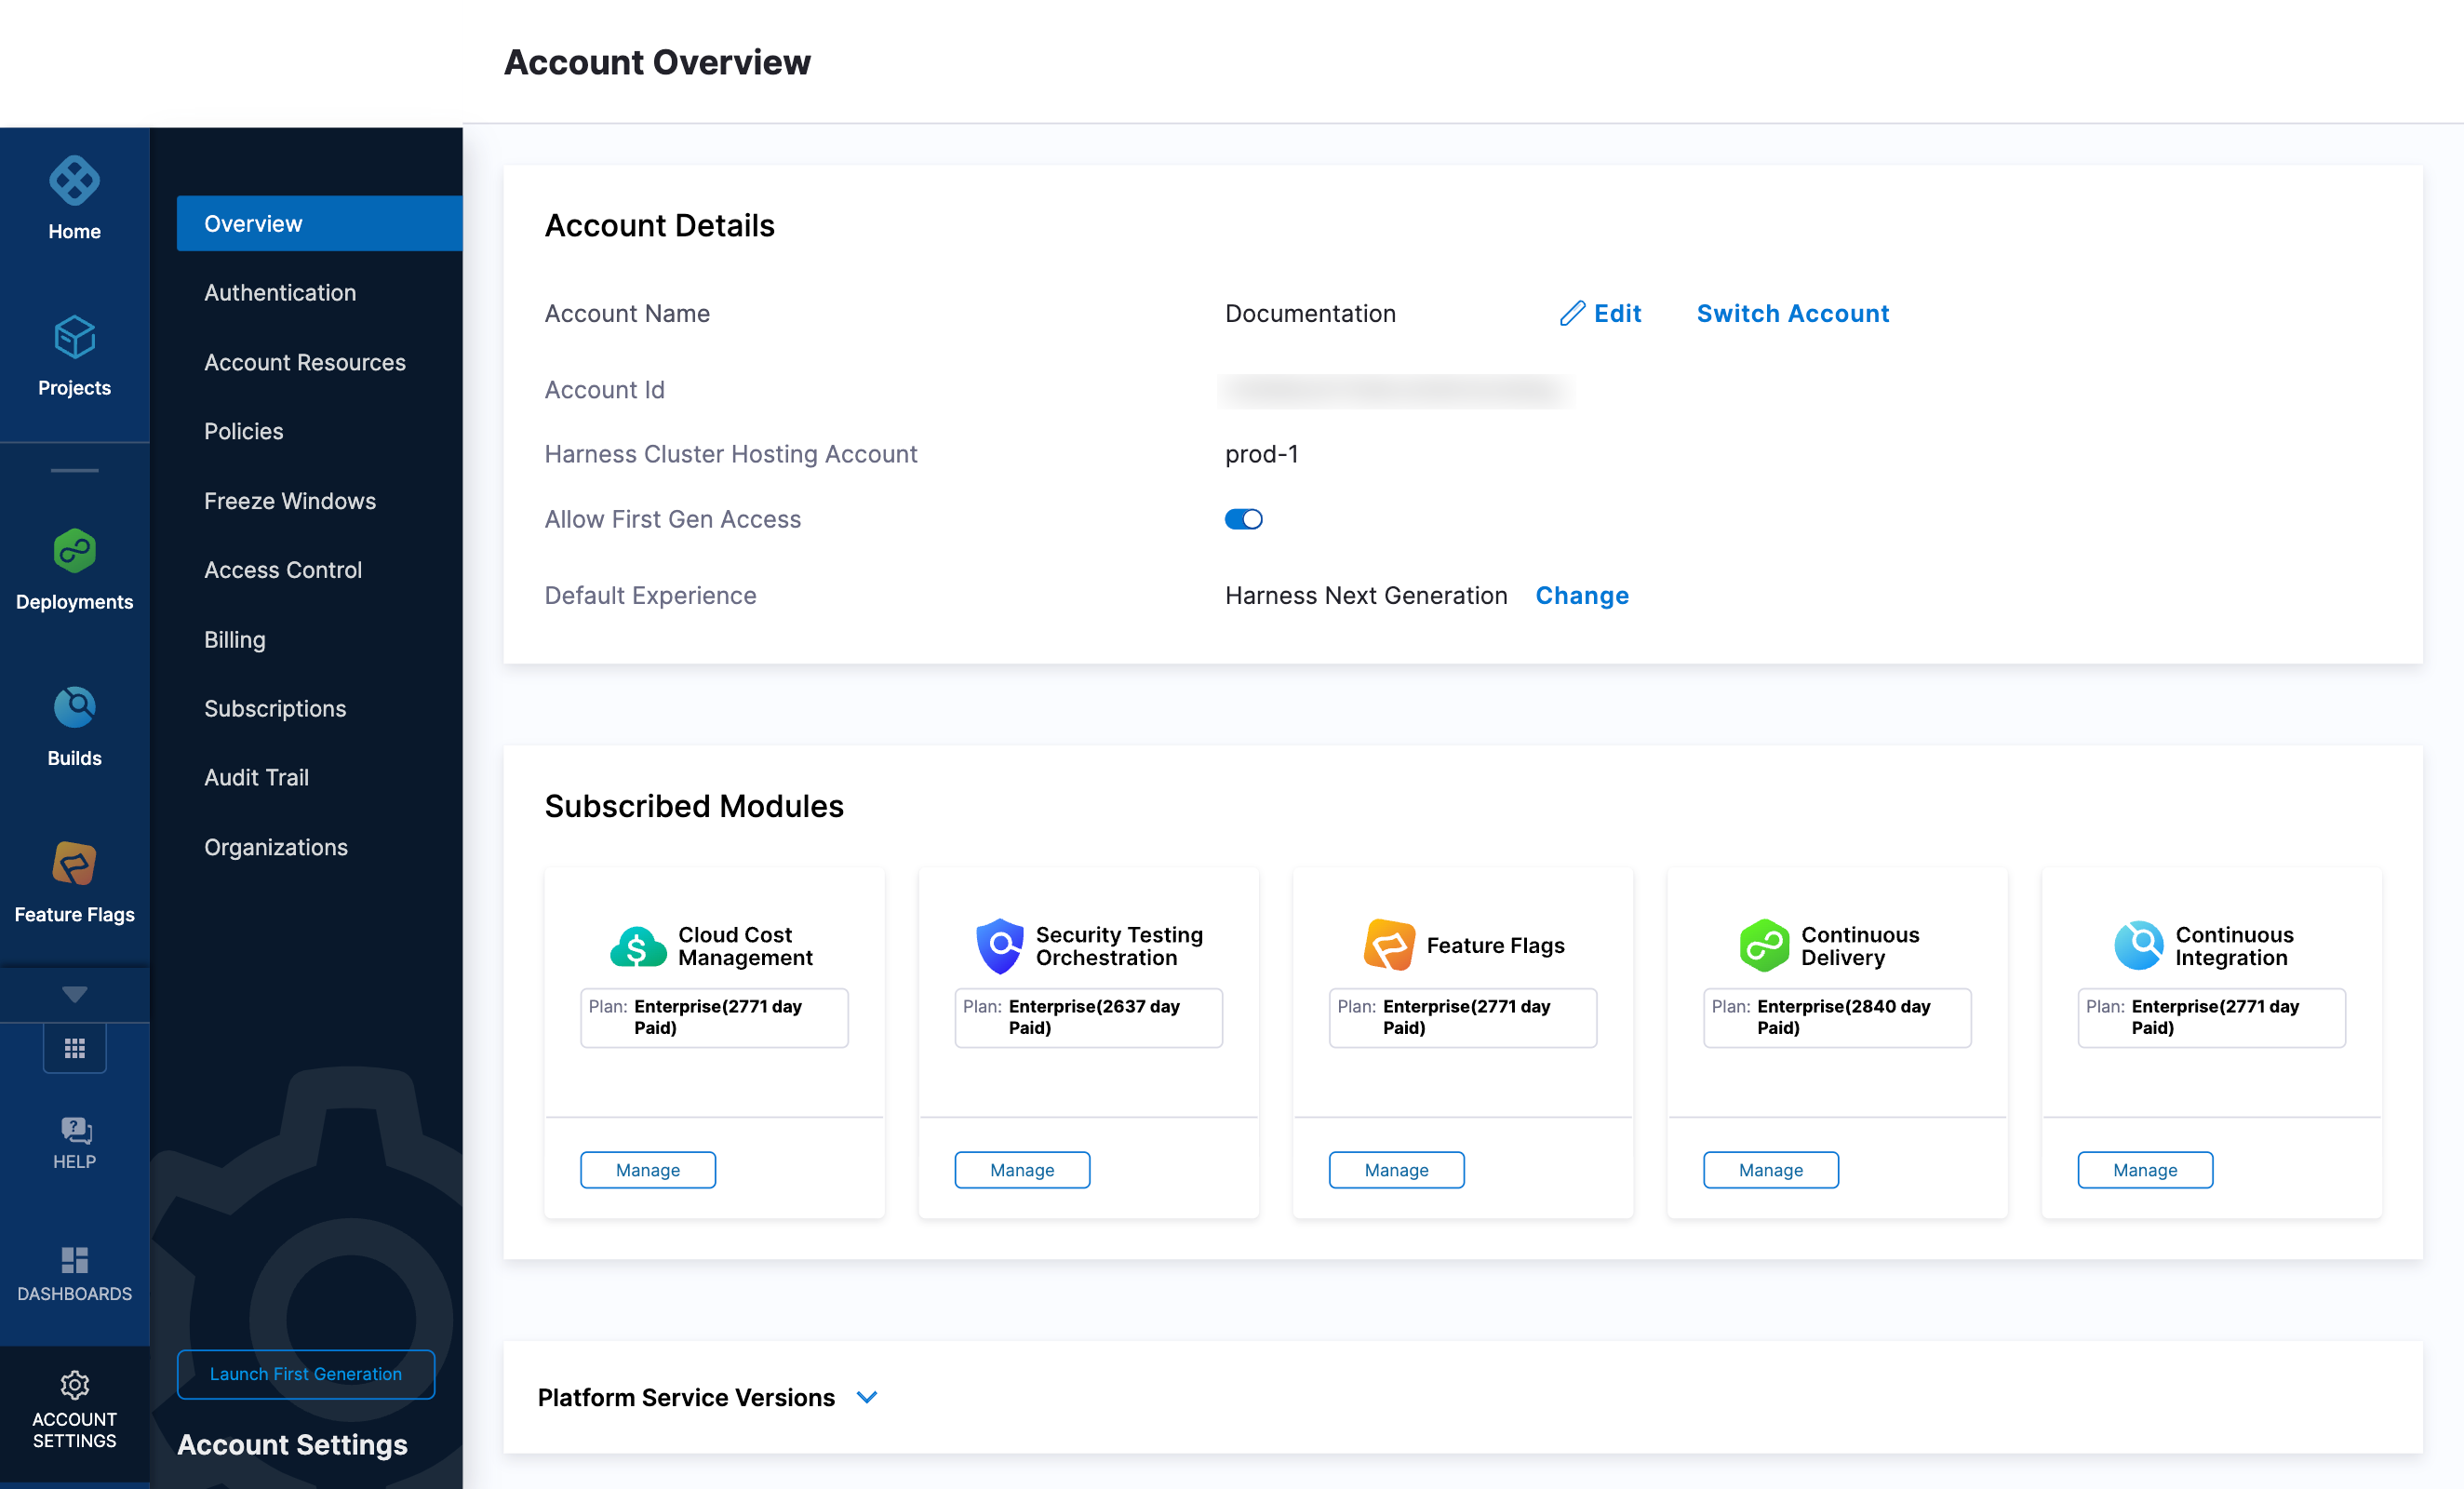
Now replace the variables in the file with your Harness accound ID and delegate token values. Replace PUT_YOUR_MANAGER_HOST_AND_PORT_HERE with the Harness Manager Endpoint noted below. For Harness SaaS accounts, you can find your Harness Cluster Location on the Account Overview page under the Account Settings section of the left navigation. For Harness CDCE, the endpoint varies based on the Docker vs. Helm installation options.
| Harness Cluster Location | Harness Manager Endpoint on Harness Cluster |
|---|---|
| SaaS prod-1 | https://app.harness.io |
| SaaS prod-2 | https://app.harness.io/gratis |
| SaaS prod-3 | https://app3.harness.io |
| CDCE Docker | http://<HARNESS_HOST> if Docker Delegate is remote to CDCE or http://host.docker.internal if Docker Delegate is on same host as CDCE |
| CDCE Helm | http://<HARNESS_HOST>:7143 where HARNESS_HOST is the public IP of the Kubernetes node where CDCE Helm is running |
Run Terraform init, plan, and apply
Initialize Terraform. This downloads the Terraform Helm provider to your machine.
terraform init
Run the following step to view the changes Terraform is going to make on your behalf.
terraform plan
Finally, run this step to make Terraform install the Kubernetes delegate using the Helm provider.
terraform apply
When prompted by Terraform if you want to continue with the apply step, type yes, and then you will see output similar to the following.
helm_release.delegate: Creating...
helm_release.delegate: Still creating... [10s elapsed]
helm_release.delegate: Still creating... [20s elapsed]
helm_release.delegate: Still creating... [30s elapsed]
helm_release.delegate: Still creating... [40s elapsed]
helm_release.delegate: Still creating... [50s elapsed]
helm_release.delegate: Still creating... [1m0s elapsed]
helm_release.delegate: Creation complete after 1m0s [id=firstk8sdel]

Apply complete! Resources: 1 added, 0 changed, 0 destroyed.
Download a Kubernetes manifest template
curl -LO https://raw.githubusercontent.com/harness/delegate-kubernetes-manifest/main/harness-delegate.yaml
Replace variables in the template
Open the harness-delegate.yaml file in a text editor and replace PUT_YOUR_DELEGATE_NAME_HERE, PUT_YOUR_HARNESS_ACCOUNTID_HERE, and PUT_YOUR_DELEGATE_TOKEN_HERE with your delegate name (for example, firstk8sdel), Harness accountId, and delegate token values, respectively.
Replace the PUT_YOUR_MANAGER_HOST_AND_PORT_HERE variable with the Harness Manager Endpoint noted below. For Harness SaaS accounts, you can find your Harness Cluster Location on the Account Overview page under the Account Settings section of the left navigation. For Harness CDCE, the endpoint varies based on the Docker vs. Helm installation options.
| Harness Cluster Location | Harness Manager Endpoint on Harness Cluster |
|---|---|
| SaaS prod-1 | https://app.harness.io |
| SaaS prod-2 | https://app.harness.io/gratis |
| SaaS prod-3 | https://app3.harness.io |
| CDCE Docker | http://<HARNESS_HOST> if Docker Delegate is remote to CDCE or http://host.docker.internal if Docker Delegate is on same host as CDCE |
| CDCE Helm | http://<HARNESS_HOST>:7143 where HARNESS_HOST is the public IP of the Kubernetes node where CDCE Helm is running |
Apply the Kubernetes manifest
kubectl apply -f harness-delegate.yaml
Prerequisite
Ensure that you have the Docker runtime installed on your host. If not, use one of the following options to install Docker:
Install on Docker
Now you can install the delegate using the following command.
docker run --cpus=1 --memory=2g \
  -e DELEGATE_NAME=docker-delegate \
  -e NEXT_GEN="true" \
  -e DELEGATE_TYPE="DOCKER" \
  -e ACCOUNT_ID=PUT_YOUR_HARNESS_ACCOUNTID_HERE \
  -e DELEGATE_TOKEN=PUT_YOUR_DELEGATE_TOKEN_HERE \
  -e LOG_STREAMING_SERVICE_URL=PUT_YOUR_MANAGER_HOST_AND_PORT_HERE/log-service/ \
  -e MANAGER_HOST_AND_PORT=PUT_YOUR_MANAGER_HOST_AND_PORT_HERE \
  harness/delegate:23.03.78904
Replace the PUT_YOUR_MANAGER_HOST_AND_PORT_HERE variable with the Harness Manager Endpoint noted below. For Harness SaaS accounts, to find your Harness cluster location, select Account Settings, and then select Overview. In Account Overview, look in Account Settings. It is listed next to Harness Cluster Hosting Account.
For more information, go to View account info and subscribe to downtime alerts.
For Harness CDCE, the endpoint varies based on the Docker vs. Helm installation options.
| Harness Cluster Location | Harness Manager Endpoint on Harness Cluster |
|---|---|
| SaaS prod-1 | https://app.harness.io |
| SaaS prod-2 | https://app.harness.io/gratis |
| SaaS prod-3 | https://app3.harness.io |
| CDCE Docker | http://<HARNESS_HOST> if Docker Delegate is remote to CDCE or http://host.docker.internal if Docker Delegate is on same host as CDCE |
| CDCE Helm | http://<HARNESS_HOST>:7143 where HARNESS_HOST is the public IP of the Kubernetes node where CDCE Helm is running |
If you are using a local runner CI build infrastructure, modify the delegate install command as explained in Use local runner build infrastructure
Verify delegate connectivity
Select Continue. After the health checks pass, your delegate is available for you to use. Select Done and verify your new delegate is listed.
Helm chart & Terraform Helm provider
Kubernetes manifest
Docker
You can now route communication to external systems in Harness connectors and pipelines by selecting this delegate via a delegate selector.
Delegate selectors do not override service infrastructure connectors. Delegate selectors only determine the delegate that executes the operations of your pipeline.
Troubleshooting
The delegate installer provides troubleshooting information for each installation process. If the delegate cannot be verified, select Troubleshoot for steps you can use to resolve the problem. This section includes the same information.
Harness asks for feedback after the troubleshooting steps. You are asked, Did the delegate come up?
If the steps did not resolve the problem, select No, and use the form to describe the issue. You'll also find links to Harness Support and to Delegate docs.
- Helm Chart
- Terraform Helm Provider
- Kubernetes Manifest
- Docker
Use the following steps to troubleshoot your installation of the delegate using Helm.
Verify that Helm is correctly installed:
Check for Helm:
helmAnd then check for the installed version of Helm:
helm versionIf you receive the message
Error: rendered manifests contain a resource that already exists..., delete the existing namespace, and retry the Helm upgrade command to deploy the delegate.For further instructions on troubleshooting your Helm installation, go to Helm troubleshooting guide.
Check the status of the delegate on your cluster:
kubectl describe pods -n <namespace>If the pod did not start, check the delegate logs:
kubectl logs -f <harnessDelegateName> -n <namespace>If the state of the delegate pod is
CrashLoopBackOff, check your allocation of compute resources (CPU and memory) to the cluster. A state ofCrashLoopBackOffindicates insufficent Kubernetes cluster resources.If the delegate pod is not healthy, use the
kubectl describecommand to get more information:kubectl describe <pod_name> -n <namespace>
Use the following steps to troubleshoot your installation of the delegate using Terraform.
Verify that Terraform is correctly installed:
terraform -versionFor further instructions on troubleshooting your installation of Terraform, go to the Terraform troubleshooting guide.
Check the status of the delegate on your cluster:
kubectl describe pods -n <namespace>If the pod did not start, check the delegate logs:
kubectl logs -f <harnessDelegateName> -n <namespace>If the state of the delegate pod is
CrashLoopBackOff, check your allocation of compute resources (CPU and memory) to the cluster. A state ofCrashLoopBackOffindicates insufficent Kubernetes cluster resources.If the delegate pod is not healthy, use the
kubectl describecommand to get more information:kubectl describe <pod_name> -n <namespace>
Use the following steps to troubleshoot your installation of the delegate using Kubernetes.
Check the status of the delegate on your cluster:
kubectl describe pods -n <namespace>If the pod did not start, check the delegate logs:
kubectl logs -f <harnessDelegateName> -n <namespace>If the state of the delegate pod is
CrashLoopBackOff, check your allocation of compute resources (CPU and memory) to the cluster. A state ofCrashLoopBackOffindicates insufficent Kubernetes cluster resources.If the delegate pod is not healthy, use the
kubectl describecommand to get more information:kubectl describe <pod_name> -n <namespace>
Use the following steps to troubleshoot your installation of the delegate using Docker:
Check the status of the delegate on your cluster:
docker container ls -aIf the pod is not running, check the delegate logs:
docker container logs <delegatename> -fRestart the delegate container. To stop the container:
docker container stop <delegatename>To start the container:
docker container start <delegatename>Make sure the container has sufficient CPU and memory resources. If not, remove the older containers:
docker container rm [container id]
Configure Your AWS Credentials and Docker Endpoint in Harness
Especially with a private registry/repository, credentials for the repository are usually scattered around a few scripts or prompted by a system to enter before deployment. Harness has a concept of a Cloud Connector so this will manage the persistence of your cloud provider credentials and use them on your behalf.
To get started with creating an AWS Cloud Provider connector, head to Account Settings -> Account Resources -> Connectors + New Connector -> AWS
Name: my_aws_connector
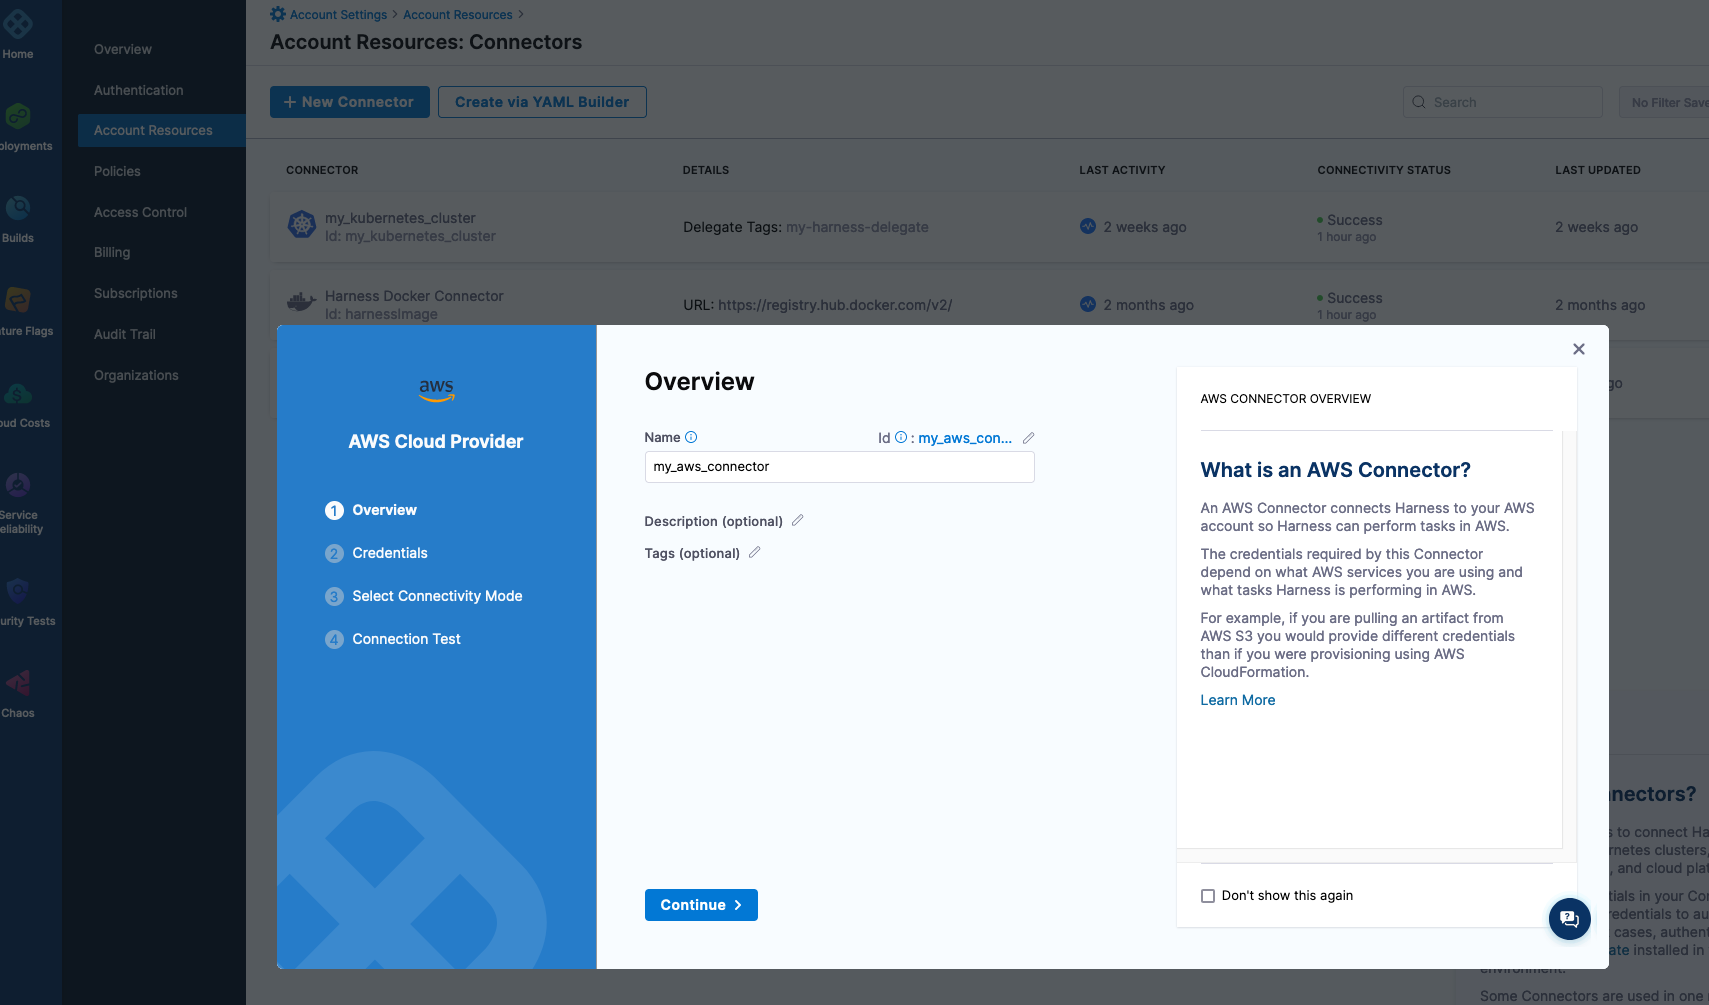
Click Continue and pick your authentication mechanism. If you have an AWS Access Key and Secret, can enter those as encrypted credentials which gets stored in the Harness Secrets Manager.
For example, you can create “my_aws_access” for your Access Key and “my_aws_secret” for the Secret.
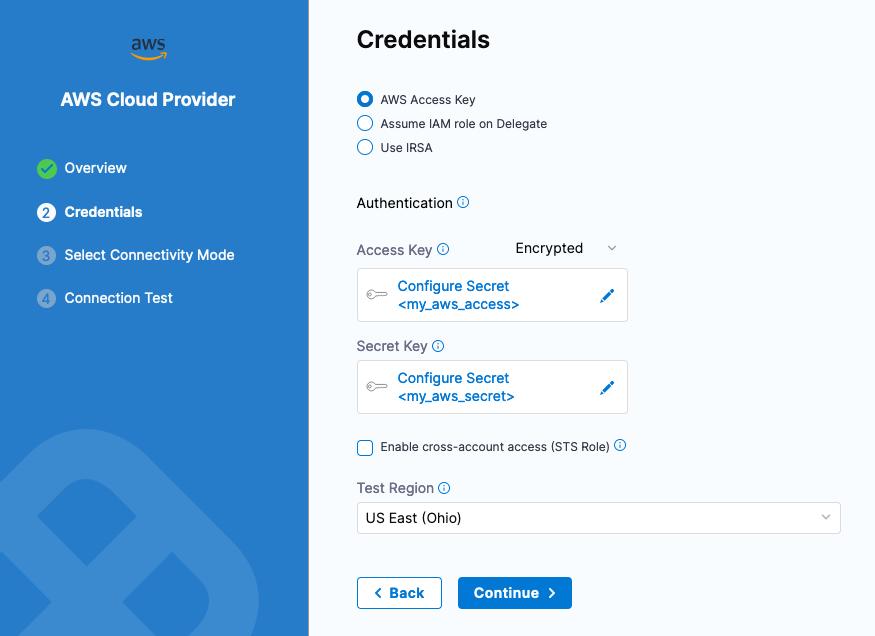
Click continue and select how you will like to connect. You can leverage the Harness Platform or a Delegate to connect. In this example, connecting through Harness is fine.
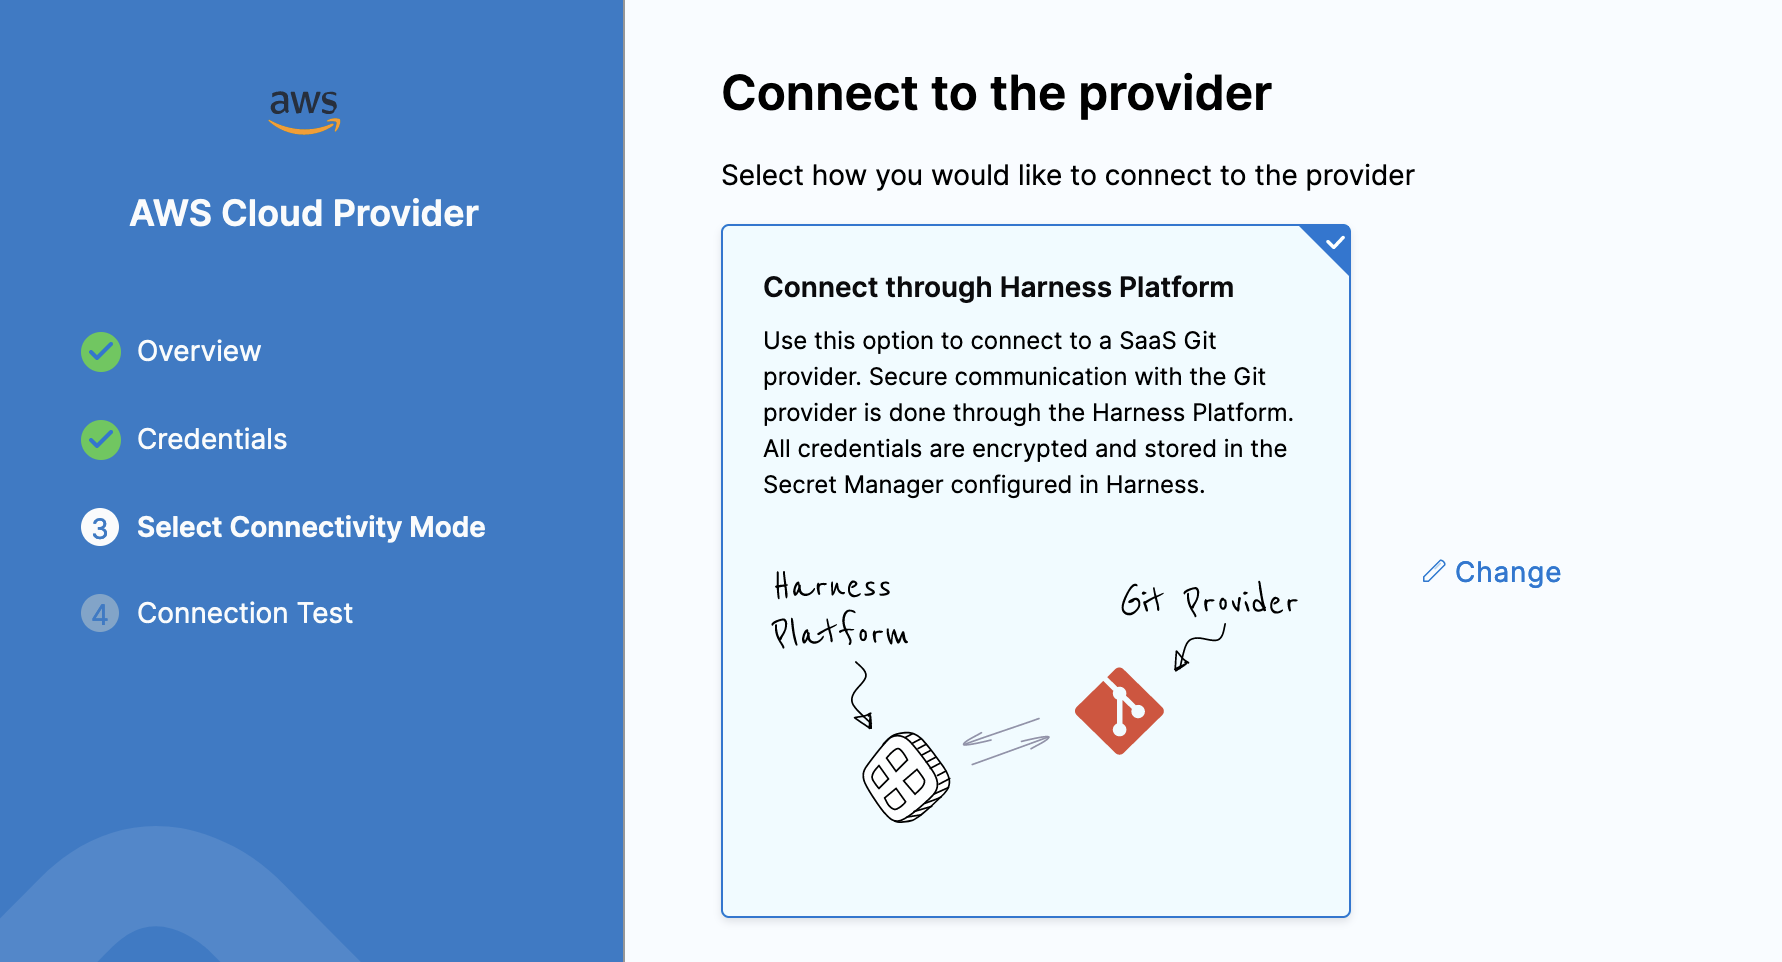
Click Save and Continue and your credentials will be tested. Once successful, you can modify one last item so you can pull images from public Docker Hub in the example.
Configure Harness Docker Connector
By default, Harness is wired to the public Docker Hub. Though depending on the image, the API endpoint can be different. The endpoint for us to hit in this example is https://registry.hub.docker.com/v2/.
Harness -> Account Settings -> Account Connectors -> Harness Docker Connector then Edit.

Modify the endpoint if not already to https://registry.hub.docker.com/v2/.
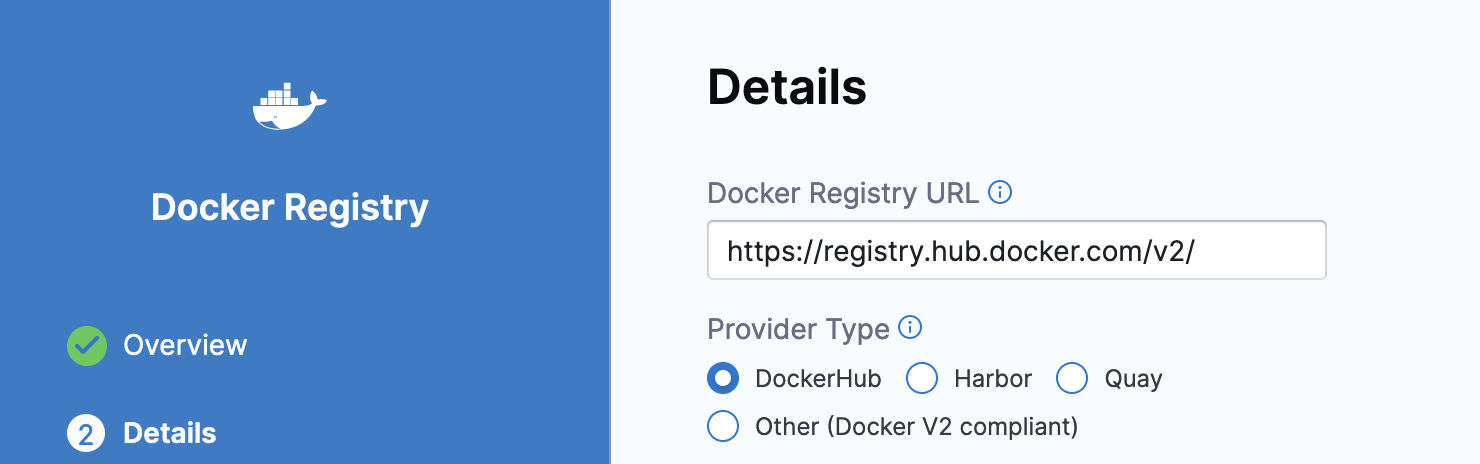
Click Continue to save. Running this Connector through the Harness Platform is fine. Then when saved and validated, you will be wired to that API Endpoint.

With those wirings out of the way, you are now ready to create an ECS Pipeline. To expedite the creation, we can wire in a pair of configuration files.
Creating Harness Hosted Configuration Files
Harness will execute your configuration files for you. For this example, we will wire two configuration files, an ECS Task Definition JSON and an ECS Service Definition JSON. These manifests can be linked to source control or stored in Harness itself. For ease of use, you can wire and modify these files to fit your ECS Role and Security Group/subnet items inside Harness.
ECS Task JSON: https://github.com/harness-apps/developer-hub-apps/blob/main/applications/first-ecs-example/ecs_task.json
Service Definition JSON: https://github.com/harness-apps/developer-hub-apps/blob/main/applications/first-ecs-example/service_definition.json
To Create a manifest hosted by Harness, can add these at the Account Level.
Harness -> Account Settings -> Account Resources -> File Store + New.
Can create two new files, one called “ecs_task.json” and one called “service_definition.json” based on the above files in GitHub. Copy and paste the contents into each respective file and save each.
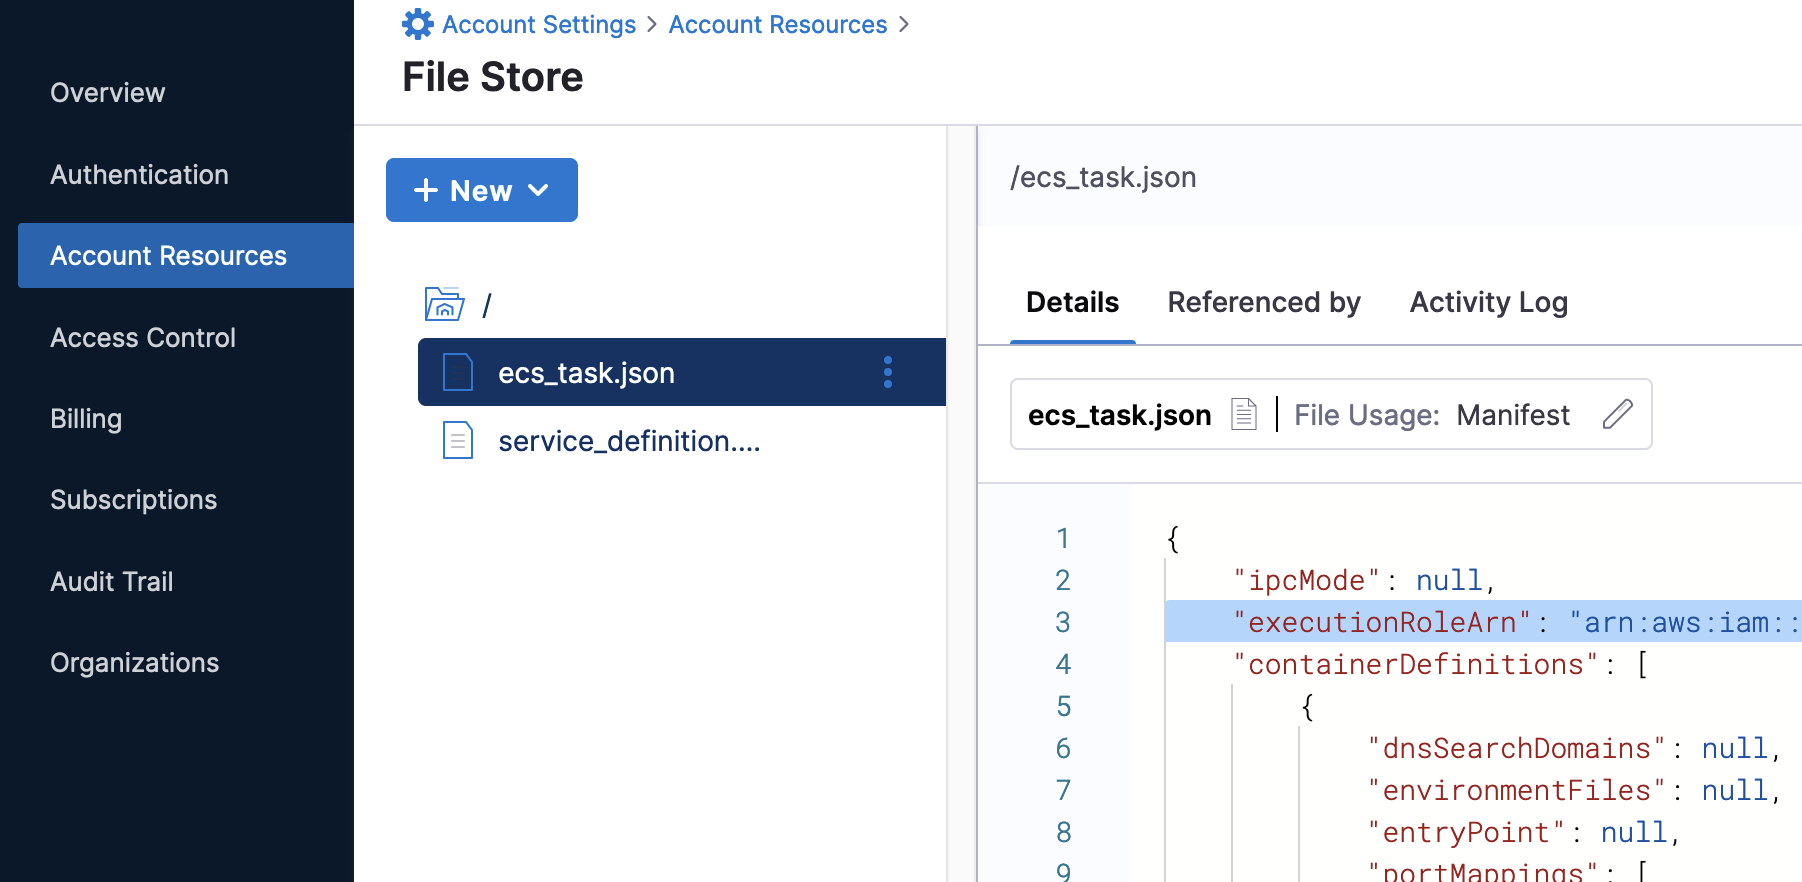
ECS Task JSON: On lines 3 and 53, replace the value of the “executionRoleArn” with your ecsInstanceRole.
Service Definition JSON: On line 8, replace the Security Group with your applicable Security Group. On lines 11, 12, and 13 replace the subnets with your subnet IDs for the availability zones selected when the ECS Cluster was created. You can add or subtract items in the subnet array depending on the number of subnets you have.
With those manifests out of the way, creating the ECS Pipeline will be very speedy.
Creating an ECS Harness Pipeline
With the Delegate, ECS Cluster, and manifests created, creating a Harness Pipeline is simple. Leveraging the Default Harness Project is fine for the example.
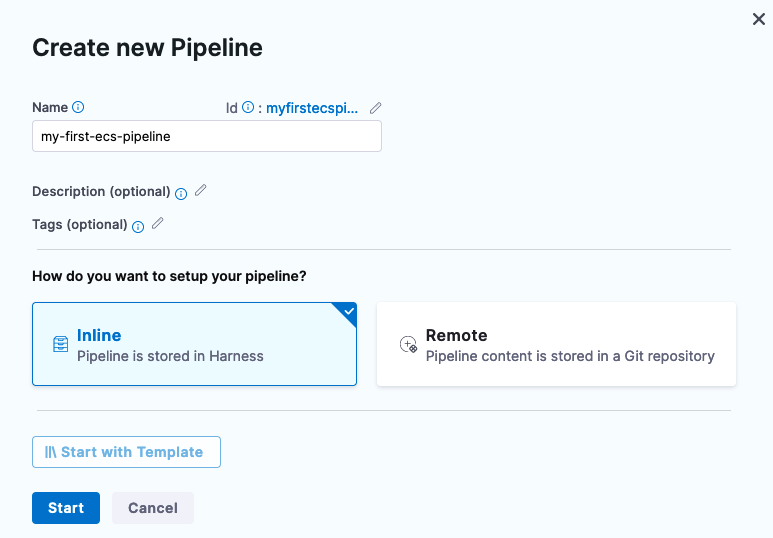
- Deployments -> Pipelines + Create new Pipeline
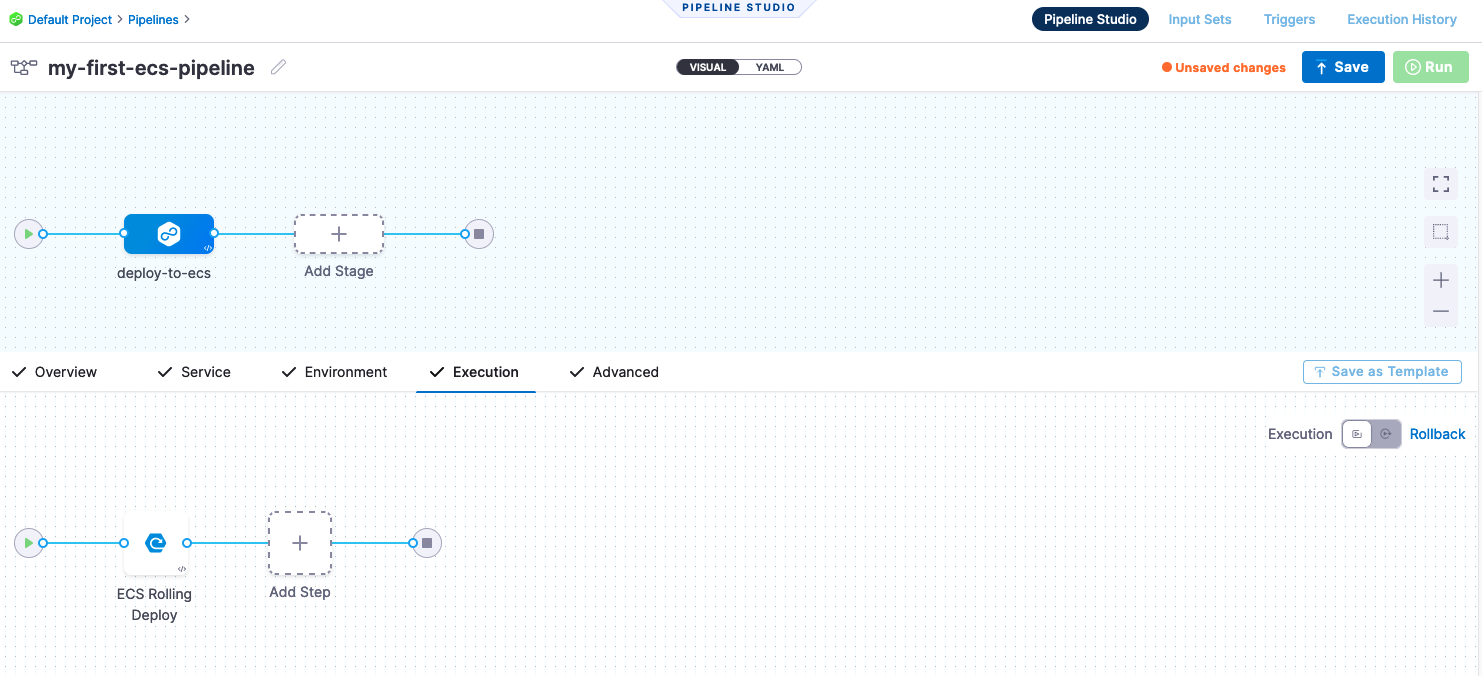
- Name: my-first-ecs-pipeline
- Setup: in-line
Once you click Start, you can add an ECS Deployment Stage. Click in + Add Stage then Deployment and select Amazon ECS.
Stage Name: deploy-to-ecs
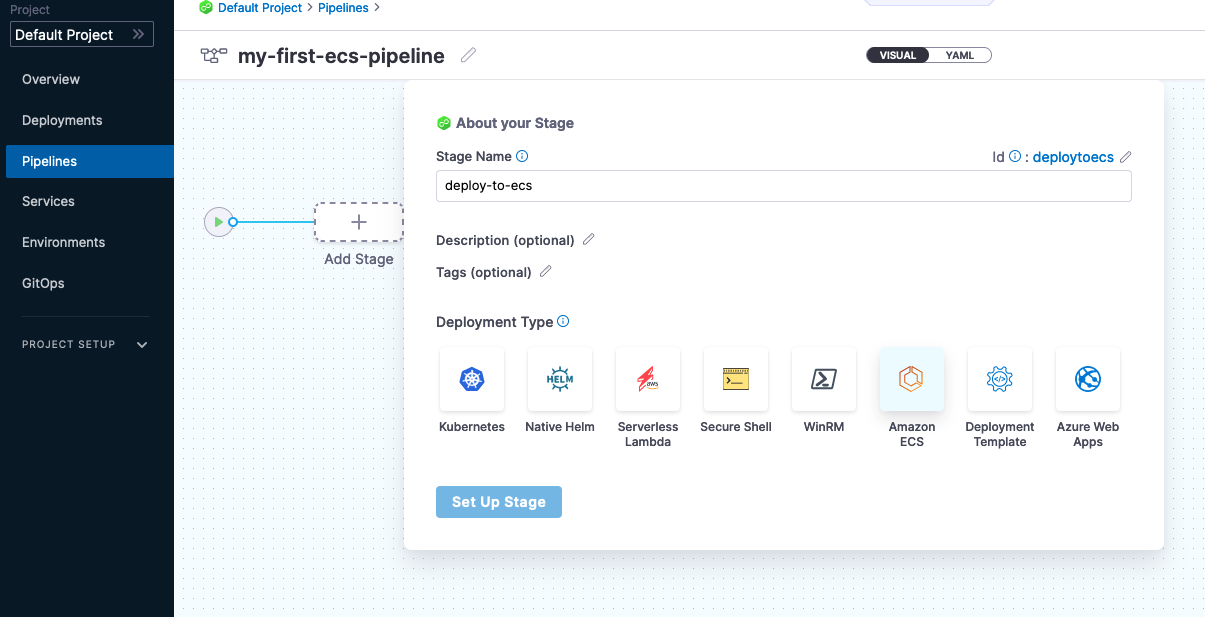
Then click Setup Stage. The next step is to create a Harness Service which will represent the ECS Configurations and Artifact that need to be deployed.
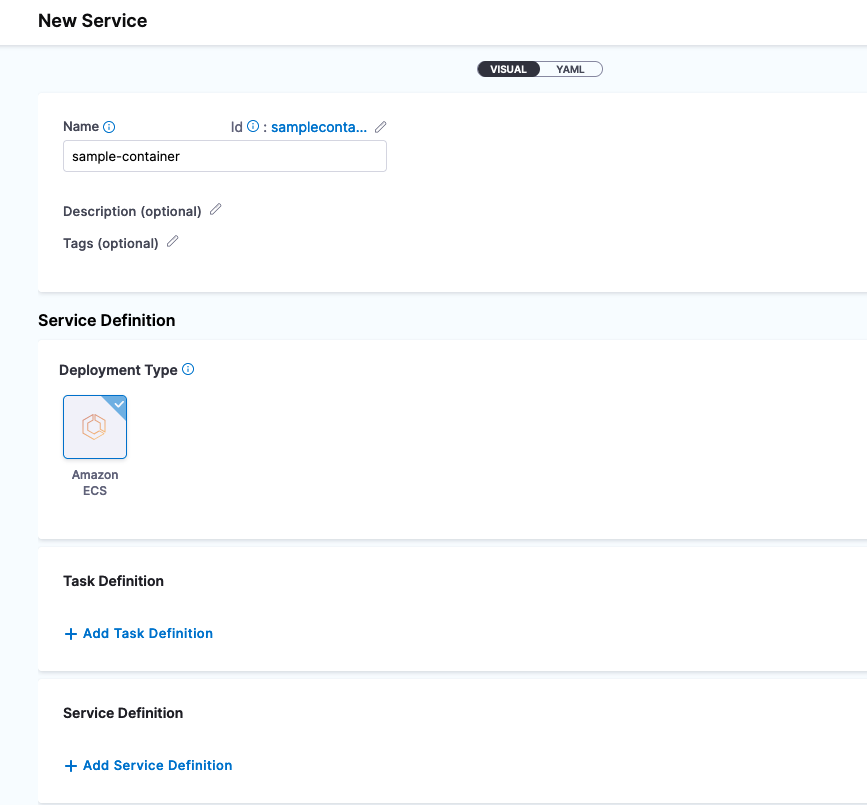
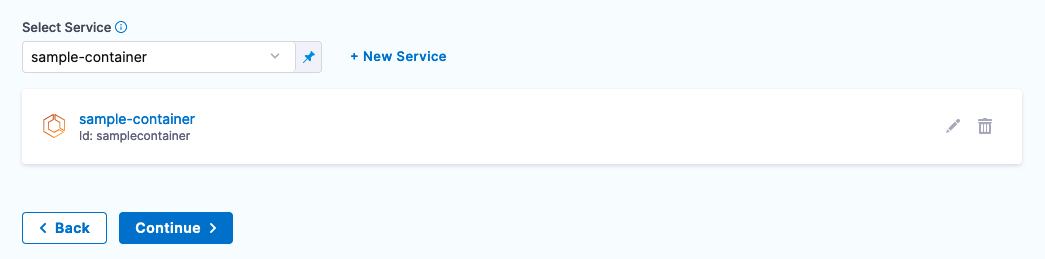
In the Service Configuration, click + New Service.

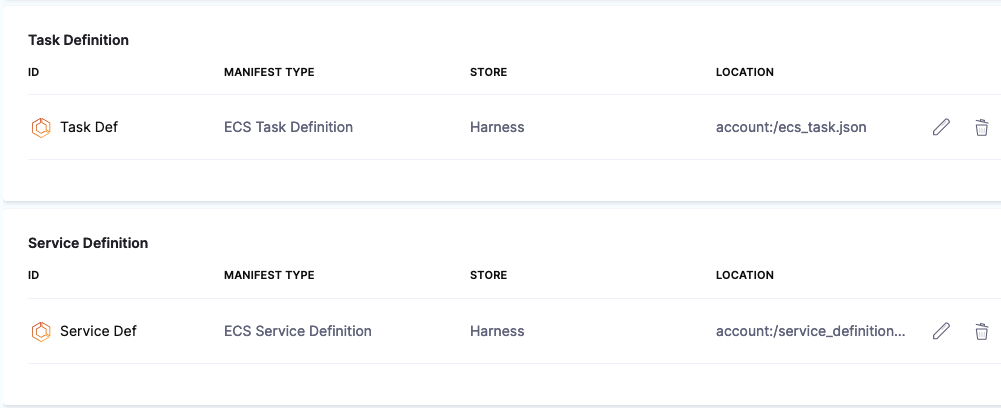
In the New Service UI, name the new service “sample-container” and add get ready to add the Task and Service Definitions.
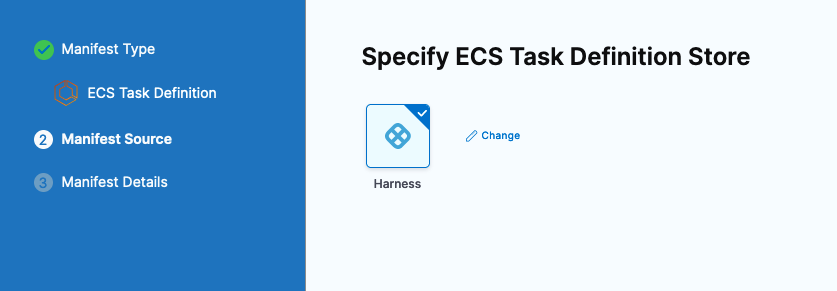
To add the Task Definition, click + Add Task Definition. Select Harness as the Task Definition Store.
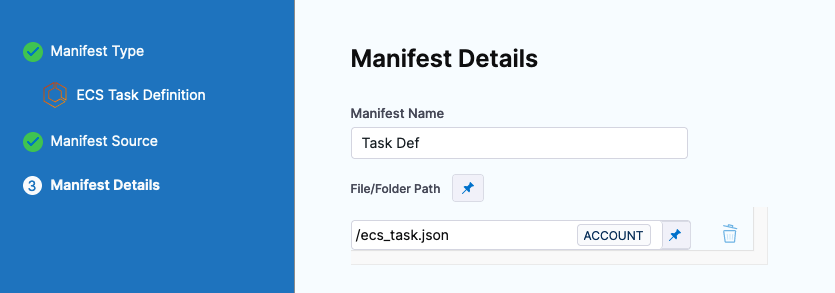
Select and name the ecs_task.json that was created before.
Manifest Name: Task Def
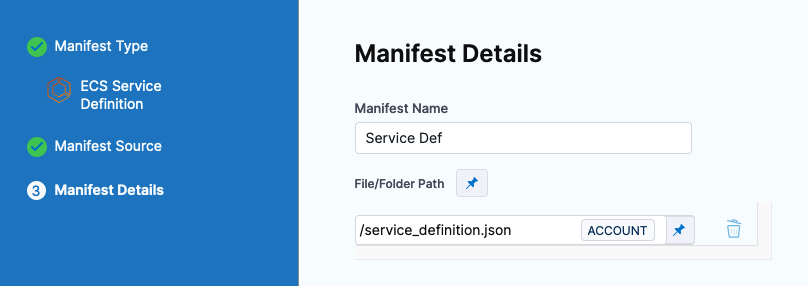
Repeat the same process for the Service Definition once saved. + Add Service Definition.
Name: Service Def
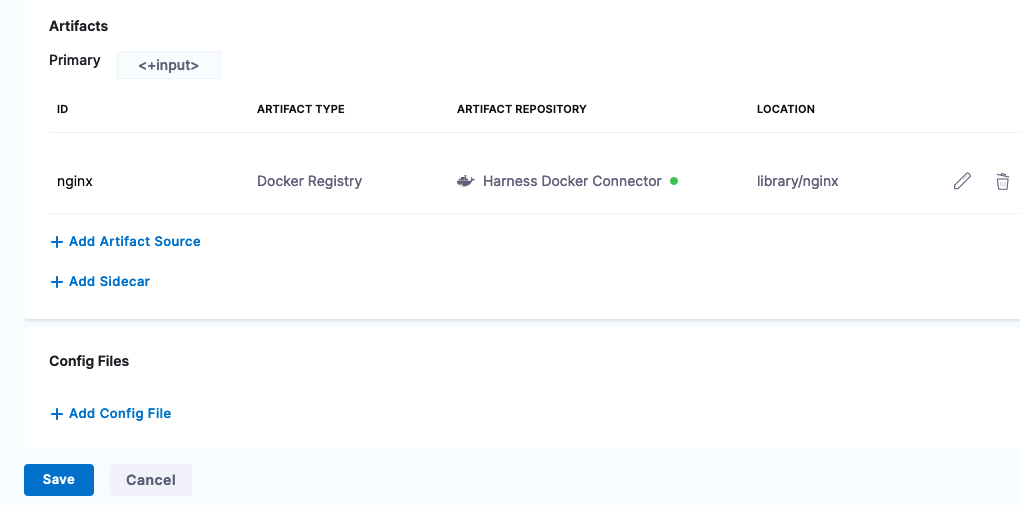
Now both are wired. The next step would be to wire in an artifact/image that you want to deploy.
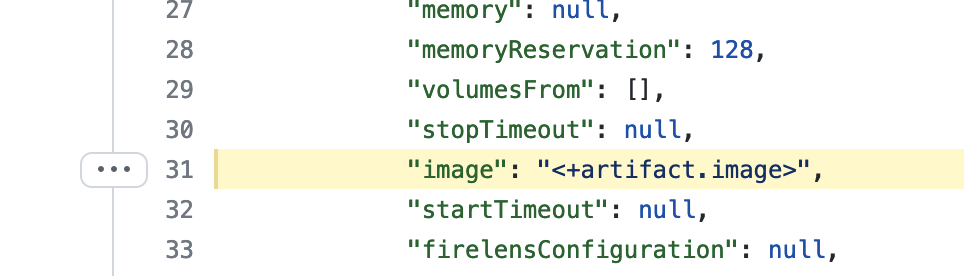
Lastly will wire an artifact to deploy. In the Task Definition, we have added a variable [if you copied from source control] to take in an input from Harness on an image to deploy.
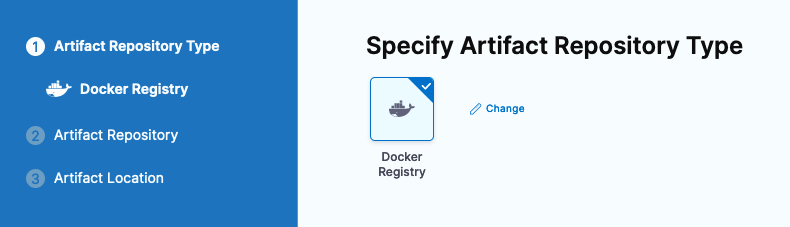
We can specify that image via the Harness by adding an Artifact Source. + Add Artifact Source.
Select Docker Registry, we will select the Public Docker Hub Connector we re-wired before.
Click Continue. Nginx can be used as an example to start.
- Artifact Source Name: nginx
- Image Path: library/nginx
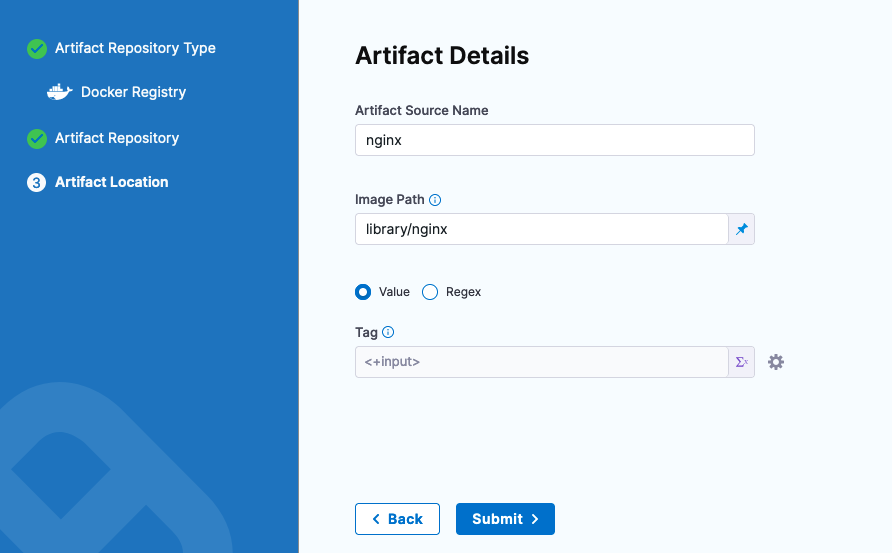
Click Submit and the Artifact will be wired in. Then click Save.
Click Continue to point Harness to your ECS Cluster.
Pointing Harness to ECS
Harness has a concept of Environments which is the target infrastructure where you want to deploy. In this case, we will be deploying to the ECS Cluster that was created.
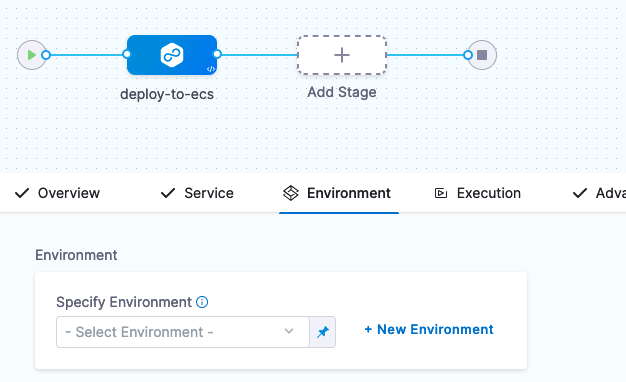
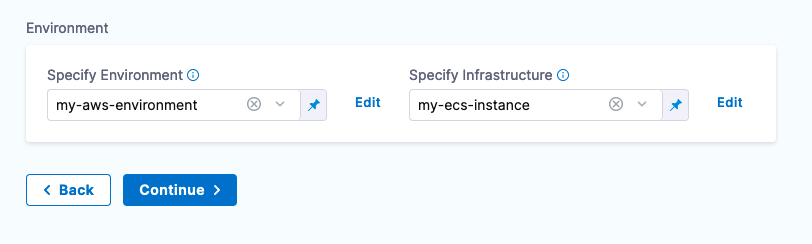
Click + New Environment
- Name: my-aws-environment
- Environment Type: Pre-Production

Click Save and next you will point to your specific ECS Cluster by adding that as a piece of Infrastructure. + New Infrastructure

- Name: my-ecs-instance
- Connector: Your AWS Connector
- Region: Your AWS Region where the ECS Cluster lives
- Cluster: harness-ecs
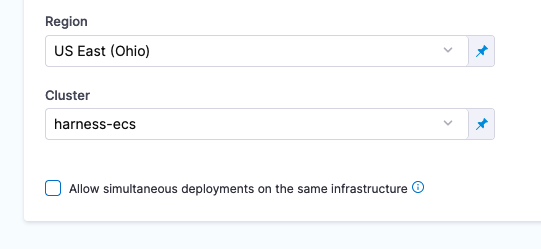
Click Save then Continue to define the Execution Strategy.
In the Execution Strategy, there are several options on how to deploy to ECS. For the example we will leverage a Rolling Deploying strategy.
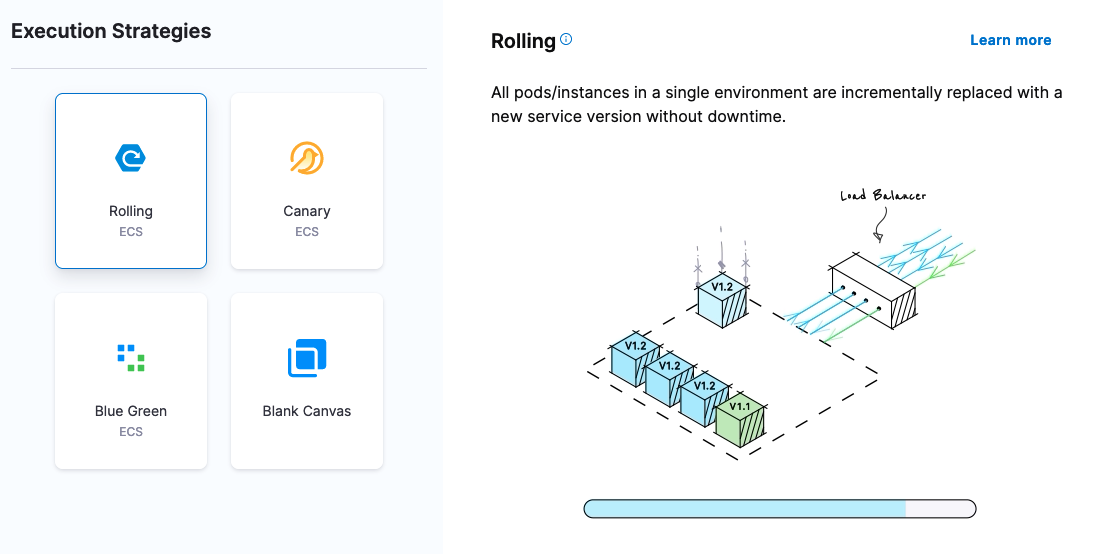
Once selected, click Use Strategy. Your Pipeline is now ready to be saved. Click on the Save button in the top right.
Now you are ready to execute.
Running Your First Harness ECS Deployment
Selecting your Pipeline from Deployments -> Pipelines, can click on the Run Button to execute.
- Primary Artifact: nginx
- Tag: stable
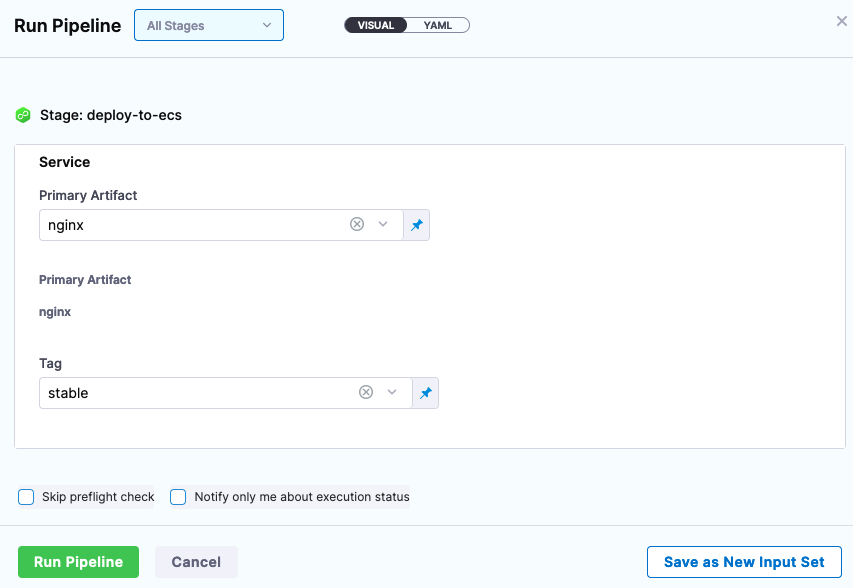
Click Run Pipeline and your Pipeline will be executed.
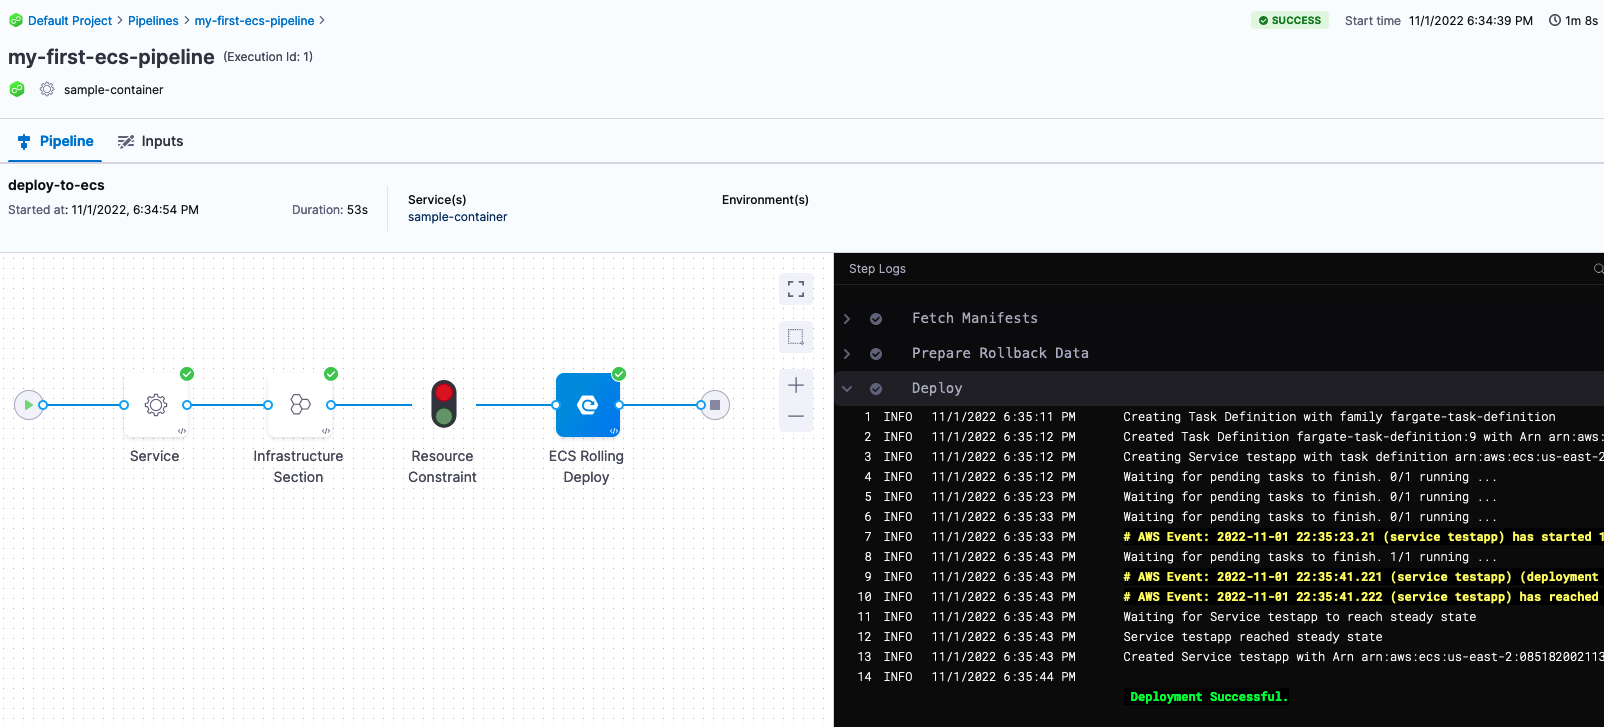
After a few moments, your Pipeline will be successfully deployed to ECS.
To see your workload in action, head back to the AWS Console and dive into the Task for the public IP.
AWS Console -> ECS -> Clusters -> harness-ecs -> Tasks -> Task UID -> Public IP
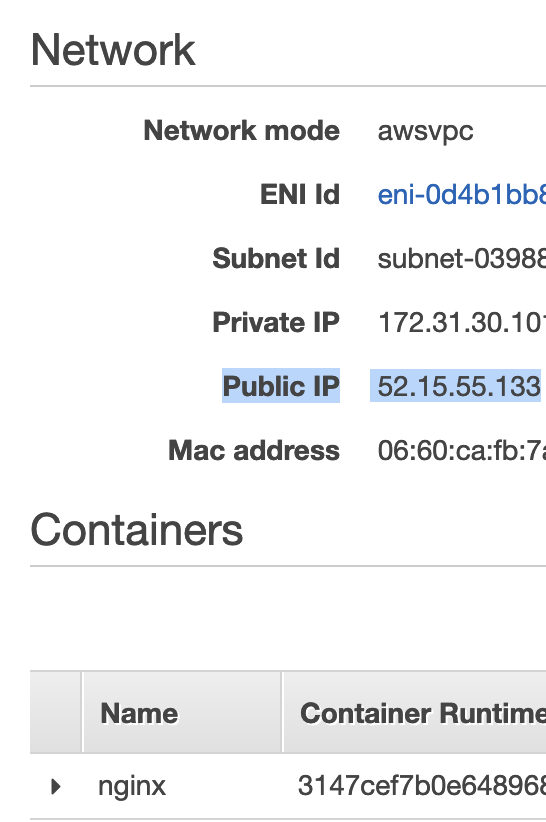
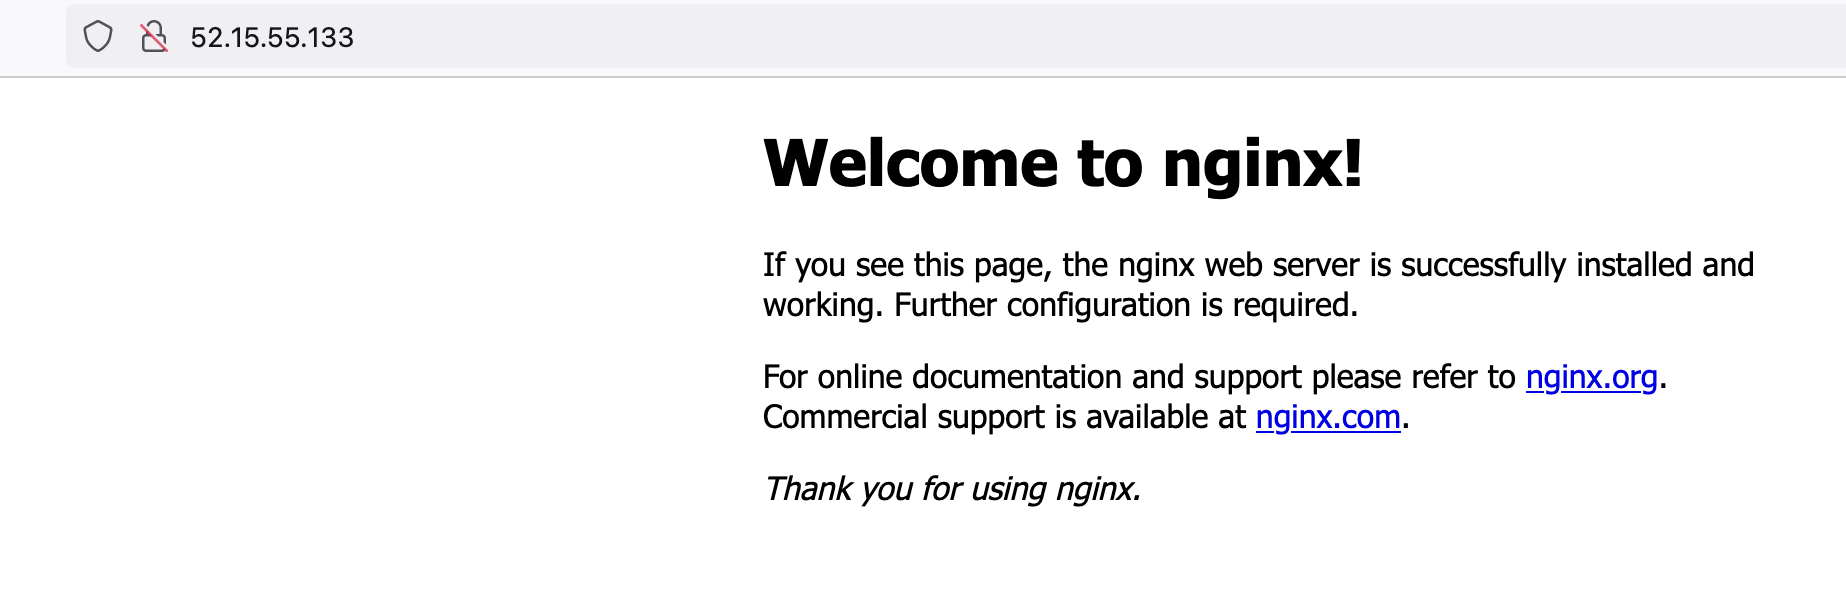
Head to the Public IP e.g 52.15.55.133 and you will see a welcome message.
Congratulations on your ECS deployment! This was a vanilla deployment to ECS. Harness has the ability to orchestrate confidence building steps. We used a pre-packaged image but Harness CI can execute a Docker Build for you and create a custom image which you can then deploy with similar into Amazon ECS.