Kubernetes infrastructure
When you set up a Deploy stage, you specify the Kubernetes cluster you want to target for deployment as a Harness Infrastructure Definition.
A Harness Infrastructure Definition specifies the target deployment infrastructure for your Harness stage. It includes specific infrastructure details for the deployment, such as the Harness Connector that provides credentials for the cluster and the cluster namespace.
For Amazon Elastic Kubernetes Service (Amazon EKS) and OpenShift, use Specify a Vendor Agnostic Kubernetes Cluster.
Before you begin
- Kubernetes deployment tutorial
- Kubernetes deployments overview
- Add Container Images as Artifacts for Kubernetes Deployments
Add deploy stage and service
For steps on adding a stage, see Add a Stage.
When you add a stage, select Deploy.
Name the stage, and select what you'd like to deploy. For example, select Service.
Click Set Up Stage.
The new stage's settings appear.
In Service, create or select a Service.
In Service Definition Deployment Type, select Kubernetes.
Add artifacts and manifests. See:
Click Next or Infrastructure.
Select or create an environment
Let's take a moment and review Harness Environments and Infrastructure Definitions.
Harness Environments represent your deployment targets logically (QA, Prod, etc). You can add the same Environment to as many stages are you need. Infrastructure Definitions represent your target infrastructure physically. They are the actual clusters, hosts, etc.
By separating Environments and Infrastructure Definitions, you can use the same Environment in multiple stages while changing the target infrastructure settings with each stage.
- In Infrastructure, in Environment, select or create an Environment.
Select connection method
Select one of the connection methods, such as Direct Connection or Cloud Provider.
We will cover all options below.
Enter cluster details
The cluster details you enter will depend on the connection method you select.
Direct Connection
This is the recommend method for cluster connections because it avoids vendor-specific settings.A Direct Connection is a vendor agnostic connection to the Kubernetes cluster.
It uses a Harness Kubernetes Cluster Connector to connect a cluster on any platform.
Currently, Harness connects to Amazon Elastic Kubernetes Service (Amazon EKS) and OpenShift using the Kubernetes Cluster Connector.If you are using a Harness Kubernetes Cluster Cloud Provider to connect to your target cluster, enter the following settings.
Connector
- Select or create a Kubernetes Cluster Connector for your target cluster.
For details on the Kubernetes Cluster Connector settings, see Kubernetes Cluster Connector Settings Reference.
Namespace
- Select the namespace in the target Kubernetes cluster. Typically, this is
default.
The namespace must already exist during deployment. Harness will not create a new namespace if you enter one here.
You can enter a fixed value, runtime input, or expression.
You can reference the namespace in your manifest using the Harness expression: <+infra.namespace>.
For example, if you entered default in Namespace, in your values.yaml you can use:
name: myApp
replicas: 2

image: <+artifact.image>

createNamespace: true
namespace: <+infra.namespace>
...
And then in the Namespace object manifest (and any object manifest that uses the namespace) you reference the values.yaml value for namespace:
 {{- if .Values.createNamespace}}
apiVersion: v1
kind: Namespace
metadata:
 name: {{.Values.namespace}}
{{- end}}
Now your values.yaml and manifest is templated for use with any stage.
For more information about manifests in Harness, see Add Kubernetes Manifests.
If you omit the namespace key and value from a manifest in your Service Definition, Harness automatically uses the namespace you entered in the Harness Environment Infrastructure Definition settings Namespace field.
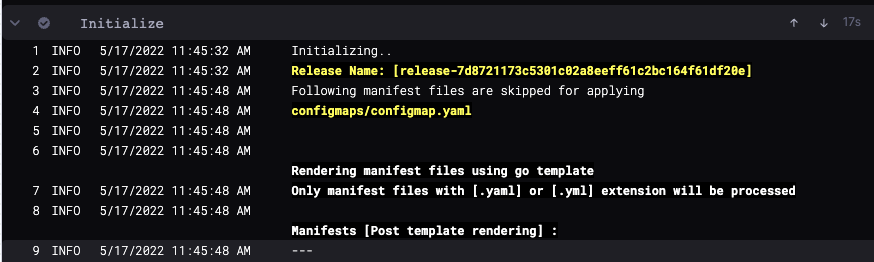
Release Name
Release name is located in Advanced. You do not need to edit it.
During deployment Harness creates a ConfigMap listing the resources of the release and uses the Release name for tracking them.
The Release name is a combination of release- and a unique string created using the Harness expression <+INFRA_KEY>.
For example, in a Kubernetes deployment you can see harness.io/release-name=release-2f9eadcc06e2c2225265ab3cbb1160bc5eacfd4f.
In Harness, the Release Name is displayed in the logs of the deployment step:
The release name must be unique across the cluster. release-<+INFRA_KEY> ensures a unique name.
release- is used as a prefix because Kubernetes service and pod names must follow RFC-1035 and must consist of lowercase alphanumeric characters or '-', start with an alphabetic character, and end with an alphanumeric character.
See Kubernetes Releases and Versioning.
Cloud Provider
Select the cloud platform where your Kubernetes cluster is hosted, such as Google Kubernetes Engine on GCP.
Connector
- Select or create a Connector for your target cluster's platform.
For details on the Connector settings, see Cloud Platform Connectors.
Cluster
- Select the cluster you created for this deployment.
If the cluster name is taking a long time to load, check the connectivity of the host running the Harness Delegate.
Namespace
- Enter the namespace of the target Kubernetes cluster. Typically, this is
default.
The namespace must already exist during deployment. Harness will not create a new namespace if you enter one here.
You can enter a fixed value, runtime input, or expression.
You can reference the namespace in your manifest using the Harness expression: <+infra.namespace>.
For example, if you entered default in Namespace, in your values.yaml you can use:
name: myApp
replicas: 2

image: <+artifact.image>

createNamespace: true
namespace: <+infra.namespace>
...
And then in the Namespace object manifest (and any object manifest that uses the namespace) you reference the values.yaml value for namespace:
 {{- if .Values.createNamespace}}
apiVersion: v1
kind: Namespace
metadata:
 name: {{.Values.namespace}}
{{- end}}
Now your values.yaml and manifest is templated for use with any stage.
For more information about manifests in Harness, see Add Kubernetes Manifests.
If you omit the namespace key and value from a manifest in your Service, Harness automatically uses the namespace you entered in the Harness Environment Infrastructure Definition settings Namespace field.
Release name
Harness requires a Kubernetes release name for tracking.
The release name must be unique across the cluster.
See Kubernetes Releases and Versioning.
The Harness-generated unique identifier <+infrastructure.infrastructureKey> can be used to ensure a unique release name.
Use release-<+infrastructure.infrastructureKey> for the Release Name instead of just <+infrastructure.infrastructureKey>. Kubernetes service and pod names follow DNS-1035 and must consist of lowercase alphanumeric characters or '-', start with an alphabetic character, and end with an alphanumeric character. Using release- as a prefix will prevent any issues.
Notes
- When using names in Harness Kubernetes stages, remember that Kubernetes service and pod names follow DNS-1035 and must consist of lowercase alphanumeric characters or '-', start with an alphabetic character, and end with an alphanumeric character.
- GCP Workload Identity: if you installed the Harness Kubernetes Delegate in a GCP Kubernetes cluster (GKE) that has GCP Workload Identity enabled, the GCP Connector will use the GCP Workload Identity if it inherits its credentials from that Delegate (using the Use the credentials of a specific Harness Delegate option).