Get Deployment Status using REST (FirstGen)
For Build Workflows or a Build and Deploy Pipeline, you can trigger deployments in response to a Git event using Webhooks. This is described in Trigger Deployments using Git Events.
Once you have created a Harness On Webhook Event Trigger, Harness creates a Manual Trigger for it.
You can do the following with a Manual Trigger:
- Start a deployment using a URL provided by Harness. See Trigger a Deployment using a URL.
- Start a deployment using a curl command. See Trigger a Deployment using cURL.
- Use a REST call to get deployment status.
In this topic, we will cover using a REST call to get deployment status.
Before You Begin
- API Keys
- Build Workflows
- Build and Deploy Pipeline
- Add a Service
- Workflows
- Add Environment
- Create a Pipeline
Step 1: Create Harness API Key
To use a REST call to get deployment status, you need to generate a Harness API key first.
The API key is used in the cURL command GET call for deployment status, described below.
- In Harness Manager, click Security, and then click Access Management.
- Click API Keys.
- Click Add API Key.
- In the Add API Key settings, enter a name and select your User Group.
- Click Submit. The new API key is created.
- To copy the API key, first click the Eye icon to reveal the key's value.
- Next, click the Copy icon beside the key. This copies the key's value to your clipboard.
- To delete an API key, click the Delete icon.
Step 2: Show cURL Command
The cURL command for executing a deployment is provided by every Trigger of type On Webhook Event.
In Triggers, locate the Trigger you want run.
Click Manual Trigger.
In the Manual Trigger settings, click Show Curl Command. The cURL command is displayed.
When you created a Trigger, if you selected values for parameters that are represented by placeholders in the cURL command, you do not need to add values for the cURL placeholders.
If you add values for the cURL placeholders, you will override manual settings in the Trigger.
This is also true for Triggers that execute templated Workflows and Pipelines. If you create a Trigger that executes a templated Workflow or Pipeline, you can select values for the templated settings in the Trigger, but you can still override them in the cURL command.
Let's look at a placeholder example:
curl -X POST -H 'content-type: application/json' \
 --url https://app.harness.io/api/webhooks/xxxxxx \
 -d '{"application":"xxxxxx","artifacts":[{"service":"micro-service","buildNumber":"micro-service_BUILD_NUMBER_PLACE_HOLDER"}]}'
For service, enter the name of the Harness Service.
For buildNumber, enter the artifact build number from the Artifact History in the Service.
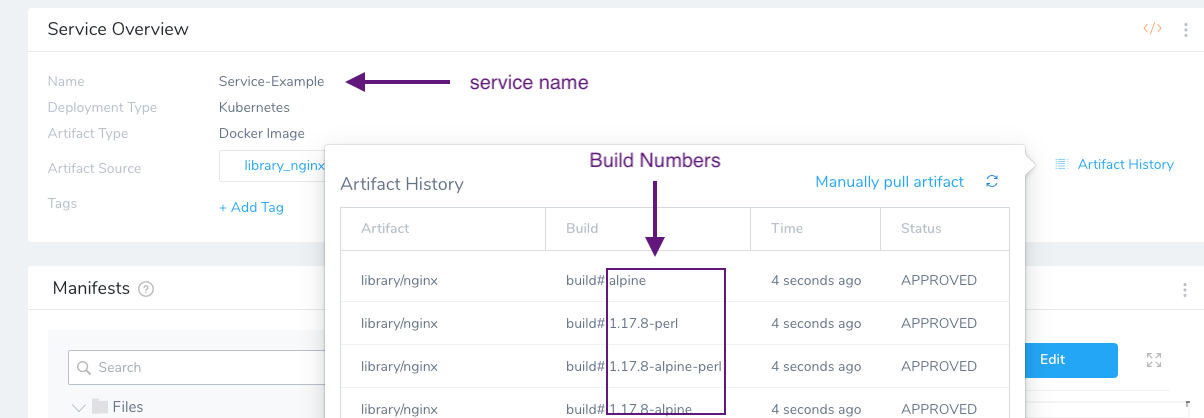
For example:
curl -X POST -H 'content-type: application/json' \
 --url https://app.harness.io/api/webhooks/xxxxxx \
 -d '{"application":"xxxxxx","artifacts":[{"service":"Service-Example","buildNumber":"1.17.8-perl"}]}'
Step 3: Run cURL Command
Once you have replaced the placeholders, run the cURL command.
The output will be something like this (private information has been replaced with xxxxxx):
{
 "requestId":"-tcjMxQ_RJuDUktfl4AY0A",
 "status":"RUNNING",
 "error":null,
 "uiUrl":"https://app.harness.io/#/account/xxxxxx/app/xxxxxx/pipeline-execution/-xxxxxx/workflow-execution/xxxxxx/details",
 "apiUrl":"https://app.harness.io/gateway/api/external/v1/executions/-xxxxxx/status?accountId=xxxxxx&appId=xxxxxx"
 }
The uiUrl can be used directly in a browser. apiUrl can be used to track deployment status programmatically, such as using a REST call.
Step 4: Use the API URL
To get deployment status using a REST call (in this example, cURL), use the following cURL command, replacing API_URL with the URL from apiUrl, and API_KEY with the API key you generated in Harness:
curl -X GET -H 'X-Api-Key:**API\_KEY**' --url "**API\_URL**"
For example (private information has been replaced with xxxxxx):
curl -X GET -H 'X-Api-Key:a1b2c3' --url "https://app.harness.io/gateway/api/external/v1/executions/xxxxxx/status?accountId=xxxxxx&appId=xxxxxx"
The output from the curl command will contain the status of the deployment. These are the same status messages you can see in the Continuous Deployments dashboard, such as:
{"status":"SUCCESS"}, {"status":"FAILED"}, {"status":"ABORTED"}, {"status":"QUEUED"}.
Configure As Code
To see how to configure the settings in this topic using YAML, configure the settings in the UI first, and then click the YAML editor button.
Related Topics
- Passing Variables into Workflows from Triggers
- For information on using Triggers as part of Harness Git integration, see Onboard Teams Using Git.
- Trigger Deployments When a New Artifact is Added to a Repo
- Schedule Deployments using Triggers
- Trigger Deployments when Pipelines Complete
- Trigger a Deployment using cURL
- Trigger a Deployment when a File Changes
- Trigger Deployments using Git Events
- Pause All Triggers using Deployment Freeze