Trigger pipelines using Git events
You can trigger pipelines in response to Git events that match specific payload conditions you set up in a Harness trigger. For example, when a pull request or push event occurs on a Git repo and your trigger settings match the payload conditions, a CI or CD pipeline can run.
Triggers enable event-driven CI/CD and support the practice of every commit building and/or deploying to a target environment.
This topic demonstrates how to create a trigger for GitHub payload conditions. It shows how to use Conditions settings to create a highly-specific trigger; however Conditions are optional, and you can create simple triggers that respond to, for example, any Pull Request activity on a certain repo. For information about triggers settings, go to the Triggers reference. For information about the Harness Git Experience, go to the Harness Git Experience Overview
- Currently, Harness supports Git-based triggers for the most common Git providers. You can use a Custom Trigger for other repo providers.
- In Harness, you can select who is able to create and use triggers within Harness, but you must use your Git provider's RBAC to control who can initiate the Git events that start the Harness Trigger.
Harness variable expressions are not supported in triggers for pipeline or stage variables.
Video summary
Here's a two minute video showing you how to create and run a Trigger in response to Git events.
Add a trigger to a pipeline
These steps assume you're familiar with creating CD pipelines or creating CI pipelines. Your pipeline must have a defined codebase for the trigger to listen on. For more information, go to Create and Configure a Codebase.
- Go to your pipeline in Harness.
- Select Triggers.
- Select New Trigger.
- Choose your SCM provider.
You can select the Custom trigger type if you are using an unsupported Git provider. Go to the Custom Trigger documentation for guidance on creating custom triggers.
Configure the trigger
All triggers in a Harness account have the same URL: https://app.harness.io/gateway/ng/api/webhook?accountIdentifier=ACCOUNT_ID. This means that you must set up your trigger conditions carefully to ensure that triggers start pipelines for relevant events only.
On the trigger's Configuration tab, enter a Name and Description.
Payload Type is automatically populated based on the selected SCM provider.
For Connector, select a code repo connector for your SCM provider.
- A connector is required for all Git trigger types except Custom. In the connector's Credentials settings, make sure API access is enabled.
- For Custom triggers, you must set up the external tool to send payloads to to the trigger URL. Refer to your tool's documentation for instructions on sending payloads.
For Event, select a Git event type, and, if required, select one or more Actions.
Configure additional settings, such as Auto-abort Previous Execution, Configure Secret, and Polling Frequency, according to your desired trigger configuration.
For details on trigger settings, go to the Triggers reference.
Set trigger conditions
Conditions specify additional trigger criteria beyond the Event and Actions. Conditions are optional, but they are necessary if you want to create specific, limited-scope triggers. Conditions can use Harness built-in expressions for accessing trigger settings, Git payload data, and headers.
Here are some examples of trigger conditions:
- Trigger a pipeline when a specific value is passed in the source payload.
- Trigger a pipeline when there's a change in a specific file or a pull request.
- Trigger a pipeline based on a specific artifact tag convention.
- Trigger a pipeline if the source or target branch in the Git event matches a specified pattern.
- Trigger a pipeline if there are file changes in specific directories in the Git repo (This is useful when working with a mono-repository; it ensures that pipelines only run in response to certain changes, rather than every change).
Triggers are like complex filters in which the Conditions are AND-ed together. To execute a trigger, the event payload must match all trigger conditions.
For example, the configuration in the following image requires that the event match all conditions for Source Branch, Target Branch, Changed Files, Header Conditions, Payload Conditions, and JEXL Condition to activate the trigger.
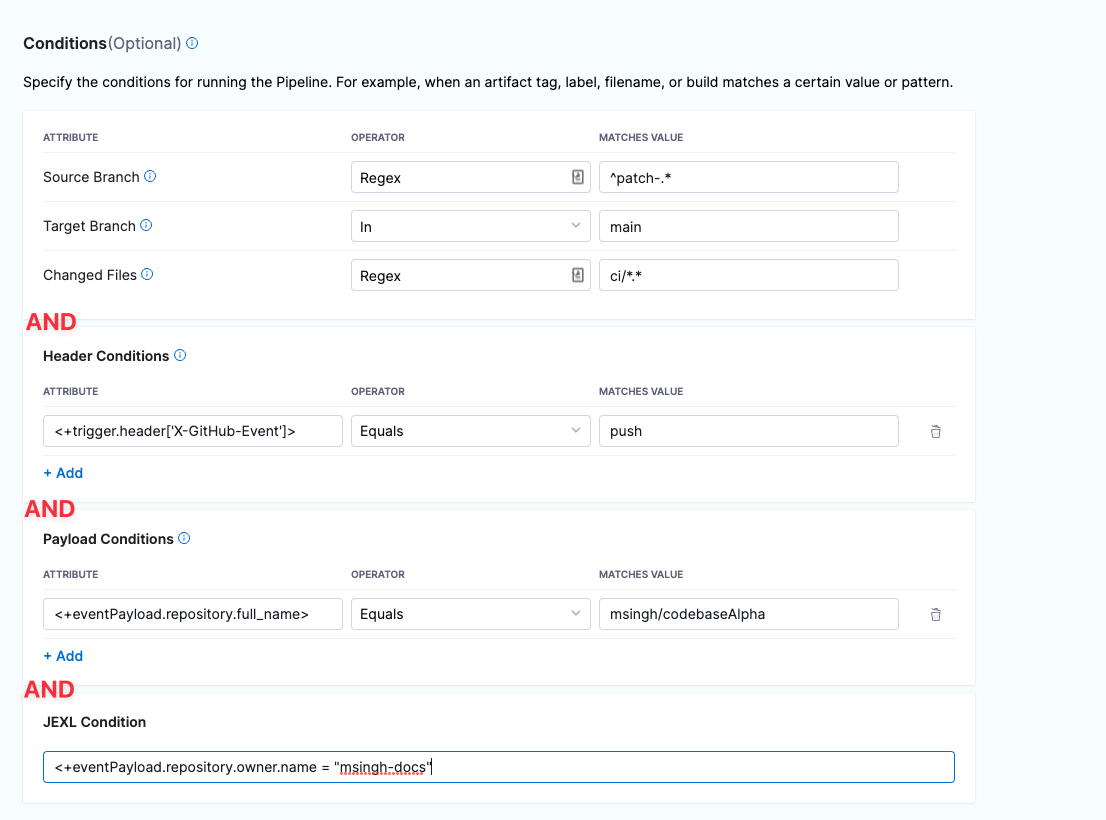
If you want a trigger that uses OR, NOT, or other operators across the payload, define only a JEXL Condition and leave the other conditions empty (unless you want to AND them to your JEXL condition).
Some information about Conditions is provided in the following sections. For much more detail on Conditions, including Operators, go to the Triggers reference.
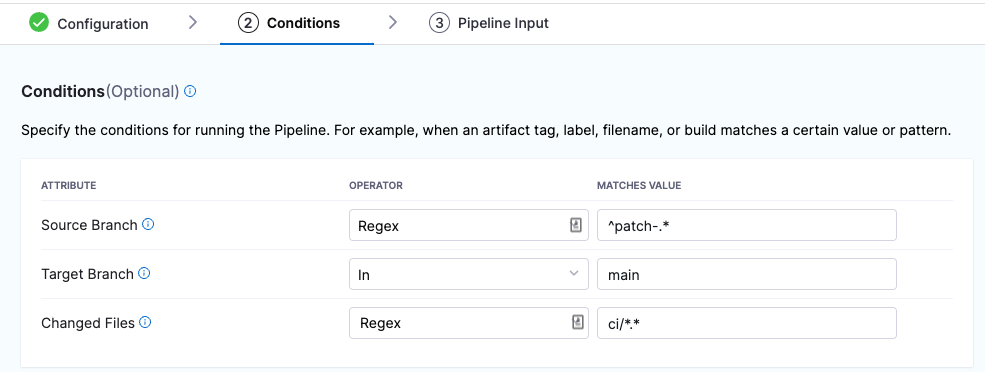
Branches and Changed Files
You can configure triggers based on the source branches, target branches, and changed files involved in a Git event.
If you want to specify multiple paths, use the Regex operator. You can also use a Regex to specify all files in a parent folder, such as ci/*. This is shown in the Changed Files row in the following screenshot.
For more information about Attributes, Operators, Matching Values, and Conditions, go to the Triggers reference.
Header Conditions
In Header Conditions, define attributes for Git webhook header data and corresponding values to match.
In the Attribute field, the header expression format is <+trigger.header['key-name']>, such as <+trigger.header['X-GitHub-Event']>.
For more information about Attributes, Operators, Matching Values, and Header Conditions, go to the Triggers reference.
Payload Conditions
CThese conditions are based on the values of the webhook's JSON payload. Harness treats the JSON payload as a data model and parses the payload and listens for events on a JSON payload key.
To reference payload values, you use <+eventPayload.[path-to-key-name], for example <+eventPayload.repository.full_name>.
For more information about Attributes, Operators, Matching Values, and Payload Conditions, go to the Triggers reference.
JEXL Condition
You can refer to payload data and headers using JEXL expressions. That includes all constants, methods, and operators in JexlOperator.
Be careful when you combine Harness variables and JEXL expressions:
- Invalid expression format:
<+pipeline.variables.MAGIC.toLowerCase()>- This expression is ambiguous. It could be evaluated as a Harness variable (return the value of variable
pipeline.variables.MAGIC.toLowerCase()) or as a JEXL operation (return the lowercase of literal stringpipeline.variables.MAGIC).
- This expression is ambiguous. It could be evaluated as a Harness variable (return the value of variable
- Valid expression format:
<+<+pipeline.variables.MAGIC>.toLowerCase()>- First, this expression gets the value of the variable
pipeline.variables.MAGIC, and then it returns the value converted to all lowercase.
- First, this expression gets the value of the variable
Here are some examples of valid combined JEXL and Harness expressions:
<+trigger.payload.pull_request.diff_url>.contains("triggerNgDemo")<+trigger.payload.pull_request.diff_url>.contains("triggerNgDemo") || <+trigger.payload.repository.owner.name> == "wings-software"<+trigger.payload.pull_request.diff_url>.contains("triggerNgDemo") && (<+trigger.payload.repository.owner.name> == "wings-software" || <+trigger.payload.repository.owner.name> == "harness")
For more information about Attributes, Operators, Matching Values, and JEXL Conditions, go to the Triggers reference.
Set pipeline input
Pipelines often have Runtime Inputs, such as codebase branch names or artifact versions and tags.
- Provide values for the inputs or use Input Sets.
- Select Create Trigger to save your trigger.
The trigger is added to the triggers page. The last step is webhook registration.
Register the webhook in the Git provider
For all Git providers supported by Harness, non-custom webhooks are automatically created in the repo. For details about automatically-registered Git events, go to the Triggers reference.
However, if automatic registration fails or you created a custom webhook, you must manually copy the webhook URL and add it to your repo webhooks.
To configure a functioning Git event webhook trigger:
- You must have the appropriate level of access to configure repo webhooks in your Git provider.
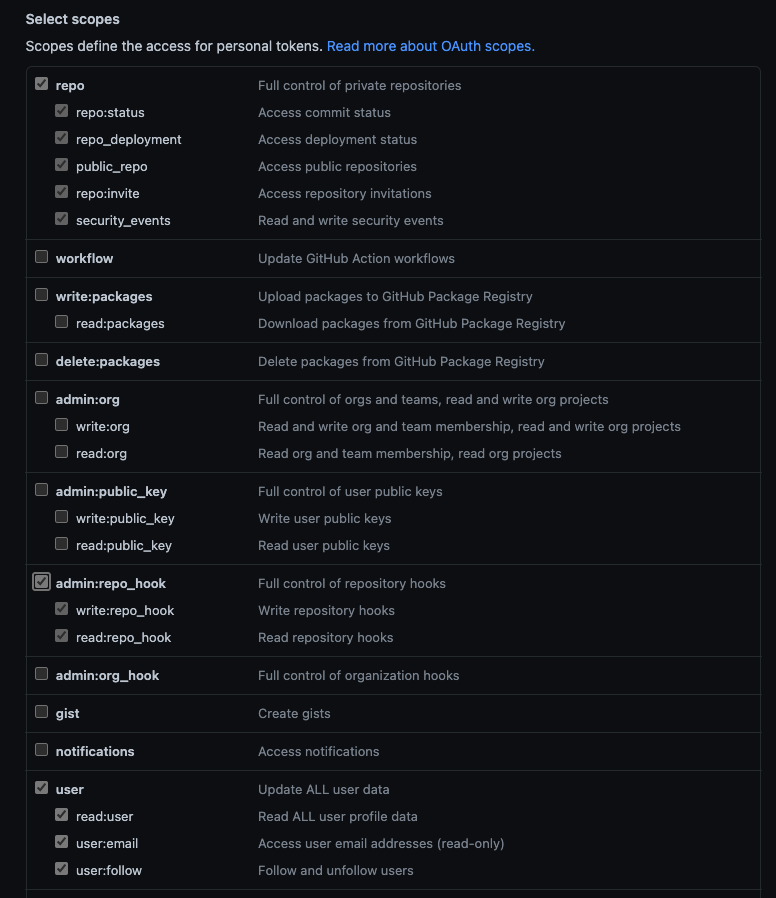
- The personal access token use for code repo connector authentication must have the appropriate scopes.
For example, for GitHub, you must be a repo admin and the GitHub personal access token used in the pipeline's GitHub connector must include all repo, user, and admin:repo_hook options for Scopes.
For information about other provider's token scopes, go to:
Go to your pipeline in Harness and select Triggers.
Select your custom webhook.
Select the link icon to copy the webhook URL.

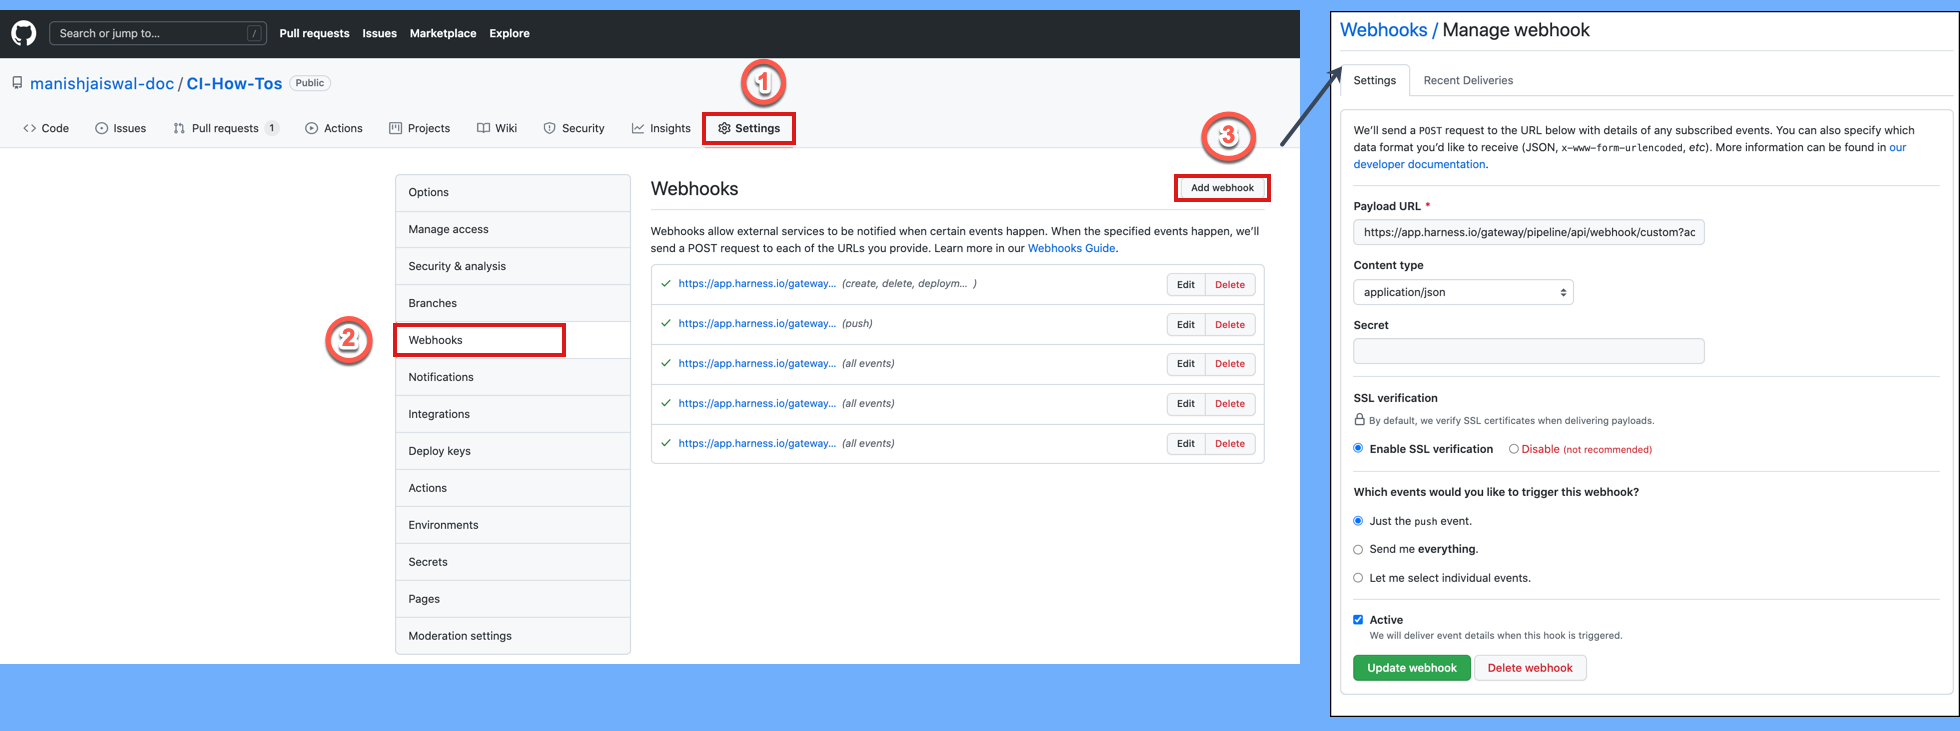
Log in to your repo in your SCM provider and navigate to the repo's webhook settings.
Create a new webhook and paste the webhook URL you copied from Harness.
Make sure that the content type for outbound requests is Application/json.
Make sure that Enable verification is enabled.
Select the events that you would like to trigger this webhook. The following example selected Just the push event, which means that this webhook is only triggered if there is a push event.
Select Update webhook.
For more information about manual webhook registration, go to the Triggers reference.
Common causes of Webhook registration failed errors
Webhook registration is immediate but the Harness Triggers page does not refresh immediately. Simply refresh the page to see if the webhook registers successfully.
If you see Webhook registration failed, here are the common causes:
- Github repository does not exist:
- Ensure you selected the correct repo.
- The token used in the Harness connector does not have read write permissions:
- Ensure that it has the repo, user, and admin:repo_hook options enabled.
- If your Git provider organization uses SSO, ensure that the token is authorized for access to the organization containing the repo.
- The Enable API access option in the connector is not enabled.
- Ensure this option is enabled and the Personal Access Token used in the settings has the repo, user, and admin:repo_hook options enabled.
Once you have fixed the issue, simply edit the Harness trigger, select Continue to navigate through its settings, and then select Update Trigger.
Once you are back on the Triggers page, refresh the page to verify that the webhook was registered.
Ensure that multiple Webhooks are not registered for the same repo. This can trigger multiple builds or deployments with a single push event.
Test the trigger
To test the trigger, make (and push) a change in your repo. If you created a Pull Request (or similar) trigger, you'll also need to create a Pull Request.
In your Git repo, you can see that the request and response were successful.
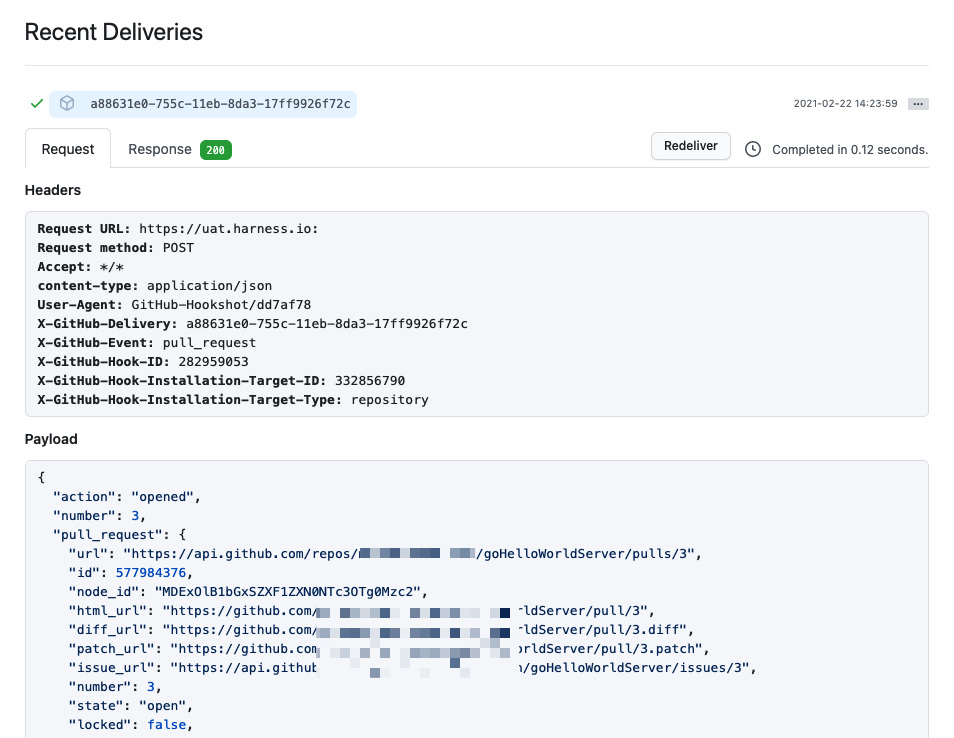
Note that if you specified Conditions the payload data must match your conditions to activate the trigger.
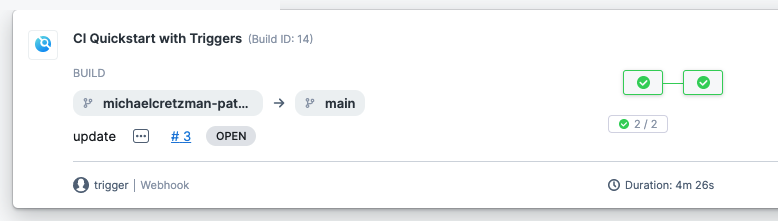
In Harness, view the Pipeline execution. In Harness CI, click Builds (1). You can see the source branch (2), target branch (3), and the pull request comment and number (4).
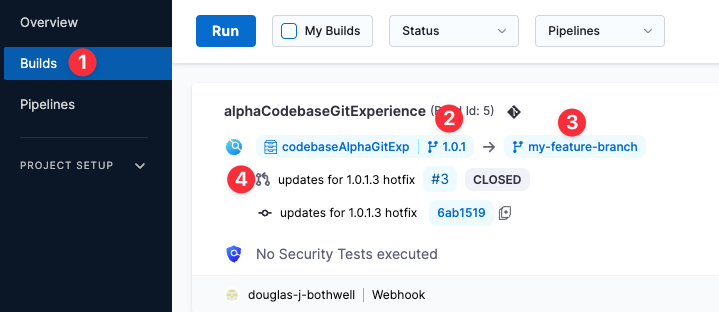
Select the pull request number to go to your repo at the pull request event.
On the list of triggers for a pipeline, you can see when each trigger was last activated.
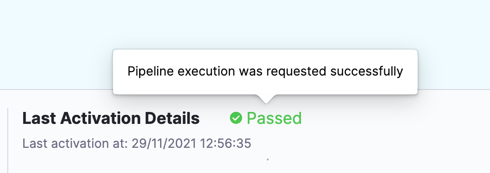
Activation means the trigger was able to request pipeline execution; it doesn't mean that the webhook didn't work.
Failed usually means the pipeline has a configuration issue that prevented the trigger from initiating a pipeline.
Trigger type expression
You can use the Harness expression <+pipeline.triggerType> to see how the pipeline was executed.
You can echo the expression like this:
echo "pipeline.triggerType: " <+pipeline.triggerType>
For example, if the pipeline is executed manually, the <+pipeline.triggerType> expression will resolve to MANUAL. If the pipeline is executed by a Webhook trigger, the expression will resolve to WEBHOOK.
pipeline.triggerType: WEBHOOK
Null comparisons
You can also use JEXL comparisons with Trigger expressions.
For example, let's look at an example that uses the ? ternary operator in a JEXL expression.
This ternary operator takes three operands: a Boolean expression, and two values or expressions that are evaluated based on the Boolean expression.
The ternary operator is also known as the conditional operator because it evaluates a Boolean expression and returns one of two possible values, depending on whether the expression is true or false.
In the following example, we use the <+pipeline.triggerType> expression to see how the pipeline was executed.
If the expression evaluates to WEBHOOK (true), we expose and resolve the <+trigger.commitSha> to show the commit SHA that fired the trigger. If the expression does not resolve to WEBHOOK (false), we show the pipeline execution Id.
echo <+<+pipeline.triggerType> == "WEBHOOK" ? <+trigger.commitSha>:<+pipeline.executionId>>
We can do the same using the MANUAL value:
echo <+<+pipeline.triggerType> == "MANUAL" ? <+pipeline.executionId>:<+trigger.commitSha>>
Here's a sample pipeline that demonstrates these comparisons.
Pipeline with trigger expressions comparisons
pipeline:
  name: Trigger
  identifier: Trigger
  projectIdentifier: CD_Docs
  orgIdentifier: default
  tags: {}
  stages:
    - stage:
        name: Custom
        identifier: Custom
        description: ""
        type: Custom
        spec:
          execution:
            steps:
              - step:
                  type: ShellScript
                  name: Echo
                  identifier: Echo
                  spec:
                    shell: Bash
                    onDelegate: true
                    source:
                      type: Inline
                      spec:
                        script: |-
                          echo "pipeline.triggerType: " <+pipeline.triggerType>
                          echo "pipeline.executionId: " <+pipeline.executionId>
                          echo "trigger.commitSha: " <+trigger.commitSha>
                    environmentVariables: []
                    outputVariables: []
                  timeout: 10m
              - step:
                  type: ShellScript
                  name: Triggered by WEBHOOK
                  identifier: Comparison_2
                  spec:
                    shell: Bash
                    onDelegate: true
                    source:
                      type: Inline
                      spec:
                        script: echo <+<+pipeline.triggerType> == "WEBHOOK" ? <+trigger.commitSha>:<+pipeline.executionId>>
                    environmentVariables: []
                    outputVariables: []
                  timeout: 10m
              - step:
                  type: ShellScript
                  name: Triggered by MANUAL
                  identifier: Comparison
                  spec:
                    shell: Bash
                    onDelegate: true
                    source:
                      type: Inline
                      spec:
                        script: echo <+<+pipeline.triggerType> == "MANUAL" ? <+pipeline.executionId>:<+trigger.commitSha>>
                    environmentVariables: []
                    outputVariables: []
                  timeout: 10m
        tags: {}
Troubleshooting
If a pipeline does not start in response to an incoming event, do the following:
- Check the execution history (select Execution History in the top right of the Pipeline Studio).
- Verify that the runtime inputs are correct.
- Check the payloads sent from the Git provider and compare the relevant fields with your trigger conditions. For example, in GitHub you can view the full payload of each event sent from a specific webhook.