Use a GitHub App in a GitHub connector
You can use a GitHub App to provide authentication for a GitHub connector. This enables API access to GitHub through the GitHub App.
GitHub recommends using GitHub Apps for GitHub connectors, because GitHub Apps offer more granular permissions than other authentication methods.
This topic assumes you have an understanding of:
Permissions requirements
You must meet one or more of the following criteria:
- You can install GitHub Apps on your personal account or under an organization where you have administrative access.
- You have admin permissions on a GitHub repo under a GitHub organization, and you can install GitHub Apps in that repo.
- You will install the GitHub App in a repo that requires an organization's permission, and the organization owner has approved the application, and can provide approvals as needed to proceed with app installation.
Create the GitHub App
You can create and register GitHub Apps in your personal GitHub account or in any GitHub organization where you have administrative access.
Follow the instructions in the GitHub documentation on Creating a GitHub App. Populate the settings as follows:
- GitHub App Name: Enter a name.
- Homepage URL: Enter
https://harness.io/. - Webhook: Deselect Active. The app is used for authentication and doesn't need to receive webhook events.
- Permissions: Configure the following Repository Permissions.
- Administration: Select Read & write.
- Commit statuses: Select Read & write.
- Contents: Select Read & write.
- Metadata: Select Read-only.
- Pull requests: Select Read & write. This is required for the Issue Comment event trigger for Github.
- Webhooks: Select Read & write.
- Where can this GitHub App be installed: Select Any account. The app must be public to use it with a GitHub connector.
A private app can only be installed on the account that owns the app. Your app is private if you didn't select Any account for Where can this GitHub App be installed. You must edit your app and make it public. For instructions, go to the GitHub documentation on Changing the visibility of a GitHub App.
Install the GitHub App
Follow the instructions in the GitHub documentation on Installing your own GitHub App, and note the following:
- For Repository access, select Only select repositories, and then select the repos you want to connect with through your Harness GitHub connector.
- Configure these Permissions:
- Metadata: Read
- Code: Read & write
- Commit statuses: Read & write
- Pull Requests: Read & write
Get the Installation ID and App ID
You need the Installation ID and App ID to configure your Harness GitHub connector.
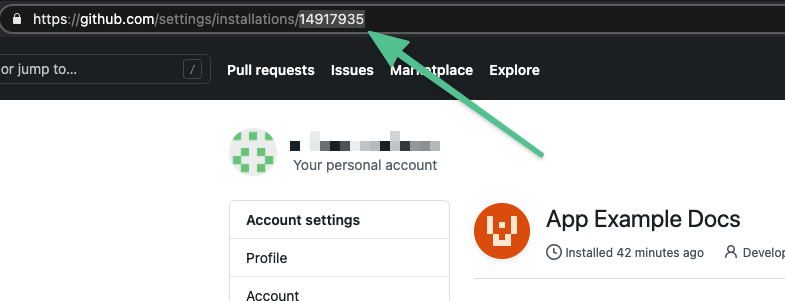
Get the Installation ID from the URL of the installed app, such as:
https://github.com/settings/installations/INSTALLATION_ID
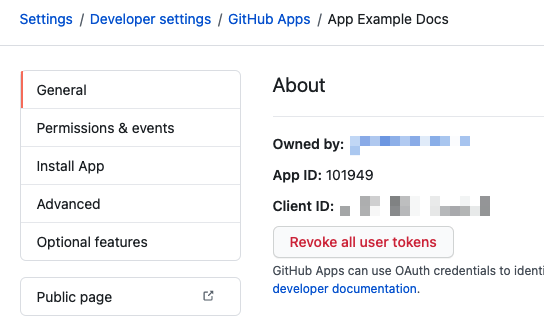
Get the App ID from the app's General tab.

Generate a private key
You need a private key for your GitHub app to configure your Harness GitHub connector.
Follow the instructions in the GitHub documentation for generating private keys for GitHub Apps
Save the private key file to your local machine. GitHub only stores the public portion of the key.
Open a terminal and
cdto the folder containing the key.Run the following command to convert the key file to the necessary format for the Harness GitHub connector. Replace
YOUR_KEY.pemwith the name of the PEM file you saved:openssl pkcs8 -topk8 -inform PEM -outform PEM -in <your-key>.pem -out converted-github-app.pem -nocryptIn Harness, store the converted key file as a Harness encrypted file secret.
Configure the GitHub connector
You can use your GitHub App as either the primary authentication method or the API access authentication method for your GitHub connector.
- Primary authentication
- API access authentication
Currently, the option to use a GitHub App as the primary authentication method for a GitHub connector is behind the feature flag CDS_GITHUB_APP_AUTHENTICATION. Contact Harness Support to enable the feature.
The Git Clone step doesn't support GitHub connectors that use GitHub App authentication.
- In your Harness project, select Connectors under Project Setup.
- Create a new connector or edit an existing GitHub connector.
- Configure the GitHub connector settings. The GitHub App is part of the Credentials settings.
- For Authentication, select GitHub App.
- Enter the your GitHub installation ID and app ID.
- Select your private key file secret.
- Select Continue.
- If the connection test succeeds, select Finish to save the connector.
- In your Harness project, select Connectors under Project Setup.
- Create a new connector or edit an existing GitHub connector.
- Configure the GitHub connector settings. The GitHub App is part of the Credentials settings.
- Select Enable API access. This setting is only available for connection types and authentication methods where it is not already enabled by default.
- For API Authentication, select GitHub App.
- Enter the your GitHub installation ID and app ID.
- Select your private key file secret.
- Select Continue.
- If the connection test succeeds, select Finish to save the connector.
Option: Set up a PR trigger
You can configure your pipelines to use Git event triggers so that builds automatically run in response to events in your Git repos.
If you want to set up a PR trigger, make sure the webhook definition uses the Pull Request event.