Add AppDynamics as a Verification Provider
To set up AppDynamics to work with Harness' Continuous Verification features, you must add AppDynamics as Harness Verification Provider.
Before You Begin
- Set up a Harness Application, containing a Service and Environment. See Create an Application.
- See the AppDynamics Verification Overview.
- The AppDynamics account that you use to connect Harness to AppDynamics must have the following General Permission:
View.
Limitations
Harness does not support AppDynamics Lite. If you set up AppDynamics with Harness using an AppDynamics Pro Trial account, and that trial expires, you will be using AppDynamics Lite—which will not work with Harness.
If you require more flexibility than the standard integration outlined here, you also have the option to add AppDynamics as a Custom APM.
Step 1: Add Verification Provider
To begin adding AppDynamics as a Harness Verification Provider,:
In Harness, click Setup.
Click Connectors, and then click Verification Providers.
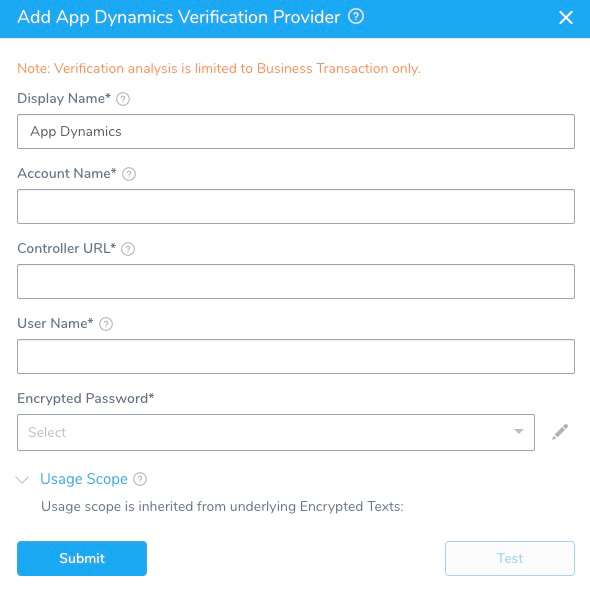
Click Add Verification Provider, and select AppDynamics. The Add AppDynamic Verification Provider dialog appears.

Step 2: Display Name
Enter a name for this connection. You will use this name when selecting the Verification Provider in Harness Environments and Workflows.
If you plan to use multiple providers of the same type, ensure that you give each provider a different name.
Step 3: Account Name
In the Account Name field, enter the name of AppDynamics account you want to use.
For Harness On-Prem, enter customer1.
Step 4: Controller URL
In the Controller URL field, enter the URL of the AppDynamic controller in the format:
http://<Controller_Host>:<port>/controller
For example:
https://xxxx.saas.appdynamics.com/controller
Step 5: User Name and Password
In the User Name and Encrypted Password fields, enter the credentials to authenticate with the AppDynamics server.
In Encrypted Password, select or create a new Harness Encrypted Text secret.
Only local AppDynamics users are supported. SAML users are not supported.
Step 6: Usage Scope
Usage scope is inherited from the secret used in Encrypted Password.
Step 7: Test and Save
- When you have set up the dialog, click Test.
- Once the test is successful, click Submit to add this Verification Provider.