Custom Ingest settings reference
You can ingest results from any third-party scanner. Your results need to be in either SARIF or Harness Custom JSON format.
For a full description of the workflow, go to Ingest Results from Custom or Unsupported Scanners.
The Custom Ingest step is intended for scanners that have no supported integration in STO. Harness recommends that you always use the documented workflow for supported scanners. For a list of all STO-supported scanners, go to Security Step Settings Reference.
- UI configuration support is currently limited to a subset of scanners. Extending UI support to additional scanners is on the Harness engineering roadmap.
- Each scanner template shows only the options that apply to a specific scan. If you're setting up a repository scan, for example, the UI won't show Container Image settings.
- Docker-in-Docker is not required for these steps unless you're scanning a container image. If you're scanning a repository using Bandit, for example, you don't need to set up a Background step running DinD.
- Support is currently limited to Kubernetes and Harness Cloud AMD64 build infrastructures only.
Scan settings
Scan Mode
- Ingestion Ingestion scans are not orchestrated. The Security step ingest results from a previous scan (for a scan run in an previous step) and then normallizes and compresses the results.
Scan Configuration
The predefined configuration to use for the scan. All scan steps have at least one configuration.
Target settings
Type
The target type to scan for vulnerabilities.
- Repository Scan a codebase repo.
- Container Image Scan the layers, libraries, and packages in a container image.
- Instance Scan a running application.
- Configuration Scan your cloud environment by gathering configuration data via the cloud provider’s APIs.
Name
The Identifier that you want to assign to the target you’re scanning in the pipeline. Use a unique, descriptive name such as codebaseAlpha or jsmith/myalphaservice. Using descriptive target names will make it much easier to navigate your scan data in the STO UI.
Variant
An identifier for a specific variant to scan, such as the branch name or image tag. This identifier is used to differentiate or group results for a target. Harness maintains a historical trend for each variant.
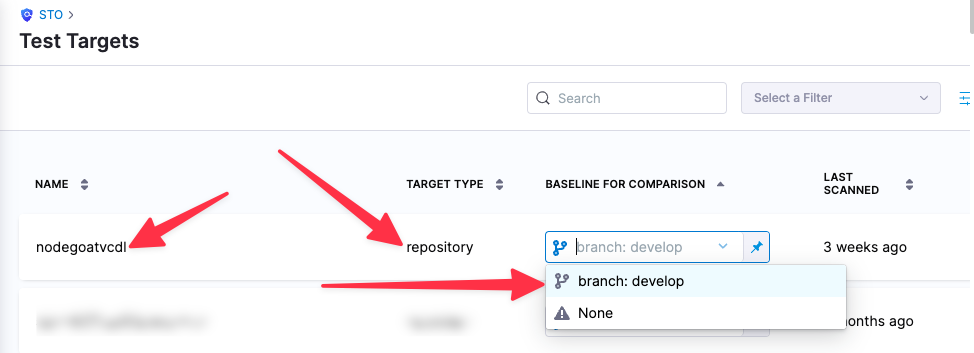
You can see the target name, type, and variant in the Test Targets UI:
Ingestion Settings
Ingestion File (ingestion)
The results data file to use when running an Ingestion scan. STO steps can ingest scan data in SARIF and Harness Custom JSON format. Generally an Ingestion scan consists of a scan step (to generate the data file) and an ingestion step (to ingest the data file).
Authentication Settings
Domain (extraction)
The fully-qualified URL to the scanner.
Enforce SSL
The step and the scanner communicate over SSL by default. Set this to false to disable SSL (not safe).
API Version
The scanner API version. Some scanners require this.
Type
The scanner API version. Specify one of the following:
- Username & Password
- API Key
Access ID (orchestration)
Username to log in to the scanner.
Access Token
The access token to log in to the scanner. In most cases this is a password or an API key.
You should create a Harness text secret with your encrypted token and reference the secret using the format <+secrets.getValue("project.container-access-id")>. For more information, go to Add and Reference Text Secrets.
Container Image settings
Type (orchestration)
The registry type where the image is stored:
Docker v2 A registry that uses the Docker Registry v2 API such as Docker Hub, Google Container Registry, or Google Artifact Registry.
Local Image
Domain (extraction)
The URL of the artifact repository that contains the image to scan. Examples:
docker.ioapp.harness.io/registryus-east1-docker.pkg.devus.gcr.io
Name
The image name. For non-local images, you also need to specify the image repository. Example: jsmith/myalphaservice
Tag
The image tag. Examples: latest, 1.2.3
Access Id
Username to log in to the container registry.
Access Token
The access token used to log in to the container registry. In most cases this is a password or an API key.
You should create a Harness text secret with your encrypted token and reference the secret using the format <+secrets.getValue("project.container-access-id")>. For more information, go to Add and Reference Text Secrets.
Region
The region where the image to scan is located, as defined by the cloud provider such as AWS.
Scan Tool Settings
Project Name
The name of the scan project as defined in the scanner. This is the also the target name in the Harness UI (Security Tests > Test Targets).
Project Version
The version of the scan project, as defined in the scanner.
Include
The initial scope for the scan. This should match the format required by the scanner.
Exclude
Exclusions to the initial scope for the scan. This should match the format required by the scanner.
Context Name
The context to use for the scan. If you’re running a ZAP scan, for example, you can define contexts to include multiple URLs in the same scan.
Context Name (images)
The image to specify when you’re looking to ingest data from a previous scan. If you’re running a Prisma Cloud scan, for example, you can specify the image name and get the latest scan for that image.
Team Name
The product team name. In Checkmarx, for example, supports team names in the format /<server-name>/<team-name> such as /server1.myorg.org/devOpsEast.
Port
The TCP port to communicate with the scanner. You can specify this to override the default port for that scanner.
Java Libraries
A comma-separated list of paths to files with third-party libraries used by your tests. If you’re running a SonarQube scan, for example, this corresponds to the sonar.java.libraries parameter.
Java Binaries
A comma-separated list of paths to the folders with the bytecode files you want to scan. If you’re running a SonarQube scan, for example, this corresponds to the sonar.java.binaries parameter.
Product Token
The access token used to log in to a specific product in the scanner. This is required for some scans. In most cases this is a password or an API key.
You should create a Harness text secret with your encrypted token and reference the secret using the format <+secrets.getValue("project.container-access-id")>. For more information, go to Add and Reference Text Secrets.
Name
The access ID used to look up a specific product in the scanner. This is required for some product suites such as Prisma Cloud.
You might want to create a Harness text secret with your encrypted Id and reference the secret using the format <+secrets.getValue("project.container-access-id")>. For more information, go to Add and Reference Text Secrets.
Project Token
The access token used to log in to a specific product in the scanner. This is required for some scans. In most cases this is a password or an API key.
You should create a Harness text secret with your encrypted token and reference the secret using the format <+secrets.getValue("project.container-access-id")>. For more information, go to Add and Reference Text Secrets.
Lookup Type
The type of key used to look up the object to scan: password or API key.
Instance settings
Domain
Domain of the application instance to scan. You can include the full path to the app in this field, or split the full path between the Domain and the Path fields. Example: https://myapp.io/portal/us
Protocol
HTTPS (default) or HTTP.
Port
The TCP port used by the scanned app instance.
Path
Path to append to the application instance domain, if you're splitting the full path between the Domain and Path settings. For example, you might specify the domain as https://myapp.io and the path as /portal/us.
Log Level, CLI flags, and Fail on Severity
Log Level
The minimum severity of the messages you want to include in your scan logs. You can specify one of the following:
- DEBUG
- INFO
- WARNING
- ERROR
Additional CLI flags
You can use this field to customize the scan with specific command-line arguments supported by that scanner.
Fail on Severity
Every Security step has a Fail on Severity setting. If the scan finds any vulnerability with the specified severity level or higher, the pipeline fails automatically. You can specify one of the following:
CRITICALHIGHMEDIUMLOWINFONONE— Do not fail on severity
The YAML definition looks like this: fail_on_severity : critical # | high | medium | low | info | none