Zed Attack Proxy (ZAP) Scanner Reference
Zed Attack Proxy (ZAP) is a free, open-source penetration tool for testing web applications. ZAP runs as a “man-in-the-middle proxy” between the tester’s browser and the web app. You can use ZAP to run penetration testing to simulate a malicious external attack and use the results to protect your app from unauthorized access and denial-of-service attacks.
Before you begin
Docker-in-Docker requirements
Docker-in-Docker is not required for ingestion workflows where the scan data has already been generated.
You need to include a Docker-in-Docker background service in your stage if either of these conditions apply:
- You configured your scanner using a generic Security step rather than a scanner-specific template such as Aqua Trivy, Bandit, Mend, Snyk, etc.
- You’re scanning a container image using an Orchestration or Extraction workflow.
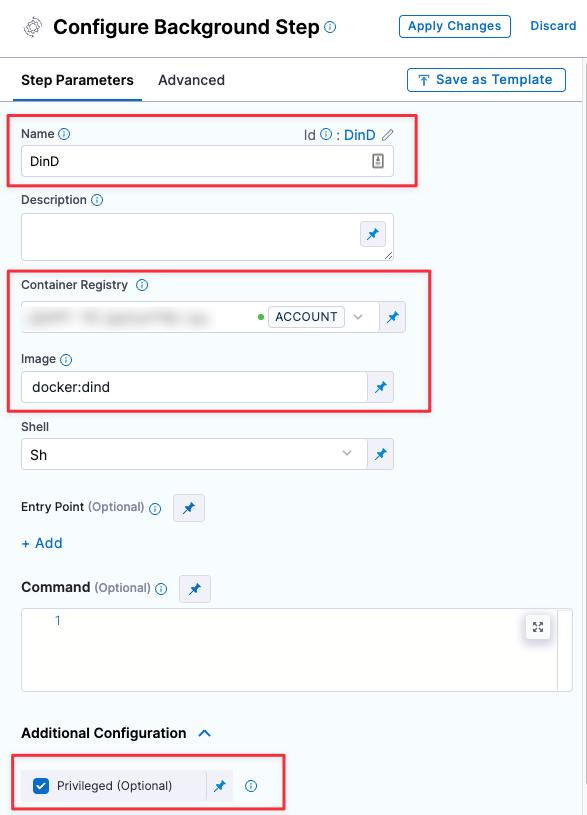
Set up a Docker-in-Docker background step
Go to the stage where you want to run the scan.
In Overview, add the shared path
/var/run.In Execution, do the following:
- Click Add Step and then choose Background.
- Configure the Background step as follows:
- Dependency Name =
dind - Container Registry = The Docker connector to download the DinD image. If you don't have one defined, go to Docker connector settings reference.
- Image =
docker:dind - Under Optional Configuration, select the Privileged checkbox.
- Dependency Name =
Root access requirements
You need to run the scan step with root access if either of the following apply:
You need to run a Docker-in-Docker background service.
You need to add trusted certificates to your scan images at runtime.
You can set up your STO scan images and pipelines to run scans as non-root and establish trust for your own proxies using self-signed certificates. For more information, go to Configure STO to Download Images from a Private Registry.
Zap step configuration
The recommended workflow is add a ZAP step to a Security Tests or CI Build stage and then configure it as described below. You can also configure ZAP scans programmatically by copying, pasting, and editing the YAML definition.
- UI configuration support is currently limited to a subset of scanners. Extending UI support to additional scanners is on the Harness engineering roadmap.
- Each scanner template shows only the options that apply to a specific scan. If you're setting up a repository scan, for example, the UI won't show Container Image settings.
- Docker-in-Docker is not required for these steps unless you're scanning a container image. If you're scanning a repository using Bandit, for example, you don't need to set up a Background step running DinD.
- Support is currently limited to Kubernetes and Harness Cloud AMD64 build infrastructures only.
Scanner Template example
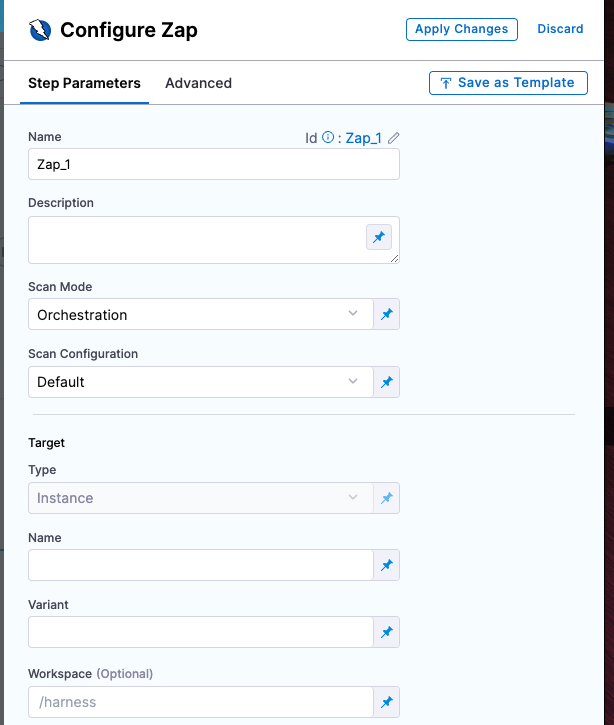
Scan
Scan Mode
The orchestration mode to use for the scan. The following list includes the UI and YAML values for the supported options.
- Orchestrated A fully-orchestrated scan. A Security step in the Harness pipeline orchestrates a scan and then normalizes and compresses the results.
- Ingestion Ingestion scans are not orchestrated. The Security step ingest results from a previous scan (for a scan run in an previous step) and then normallizes and compresses the results.
Scan Configuration
The predefined configuration to use for the scan. All scan steps have at least one configuration.
The following options are supported for Zap scans:
- Default
- Standard —
scanMode=active,scanType=atandard - Attack —
scanMode=active,scanType=attack - Quick —
scanMode=active,scanType=standard,quickMode=true
Target
Type
- Instance Scan a running application.
Name
The Identifier that you want to assign to the target you’re scanning in the pipeline. Use a unique, descriptive name such as codebaseAlpha or jsmith/myalphaservice. Using descriptive target names will make it much easier to navigate your scan data in the STO UI.
Variant
An identifier for a specific variant to scan, such as the branch name or image tag. This identifier is used to differentiate or group results for a target. Harness maintains a historical trend for each variant.
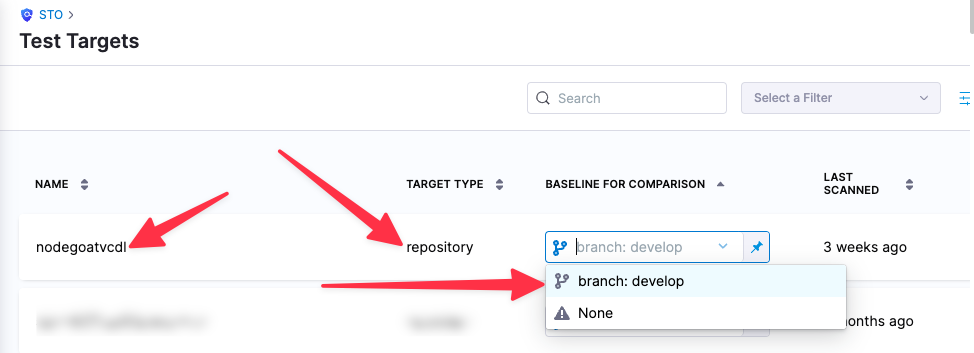
You can see the target name, type, and variant in the Test Targets UI:
Workspace
The workspace path on the pod running the Security step. The workspace path is /harness by default.
You can override this if you want to scan only a subset of the workspace. For example, suppose the pipeline publishes artifacts to a subfolder /tmp/artifacts and you want to scan these artifacts only. In this case, you can specify the workspace path as /harness/tmp/artifacts.
Ingestion File
The results data file to use when running an Ingestion scan. STO steps can ingest scan data in SARIF and Harness Custom JSON format. Generally an Ingestion scan consists of a scan step (to generate the data file) and an ingestion step (to ingest the data file).
Instance
Domain
Domain of the application instance to scan. You can include the full path to the app in this field, or split the full path between the Domain and the Path fields. Example: https://myapp.io/portal/us
Protocol
HTTPS (default) or HTTP.
Port
The TCP port used by the scanned app instance.
Path
Path to append to the application instance domain, if you're splitting the full path between the Domain and Path settings. For example, you might specify the domain as https://myapp.io and the path as /portal/us.
Log Level, CLI flags, and Fail on Severity
Log Level
The minimum severity of the messages you want to include in your scan logs. You can specify one of the following:
- DEBUG
- INFO
- WARNING
- ERROR
Additional CLI flags
You can use this field to customize the scan with specific command-line arguments supported by that scanner.
Fail on Severity
Every Security step has a Fail on Severity setting. If the scan finds any vulnerability with the specified severity level or higher, the pipeline fails automatically. You can specify one of the following:
CRITICALHIGHMEDIUMLOWINFONONE— Do not fail on severity
The YAML definition looks like this: fail_on_severity : critical # | high | medium | low | info | none
Additional Configuration
In the Additional Configuration settings, you can use the following options:
Advanced settings
In the Advanced settings, you can use the following options:
Security step configuration (deprecated)
Scan policy types
STO supports the following scan policy types for ZAP:
orchestratedScan— A Security step in the pipeline runs the scan and ingests the results. This is easier to set up and supports scans with default or predefined settings.ingestionOnly— Run the scan in a Run step, or outside the pipeline, and then ingest the results. This is useful for advanced workflows that address specific security needs. See Ingest scan results into an STO pipeline.
Target and variant
The following settings are required for every Security step:
target_nameA user-defined label for the code repository, container, application, or configuration to scan.variantA user-defined label for the branch, tag, or other target variant to scan.
Make sure that you give unique, descriptive names for the target and variant. This makes navigating your scan results in the STO UI much easier.
You can see the target name, type, and variant in the Test Targets UI:
For more information, go to Targets, baselines, and variants in STO.
ZAP scan Settings
product_name=zapscan_type=instanceproduct_config_name— Specify one of the following:standard(scanMode = active, scanType = standard)attack(scanMode = active, scanType = attack)quick(scanMode = active, scanType = standard, quickMode = true)
instance_identifier— The target Id that will appear in the Test Targets page of the Harness UI.instance_environment— The instance environment, such asdev,qa,pre-qa, orprod.instance_domain— The app domain to scan, for examplepublic-firing-range.appspot.com/instance_protocol— The protocol of the site to scan. Generally this ishttporhttps.instance_type=websitefail_on_severity- See Fail on Severity.
Optional Settings
instance_path— Specify if the app URL includes a path beyond the domain. If you want to scanhttps://app.my-domain.com/myModule/myApp, the instance path ismyModule/myApp.instance_port— Specify if the site is accessed using a non-default port.
Ingestion settings
The following setting is required for Security steps where the policy_type is ingestionOnly.
ingestion_fileThe results data file to use when running an Ingestion scan. You should specify the full path to the data file in your workspace, such as/shared/customer_artifacts/my_scan_results.json. STO steps can ingest scan data in SARIF and Harness Custom JSON format.
The following steps outline the general workflow for ingesting scan data into your pipeline:
Specify a shared folder for your scan results, such as
/shared/customer_artifacts. You can do this in the Overview tab of the Security stage where you're ingesting your data.Create a Run step that copies your scan results to the shared folder. You can run your scan externally, before you run the build, or set up the Run step to run the scan and then copy the results.
Add a Security step after the Run step and add the
target name,variant, andingestion_filesettings as described above.
For a complete workflow description and example, go to Ingest Scan Results into an STO Pipeline.