YAML reference -- pipelines
This topic describes the YAML schema for a Pipeline.
It includes common examples of the major schema entries.
New to Harness YAML? See Harness YAML Quickstart.
Visual Summary
Here's a very quick video showing you how to build a Pipeline using YAML:
Viewing the YAML Schema
The Harness YAML schema is over 20k lines long and we are investigating how to expose it in a way that makes it easy to navigate.
In the meantime, you can use Chrome DevTools to view the schema:

Pipeline Studio YAML Editor
The Pipeline Studio includes visual and YAML editors.
The best way to get started with YAML is to do a CI or CD quickstart and then view the YAML in Pipeline Studio.
See CD Quickstarts and Get started with CI.
The YAML editor validates YAML before allowing you to save it.
To learn how to use the YAML editor, see Harness YAML Quickstart for CD.
Autocomplete and Command Palette
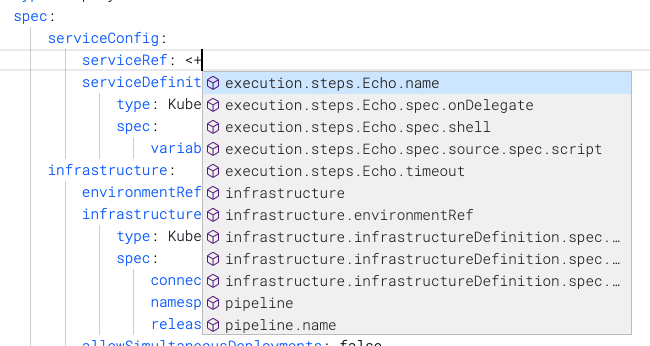
The YAML editor has an autocomplete feature that makes it very easy to see what entries are available.
The keyboard command for autocomplete is Ctrl + Space.

If an entry already has a value, the autocomplete will not show you other options. You need to delete the value and then enter Ctrl + Space.
The command palette keyboard command is F1.
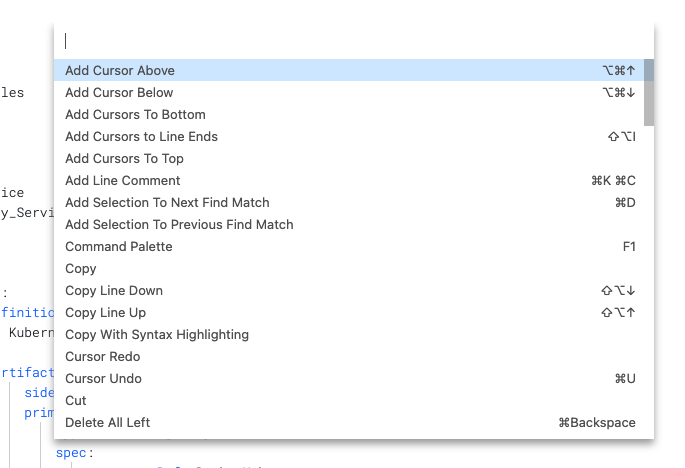
The command palette displays the keyboard shortcuts for all commands.
Limitations
The visual editor lets you create Connectors inline but the YAML editor does not. For the YAML editor you need the entity Id of the Connector first. Typically, the Id is entered as the value for the connectorRef key.
This is a minor limitation as once you have entered in the Id you can configure the rest of the settings in YAML using autocomplete.
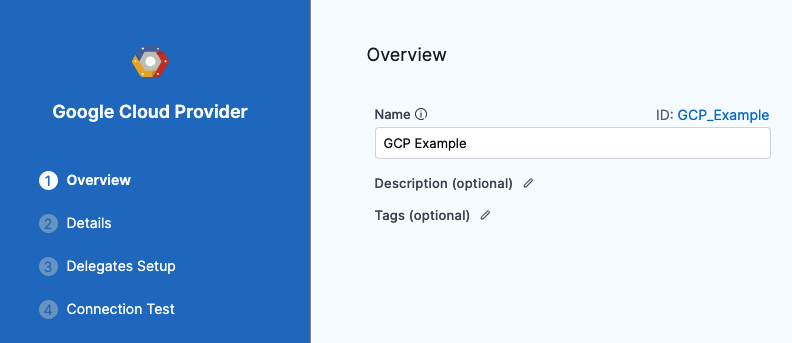
For example, here is a Connector with the name GCP Example and Id GCP_Example. You can see the Id used in the YAML as connectorRef: GCP_Example:
| Connector | YAML |
 | 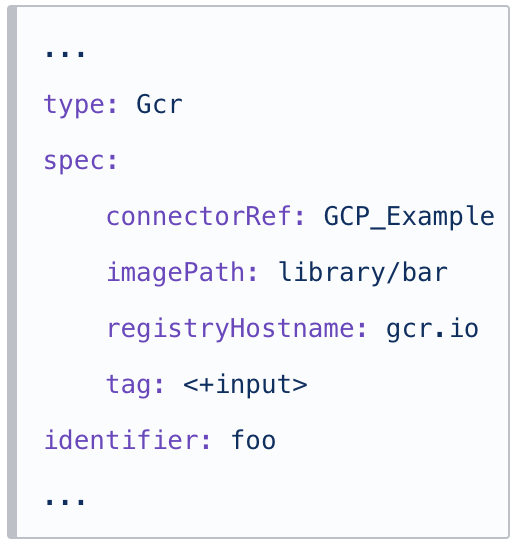 |
...type: Gcrspec: connectorRef: GCP_Example imagePath: library/bar registryHostname: gcr.io tag: <+input>identifier: foo...
|
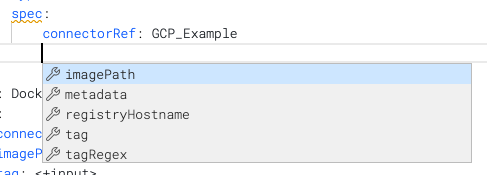
Once you have entered the Id in connectorRef, you can use autocomplete to view the remaining settings:
Schema Overview
Harness Pipeline YAML lets you model your release process declaratively. Each Pipeline entity, component, and setting has a YAML entry.
Entries
Entries are standard YAML associative arrays using key: value.
Settings are not quoted.
Indentation
Whitespace indentation is 4 spaces.
Conventions
Pipeline syntax uses the following conventions:
- Quotes indicate an empty string. Values do not need quotes. Once you enter a value and save the quotes are removed.
- Entries are listed as
key: keyword. The key is a data type that corresponds to a setting such asskipResourceVersioning. The keyword is a literal definition for the setting, likefalseorK8sManifest. - Brackets indicate an inline series branch (an array of the data type). For example
variables: []. To edit, you delete the brackets, enter a new line, and enter a dash-. Now you can use autocomplete to see the available entries. - Curly braces indicate an array separated by new lines. For example,
tags: {}. To enter the entries for this type, delete the curly braces, enter a new line, and then enter thekey: valuepairs. For example:
...
tags:
    docs: "CD"
    yaml example: ""
...
- The block style indicator
|turns every newline within the string into a literal newline and adds one line at the end. The-indicates removes newlines from the end. For example:
...
script: |-
    echo "hello"

    echo <+pipeline.name>
...
Pipeline
A Pipeline can have an unlimited number of configurations. This section simply covers the basic YAML schema.
Schema
This is the basic schema for a Pipeline:
pipeline:
    name: ""
    identifier: ""
    projectIdentifier: ""
    orgIdentifier: ""
    tags: {}
    stages:
        - stage:
    flowControl:
    notificationRules:
The projectIdentifier and orgIdentifier must match existing Project and Org Ids.
From here you can add stages, Service, Infrastructure, and Execution. Harness will not allow you to save your Pipeline until these three components are set up.
Example
Here is a very basic Pipeline that meets the minimum requirements and uses a Shell Script step:
pipeline:
    name: YAML
    identifier: YAML
    projectIdentifier: CD_Examples
    orgIdentifier: default
    tags: {}
    stages:
        - stage:
              name: Deploy
              identifier: Deploy
              description: ""
              type: Deployment
              spec:
                  serviceConfig:
                      serviceRef: nginx
                      serviceDefinition:
                          type: Kubernetes
                          spec:
                              variables: []
                  infrastructure:
                      environmentRef: helmchart
                      infrastructureDefinition:
                          type: KubernetesDirect
                          spec:
                              connectorRef: <+input>
                              namespace: <+input>
                              releaseName: release-<+INFRA_KEY>
                      allowSimultaneousDeployments: false
                  execution:
                      steps:
                          - step:
                                type: ShellScript
                                name: Echo
                                identifier: Echo
                                spec:
                                    shell: Bash
                                    onDelegate: true
                                    source:
                                        type: Inline
                                        spec:
                                            script: echo "hello"
                                    environmentVariables: []
                                    outputVariables: []
                                    executionTarget: {}
                                timeout: 10m
                      rollbackSteps: []
              tags: {}
              failureStrategies:
                  - onFailure:
                        errors:
                            - AllErrors
                        action:
                            type: StageRollback
See also:
Stage
A Stage is a subset of a Pipeline that contains the logic to perform one major segment of the Pipeline process. Stages are based on the different milestones of your Pipeline, such as building, approving, and delivering.
Schema
stages:
    - stage:
          name: ""
          identifier: ""
          description: ""
          type: Deployment
          spec:
              serviceConfig:
                  serviceRef: ""
                  serviceDefinition:
                      type: ""
                      spec:
                          variables: []
              infrastructure:
                  environmentRef: ""
                  infrastructureDefinition:
                      type: ""
                      spec:
                          connectorRef: ""
                          namespace: ""
                          releaseName: release-""
                  allowSimultaneousDeployments: ""
              execution:
                  steps:
                      - step:
                            type: ""
                            name: ""
                            identifier: ""
                            spec:
                  rollbackSteps: []
          tags: {}
          failureStrategies:
              - onFailure:
                    errors:
                        - AllErrors
                    action:
                        type: StageRollback
Rollback steps, failure strategies, and execution conditions are set at the end of the stage YAML.
...
                  rollbackSteps: []
          tags: {}
          failureStrategies:
              - onFailure:
                    errors:
                        - AllErrors
                    action:
                        type: StageRollback
...
Example
stages:
    - stage:
          name: Deploy
          identifier: Deploy
          description: ""
          type: Deployment
          spec:
              serviceConfig:
                  serviceRef: nginx
                  serviceDefinition:
                      type: Kubernetes
                      spec:
                          variables: []
              infrastructure:
                  environmentRef: helmchart
                  infrastructureDefinition:
                      type: KubernetesDirect
                      spec:
                          connectorRef: <+input>
                          namespace: <+input>
                          releaseName: release-<+INFRA_KEY>
                  allowSimultaneousDeployments: false
              execution:
                  steps:
                      - step:
                            type: ShellScript
                            name: Echo
                            identifier: Echo
                            spec:
                                shell: Bash
                                onDelegate: true
                                source:
                                    type: Inline
                                    spec:
                                        script: echo "hello"
                                environmentVariables: []
                                outputVariables: []
                                executionTarget: {}
                            timeout: 10m
                  rollbackSteps: []
          tags: {}
          failureStrategies:
              - onFailure:
                    errors:
                        - AllErrors
                    action:
                        type: StageRollback
See also:
Service
A Service represents your microservices and other workloads logically.
A Service is a logical entity to be deployed, monitored, or changed independently.
When a Service is added to the stage in a Pipeline, you define its Service Definition. Service Definitions represent the real artifacts, manifests, and variables of a Service. They are the actual files and variable values.
Schema
spec:
    serviceConfig:
        serviceRef: ""
        serviceDefinition:
            type: ""
            spec:
                variables: []
If you propagate a Service from a previous stage, the YAML indicated it this way:
spec:
    serviceConfig:
        useFromStage:
            stage: ""
Example
spec:
    serviceConfig:
        serviceRef: nginx
        serviceDefinition:
            type: Kubernetes
            spec:
                variables: []
See also:
Infrastructure
Infrastructure is defined under Environments. Environments represent your deployment targets logically (QA, Prod, etc). You can add the same Environment to as many Stages as you need.
Schema
infrastructure:
    environmentRef: ""
    infrastructureDefinition:
        type: ""
        spec:
            connectorRef: ""
            namespace: ""
            releaseName: release-""
    allowSimultaneousDeployments: true|false
Example
infrastructure:
    environmentRef: <+input>
    infrastructureDefinition:
        type: KubernetesDirect
        spec:
            connectorRef: <+input>
            namespace: <+input>
            releaseName: release-<+INFRA_KEY>
    allowSimultaneousDeployments: false
That example is for the platform agnostic Kubernetes infrastructure. For a different infrastructure, such as GCP, it would look slightly different:
 infrastructure:
    environmentRef: <+input>
    infrastructureDefinition:
        type: KubernetesGcp
        spec:
            connectorRef: <+input>
            cluster: <+input>
            namespace: <+input>
            releaseName: release-<+INFRA_KEY>
    allowSimultaneousDeployments: false
See also:
Execution
The stage Execution contains the steps for the stage.
Schema
execution:
    steps:
        - step:
              identifier: ""
              name: ""
              type: ""
    rollbackSteps: []
Example
Here is an example using the Shell Script step.
execution:
    steps:
        - step:
              type: ShellScript
              name: Step
              identifier: Step
              spec:
                  shell: Bash
                  onDelegate: true
                  source:
                      type: Inline
                      spec:
                          script: echo "hello"
                  environmentVariables: []
                  outputVariables: []
                  executionTarget: {}
              timeout: 10m
    rollbackSteps: []
Steps and Step Groups
A step is an individual operation in a stage.
Steps can be run in sequential and parallel order.
A Step Group is a collection of steps that share the same logic such as the same rollback strategy.
Schema
Step:
- step:
      identifier:
      name:
      type:
Step Group:
- stepGroup:
      name:
      identifier:
      steps:
          - step:
                identifier:
                name:
                type:
Example
Each step has different entries.
Here is an example of a Canary Deployment step.
- step:
      name: Canary Deployment
      identifier: canaryDeployment
      type: K8sCanaryDeploy
      timeout: 10m
      spec:
          instanceSelection:
              type: Count
              spec:
                  count: 1
          skipDryRun: false
See also:
Fixed Value, Runtime Input, and Expression
You can use Fixed Value, Runtime Input, and Expressions for most settings.
- Fixed value: The value is simply entered in the value of the
key: valueentry. - Runtime input: You simple enter
<+input>in the value of thekey: valueentry. - Expression: You simply enter
<+in the value of thekey: valueentry and a list of available expressions appears. Select the expression to use.
 See also:
Flow Control
Barriers allow you to synchronize different stages in your Pipeline, and control the flow of your deployment systematically.
The Flow Control YAML is at the end of the Pipeline YAML, but it is not mandatory.
Schema
pipeline:
    name: ""
    identifier: ""
    projectIdentifier: ""
    orgIdentifier: ""
    tags: {}
    stages:
...
    flowControl:
        barriers:
            - name: ""
              identifier: ""
Example
flowControl:
    barriers:
        - name: mybarrier
          identifier: mybarrier
See also:
Notification Rules
You can send Pipeline event notifications using email and popular communication and incident management platforms.
Event notifications are set up using Notification Rules in your Pipeline. You select the types of events to send, and then select how you want to send notifications. When those events occur, Harness sends event information to those channels and recipients.
The Notification Rules YAML is at the end of the Pipeline YAML, but it is not mandatory.
Schema
pipeline:
    name: ""
    identifier: ""
    projectIdentifier: ""
    orgIdentifier: ""
    tags: {}
    stages:
...
    notificationRules:
        - name: ""
          pipelineEvents:
              - type: ""
          notificationMethod:
              type: ""
              spec:
                  userGroups: []
                  recipients:
                      - ""
          enabled: true|false
Example
notificationRules:
    - name: mynotification
      pipelineEvents:
          - type: AllEvents
      notificationMethod:
          type: Email
          spec:
              userGroups: []
              recipients:
                  - john.doe@harness.io
      enabled: true
See also:
Triggers
Triggers are used to automate the execution of Pipelines based on some event like new artifact/manifest, or run on a schedule or an external webhook.
Trigger YAML is not part of the main Pipeline YAML, but Triggers can be configure using YAML in the Triggers tab of the Pipeline.
Schema
Webhook:
trigger:
    name: ""
    identifier: ""
    enabled: true|false
    description: ""
    tags: {}
    orgIdentifier: ""
    projectIdentifier: ""
    pipelineIdentifier: ""
    source:
        type: Webhook
        spec:
            type: Github
            spec:
                type: ""
                spec:
                    connectorRef: ""
                    autoAbortPreviousExecutions: true|false
                    payloadConditions:
                        - key: ""
                          operator: ""
                          value: ""
                        - key: ""
                          operator: ""
                          value: ""
                        - key: ""
                          operator: ""
                          value: ""
                    headerConditions: []
                    actions: []
Schedule (Cron):
trigger:
    name: ""
    identifier: ""
    enabled: true|false
    tags: {}
    orgIdentifier: ""
    projectIdentifier: ""
    pipelineIdentifier: ""
    source:
        type: Scheduled
        spec:
            type: Cron
            spec:
                expression: ""
Custom:
trigger:
    name: ""
    identifier: ""
    enabled: true|false
    description: ""
    tags: {}
    orgIdentifier: ""
    projectIdentifier: ""
    pipelineIdentifier: ""
    source:
        type: Webhook
        spec:
            type: Custom
            spec:
                payloadConditions: []
                headerConditions: []
Example
Here's a Webhook Trigger for a Pipeline with Runtime Input settings. Runtime Input settings in a Pipeline result in the inputYaml section of the Trigger.
trigger:
    name: mytrigger
    identifier: mytrigger
    enabled: true
    description: ""
    tags: {}
    orgIdentifier: default
    projectIdentifier: CD_Examples
    pipelineIdentifier: YAML
    source:
        type: Webhook
        spec:
            type: Github
            spec:
                type: PullRequest
                spec:
                    connectorRef: quickstart
                    autoAbortPreviousExecutions: false
                    payloadConditions:
                        - key: changedFiles
                          operator: Equals
                          value: filename
                        - key: sourceBranch
                          operator: Equals
                          value: foo
                        - key: targetBranch
                          operator: Equals
                          value: bar
                    headerConditions: []
                    actions: []
    inputYaml: |
        pipeline:
            identifier: YAML
            stages:
                - stage:
                      identifier: Deploy
                      type: Deployment
                      spec:
                          infrastructure:
                              infrastructureDefinition:
                                  type: KubernetesDirect
                                  spec:
                                      connectorRef: Kubernetes_Quickstart
                                      namespace: default
                - stage:
                      identifier: Canary
                      type: Deployment
                      spec:
                          infrastructure:
                              environmentRef: helmchart
                              infrastructureDefinition:
                                  type: KubernetesDirect
                                  spec:
                                      connectorRef: Kubernetes_Quickstart
                                      namespace: default
See also:
Input Sets and Overlays
Harness Input Sets are collections of runtime inputs for a Pipeline provided before execution. Runtime inputs contain the values that you would be prompted to provide when you executed the Pipeline.
Overlays are groups of Input Sets. Overlays enable you to provide several Input Sets when executing a Pipeline.
Schema
The Input Set YAML depends on the settings in your Pipeline that use Runtime Inputs.
Input Set:
inputSet:
    name: ""
    tags: {}
    identifier: ""
    orgIdentifier: ""
    projectIdentifier: ""
    pipeline:
        identifier: ""
        stages:
            - stage:
                  identifier: ""
                  type: ""
                  spec:
                      infrastructure:
                          infrastructureDefinition:
                              type: ""
                              spec:
                                  connectorRef: ""
                                  namespace: ""
Overlay:
overlayInputSet:
    name: ""
    identifier: ""
    orgIdentifier: ""
    projectIdentifier: ""
    pipelineIdentifier: ""
    inputSetReferences:
        - ""
        - ""
    tags: {}
Example
Input Set:
inputSet:
    name: My Input Set 1
    tags: {}
    identifier: My_Input_Set
    orgIdentifier: default
    projectIdentifier: CD_Examples
    pipeline:
        identifier: YAML
        stages:
            - stage:
                  identifier: Deploy
                  type: Deployment
                  spec:
                      infrastructure:
                          infrastructureDefinition:
                              type: KubernetesDirect
                              spec:
                                  connectorRef: Kubernetes_Quickstart
                                  namespace: default
            - stage:
                  identifier: Canary
                  type: Deployment
                  spec:
                      infrastructure:
                          environmentRef: helmchart
                          infrastructureDefinition:
                              type: KubernetesDirect
                              spec:
                                  connectorRef: Kubernetes_Quickstart
                                  namespace: default
Overlay:
overlayInputSet:
    name: My Overlay Set
    identifier: My_Overlay_Set
    orgIdentifier: default
    projectIdentifier: CD_Examples
    pipelineIdentifier: YAML
    inputSetReferences:
        - My_Input_Set
        - My_Input_Set_2
    tags: {}
See also:
Connectors
Connectors contain the information necessary to integrate and work with 3rd party tools.
Harness uses Connectors at Pipeline runtime to authenticate and perform operations with a 3rd party tool.
In the visual editor, Connectors can be added inline as your build your Pipeline.
In YAML editor, Connectors are not configured inline. You can only reference existing Connectors.
When you create a Connector, you can use YAML.
Here's what the YAML for a Connector looks like:
connector:
    name: cd-doc
    identifier: cddoc
    description: ""
    orgIdentifier: default
    projectIdentifier: CD_Examples
    type: K8sCluster
    spec:
        credential:
            type: InheritFromDelegate
        delegateSelectors:
            - example
You reference a Connector in your Pipeline by using its Id in connectorRef:
...
infrastructureDefinition:
    type: KubernetesDirect
    spec:
        connectorRef: cddoc
        namespace: default
        releaseName: release-<+INFRA_KEY>
...