Connect to Custom Verification for Custom Metrics
Connect Harness to a Custom Metrics Data Provider to have Harness verify the success of your deployments. Harness will use your tools to verify deployments and use its machine learning features to identify sources of failures.
Before You Begin
Step 1: Add Custom Verification Provider
To connect a custom metrics data provider, do the following:
- Click Setup.
- Click Connectors.
- Click Verification Providers.
- Click Add Verification Provider, and click Custom Verification.
The Metrics Data Provider dialog appears.
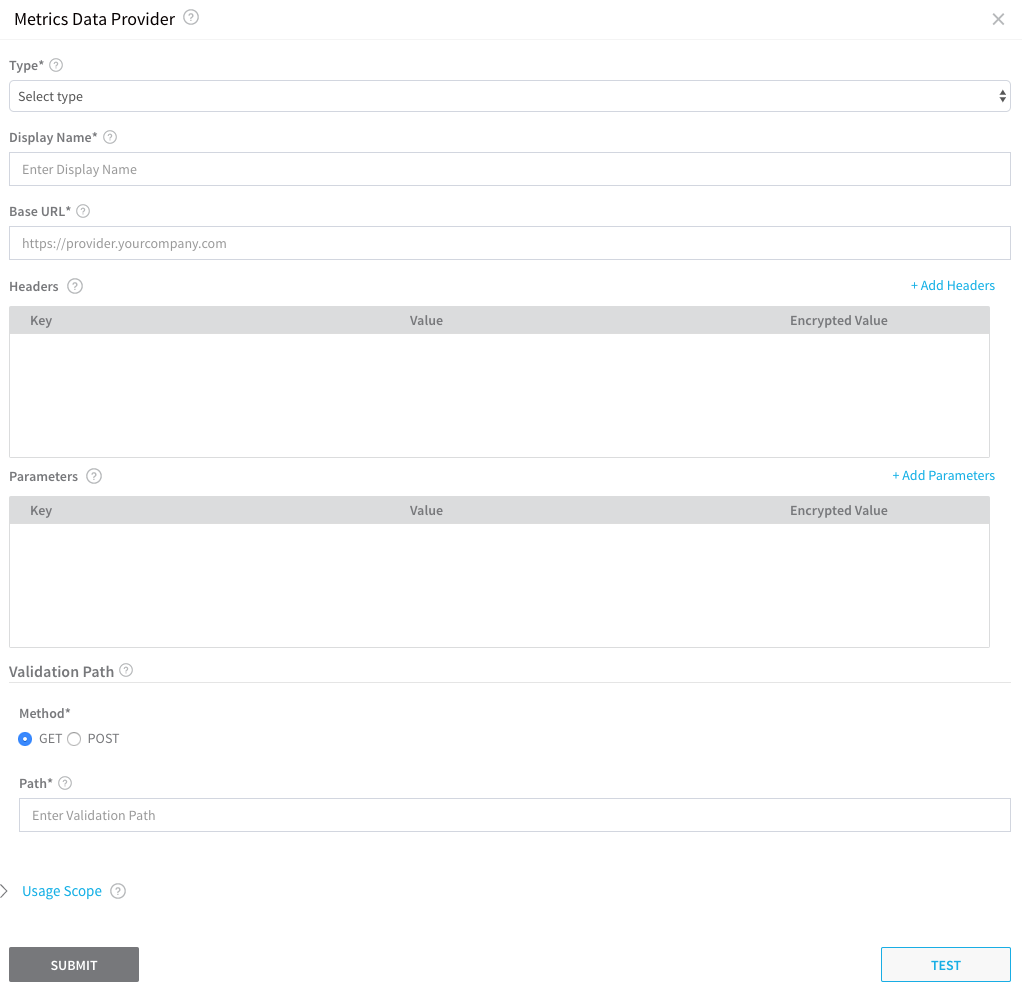
In the Metrics Data Provider dialog, you can configure how Harness can query event data via API.
For example, with New Relic Insights, you are configuring the Metrics Data Provider dialog to perform a cURL request like the following:
curl -H "Accept: application/json" \
-H "X-Query-Key: YOUR_QUERY_KEY" \
"https://insights-api.newrelic.com/v1/accounts/**YOUR\_ACCOUNT\_ID**/query?nrql=**YOUR\_QUERY\_STRING**"
To query event data via API in New Relic Insights, you will need to set up an API key in New Relic. For more information, see Query Insights event data via API from New Relic.The purpose of the Metrics Data Provider dialog is to validate the credentials and validation path you enter and return an HTTP 200 from your metrics provider.
The Metrics Data Provider dialog has the following fields.
Step 2: Type
Select Metrics Data Provider.
Step 3: Display Name
The name for this Verification Provider connector in Harness. This is the name you will use to reference this Verification Provider whenever you use it to add a verification step to a Workflow.
Step 4: Base URL
Enter the URL for API requests. For example, in New Relic Insights, you can change the default URL to get the Base URL for the API.
Default URL: https://insights.newrelic.com/accounts/12121212
Base URL for API: https://insights-api.newrelic.com/v1/accounts/12121212
Step 5: Headers
Add the query headers required by your metrics data provider. For New Relic Insights, do the following:
- Click Add Headers.
- In Key, enter X-Query-Key. For New Relic, a X-Query-Key must contain a valid query key.
- In Value, enter the key, or click Use Secret and select or create a new Harness Encrypted Text secret for the API key you got from New Relic.
- Click the checkbox under Encrypted Value to encrypt the key.
- Click Add Headers again.
- In Key, enter Accept. This is for the Content-Type of a query.
- In Value, enter application/json. The Content-Type of a query must be application/json.
Step 6: Parameters
Add any request parameters that do not change for every request.
In Value, enter the key, or click Use Secret and select or create a new Harness Encrypted Text secret for the API key you got from New Relic.
Step 7: Validation Path
Harness expects a JSON response, not simply text.In Path, you will define a validation path.
Enter the query string from your metric provider.
The resulting URL ({base_URL}/{validation_path}) is used to validate the connection to the metric provider.
This query is invoked with the headers and parameters defined here.For example, in New Relic Insights, you can take the query from the NRQL> field and add it to the string query?nrql=, for example:
query?nrql=SELECT%20average%28duration%29%20FROM%20PageView
The field accepts URL encoded or unencoded queries.
If you select POST, the Body field appears. Enter a sample JSON body to send as the payload when making the call to the APM provider. The requirements of the JSON body will depend on your APM provider.