Add a CodeCommit Repo
This topic outlines how to use AWS CodeCommit as a source repo with your Harness account and Applications. You can pull source files, such as manifests, specs, and config files, from your Source Repo as part of setting up your Harness Service and other entities.
CodeCommit is supported as a Source Repo only. It cannot be used with Harness Git Sync.
Before You Begin
Ensure your Git repo is initialized (git init) before connecting Harness to it.
Fetching very large repos
Currently, this feature is behind the feature flag OPTIMIZED_GIT_FETCH_FILES. Contact Harness Support to enable the feature.
Harness performs a git clone to fetch files. If the fetch is timing out, it can be because the repo is too large for the network connection to fetch it before timing out. To fetch very large repos, enable the feature flag OPTIMIZED_GIT_FETCH_FILES. When this feature flag is enabled, Harness will use provider-specific APIs to improve performance.
Some important notes:
- If you enable
OPTIMIZED_GIT_FETCH_FILES, you must use a token for authentication. Passwords are not supported. - If you enable
OPTIMIZED_GIT_FETCH_FILES, all of the files and folders must be in the same directory. You cannot fetch files outside of the repo or use symlinks.
Step: Add Source Repo Provider
To add a source repo, do the following:
- Click Setup.
- Click Connectors.
- Click Source Repo Providers, and then click Add Source Repo Provider. The Git Connector settings appear.
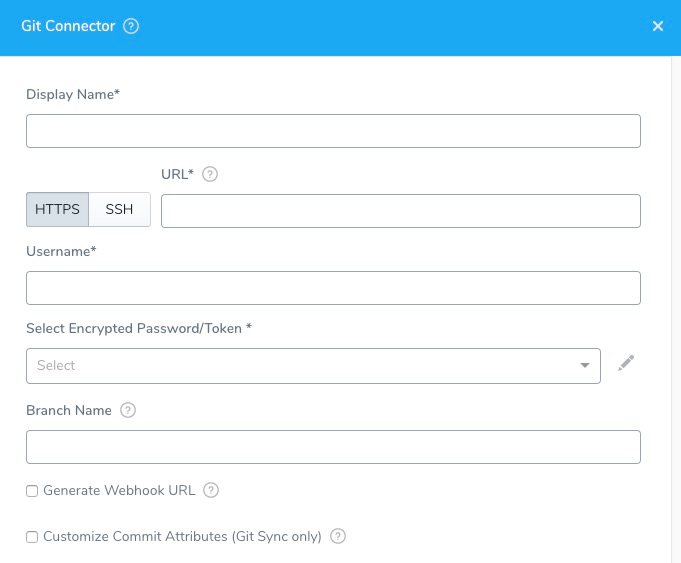
Step: Display Name
Enter a name for the repo connection. This is the name you will select when you sync your Harness account and applications in Configuration as Code.You could create a Source Repo Provider for the Harness admin account, such as Admin_CodeCommit. Later, you can create a Source Repo account for each Harness user, such as J_User_CodeCommit.
Step: Provider
Currently, this feature is behind the Feature Flag OPTIMIZED_GIT_FETCH_FILES. Contact Harness Support to enable the feature.In Provider, select Git.
Step: Git Repo or Git Account
You can add a connection to your entire Git account (org) or just a repo in the account. Selecting a Git account (org) enables you to use one Source Repo Connector for all of your subordinate repos.
Later when you test this connection, you will use a repo in the account.
In either case, when you use the Connector later in Harness, you will specify which repo to use.
Step: HTTPS/SSH
Select HTTPS or SSH for the connection. You will need to provide the protocol-relevant URL in URL. If you use Two-Factor Authentication for your Git repo, connect over HTTPS or SSH.
For SSH, ensure that the key is not OpenSSH, but rather RSA or another algorithm. To generate an SSHv2 key, use:
ssh-keygen -t rsa -m PEM
The rsa and -m PEM ensure that the key is RSA.
Next, follow the prompts to create the PEM key. For more information, see the ssh-keygen man page and Connecting to GitHub with SSH.
Step: URL
Enter the URL for your Git repo. Ensure that it matches the option you selected in HTTPS/SSH.
Currently, Git Account is in Beta and behind a Feature Flag. Contact Harness Support to enable the feature.If you selected Git Repo in Type, enter the full URL for the repo, such as https://github.com/account-name/repo-name.
If you selected Git Account in Type, enter the URL without the repo name, like https://github.com/account-name. When you use this Source Repo Provider in a Harness setting you will be prompted to provide a repo name.
Step: Username and Password/Token
In Select Encrypted Password/Token, select or create a new Harness Encrypted Text secret for the credentials of your CodeCommit user account.
If you have set up Two-Factor Authentication in your Git repo, then you need to generate a personal access token in your repo and enter that token in the Password/Token field.
If you enable OPTIMIZED_GIT_FETCH_FILES, you must use a token for authentication. Passwords are not supported.
Step: SSH Key
If you selected SSH as the connection protocol, you must add the SSH Key for use with the connection.
In SSH Key, select or create a new Harness Encrypted Text secret.
If you added a key in Harness Secrets Management, you can select it here. To add a new key, click the drop-down and select Add New SSH Key. The SSH Configuration dialog appears.
In User Name, enter the SSH Key ID that was generated when you uploaded your SSH public key to CodeCommit.
In Credentials, paste in the key or key file path, enter a display name, and then click Submit.
Step: Branch Name
If you selected Git Repo in Type, enter the branch name to sync with Harness, such as master, dev, or myAppName. Do not enter the full URL to the branch.
Names may not contain characters from the Emoticons unicode block.
Step: Customize Commit Attributes
Do not use this option with CodeCommit.
CodeCommit is supported as a Source Repo only. It cannot be used with Harness Git Sync.
Step: Usage Scope
For HTTPS connections, usage scope is inherited from the secret you entered in Select Encrypted Password/Token.
For SSH, connections, select the Harness Applications and Environments where the connection may be used.
Step: Test and Save
To finish configuring this Source Repo Provider:
- Click Test. Harness verifies the settings you entered. If you selected Git Account in Type, you need to provide a subordinate repo to test with.
- When testing is successful, click Submit. This Source Repo Provider is now added to Harness.