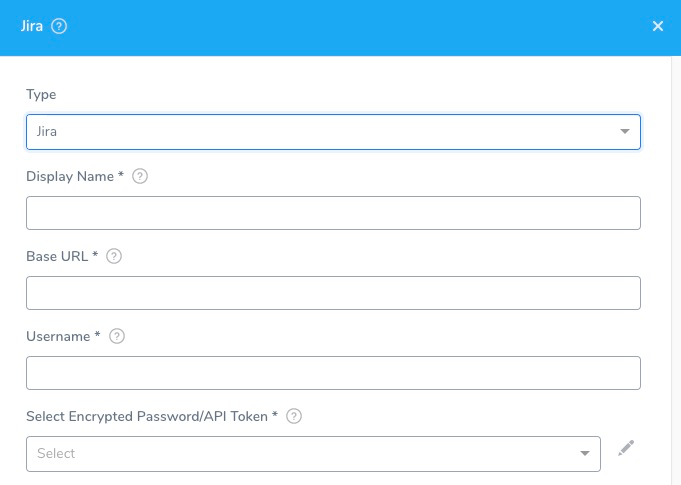
Add Jira Collaboration Provider
Add Jira as a Harness Collaboration Provider, to enable deployment notifications, approvals, and tracking through Jira.
Before You Begin
Limitations
- Your Jira REST API account must have permissions to create and edit issues in the relevant Jira projects. The Administer Jira permission includes all relevant permissions (as does the Administrator or Member permission on Jira next-gen).
For details, see Atlassian's documentation on Operation Permissions, Issues, and Managing Project Permissions. - When you set up the Jira Connector, Username requires the full email address you use to log into Jira.
Step 1: Add Collaboration Provider
Start adding a Collaboration Provider to Harness as follows:
- Click Setup.
- Click Connectors.
- Click Collaboration Providers.
- Click Add Collaboration Provider. This opens the default Collaboration Provider settings, which you will configure in the following steps.
Step 2: Type
Select Jira. The Jira settings appear.

Step 3: Display Name
In Display Name, enter a unique name to identify this Jira account connection. When you add Jira steps to Workflows or Pipelines, you will select the appropriate Jira account using this name.
Step 4: Base URL
In Base URL, enter the base URL by which your users access your Jira applications. For example: https://mycompany.atlassian.net.
In Jira, the base URL is set to the same URL that Web browsers use to view your Jira instance. For details, see Configuring the Base URL from Atlassian.
If you are using on-premises Jira server with HTTPS redirects enabled, use the HTTPS URL to ensure the JIRA client follows redirects.
Step 5: Username
In Username, enter the full email address you use to log into Jira.
Step 6: Password/API Token
In Select Encrypted Password/API Token, select or create a new Harness Encrypted Text secret containing the password or API Token to use for the Jira account.
For more information, see API tokens from Atlassian.
Step 7: Usage Scope
Usage scope is inherited from the secret entered in Select Encrypted Password/API Token.
Step 8: Test and Save
- Click Test to check your configuration.
- When the test is successful, click Submit to save your Jira Collaboration Provider.
Next Steps
- To use Jira in a Workflow or Pipeline, see Jira Integration.
- To integrate Jira with Harness Verification features, see File Jira Tickets on Verification Events