Create a Kubernetes Blue/Green Deployment (FirstGen)
This topic will walk you through creating a Blue/Green Workflow in Harness for a Deployment workload.
For information on Blue/Green deployments, see Deployment Concepts and Strategies.
Before You Begin
Ensure you are familiar with the following:
- Kubernetes Quickstart
- Kubernetes Deployments Overview
- Define Kubernetes Manifests
- Define Your Kubernetes Target Infrastructure
Review: What Workloads Can I Deploy?
Harness Canary and Blue/Green Workflow default steps support a single Deployment workload as a managed entity.
In Harness, a managed workload is a Deployment, StatefulSet, or DaemonSet object deployed and managed to steady state.
Rolling Workflow default steps support Deployment, StatefulSet, or DaemonSet as managed workloads, but not Jobs.
You can deploy any Kubernetes workload in any Workflow type by using a Harness annotation to make it unmanaged (harness.io/direct-apply).
The Apply Step can deploy any workloads or objects in any Workflow type as a managed workload.
OpenShift: See Using OpenShift with Harness Kubernetes.
Review: Harness Blue Green Deployments
Here's a quick summary of how Harness performs Blue Green deployments.
Only one Kubernetes service is mandatory and it doesn’t need any annotations to establish if it is the primary (production) service.
Here is a very generic service example that uses a values.yaml file for its values:
apiVersion: v1
kind: Service
metadata:
  name: {{.Values.name}}-svc
spec:
  type: {{.Values.serviceType}}
  ports:
  - port: {{.Values.servicePort}}
    targetPort: {{.Values.serviceTargetPort}}
    protocol: TCP
  selector:
    app: {{.Values.name}}
Note that there are no annotations to indicate that it is the primary service. Harness will add this later.
If you have more than one service, Harness does not automatically know which is the primary service unless you add the annotations described below. If you use two services, please annotate them as described below.
- First deployment:
- Harness creates two services (primary and stage) and one pod set for the app.
- The primary service is given this annotation:
annotations: harness.io/primary-service: "true" - The stage service is given this annotation:
annotations: harness.io/stage-service: "true" - The pod set is given an annotation of
harness.io/color: blue. - Harness points the stage service at the pod set and verifies that the set reached steady state.
- Harness swaps the primary service to pod set. Production traffic now flows to the app.
- Second deployment (new version of the same app):
- Harness creates a new pod set for new app version. The pod set is given the annotation
harness.io/color: green. - Harness points the stage service at new pod set (with new app version) and verifies that the set reached steady state.
- Harness swaps the primary service to new pod set, stage service to old pod set.
- Harness creates a new pod set for new app version. The pod set is given the annotation
- Third deployment:
- Harness deploy new app version to the pod set not using the primary service.
- Harness points the stage service at new pod set (with new app version) and verifies that the set reached steady state.
- Harness swaps the primary service to new pod set, stage service to old pod set.
Visual Summary
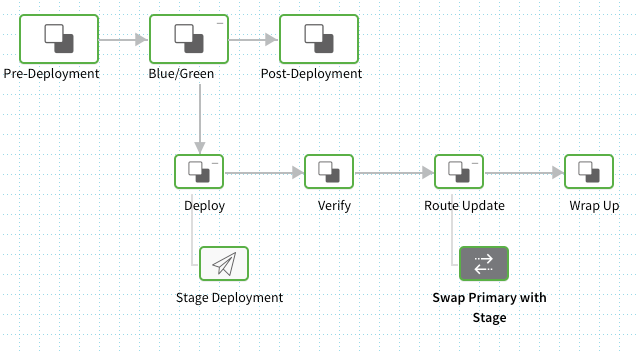
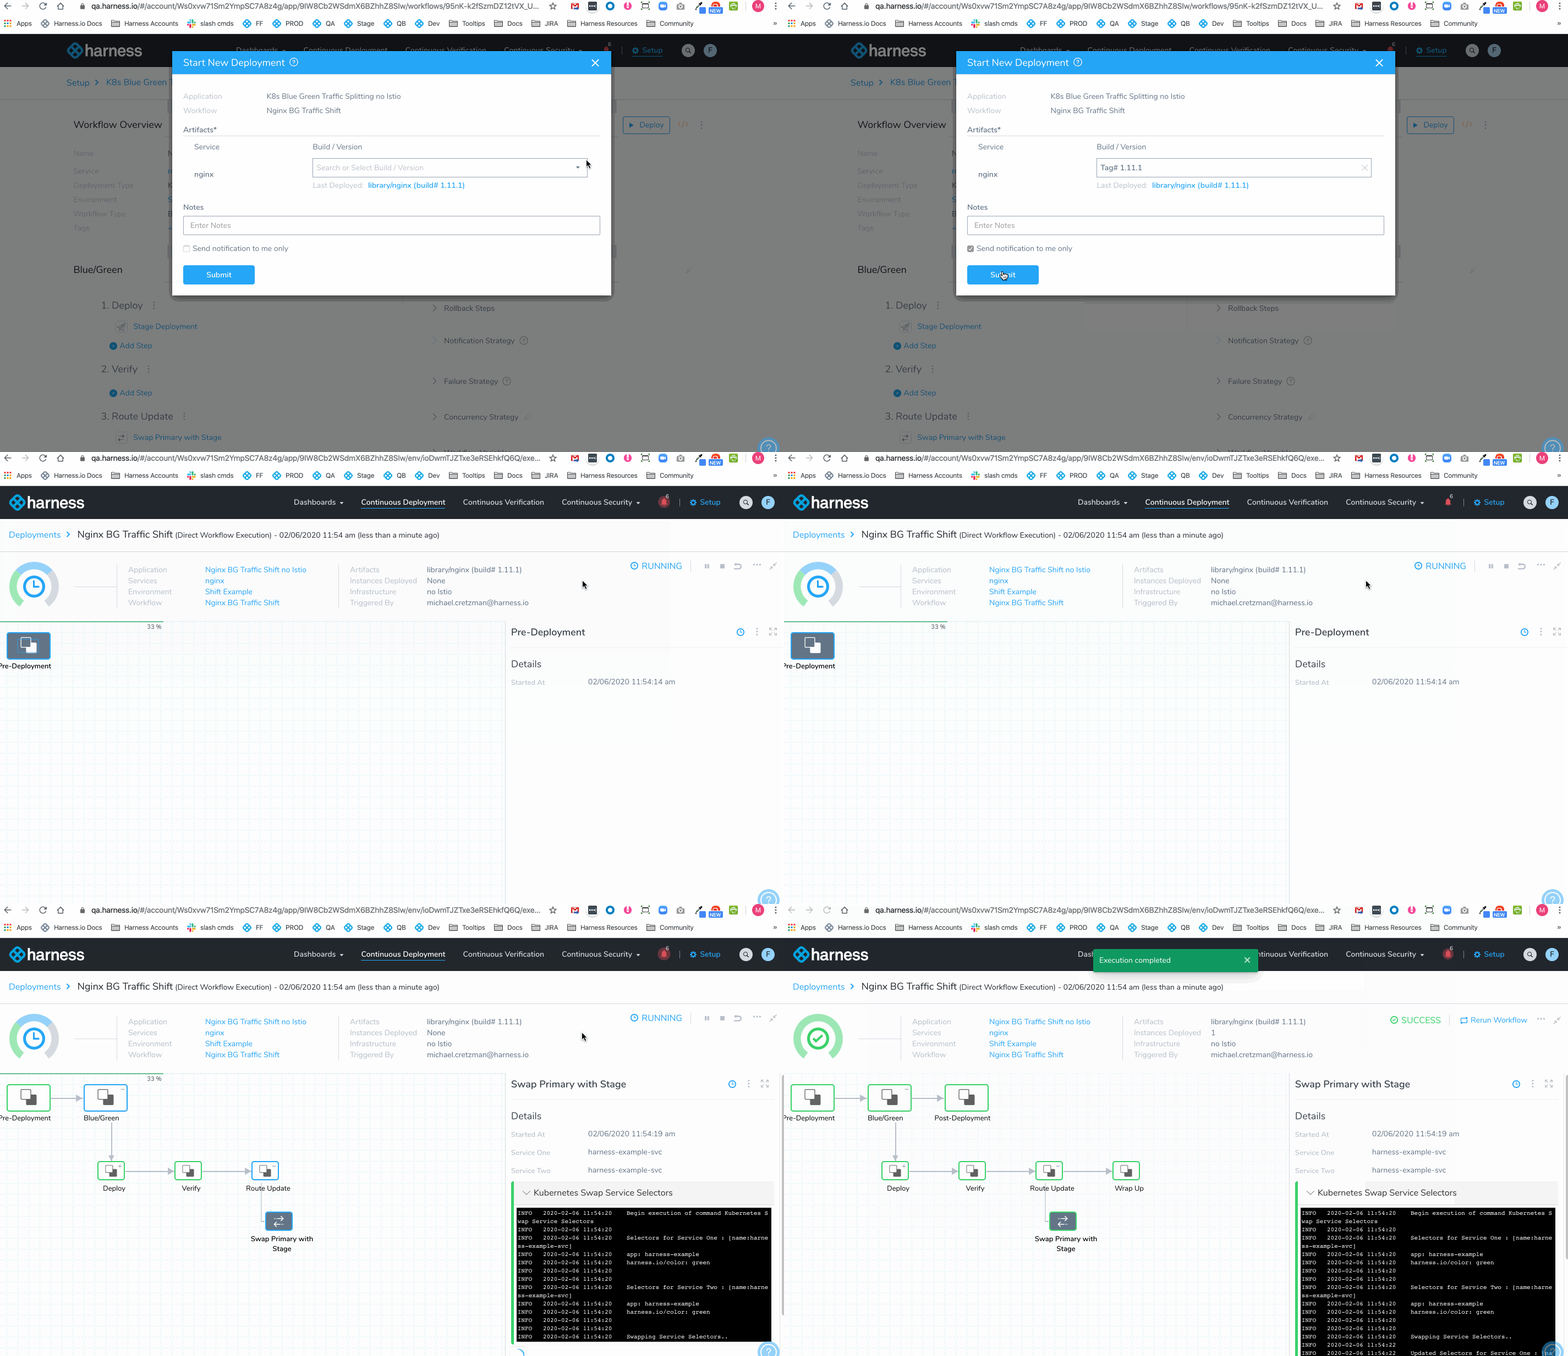
Here's an example of what your BlueGreen deployment will look like:
Step 1: Create the Harness Kubernetes Service
A Harness Service is different from a Kubernetes service. A Harness Service includes the manifests and container used for deployment. A Kubernetes service enables applications running in a Kubernetes cluster to find and communicate with each other, and the outside world. To avoid confusion, a Harness Service is always capitalized in Harness documentation. A Kubernetes service is not.
In Harness, click Setup, and then click Add Application.
Enter a name for the Application and click Submit.
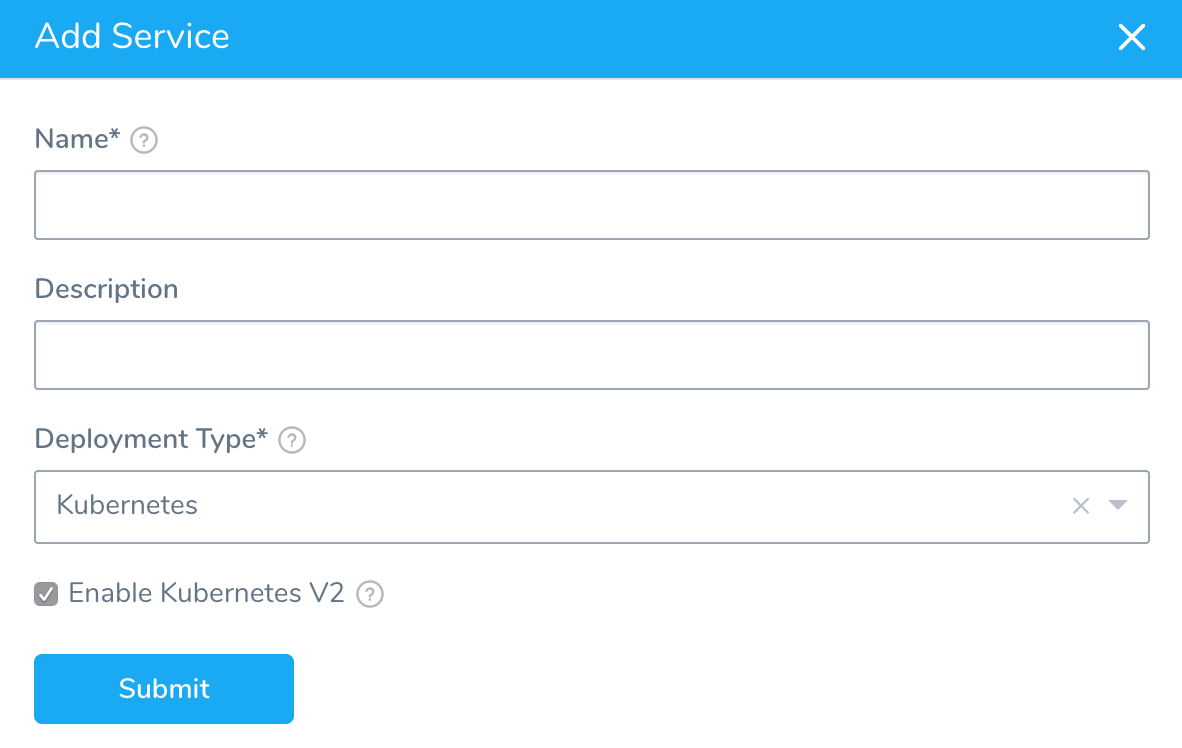
Click Services, and then click Add Service. The Add Service settings appear.
In Name, enter a name for the Service.
In Deployment Type, select Kubernetes, and then ensure Enable Kubernetes V2 is selected.
Click Submit. The new Harness Kubernetes Service is created.
Step 2: Provide Manifests
When you create a Harness Service for a Blue/Green deployment, you need to include a manifest for one Kubernetes service.
You must also provide a manifest for your Kubernetes Deployment object.
The default manifest provided by Harness will work fine.
That is all that is needed to set up a simple Harness Service for Kubernetes Blue/Green deployment.
There are no Harness Infrastructure Definition settings specific to Kubernetes Blue/Green deployment. Create or use the Infrastructure Definition that targets your cluster, as described in Define Your Kubernetes Target Infrastructure.
Step 3: Create the Workflow
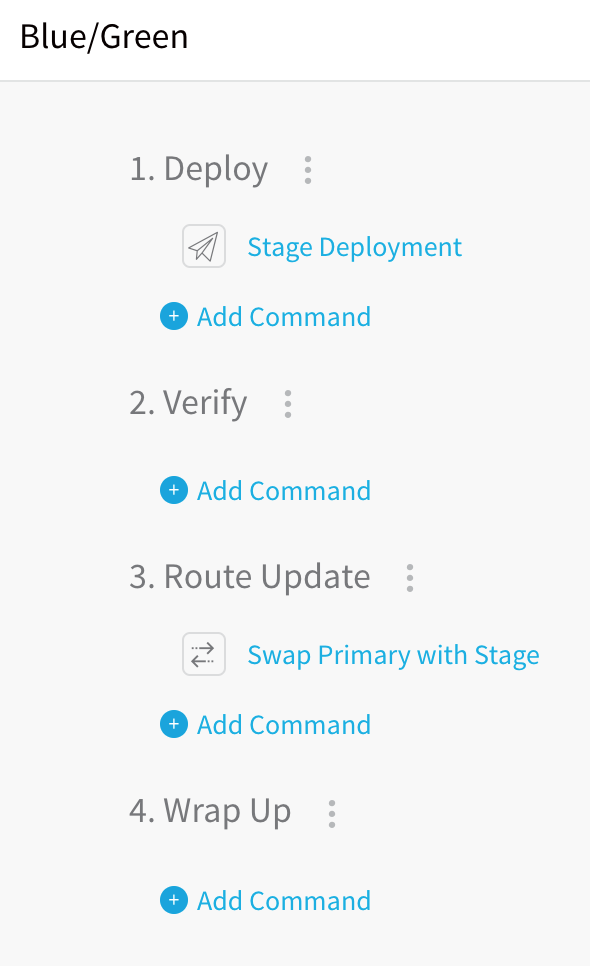
When you create a Harness Kubernetes Workflow for Blue/Green deployment, Harness automatically generates the steps for setting up the Kubernetes services you defined in your Harness Service, and for swapping the Kubernetes services between the new and old containers.
To create a Kubernetes Blue/Green Workflow, do the following:
- In your Application, click Workflows.
- Click Add Workflow. The Workflow dialog appears.
- In Name, enter a name for your Workflow.
- In Workflow Type, select Blue/Green Deployment.
- In Environment, select the Environment you created for your Kubernetes deployment.
- In Service, select the Service containing manifests for the primary and stage Kubernetes services.
- In Infrastructure Definition, select the Infrastructure Definition where you want to deploy. As stated earlier, there are no Harness Infrastructure Definition settings specific to Kubernetes Blue/Green deployment.
When you are finished the Workflow dialog will look like this: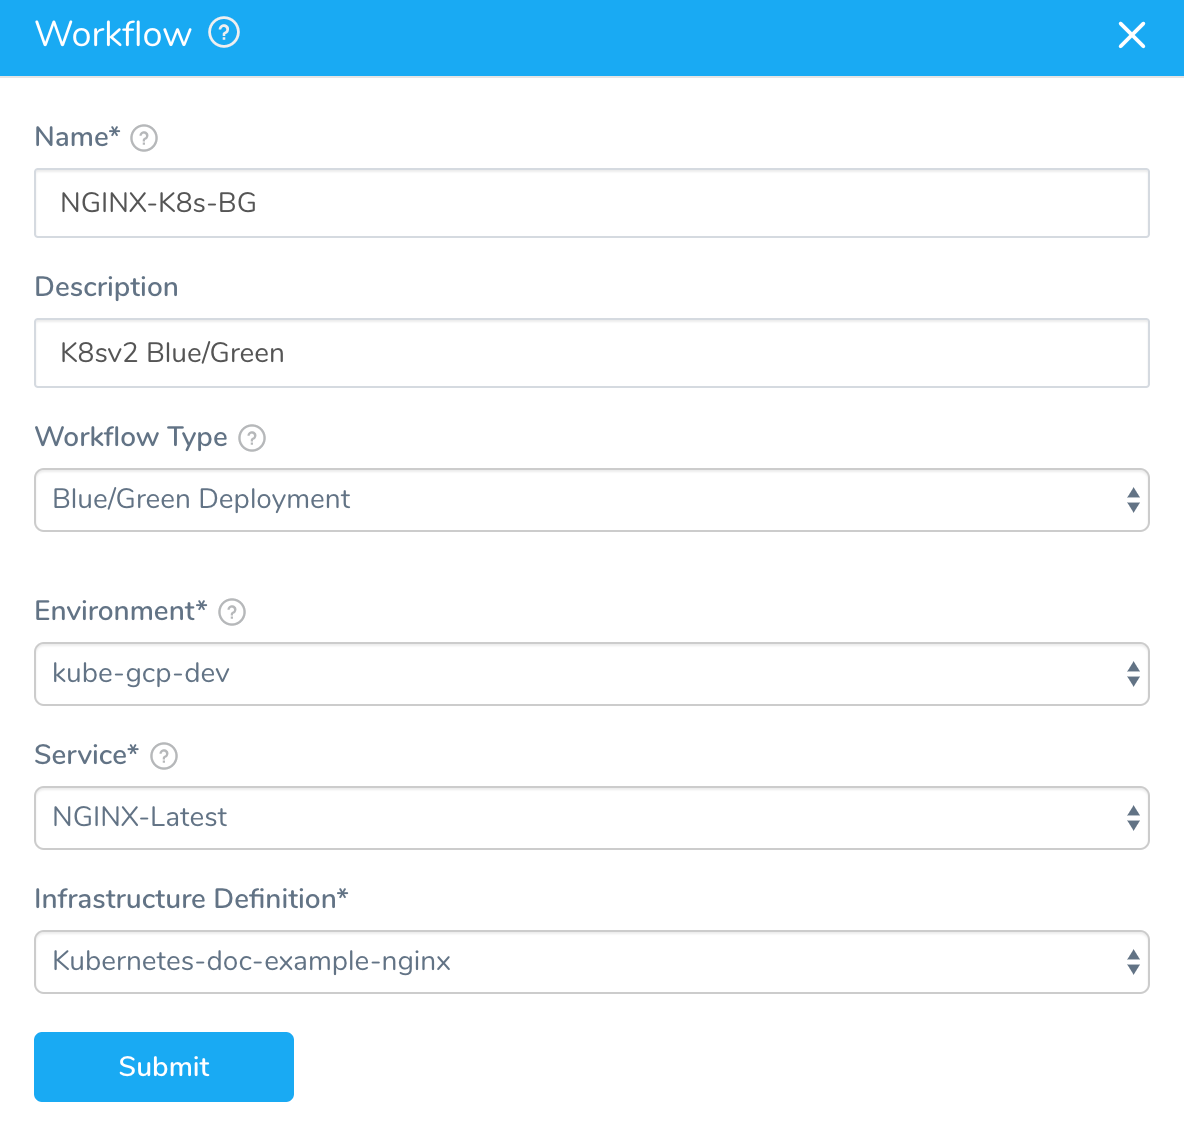
- Click SUBMIT. The new Workflow appears.
Let's look at each step in the Workflow and its deployment step logs.
Step 4: Stage Deployment Step
The Stage Deployment step is added automatically when you create the Workflow.
In the Blue/Green Workflow, click the Stage Deployment step.
The Stage Deployment step has the following options.
Manifest Options
Export Manifest
If you enable this option, Harness does the following at runtime:
- Downloads manifests (if remote).
- Renders manifests in logs.
- Performs a dry run unless the Skip Dry Run option is enabled.
- Export the deployment manifests to the variable
${k8sResources.manifests}. - Does not deploy the manifests. To deploy the manifests, you must add another Kubernetes step of the same type (Canary, Rolling, Apply, Stage Deployment) an enable the Inherit Manifest option to deploy a copy of the exported manifests.
If Export Manifest is enabled, the manifests are not deployed. You can use the Inherit Manifest option in a subsequent Kubernetes step to deploy a copy of the exported manifests.
The exported manifests can be written to storage on the Delegate where the step is run. For example, you can add a Shell Script step to echo and write the manifest to a file:
echo "${k8sResources.manifests}" > /opt/harness-delegate/test/canaryPlan
If you use ${k8sResources.manifests} in a script ensure that your script expects multiline output. You can use cat command to concatenate the lines.If you have the 3rd party tool that check compliance, it can use the exported manifests.
To deploy the manifests, a copy of the exported manifests can be inherited by the next Kubernetes step (Canary, Rolling, Apply, Stage Deployment) using the Inherit Manifest option.
If Export Manifest is enabled in multiple Kubernetes steps of the same type in the same Workflow Phase, the last step overrides the exported manifests. This is important because the next Kubernetes step to inherit a copy of the exported manifests will only use the exported manifests from last Kubernetes step with Export Manifest is enabled.
Inherit Manifest
Enable this option to inherit and deploy a copy of the manifests exported from the previous Kubernetes step (Canary, Rolling, Apply, Stage Deployment) using the Export Manifest option.
The Inherit Manifest option will only inherit the exported manifest from the last Kubernetes step of the same type and in the same Workflow Phase.
For example, if you enable the Inherit Manifest option in a Canary Deployment step, then it will only inherit a copy of the manifests exported from the last Canary Deployment step with the Export Manifest option enabled in the same Workflow Phase.
Skip Dry Run
By default, Harness uses the --dry-run flag on the kubectl apply command during the Initialize step of this command, which prints the object that would be sent to the cluster without really sending it. If the Skip Dry Run option is selected, Harness will not use the --dry-run flag.
Delegate Selector
If your Workflow Infrastructure Definition's Cloud Provider uses a Delegate Selector (supported in Kubernetes Cluster and AWS Cloud Providers), then the Workflow uses the selected Delegate for all of its steps.
In these cases, you shouldn't add a Delegate Selector to any step in the Workflow. The Workflow is already using a Selector via its Infrastructure Definition's Cloud Provider.
If your Workflow Infrastructure Definition's Cloud Provider isn't using a Delegate Selector, and you want this Workflow step to use a specific Delegate, do the following:
In Delegate Selector, select the Selector for the Delegate(s) you want to use. You add Selectors to Delegates to make sure that they're used to execute the command. For more information, see Select Delegates for Specific Tasks with Selectors.
Harness will use Delegates matching the Selectors you add.
If you use one Selector, Harness will use any Delegate that has that Selector.
If you select two Selectors, a Delegate must have both Selectors to be selected. That Delegate might also have other Selectors, but it must have the two you selected.
You can use expressions for Harness built-in variables or Account Default variables in Delegate Selectors. When the variable expression is resolved at deployment runtime, it must match an existing Delegate Selector.
For example, if you have a Delegate Selector prod and the Workflow is using an Environment also named prod, the Delegate Selector can be ${env.name}. This is very useful when you match Delegate Selectors to Application component names such as Environments, Services, etc. It's also a way to template the Delegate Selector setting.#### Step Deployment
The Stage Deployment step simply deploys the two Kubernetes services you have set up in the Harness Service Manifests section.
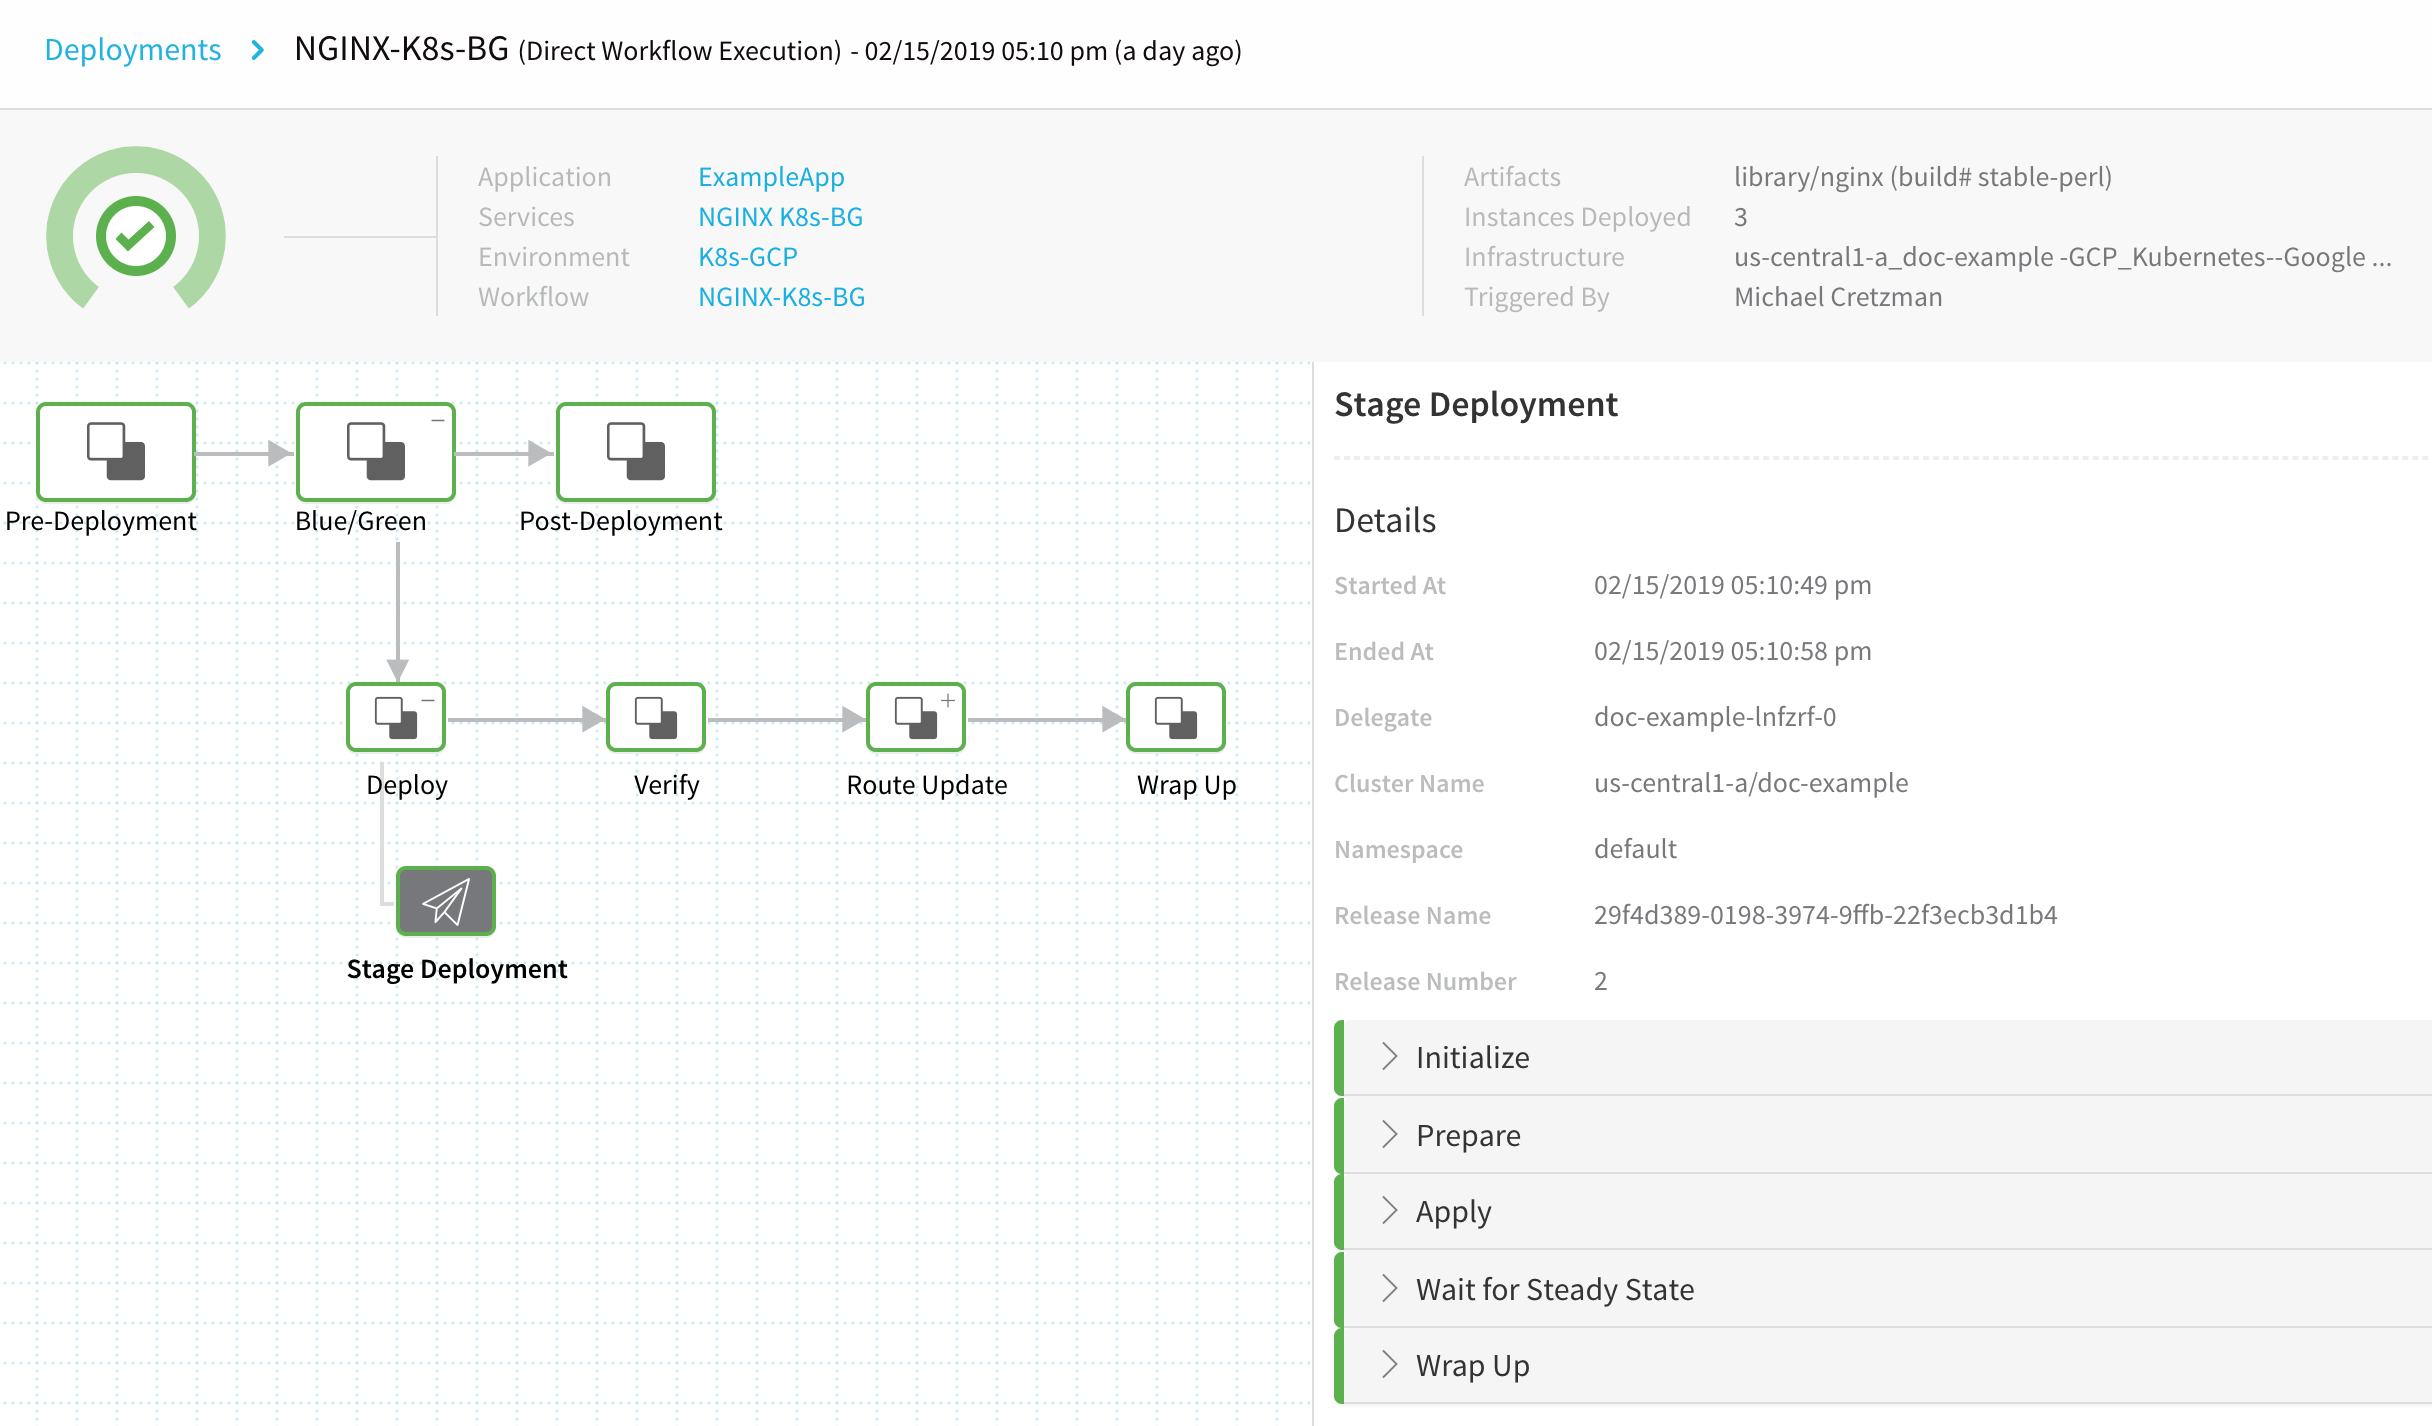
When you look at the Stage Deployment step in Harness Deployments, you will see the following log sections.
Initialize
The Initialize stage initializes the two Kubernetes services you have set up in the Harness Service Manifests section (displayed earlier), primary and stage, validating their YAML.
Initializing..

Manifests [Post template rendering] :

---
apiVersion: v1
kind: Service
metadata:
  name: harness-example-svc-primary
  annotations:
    harness.io/primary-service: "true"
  labels:
    app: bg-demo-app
spec:
  type: ClusterIP
  ports:
  - port: 80
    protocol: TCP
  selector:
    app: bg-demo-app
---
apiVersion: v1
kind: Service
metadata:
  name: harness-example-svc-stage
  annotations:
    harness.io/stage-service: "true"
  labels:
    app: bg-demo-app
spec:
  type: ClusterIP
  ports:
  - port: 80
    protocol: TCP
  selector:
    app: bg-demo-app
---
apiVersion: apps/v1
kind: Deployment
metadata:
  name: harness-example
spec:
  selector:
    matchLabels:
      app: bg-demo-app
  replicas: 3
  template:
    metadata:
      labels:
        app: bg-demo-app
    spec:
      containers:
      - name: my-nginx
        image: nginx
        ports:
        - containerPort: 80


Validating manifests with Dry Run

kubectl --kubeconfig=config apply --filename=manifests-dry-run.yaml --dry-run
service/harness-example-svc-primary configured (dry run)
service/harness-example-svc-stage configured (dry run)
deployment.apps/harness-example created (dry run)

Done.
Prepare
Typically, in the Prepare section, you can see that each release of the resources is versioned. This is used in case Harness needs to rollback to a previous version.
See Kubernetes Rollback.In the case of Blue/Green, the resources are not versioned because a Blue/Green deployment uses rapid rollback: network traffic is simply routed back to the original instances. You do not need to redeploy previous versions of the service/artifact and the instances that comprised their environment.
Manifests processed. Found following resources:

Kind                Name                                    Versioned
Service             harness-example-svc-primary             false
Service             harness-example-svc-stage               false
Deployment          harness-example                         false

Primary Service is at color: blue
Stage Service is at color: green

Cleaning up non primary releases

Current release number is: 2

Versioning resources.

Workload to deploy is: Deployment/harness-example-green

Done.
Apply
The Apply section applies a combination of all of the manifests in the Service Manifests section as one file using kubectl apply.
kubectl --kubeconfig=config apply --filename=manifests.yaml --record

service/harness-example-svc-primary configured
service/harness-example-svc-stage configured
deployment.apps/harness-example-blue configured

Done.
Wait for Steady State
The Wait for Steady State section displays the blue service rollout event.
kubectl --kubeconfig=config get events --output=custom-columns=KIND:involvedObject.kind,NAME:.involvedObject.name,MESSAGE:.message,REASON:.reason --watch-only

kubectl --kubeconfig=config rollout status Deployment/harness-example-blue --watch=true

Status : deployment "harness-example-blue" successfully rolled out

Done.
Next, the Swap Primary with Stage Workflow step will swap the blue and green services to route primary network traffic to the new version of the container, and stage network traffic to the old version.
Step 5: Swap Primary with Stage Step
In the Blue/Green Workflow, click the Swap Primary with Stage step.
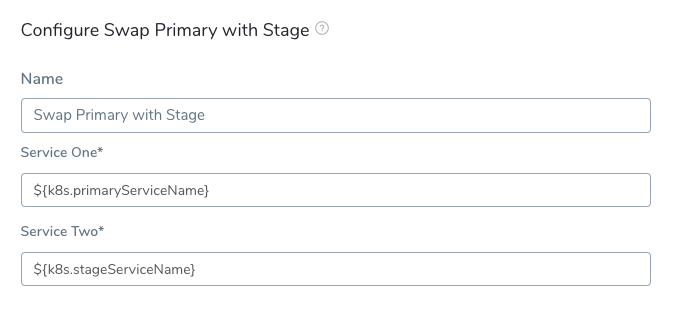
For the Delegate Selector setting, see Delegate Selector above.You can see that the primary Kubernetes service is represented by the variable ${k8s.primaryServiceName}, and the stage service by the variable ${k8s.stageServiceName}. You can see how the swap works in the Swap Primary with Stage step in Harness Deployments.
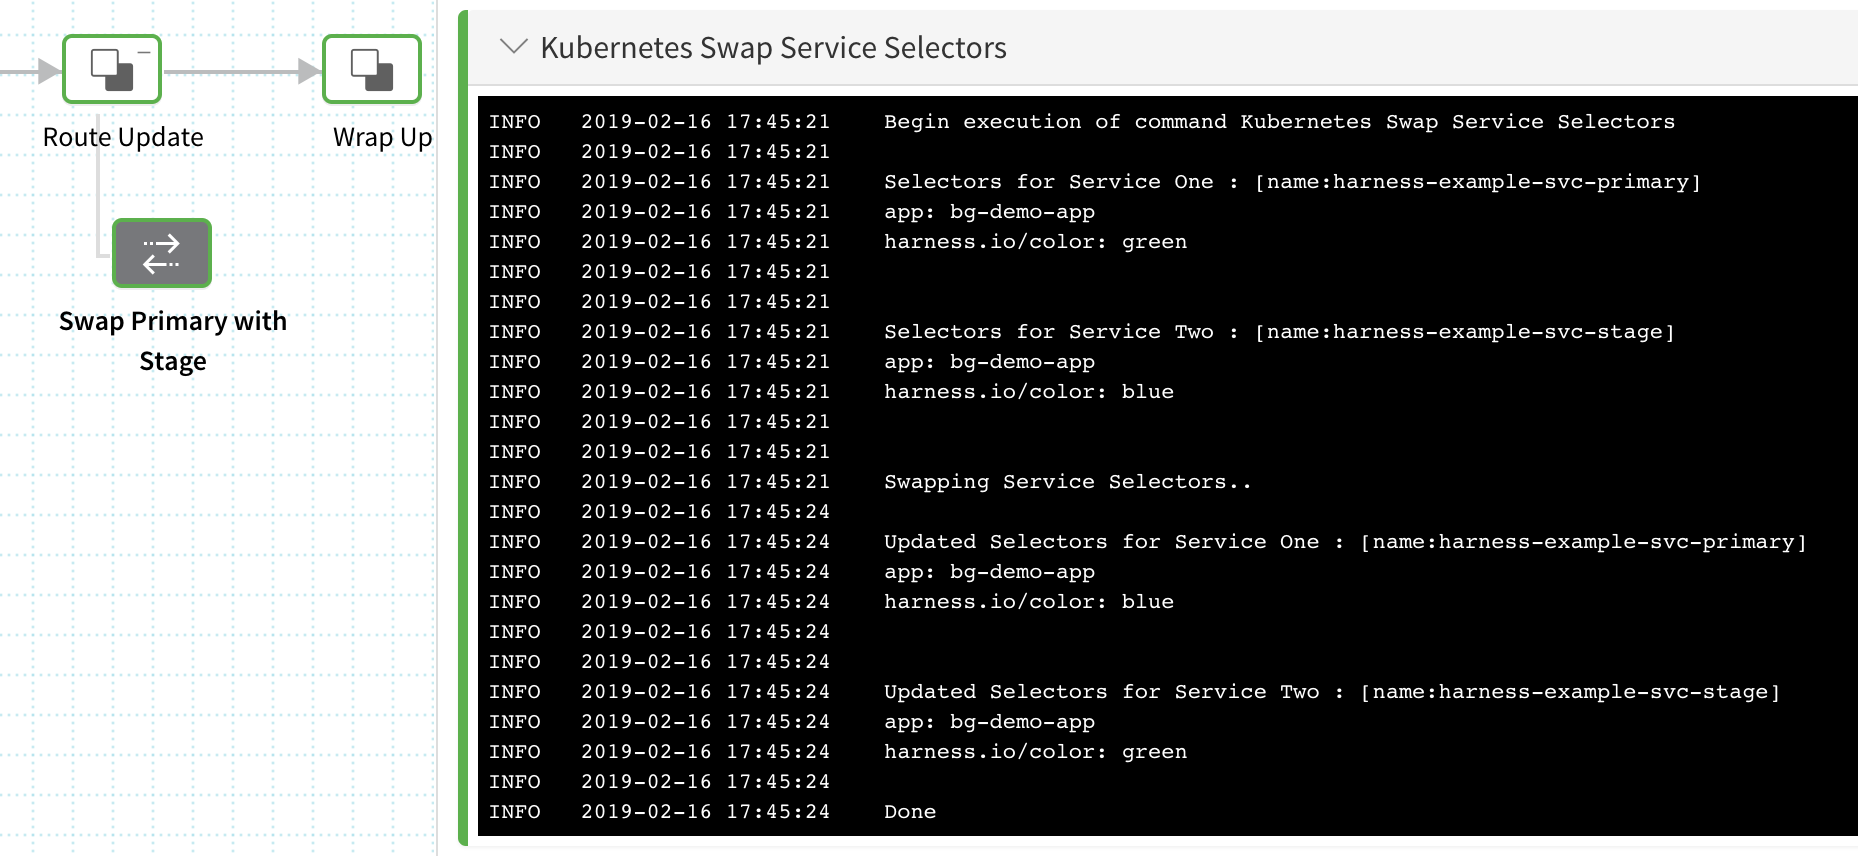
Here is the log for the step, where the mandatory Selectors you used in the Harness Service Manifests files are used.
Begin execution of command Kubernetes Swap Service Selectors

Selectors for Service One : [name:harness-example-svc-primary]
app: bg-demo-app
harness.io/color: green

Selectors for Service Two : [name:harness-example-svc-stage]
app: bg-demo-app
harness.io/color: blue

Swapping Service Selectors..

Updated Selectors for Service One : [name:harness-example-svc-primary]
app: bg-demo-app
harness.io/color: blue

Updated Selectors for Service Two : [name:harness-example-svc-stage]
app: bg-demo-app
harness.io/color: green

Done
The Swap Primary with Stage command is simply the Swap Service Selectors command renamed to Swap Primary with Stage for this Workflow type. You can use Swap Service Selectors to swap the pods referred to by any two Kubernetes services. You simply put the expressions for any two services (${k8s.primaryServiceName}, ${k8s.stageServiceName}) and they will be swapped. For example, you can have a Blue/Green deployment Workflow to swap services and then a separate Workflow that uses the Swap Service Selectors command to manually swap back when needed.### Example: Blue/Green Workflow Deployment
Now that the setup is complete, you can click Deploy in the Workflow to deploy the artifact to your cluster.
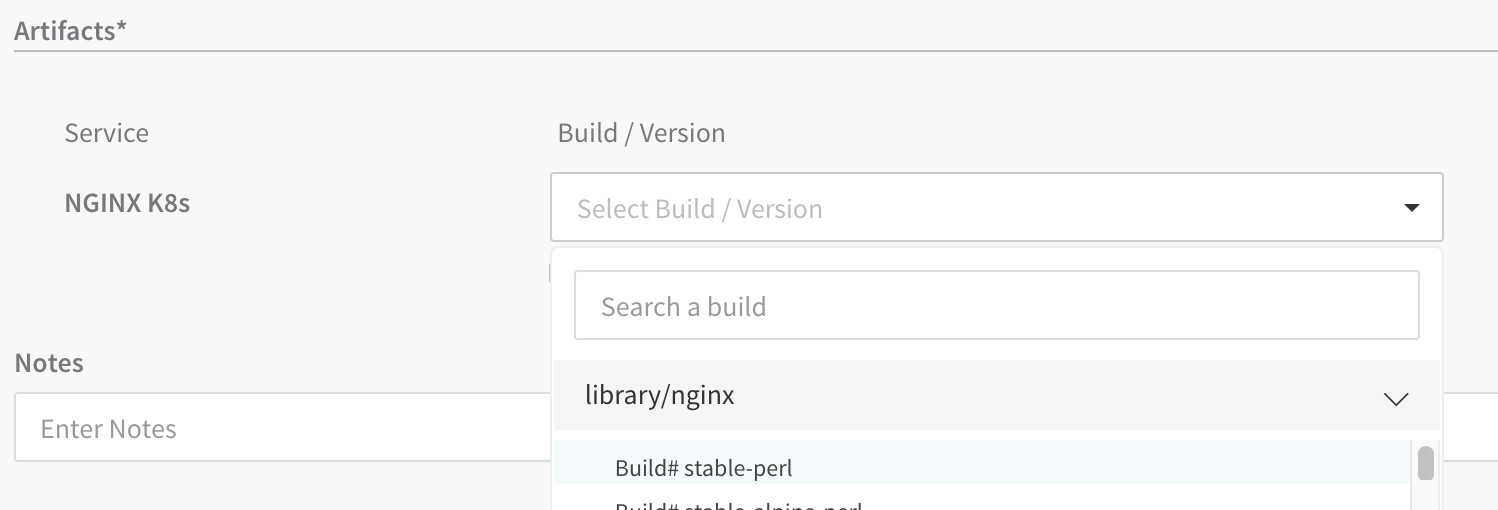
Next, select the artifact build version and click SUBMIT.
The Workflow is deployed. The swap is complete and the Blue/Green deployment was a success.
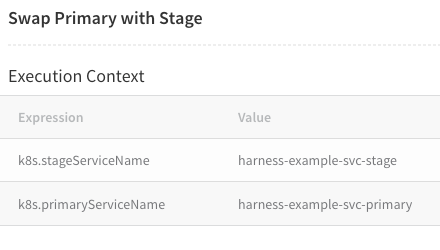
On the Harness Deployments page, expand the Workflow steps and click the Swap Primary with Stage step.
In the Details section, click the vertical ellipsis and click View Execution Context.
You can see that the names and of primary and stage services deployed.
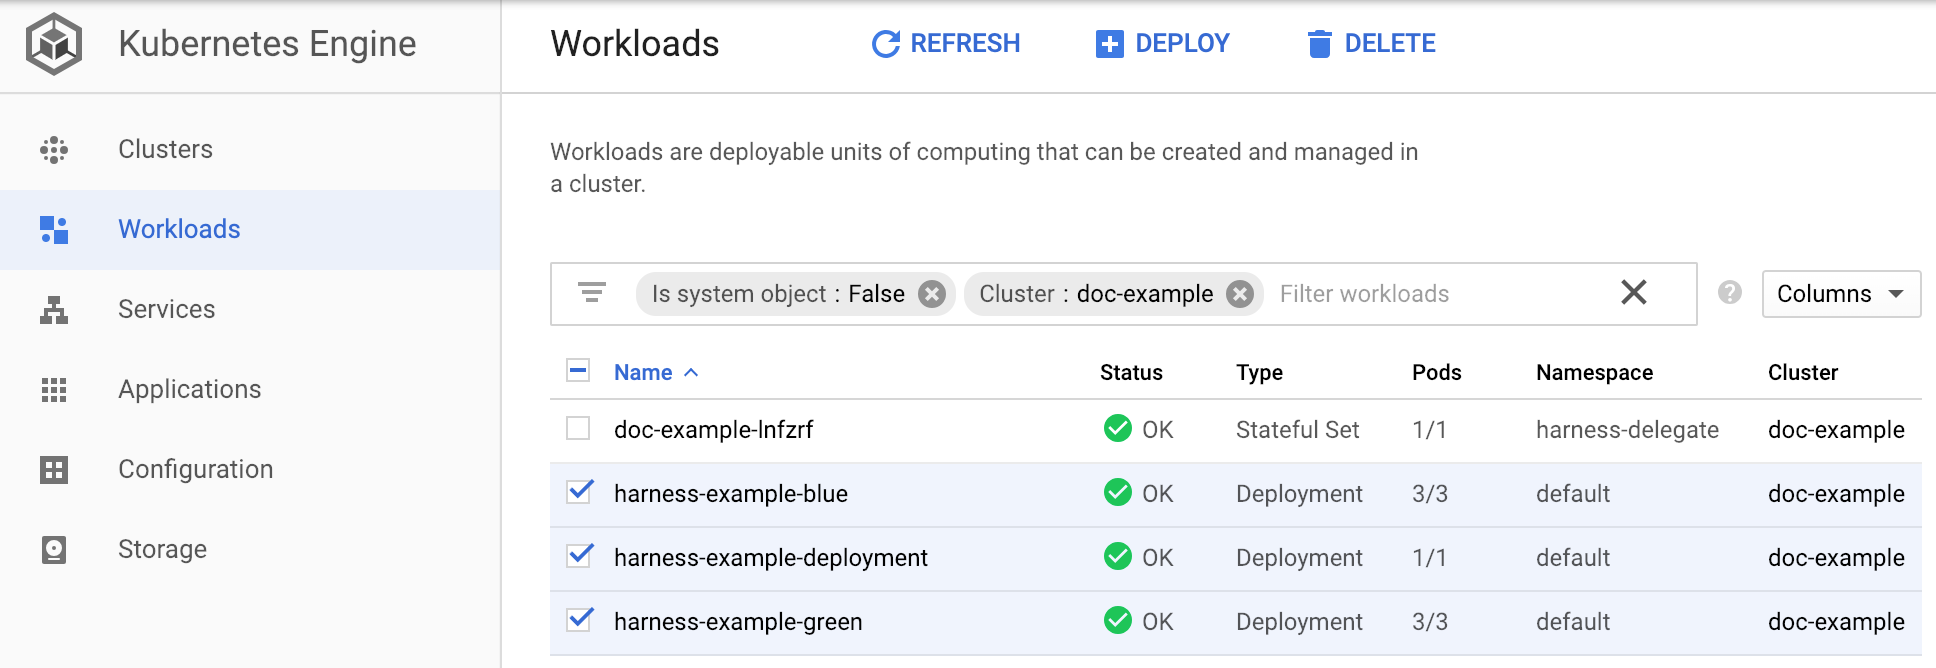
Now that you have successfully deployed your artifact to your Kubernetes cluster pods using your Harness Application, look at the completed workload in the deployment environment of your Kubernetes cluster.
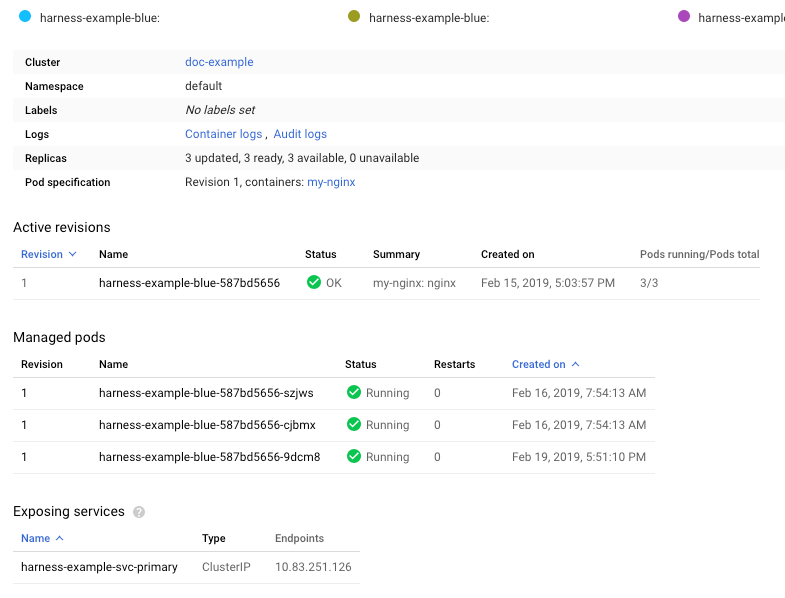
For example, here is the Blue/Green workload in Google Cloud Kubernetes Engine, displaying the blue and green services and Deployment workload:
If you click a workload, you will see the pods and service created:
Option: Scale Down Old Version
A great benefit of a Blue/Green deployment is rapid rollback: rolling back to the old version of a service/artifact is simple and reliable because network traffic is simply routed back to the original instances. You do not need to redeploy previous versions of the service/artifact and the instances that comprised their environment.
Scale Down Example
If you would like to scale down the old version for one service, add a Shell Script step to the Post-deployment steps of your Workflow, for example:
kubectl scale deploy -n ${infra.kubernetes.namespace} $(kubectl get deploy -n ${infra.kubernetes.namespace} -o jsonpath='{.items[?(@.spec.selector.matchLabels.harness\.io/color=="'$(kubectl get service/${k8s.stageServiceName} -n ${infra.kubernetes.namespace} -o jsonpath='{.spec.selector.harness\.io/color}')'")].metadata.name}') --replicas=0
If you use a Delegate installed outside of the target cluster, any scripts in your Pipeline need to use the ${HARNESS_KUBE_CONFIG_PATH} expression to reference the path to a Harness-generated kubeconfig file containing the credentials you provided (export KUBECONFIG=${HARNESS_KUBE_CONFIG_PATH}).
For example:
export KUBECONFIG=${HARNESS_KUBE_CONFIG_PATH} kubectl scale deploy -n ${infra.kubernetes.namespace} $(kubectl get deploy -n ${infra.kubernetes.namespace} -o jsonpath='{.items[?(@.spec.selector.matchLabels.harness\.io/color=="'$(kubectl get service/${k8s.stageServiceName} -n ${infra.kubernetes.namespace} -o jsonpath='{.spec.selector.harness\.io/color}')'")].metadata.name}') --replicas=0
This example does not apply to scaling down multiple deployments in the same namespace. If you use the example and you have multiple deployments in the same namespace it will impact multiple deployments. You should also include a label (or another matchSelector) specific to the particular deployment, so it doesn’t scale down all the blue deployments in the namespace. For example, match blue and my-specific-app.### Option: Using the Horizontal Pod Autoscaler (HPA)
If you are using the Horizontal Pod Autoscaler with your deployment, create a blue and green HPA configuration that will point at your deployments.
templates/hpa-blue.yaml:
apiVersion: autoscaling/v2beta2
kind: HorizontalPodAutoscaler
metadata:
  name: {{.Values.name}}-blue
  labels:
    harness.io/color: blue
spec:
  scaleTargetRef:
    apiVersion: apps/v1
    kind: Deployment
    name: {{.Values.name}}-blue
  minReplicas: {{ .Values.autoscaling.minReplicas }}
  maxReplicas: {{ .Values.autoscaling.maxReplicas }}
  metrics:
    {{- toYaml .Values.autoscaling.metrics | nindent 4 }}
templates/hpa-green.yaml:
apiVersion: autoscaling/v2beta2
kind: HorizontalPodAutoscaler
metadata:
  name: {{.Values.name}}-green
  labels:
    harness.io/color: green
spec:
  scaleTargetRef:
    apiVersion: apps/v1
    kind: Deployment
    name: {{.Values.name}}-green
  minReplicas: {{ .Values.autoscaling.minReplicas }}
  maxReplicas: {{ .Values.autoscaling.maxReplicas }}
  metrics:
    {{- toYaml .Values.autoscaling.metrics | nindent 4 }}
You can add your scaling configuration to your manifest (or share it if you are using a Helm chart):
autoscaling:
  minReplicas: 1
  maxReplicas: 5
  metrics:
  - type: Resource
    resource:
      name: cpu
      target:
        type: Utilization
        averageUtilization: 20
  - type: Resource
    resource:
      name: memory
      target:
        type: Utilization
        averageUtilization: 20
When using this with a traffic splitting strategy, your pods will scale automatically as your new pods begin receiving heavier loads.
Kubernetes Rollback
See Kubernetes Rollback.
Notes
- Blue/Green Rollback — A great benefit of a Blue/Green deployment is rapid rollback: rolling back to the old version of a service/artifact is simple and reliable because network traffic is simply routed back to the original instances. You do not need to redeploy previous versions of the service/artifact and the instances that comprised their environment.
- The Swap Primary with Stage command is simply the Swap Service Selectors command renamed to Swap Primary with Stage for this Workflow type. You can use Swap Service Selectors to swap the any two Kubernetes services that include the primary and stage selectors. You simply put the expressions for any two services (
${k8s.primaryServiceName},${k8s.stageServiceName}) in Swap Service Selectors and they will be swapped. For example, you can have a Blue/Green deployment Workflow to swap services and then a separate Workflow that uses the Swap Service Selectors command to manually swap back when needed.
