Define or Add Kubernetes Manifests
This content is for Harness FirstGen. Switch to NextGen.
Harness provides a simple and flexible way to use Kubernetes manifests. You can add new files or upload existing manifests. You can work on your manifest inline, using the Go templating and Expression Builder features of Harness, or simply link to remote manifests in a Git repo.
This topics provides a quick overview or some options and steps when using Kubernetes manifest, with links to more details.
Before You Begin
Review: What Workloads Can I Deploy?
See What Can I Deploy in Kubernetes?
Limitations
A values.yaml file can use flat or nested values. Harness supports nested values only.
Step 1: Create the Harness Kubernetes Service
In Harness, click Setup, and then click Add Application.
Enter a name for the Application and click Submit.
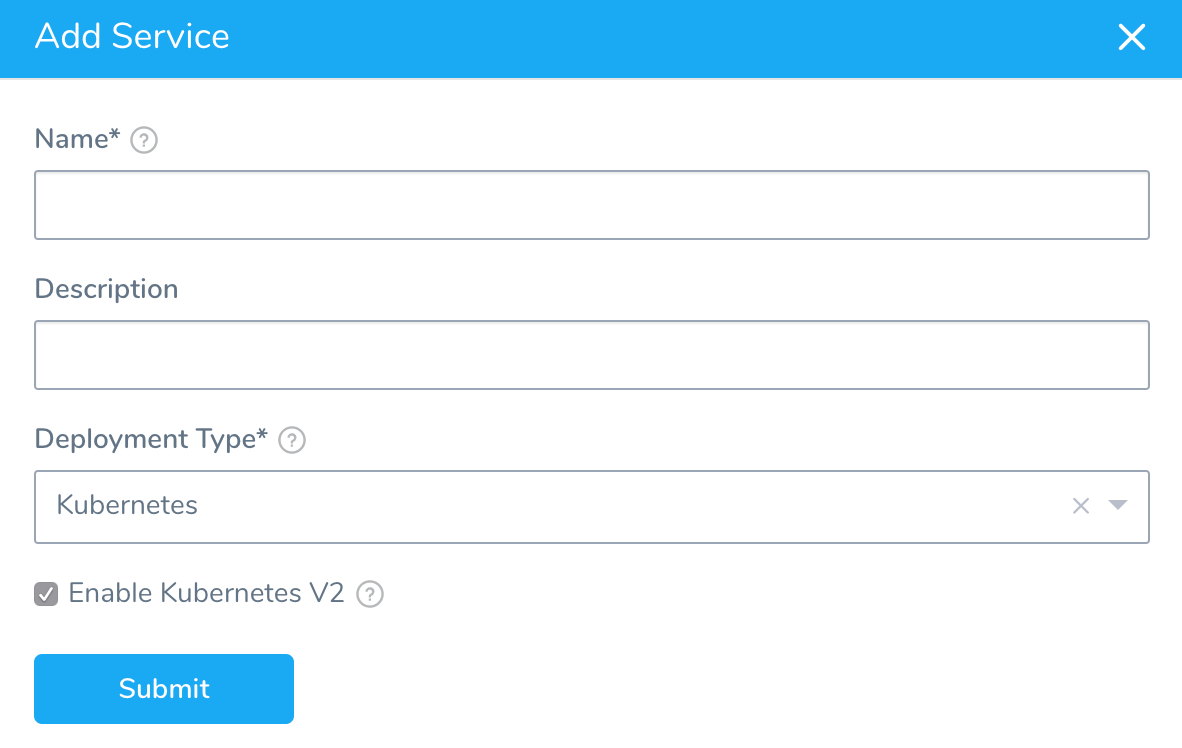
Click Services, and then click Add Service. The Add Service settings appear.

In Name, enter a name for the Service.
In Deployment Type, select Kubernetes, and then ensure Enable Kubernetes V2 is selected.
Click Submit. The new Harness Kubernetes Service is created.
Option: Edit Inline Manifest Files
When you create your Harness Kubernetes Service, several default files are added.
For example, the Manifests section has the following default files:
- values.yaml - This file contains the data for templated files in Manifests, using the Go text template package. This is described in greater detail below.
The only mandatory file and folder requirement in Manifests is that values.yaml is located at the directory root. The values.yaml file is required if you want to use Go templating. It must be named values.yaml and it must be in the directory root.* deployment.yaml - This manifest contains three API object descriptions, ConfigMap, Secret, and Deployment. These are standard descriptions that use variables in the values.yaml file.
Manifest files added in Manifests are freeform. You can add your API object descriptions in any order and Harness will deploy them in the correct order at runtime.1. Add or edit the default files with your own Kubernetes objects.
Option: Add or Upload Local Manifest Files
You can add manifest files in the following ways:
- Manually add a file using the Manifests Add File dialog.
- Uploading local files.
See Upload Kubernetes Resource Files.
Step 2: Use Go Templating and Harness Variables
You can use Go templating and Harness built-in variables in combination in your Manifests files.
See Use Go Templating in Kubernetes Manifests.
The inline values.yaml file used in a Harness Service does not support Helm templating, only Go templating. Helm templating is fully supported in the remote Helm charts you add to your Harness Service.Harness variable expressions may be added to values.yaml, not the manifests themselves. This provides more flexibility.
Step 3: Expression Builder
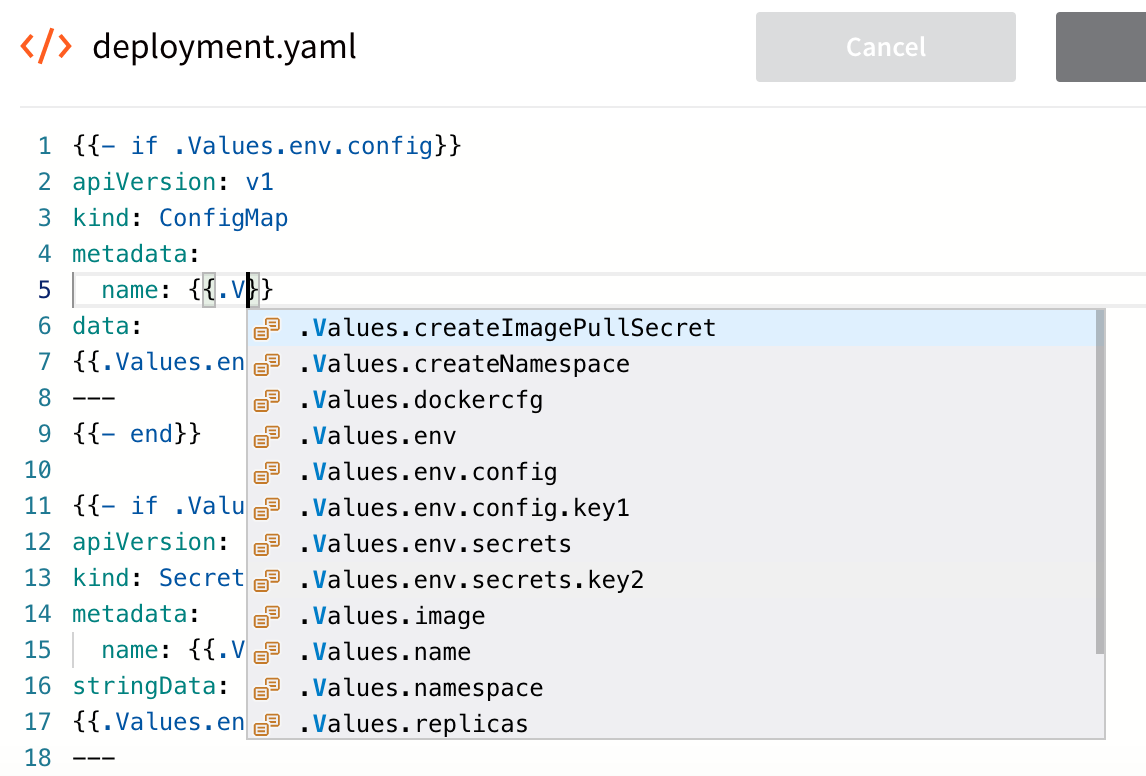
When you edit manifests in the Harness Service, you can enter expressions by entering {{. and Harness will fetch the values available in the values.yaml file.

This expression builder helps to ensure that you do not accidentally enter an incorrect value in your manifests.
Option: Use Remote Manifests and Charts
You can use your Git repo for the configuration files in Manifests and Harness uses them at runtime. You have the following options for remote files:
- Kubernetes Specs in YAML format - These files are simply the YAML manifest files stored on a remote Git repo. See Link Resource Files or Helm Charts in Git Repos.
- Helm Chart from Helm Repository - Helm charts files stored in standard Helm syntax in YAML on a remote Helm repo. See Use a Helm Repository with Kubernetes.
- Helm Chart Source Repository - These are Helm chart files stored in standard Helm syntax in YAML on a remote Git repo or Helm repo. See Link Resource Files or Helm Charts in Git Repos.
- Kustomization Configuration — kustomization.yaml files stored on a remote Git repo. See Use Kustomize for Kubernetes Deployments.
- OpenShift Template — OpenShift params file from a Git repo. See Using OpenShift with Harness Kubernetes.
- Files in a packaged archive — In some cases, your manifests, templates, etc are in a packaged archive and you simply wish to extract then and use then at runtime. You can use a packaged archive with the Custom Remote Manifests setting in a Harness Kubernetes Service. See Add Packaged Kubernetes Manifests.
Remote files can also use Go templating.
Option: Deploy Helm Charts
In addition to the Helm options above, you can also simply deploy the Helm chart without adding your artifact to Harness.
Instead, the Helm chart identifies the artifact. Harness installs the chart, gets the artifact from the repo, and then installs the artifact. We call this a Helm chart deployment.
See Deploy Helm Charts.
Best Practice: Use Readiness Probes
Kubernetes readiness probes indicate when a container is ready to start accepting traffic. If you want to start sending traffic to a pod only when a probe succeeds, specify a readiness probe. For example:
...
    spec:
      {{- if .Values.dockercfg}}
      imagePullSecrets:
      - name: {{.Values.name}}-dockercfg
      {{- end}}
      containers:
      - name: {{.Values.name}}
        image: {{.Values.image}}
        {{- if or .Values.env.config .Values.env.secrets}}
       readinessProbe:
         httpGet:
           path: /
           port: 3000
         timeoutSeconds: 2
        envFrom:
        {{- if .Values.env.config}}
        - configMapRef:
            name: {{.Values.name}}
        {{- end}}
        {{- if .Values.env.secrets}}
        - secretRef:
            name: {{.Values.name}}
        {{- end}}
        {{- end}}
...
See When should you use a readiness probe? from Kubernetes and Kubernetes best practices: Setting up health checks with readiness and liveness probes from GCP.
In this example. kubelet will not restart the pod when the probe exceeds two seconds. Instead, it cancels the request. Incoming connections are routed to other healthy pods. Once the pod is no longer overloaded, kubelet will start routing requests back to it (as the GET request now does not have delayed responses).
Secrets in values.yaml
If you use Harness secrets in a values.yaml and the secret cannot be resolved by Harness during deployment, Harness will throw an exception.
An exception is thrown regardless of whether the secret is commented out.